


If you are in the business of video editing, or you would like to be, there are several video editing techniques that you need to know. In this article, we’ll look at two of the techniques that you absolutely must know; the J-cut and the L-cut.
These two techniques are used by editors to allow audiences to see the context of the dialogue rather than only the dialogue itself. You may want to incorporate J-cuts and L-cuts into your next project – let’s look at the best ways to do that.
Edit your own videos with Camtasia
Download a free trial of Camtasia to quickly and easily edit your own videos.
What is a J Cut?
In the most basic sense, a J-cut is a split edit. The audio track from the second scene overlaps the first scene’s video. Looking at it from the viewer’s perspective, you would hear the audio of the second scene before the video cuts in.
Because of this, a J-cut is also referred to as an “audio advance”, “audio under” or “audio lead”. This technique is often used in dialogue scenes or for evocative transitions. It has the overall effect of making the audience, whether consciously or subconsciously, anticipate what is about to happen.
What is a L Cut?
An L-cut is also a split edit. In this technique, the audio from one shot continues under the video of the next one. What the viewer experiences is hearing the audio from the preceding scene while watching video that has already cut to something else.
If you’re looking to scene transition from an old clip to a new one without interrupting the natural flow, an L-cut is a great option.
In contrast to the J-cut the L-cut has the audience, whether they know it or not, lingering on the last scene while their focus shifts to the new shot.
Wondering why these techniques are referred to as J-cuts and L-cuts? It is in reference to how they appear in an NLE software timeline. The audio track protrudes from underneath the video track to the left for a J-cut and to the right for an L-cut.
What is the difference between a J Cut and a L Cut?
J-cuts vs L-cuts – what’s the difference? They are very similar in that they both help to transition from one scene to the next gently. The difference though, is significant. They do provide opposite experiences for the viewer.
In a J-cut, the viewer hears the audio for the upcoming scene before the picture changes. In a L-cut, the viewer continues to hear the audio from the previous scene even as the picture has shifted to the new scene.
Edit your own videos with Camtasia
Download a free trial of Camtasia to quickly and easily edit your own videos.
When to use L Cuts?
L-cuts are a good technique to use when what you want to do is make a scene linger. They work really well as a way to add tension to your content or leave your viewer on a dramatic note.
L-cuts can be seen quite often in long form content like tv shows and movies to support cliffhanger endings or make sure the viewer continues to experience the scene even after the visual space has faded to black.
L-cuts are also a great option for use in montages. In this use case you can present the viewer with a series of images while the audio that began in the clip preceding them continues.
When to use J Cuts?
J-cuts are really versatile. They can be used as a way to help dialogue flow effortlessly or to give some interest to a potentially lacklustre opening. They are excellent at helping to keep the audience’s attention.
Make powerful openings
If you picture the opening scenes to your favourite movies there are probably at least a few you can recall where the audio begins while the opening credits are still running through. When it’s done well, this technique gets the viewer hooked before the video’s imagery has even started.
Express urgency
Given the right context, a J-cut can live up to the shape of its namesake and literally act as a hook in your storytelling. It can create a sense of urgency in scenes where a question is asked just as the scene is ending – the viewer can’t wait to see what the answer might be.
The Marketer’s Ultimate Guide to Video
In our FREE ebook, we’ve put together practical strategies to get out of the woods and create engaging, powerful video content on your own that reaches your audience.
Add dialogue to storytelling
J-cuts help dialogue heavy scenes to follow a natural pattern. Using this technique to have the first seconds of returned conversation occur over video of the first speaker can help to illustrate a natural conversational pattern with smooth transitions between speakers. This technique can give the viewer a sense of being a part of the conversation, rather than just a static observer.
Use narrations
Without J-cuts, scenes with narration would feel like watching an invisible talking head describe a scene to you – and that does not make for excellent storytelling. Using J-cuts (combined with L-cuts) in scenes heavy with narration helps to convey emotion and create fluidity.
Create an L-Cut in Camtasia
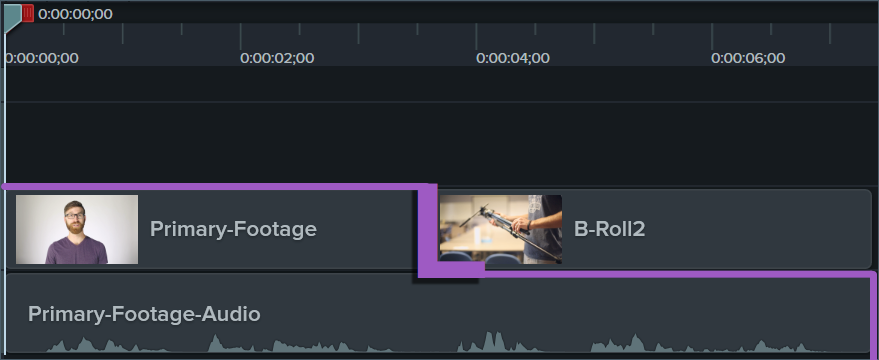
As mentioned earlier, an L-cut is when audio from a preceding scene plays over footage from the next scene. I have setup an L-cut on the timeline in the example below. Notice how the primary footage audio on the bottom track remains constant but the primary footage video is cut and the b-roll clip begins. This creates an “L” shape with the primary footage and its audio. Thus, we have an L-cut.
Create an J-Cut in Camtasia
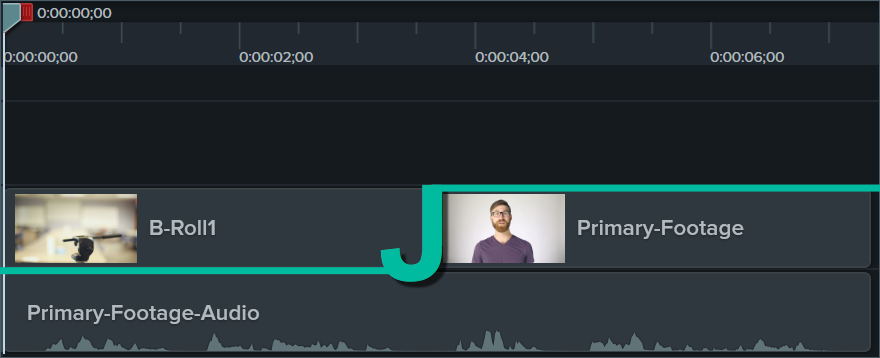
Now, lets see how a J-cut, which is essentially the reverse of an L-cut, appears on the timeline.
I’ve changed the beginning of the video and setup a J-cut on the timeline. To do this, I kept the same audio from the primary footage on the bottom track, but I begin the video with b-roll. Then, I cut from the b-roll to the primary footage. The result is a shape between the primary footage and it’s audio that approximates a J.
A step further
What we’ve seen so far are simple L-cuts and J-cuts used to begin a video, but that is by no means the only time they are useful. Let’s look at one more example in which both an L-cut and a J-cut is used to transition between two different speakers.
I’ve added another clip to my project and named it Primary-Footage-2. The new clip contains a second person that will be speaking. I need to begin with the first speaker, Speaker A, and then transition to the second speaker, Speaker B.
Edit your own videos with Camtasia
Download a free trial of Camtasia to quickly and easily edit your own videos.
To do this, begin the video with Speaker A. After a few seconds of Speaker A talking, I use an L-cut to switch the video to the b-roll. Then, near the end of the b-roll, I cut to the audio from Speaker B. After a moment or two playing b-roll and Speaker B’s audio, I will cut to the video of Speaker B using a J-cut. Check out the image below to see how this looks on the Camtasia timeline.
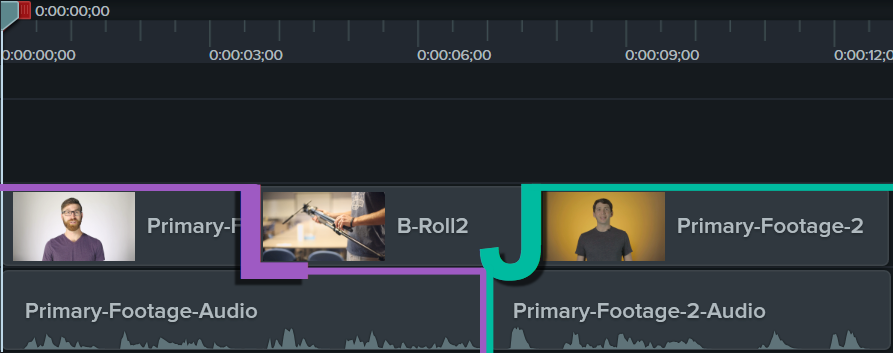
The L-cut and J-cut in this sequence make the transition between speakers feel natural, as opposed to a jarring jump cut from Speaker A to Speaker B.
Now that you know what they look like and how to set them up, try getting creative with some L-cuts and J-cuts in your own projects. They’re a simple way to add a professional touch to any video.
If you enjoyed this primer on L-cuts and J-cuts, you might be interested in our post about common video editing mistakes!
