Captions display onscreen text for the audio, sounds, or actions occurring in a video. Captions create videos accessible to a larger audience, including:
Viewers who are deaf or hearing-impaired.
Viewers that cannot listen to audio in their current settings.
Viewers who are non-native speakers by providing onscreen translations in the captions.
Caption Types
The caption type is selected during the video export process.
Closed Captions
Note: The TechSmith Smart Player is required for table of contents, closed captions, search, quizzing, and hotspots in a video. To include the TechSmith Smart Player, export the video to Knowmia, Screencast, or Local File (Windows only). See Export & Share Your Video.
Captions are turned on/off by the viewer via a CC button on the video controller.
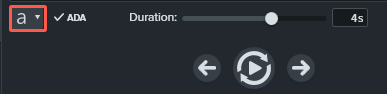
Captions are ADA compliant.
Captions can be customized.
Captions are searchable when produced as a MP4 video.
Viewers can click a search result to jump to that location in the video.
Windows
Complete one of the following options:
Select Export > Knowmia.
Select Export > Screencast.
Select Export > Local File. Select the MP4 with Smart Player option from the File type dropdown.
Mac
Complete one of the following options:
Select Export > TechSmith Knowmia.
Select Export > Screencast.
Burned In Captions
Also known as “open,” captions are always visible and cannot be turned off by the viewer.
Captions are ADA compliant.
Captions can be customized.
Captions are searchable when produced as a MP4 video with Smart Player. Viewers can click a search result to jump to that location in the video.
Windows
Select Export > Local File.
In the File type dropdown, select MP4 (recommended).
Click the Advanced Settings dropdown arrow to access additional properties.
On the Captions tab, enable the Render video with open (always visible) captions option.
Click Export.
Mac
Select Export > Local File.
In the export dialog, enter a filename and select the preferred location and file format.
In the Caption Style dropdown, select Burned in captions.
Click Export.
Under Video Captions
Captions cannot be turned off by the viewer.
Captions can be customized.
This caption type adds captions under the video and increases the video’s vertical dimensions.
Windows
Select Export > Legacy Local File.
In the Production Wizard, select Custom production settings and click Next.
Select MP4 – Smart Player and click Next.
On the Options tab, enable the Captions option and select Under video captions from the Caption Type dropdown.
Follow the prompts in the Production Wizard to complete the export process.
Mac
Under video captions are not currently supported on Camtasia for Mac.
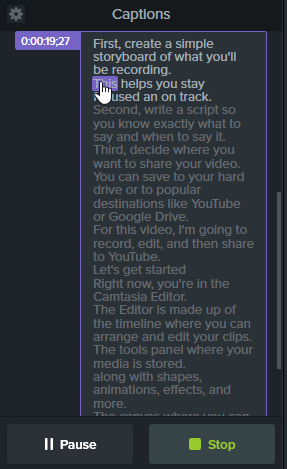
Manually type the captions as you view your video.
Move the playhead to the beginning of the timeline.
To add captions:
Windows: Click the Captions tab and click the Add Caption button.
Mac: Click the Audio Effects tab and drag the Captions effect to the audio track on the timeline. In the Caption View above the timeline, click the first caption segment.
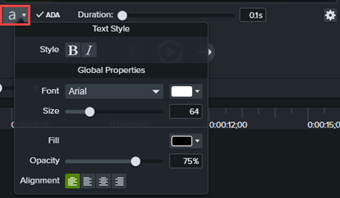
Customize font, color, text size, and more (optional):
Windows: Click the Font Properties dropdown. Mac: In the Caption options dropdown, select the Caption Settings option.
Click the Loop button or press Enter to play the audio section.
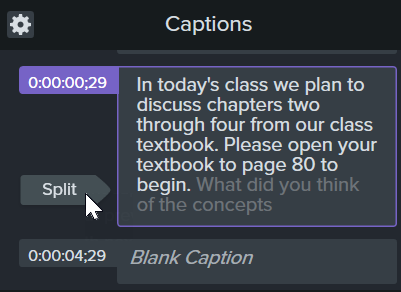
Type what you hear or paste the corresponding text from a written script.
If your caption exceeds three lines, the text changes to gray. Click the Split button to move the gray text into a new caption.
To change the duration of a caption, drag the Duration slider. The default duration is four seconds.
Click the Add New Caption button or press the Tab key to add a new caption.
Sync Captions from a Script (Windows only)
Paste a prepared script into the caption editor and synchronize the script with the audio playback.
Move the playhead to the beginning of the timeline.
Click the Captions tab and click the Add Caption button.
Paste the full script into the caption editor.
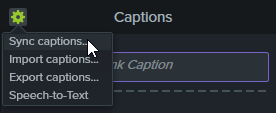
Click the Gear icon and select Sync captions.
Read the instructions that appear and when ready to sync captions, click Continue. The video begins playing and the sync controls appear below caption editor.
To add a new caption, click a word when you hear the word played back.
Click Pause to pause the video playback.
Click Stop to finish syncing the script and captions.
Speech-to-Text (Windows only)
Camtasia utilizes the Microsoft Speech-to-Text engine to automatically convert voice recordings in your project into captions.
Click the select media you want to caption on the timeline.
Click the Captions tab.
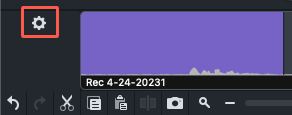
Click the gear icon and select Speech-to-Text.
Note: Speech-to-Text is grayed out if there is no voice recording on your timeline.
The Speech-to-Text tips dialog opens. Click each link to train the Microsoft Speech Engine to understand your voice, set up your microphone, and add words to the speech recognition dictionary.
When you complete the Speech-to-Text setup, click Continue.
Another dialog appears. Select what you want to caption:
Entire Timeline: Camtasia captions the full range of all media with audio on the timeline.
Selected Media: Camtasia captions only the selected audio media on the timeline.
Continue to train Speech-to-Text to recognize your pronunciation and improve the transcription accuracy.
Import or Export a Caption File
You can import or export captions as SAMI or SRT (SupRip) files. Export captions created in Camtasia to archive, to use in another program, or to share captions across platforms.
Import a Caption File Select File > Import > Captions and select a SAMI or SRT (SubRip) file. The caption file opens in the caption editor.
Export a Caption File
Select the Export menu > Export Captions.
Enter a file name and select SAMI or SRT.
On Windows, click Save. On Mac, click Export.
ADA Compliant Caption Tips
The Americans with Disabilities Act (ADA) is a federal anti-discrimination statute designed to ensure equal access to opportunities and benefits for qualified individuals with disabilities. In many state, government and education institutions, videos must include ADA compliant captions.
Apply these caption tips to make your captions ADA compliant:
Include no more than 32 characters per line.
One to three lines of text appear onscreen, display for three to seven seconds, and then are replaced by the next caption.
Captions are available throughout the entire video, even when there is no speaking.
Time captions to synchronize with the audio.
Require the use of upper and lowercase letters.
Use a font similar to Helvetica medium.
Note: If the caption style is not ADA compliant on Windows, the red ADA icon appears below the caption editor. To restore ADA compliance for all captions, click the ADA dropdown and select Make Compliant.
Captions should be accessible and readily available to those who need or want them.
Captions should appear onscreen long enough to be read.
Speakers should be identified when more than one person is onscreen or when the speaker is not visible.
Spelling is correct.
Words should be verbatim when time allows or as close as possible in other situations.
All words are captioned, regardless of language or dialect.
Punctuation is used to clarify meaning.
Add music or other descriptions inside brackets such as [music] or [laughter].
Indicate when no narration is present and describe any relevant sound effects.
Use of slang and accent is preserved and identified.
Working with Captions
Edit caption text
Windows: Select a caption in the Captions panel. Click the preview window to edit in the caption editor.
Mac: Select a caption on the Caption track and edit in the caption editor.
Edit font properties
Select caption on the timeline. Click the font properties icon in the caption editor and adjust desired settings.
Note: Exporting to Screencast automatically overrides customized font properties to meet ADA compliance.
Clear caption text
Windows: Double-click to select a caption on the timeline. Right-click the highlighted caption and select Clear Caption Text.
Mac: Select caption on timeline and delete text from the caption editor.
Remove all captions from media or timeline
Windows: Click caption on timeline and press the Delete key.
Mac: Select media on timeline. Select Modify > Captions > Remove Captions.
Split caption
Right-click (Windows) or Control+click (Mac) on the caption and select Split Caption.
Merge adjacent captions
Right-click (Windows) or Control+click (Mac) on the caption and select Merge with Previous Caption (Windows) or Merge with Next Caption (Mac)
Hide captions in video
Windows:
On the Captions track, click the disable icon.
Or, select Export > Legacy Local File > Custom production settings > Next > MP4 – Smart Player > Next > Options tab > disable the Captions option.
Mac:
Click to disable the Show Caption Track in the View menu.