If your company creates help content, especially in multiple languages, then you know how difficult it is to keep your content in line with new releases and company changes.
Text can be challenging, but it’s nothing compared to the time-consuming and tedious process of creating and editing new screenshots and graphics. Constantly making new graphics is tedious, time-consuming, and just plain annoying.
But it doesn’t have to be that way.
Using simplified user interface, or SUI graphics, is a great way to save time and resources when creating help content. In fact, Google uses this strategy to easily scale their help content and consistently deliver great help content to users across numerous languages.
While Google is an excellent example, they’re not the only company to employ the technique. In fact, it’s quickly become an industry best practice used by technical communicators and marketers alike.
Read on to learn more about SUI images and how you can start using them to scale your help content.
What is SUI?
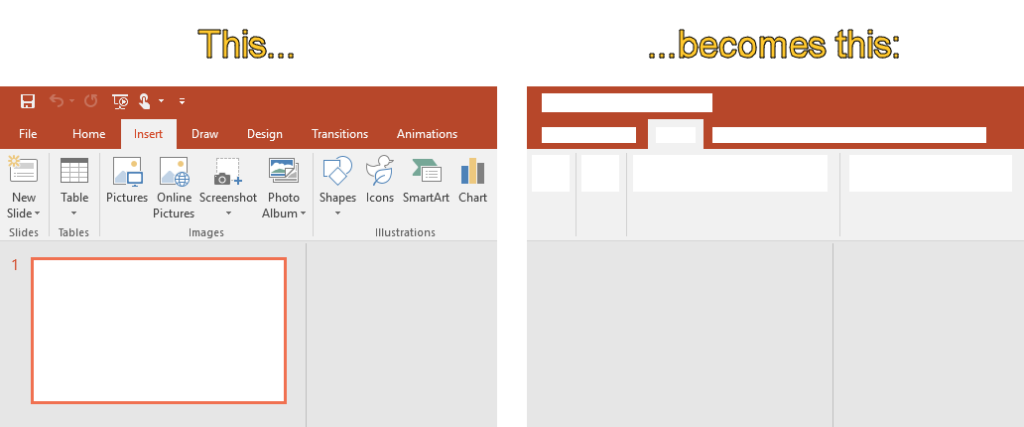
SUI stands for simplified user interface. It is a visual representation of a software interface that removes unimportant elements, reducing them to simpler shapes and providing the essential elements of the original image.
This may include covering up and removing visual noise, unrelated text, menus, buttons, or tool tips to reduce an image’s complexity and focus attention on the important parts.
That way, it’s easier for users to match what they see in the image to the interface they’re working with.
The beauty of SUI is that it isn’t just helpful to users. Simplified images often require less updates and can even be made to display no text so that a single image will work across multiple language variants of your content. When you only need to get the text for your articles translated, you save immensely in content production costs.
How Can I Use SUI?
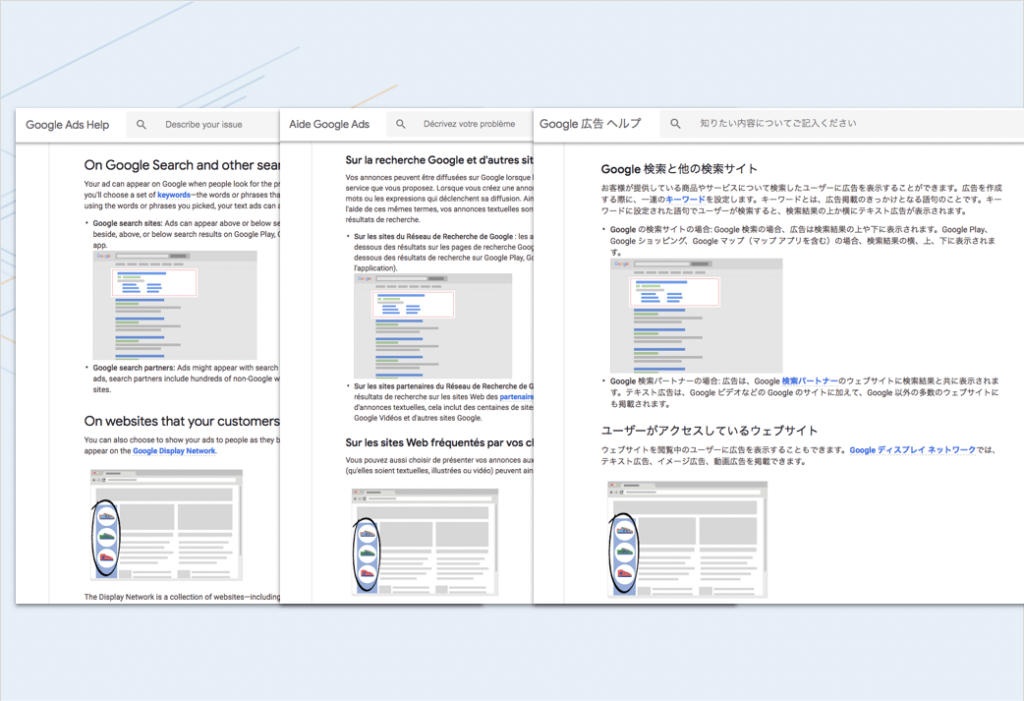
Ever wonder how Google is able to show you the answers you’re searching for in the language you want with such accurate results?
The answer is no secret: they use SUI.
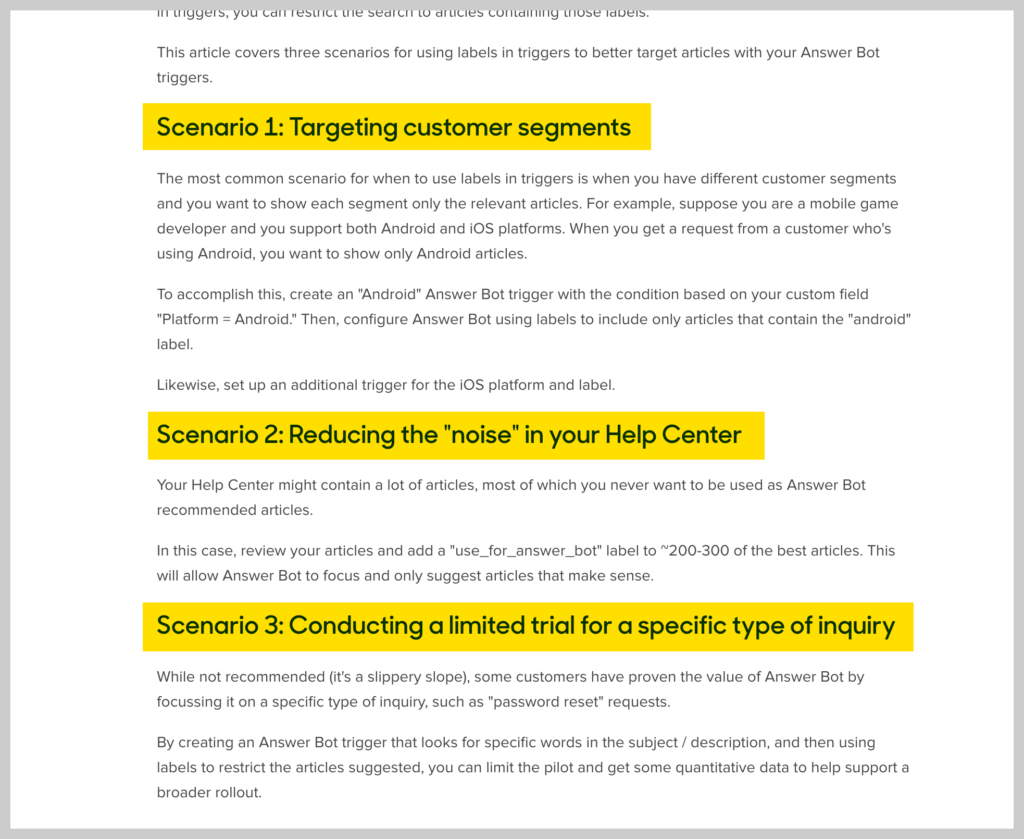
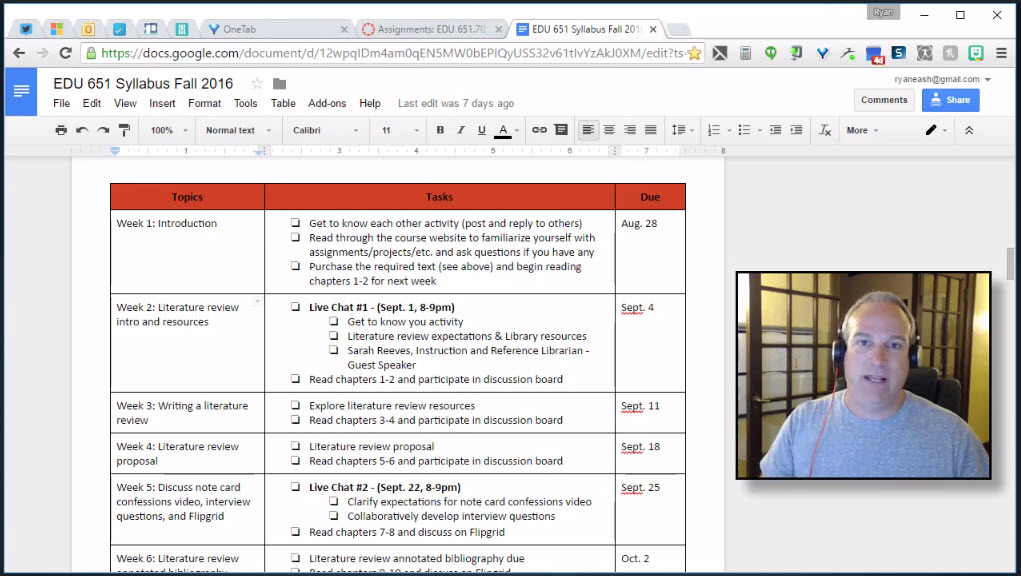
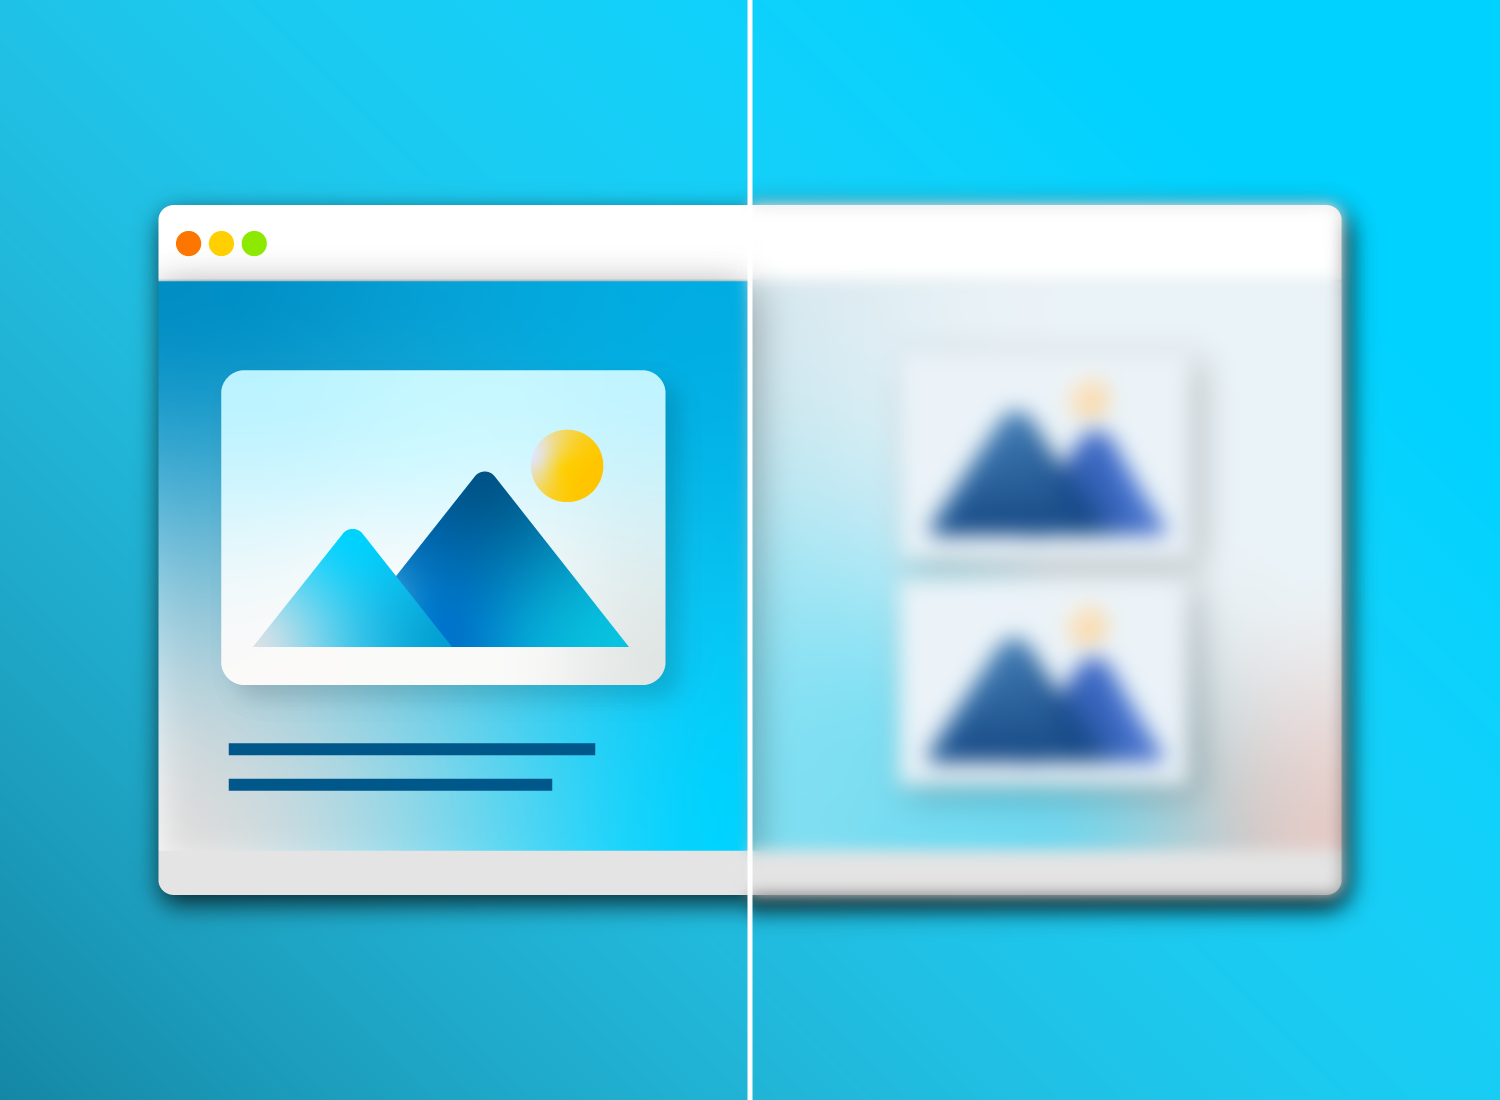
Google offers help articles, like the one seen above, in numerous languages. Notice how the images in the articles are all the same. They’re able to do this because of SUI. Interface text and other elements that might be language specific are removed. This eliminates a huge challenge in help content production: creating localized screenshots and keeping them updated.
With all the essential information and images remaining consistent, Google is simply able to pop in the updated instructions or change the language of a search result without missing a beat.
This is a method any company that provides customer support, help, or educational content can emulate. Here are a few ways you can use SUI right now.
Tutorials
Writing great tutorials for software can be tedious and tricky, especially when updates are constantly being released. Save tons of time and effort by using SUI images. That way, you’ll only have to update text.
Additionally, users learn faster with SUI images. The simplified presentation makes it easier to understand the information displayed. SUI doesn’t just make things easier for the creator, it’s helpful for the learner, too.
Keeping content relevant
Just like with tutorials, your marketing, help, and reference content will constantly need updating. Certain features may quickly become old and the content that explains how to use them will require changes. .
The more SUI you use, the less time you’ll have to spend updating information when visual changes are made to the software or product.. In some cases, you may not even have to change anything at all because SUI graphics remove the extra details and focus only on the essential.
Faster content localization
Any content creator who has been through the localization process knows that it can be time-consuming and expensive to create screenshots and graphics for every locale. Technical communicators are well versed in the effort it takes to create and manage unique screenshots for each language.
Need to translate a page across multiple languages? Rather than going through the process of changing the language of each and every word, design and structure your page around SUI graphics.
The same graphic can often be repurposed across multiple languages with little to no adjustment. Additional information or instructions can be conveyed through text.
You’ll save time and, likely, money. Take a page out of Google’s book and make things easier on yourself.
How to get started with SUI
Tools like TechSmith Snagit make creating SUI graphics a breeze. Snagit makes it easy to screenshot an image and simplify it for use as a SUI graphic. Here’s how:
Step 1: Take a screenshot
Using Snagit, capture a screenshot of the user interface you want to turn into a SUI graphic and open it in the Snagit Editor. Crop the screenshot to the dimensions of your desired output.
Step 2: Simplify your image
Snagit provides two ways to help make simplifying your images an easy process with the Simplify tool.
The first option is to simplify a screenshot manually by selecting the Simplify tool, then using the graphic elements to hide unimportant details in your image and direct attention to what matters. After choosing the Simplify tool, Snagit automatically detects the colors in your screenshot, creates a color palette, and provides a set of tools that are ideal for simplifying your images.
https://techsmith-13.wistia.com/medias/ci0blqlcxm
The second option is to automate the process. Snagit’s Auto Simplify feature recognizes shapes and text and then automatically covers them with the themed elements. Remove, add, and change the color of any of the elements Snagit adds to achieve the look you want.
https://techsmith-13.wistia.com/medias/hcghyt7swz
Watch the complete tutorial below to see the Simplify tool in action!
Step 3: Save your image
When you are done, save your file as a .png or .jpg file to be used in your documentation. We highly recommend also saving your final image as a .SNAG (.SNAGPROJ on Mac) file. This is the Snagit project file type, and it allows you to reopen the project to edit and adjust the image later on. This makes updating your image easy, so you won’t need to recreate your SUI graphic every time.
With SUI, you’ll be able to save yourself and your team time, energy, and cost. As SUI usage continues to skyrocket across other sites, you’ll have the latest and greatest tools to help people understand your content. Plus, its elegant appearance will turn heads in your marketing materials.
Now that you know how to use SUI, you can start scaling your help content today! You’ll save time, resources, and (let’s be honest) sanity.
Need help creating SUI images? TechSmith Snagit has great features that can get you making graphics in no time. Download a free trial today!
A knowledge base is a set of organized information about your product or service that a reader can go through to learn about said product or service or how to solve related problems. It is usually a collection of articles with images, videos, and text included.
Knowledge bases can be aimed at internal or external audiences and can serve different purposes.
For example, a software company may have FAQs and download instructions for their customer-facing knowledge base and also have an internal knowledge base for their employees to understand work-related tools and company policy.
Knowledge bases are used by customer service, customer support, and customer education teams.
Creating your own knowledge base article can benefit readers as they can find all the information they need in your article. We will walk you through nine tips that can get you through writing an informative, knowledge base article.
1. Ask the right questions
This first step will prime your article for success. It’s important to take a close look at what you want to say, but more importantly, you need to recognize the needs of your audience and how your information will help your future customers or clients.
Is there a problem that your current customers face that you can help them with? That may be your next topic. Your goal should be to help users find answers to the questions they have about your product or service.
This will help you narrow down your article and create a specific answer for a specific problem.
Real-life example
For example, Slack doesn’t have a help article on “How to use messages.”
Instead, they target a specific customer need, such as, “Format your messages” or “View all your unread messages.”
Slack uses specific topics for each article.
3. Talk with subject matter experts
Understanding the “why” to your article will help you remain focused and pull targeted research. When possible, we suggest working with subject matter experts.
However, if you need to draft a knowledge base template and you’re not an expert in the field, that’s okay. Interviewing a subject matter expert will help you work around that.
4. Use headers to break up your content
Once you’ve decided on a specific strategy for your article, it’s time to start painting the picture. With the research you’ve gotten yourself or the information you’ve gathered from your subject matter expert, you can begin to outline your article.
Setting your subheadings (often written in H2) creates the base-structure of your article. They direct the structure and flow of your information and, most importantly, guide readers through your information.
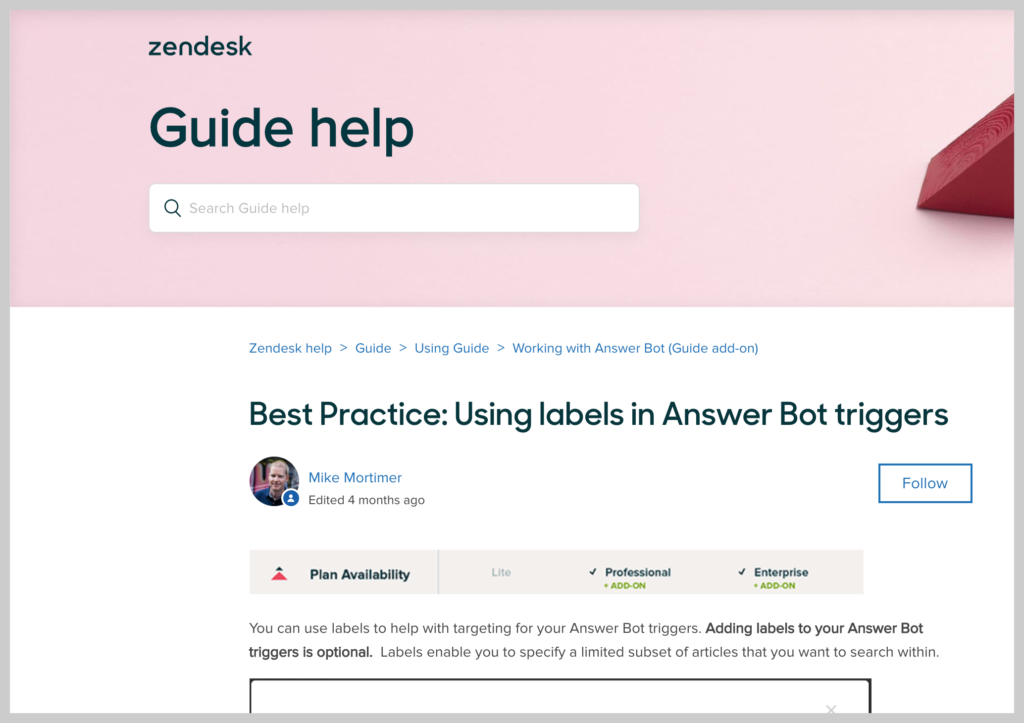
In their article they do a great job of breaking up their content using simple subheadings.
Zendesk uses subheadings to help break up their content.
On longer articles, Zendesk even adds a table of contents at the top of each article.
We’re all guilty of scanning the headers of an article before reading all the way through to make sure it’s something we want to invest our time in. Creating a headline that indicates what information is found below, you are well on your way to getting readers past the title.
5. Focus on your intro
After you create your headers, you can shift the focus to your intro. Keep this short and sweet, but be sure to include your thesis statement or key message of the article up top.
Real-life example
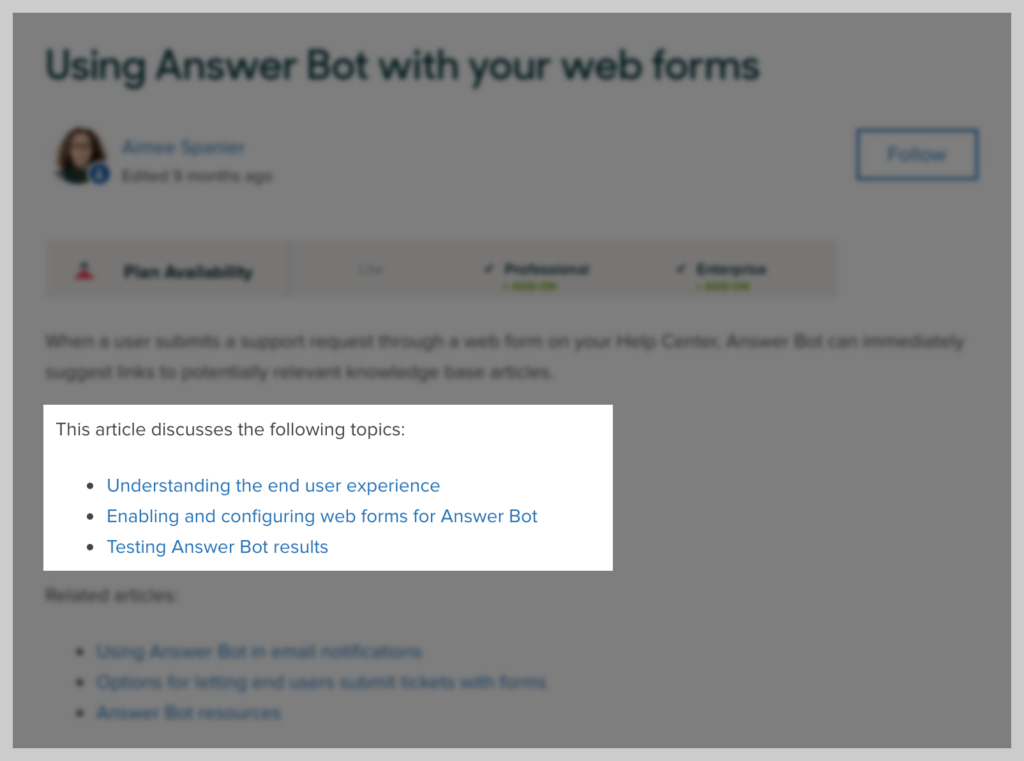
Salesforce uses a simple intro line to help users quickly see what to expect.
Your intro doesn’t have to be complicated. Even just a quick one or two-sentence summary can help add clarity for people looking for answers.
6. Kill the curse of knowledge
Always remember that your audience may have no knowledge on the subject matter at hand; you always want to use language that people of all levels of expertise can understand.
In the world of online education, step-by-step guides are an excellent tool to help someone learn something new or get help.
Start with the most basic details of your content area and build from there. If you don’t already, try creating a “Getting Started” guide or article list to help your users get started using. your product quickly.
You can advance to more complicated topics only after you’ve laid a solid foundation.
7. Add images
For many, this is the fun part. With your educational content in place, it’s time to add images.
Adding images will improve your content’s performance because, no matter how ‘good’ your content is, it will likely get overlooked without visuals.
Screenshots are just the ticket for taking your article from a helpful blog post to a full-blown reference guide, so, they’re well worth the little bit of upkeep that’s required.
8. Add videos
Embedding videos in your article will also improve your content. Articles with videos often increase viewership more than those without.
Having a relevant video in your article can increase the value a reader gets from your content and it typically keeps them on your page longer. The more time someone spends on your page, the more familiar they will get with your brand.
Now that you’ve written your article, it’s time to make sure your article gets found. Here, we enter the world of Search Engine Optimization (SEO).
You always want to write your content organically and keep your user in mind. However, when all is said and done, you also want to make sure your information gets found on Google (and other search engines).
Because if people can’t find your help, it’s not very helpful.
The best place to start is with keywords.
In an article about building a company app, be aware of what search terms people are plugging into Google when they want to know how to do this. Is it, “building an app,” “how to build an app,” or “developing an app?”
Add important keywords
Fortunately, there are tons of free keyword research tools out there that will tell you what people are typing into Google to find information on your topic. With your primary keywords in hand, be sure to include them in the following areas:
Article titles
Intro paragraph
Headers
Meta descriptions
Title tags
Be cautious of keyword stuffing though.
For example, once you know which keyword will rank well, don’t stuff it into as many paragraphs as possible in an effort to rank higher. Google will actually penalize you for doing this.
Focus on your meta description
What exactly is the meta description? Think of it as a short blurb that describes what your article is about. This is what we scan when we pull up our search results on Google. It helps people see if the article is worth reading even before they look at your headers.
So, without question, your meta description is important and it needs to include your primary keyword. It answers, “What’s in it for me?” and entices online users to click on your article over anyone else’s work that pops up on Google.
Include Alt text
Alt text is used to describe the function of an image. This is separate from a caption. People reading your article will be able to read your caption, but not the alt text (unless your image didn’t display for some reason).
Search engine crawlers are what read your alt text. When Google (and others) crawl your site to index the content, it’ll pick up the alt text on your image and, if it has a popular keyword in it, you have the opportunity to rank higher.
Write better knowledge base articles today
We love helping content creators include images and videos for better training, tutorials, lessons, and everyday communication.
When you’re ready to turn your next article into an almighty how-to with step-by-step guidelines, screenshots, and video, we’re here to help you bring that to life.
The current global pandemic has school systems and educators across the globe seeking new ways to deliver high-quality learning experiences to their students. One method that is of particular interest, especially given the fluidity of today’s circumstances, is blended learning because it is both flexible and popular with students.
According to a recent survey, 59% of students are more motivated to learn through blended or hybrid learning than in a fully online course or a flipped classroom setting.
What does this say about how the learning experience is changing for students across the globe?
It demonstrates that implementing blended learning techniques can have a positive impact on both you and your students as an educator or employer.
Blended learning enables instructors and students to use both online and face-to-face instruction to create a flexible model that’s beneficial for both instructors and students
But what exactly is blended learning, and how can you implement it in your class or work environment?
What is blended learning?
Blended learning is a way of teaching that utilizes multiple mediums. Parts of the course are strategically chosen to be delivered in an online course setting, and other parts use face-to-face instruction. For example, students may have online lectures that teach the material, and in-class labs to apply what they’ve learned.
A misconception about blended learning is that it is only useful in traditional K-12 and higher education settings. While it’s great for instructors of all grade levels, it’s also a useful model for corporate and organizational training.
It can be used by teachers of all grades, and by employers for employee training.
Easily switch to blended learning
Download a free trial of Knowmia Pro and see just how simple the switch to blended learning can be.
Online learning can include live or recorded lectures, webinars, videos, and readings. The best practice is usually to implement a few of these in different amounts for maximum effect.
The idea is to offer students and employees a more flexible, yet consistent way to learn.
What are the benefits of blended learning for students?
There are two main benefits of blended learning for students. They are flexibility and better communication.
Flexibility
One of the best benefits of blended learning, especially for older students, is flexibility.
Aspects of hybrid learning allow students to learn where they want and when they want, also known as asynchronous learning. Web-based lectures and seminars, as long as they’re not live, can be accessed at the student’s convenience. They can learn while at home, at a coffee shop, or even on the bus through their phones.
One of the major benefits here is that if a student misses something, they can simply go back and give it another listen or read.
What are the benefits of blended learning for faculty and organizations?
One of the biggest benefits of blended learning programs for faculty and organizations is lower costs. Blended learning also allows for more engagement and makes keeping track of your students and employees easy.
Save money
Blended learning saves organizations the money that would normally be spent on printing, travel, and accommodation. Since most of the work takes place online, you can spend less save on facility costs.
What’s more, individuals can save on gas and travel expenses, like public transit costs, that they would normally use to attend class.
Create engagement
Another benefit is a proven increase in student or learner engagement. It means better employees for an organization and more knowledgeable students. This reflects well on the employer or instructor and can give you a boost in confidence knowing you’re helping individuals learn in the best way possible.
Keep students on track
The web aspect of hybrid learning makes keeping track of your students and employees easy.
TechSmith Knowmia Pro comes with built-in video analytics tools that can help track video statistics.
Results are automatically collected, giving you a concise and accurate way to see who has done the lesson or training and who has not. You can also see areas where specific students/employees may need to improve.
What are the drawbacks of blended learning?
Blended learning does have its flaws. There are three main drawbacks of blended learning. They are unequal technology access, balancing multiple methods of teaching, and plagiarism.
Technology access
Oddly enough, the biggest benefit can also be the biggest drawback — the presence of technology. Not all students have equal access to technology, nor do they have the same skills or experience.
Managing this aspect can be a challenge, but it’s possible to overcome. By creating quick how-to videos and guides for your courses, you can make it clear how students access and consume content.
The access side can be harder, but one option is to research ways in your community that students can get access to equipment, high speed internet, and other technology resources. Public libraries are often a great option.
Finding the right method
Hybrid learning also creates a balancing act for instructors and employers. You must determine the best balance between in-class and online methods. It’s hard to find the right balance while also answering all your students’ questions and helping them when needed.
To address this issue, consider using class surveys to see what students like about in-person vs online learning, or try different delivery methods for lessons and assignments.
Plagiarism
Finally, students need to be educated on plagiarism and source credibility. When everything is accessible online, it leads some students to copy too much from the internet, even if unintentional.
As an instructor, you can instruct your students on how to work best online and what is considered unethical behavior.
The types of blended learning
There are four generally accepted models of blended learning used today. The hyflex model, rotational model, enriched virtual model, and the a la carte model. All four have distinct advantages and disadvantages.
Hybrid Flexible (HyFlex) model
The hyflex model is a method of teaching that, like all of the blended models, joins online and in-class learning. The unique aspect of the hyflex model is that the learning is done at the student or employee’s discretion.
They’re given all the necessary resources and a due date and allowed to do the courses whenever they choose. They can learn in a classroom, asynchronously online, or synchronously online. Each method gives students the flexibility to complete the course in a way that works best for them.
The instructor is available through email, chat, or another method to help the student when needed.
The hyflex model can utilize a number of online resources, from course videos to infographics to online quizzing and more.
Rotation model
The rotation model takes place in class, with students or employees rotating (often in groups) through different stations of learning. One or more of these stations is technology-based.
For example, one station may be a pen-on-paper multiple choice quiz. Another station might be an online video or interactive learning game. The next station could be a practical approach to the material just learned.
In this case, the instructor is available (usually in person) to help any group or individual when needed.
After everyone gets through all the stations, the instructor may collect the data and review it. From there, they can instruct the class as a whole on what they need improvements on, where they did well, and more.
The e-learning part of the rotation model can also take place at home. Students attend lectures on the web, then apply their skills to the workshops in the classroom.
Enriched virtual model
With the enriched virtual model, all teaching happens face-to-face and in class.
Homework is done remotely through the web. Students can hand their work in online, or print it and bring it to the next in-class session. While there is some flexibility and an element of student control with this model, class times and homework completion is often scheduled in a more concrete manner.
A la carte model
This method takes place completely online.
Students have access to an online learning portal filled with class material. The students are expected to get this work done on their own time, often by a given due date. All contact with the instructor happens online, often through email or another chat program.
This is a hybrid model because it uses a multitude of online resources. Instructors will often implement videos, quizzes, games, and more. This is the least personal model of blended learning, but also the most flexible.
You can really humanize video learning and make it engaging for students with a product like TechSmith Knowmia Pro.
How to implement blended learning
Four keys to implementing blended learning are to create a simple proposal, make videos, consider the needs of your students, and find the right learning management system.Whether you’re an instructor or an employer, you will benefit from implementing blended learning.
Here’s how to implement blended learning in your organization or classroom.
Make the proposal
No matter how much you want to, you can’t just implement hybrid learning immediately.
First, assuming you’re not the highest in the chain, you’ll need to get the higher-ups involved. Although blended learning is often cheaper, it still means moving funds around in the budget. Imagine your boss walks into your classroom only to see no students at all without knowing they’re doing the work online.
Make a case for blended learning to the people in charge. Come up with a list of pros, a lesson plan, and how you want to implement it. Try to get the costs down, and show them why blended learning is the right move.
The more prepared you are, the more likely the proposal will go through.
Make videos
Creating great videos is essential for blended learning and flipped classrooms. If your videos don’t engage students, then they won’t help them learn. Make sure to create a variety of high-quality, engaging course videos that go over the lesson material so that your in-class discussions can focus on diving deeper into the topics you’re focusing on.
If you’re newer to video production, TechSmith Academy has some great tips to help you get started.
Consider the needs of the students
Once approved, it’s time to implement blended learning in a way that works for your students.
Make sure your students have ample access to a computer and the internet. Set them up with resources that will help, such as public spaces with available computers. Make sure they have a reliable way to contact you and assure them that you’ll be there to help.
Make due dates and elements of the hybrid learning structure very clear. Just because the work is flexible doesn’t mean the due dates are. Let your learners know what you expect of them, and reiterate that blended learning is not an excuse to slack off.
What to look for in blended learning technology
While there are plenty of companies offering blended learning tools, not all of these are equal. There are certain things you should look for before making a definitive choice. Look for adaptability, clear data, and ease of use.
Adaptability
Everyone has a different learning process or learning style that may require a faster or slower pace.
With this in mind, try to find a tool that adapts to each student or employee’s needs. Many blended learning tools offer additional instruction for students who need it. If a student is found to be struggling with one section, it will offer the student further instruction in that area.
This allows faster learners to go through the lessons quickly without getting bored. Meanwhile, learners that enjoy more time have the extra resources they need to succeed. With easily accessible grades, instructors are able to see who they may need to contact and offer help.
Clear data
A great hybrid learning tool tracks every aspect of a student’s learning.
This goes beyond test scores. Try to find a program that tracks how long each student takes on given tasks in addition to their grades. Having a tool that shows video engagement can give you great feedback on how well your content holds learners’ attention. The more gradable portions that are visible in a blended learning task, the more data you as the instructors have to work with.
Ease of use
Blended learning can add a lot of pressure to faculty and organizations.
Inevitably, you won’t be a master of all the topics covered. You may feel helpless when a student asks you for help on something you’re not fully versed in. In this way, a good blended learning tool should help you out with these scenarios.
Many programs will give the instructor access to helpful resources tailored to a student’s specific needs. This helps guide both the student and the instructor to success. If your hybrid learning program leaves you in the dark, then it’s not helping you or your students achieve your goals.
TechSmith Knowmia Pro provides users with a world-class support team that’s available to help with any questions. It also offers great tutorials to help you produce the best educational content for your learners.
Is blended learning right for me and my students?
Whether or not blended learning is right for you and your students depends on a number of factors. While blended learning is effective, it’s not ideal for all situations.
If you’re in a smaller school or work environment, for example, it may not be necessary. Blended learning tools are only cheaper if there’s a considerable amount of people to teach.
Additionally, small class sizes means easier one-on-one time with the instructor and a more communal environment. This makes online components less worthwhile.
In rural areas where technology and internet access isn’t as reliable, blended learning is more of a burden than a saving grace. This also goes for work environments or classrooms with older students or workers. They may need more time to learn how to use the tool, creating more work for the instructor and frustrating students.
If you’re dealing with a large number of students, young students, and/or responsible students, blended learning is a great idea. It also helps if you have a busy teaching or work schedule. Thanks to reduced in-class work, you have more time to relax, focus on individual work, and field questions in a stress-free environment.
Blended learning: the present and future of education
Now that you know the ins and outs of blended learning, it’s time to make the change. As you’ve learned here, blended learning can be a great way to add flexibility to both school and workplace learning. It also can help save on costs.
When we consider the current circumstances, now might be the perfect time for you to try blended learning. Your students will be engaged and look forward to the flexibility that blended learning offers. Not only that, you’ll make your job a lot easier and more practical.
Blended learning is the present and future of learning. It’s time to step into it.
If you’re searching for a reliable blended learning solution, TechSmith can help. We provide the tools you need to thrive in the era of online and blended learning.
Frequently asked questions
What is blended learning?
Blended learning is a way of teaching that utilizes multiple mediums. Parts of the course are strategically chosen to be delivered in an online course setting, and other parts use face-to-face instruction. For example, students may have online lectures that teach the material, and in-class labs to apply what they’ve learned.
What are the benefits of blended learning for students?
There are two main benefits of blended learning for students. They are flexibility and better communication.
What are the benefits of blended learning for faculty and organizations?
One of the biggest benefits of blended learning programs for faculty and organizations is lower costs. Blended learning also allows for more engagement and makes keeping track of your students and employees easy.
What are the drawbacks of blended learning?
Blended learning does have its flaws. There are three main drawbacks of blended learning. They are unequal technology access, balancing multiple methods of teaching, and plagiarism.
How to implement blended learning
Four keys to implementing blended learning are to create a simple proposal, make videos, consider the needs of your students, and find the right learning management system. Whether you’re an instructor or an employer, you will benefit from implementing blended learning.
What are the types of blended learning?
There are four generally accepted models of blended learning used today. The flex model, rotational model, enriched virtual model, and the a la carte model. All four have distinct advantages and disadvantages.
What to look for in blended learning technology
While there are plenty of companies offering blended learning tools, not all of these are equal. There are certain things you should look for before making a definitive choice. Look for adaptability, clear data, and ease of use.
Here’s something I see far too often. People that make videos for training, teaching, and communicating believe adding effects to their videos is beyond their skill set. Or, they think they’re unnecessary, frivolous decorations.
That’s not so. I’ve created hundreds of tutorial videos, and I can confidently say that I used video effects in nearly all of them. Simply put, they’re a critical part of creating great videos that deliver a clear, resounding message.
In this post, I’ll show you how to add effects to your videos in three easy steps. Then, I’ll share a few ways you can start using effects in your videos right now.
Easily add effects to your video with Camtasia!
Download a free trial of Camtasia for an easy way to add effects your videos.
Depending on the video editing software you use, adding effects to videos can be anywhere from very simple to wildly complex. Luckily, if you’re working with TechSmith Camtasia, it’s especially easy.
Here are three easy-to-follow steps to add effects to your videos.
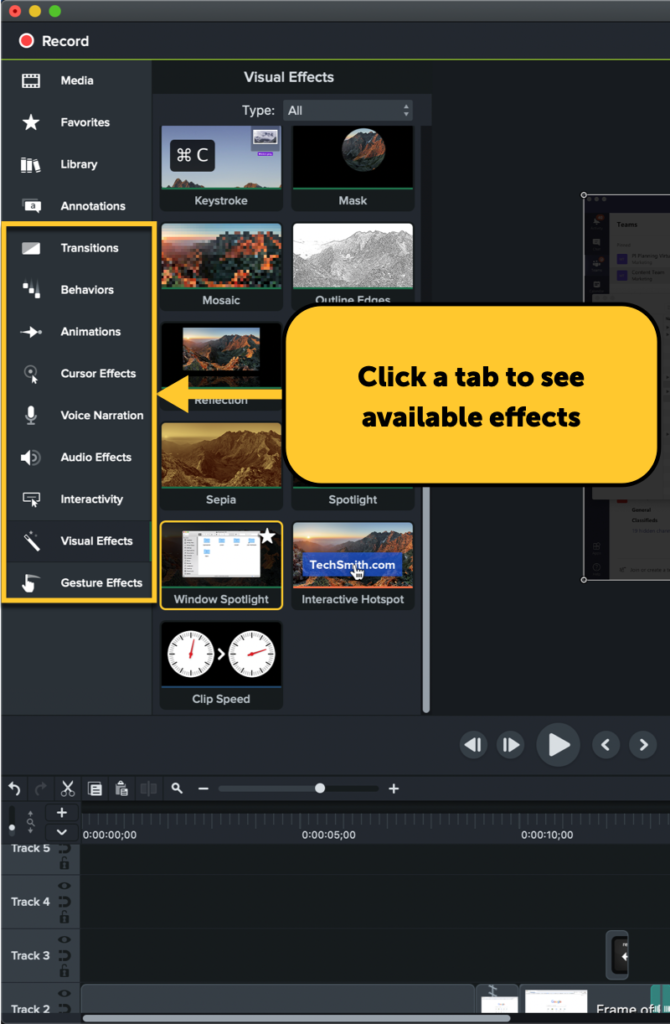
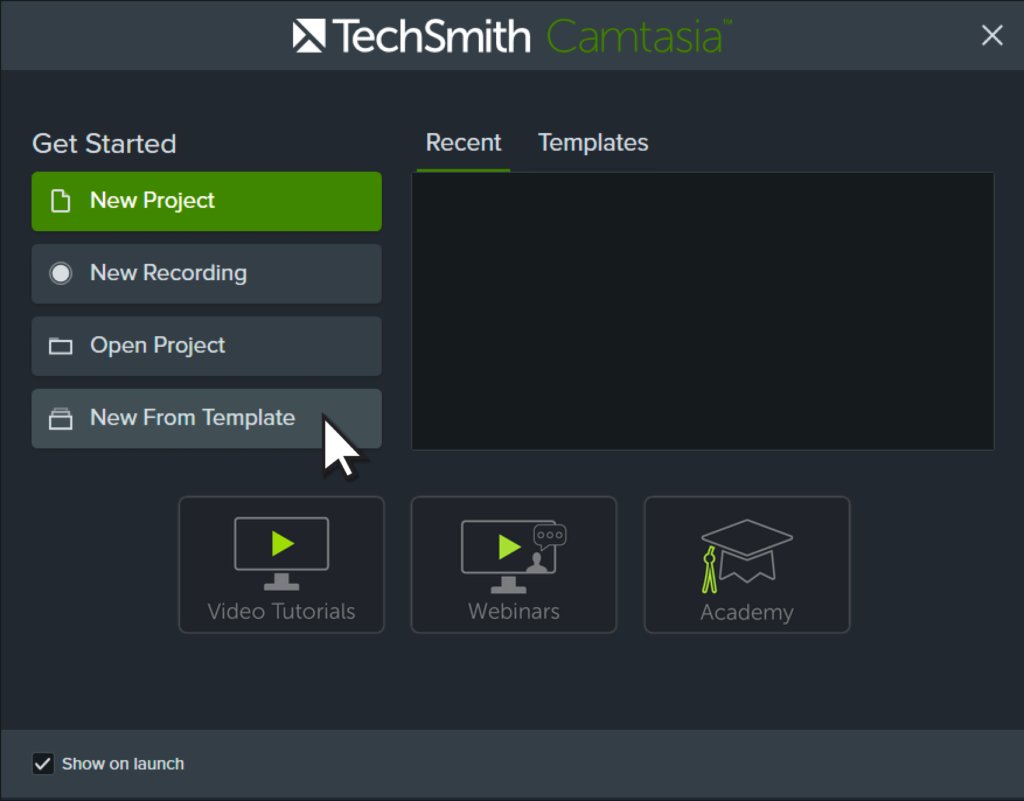
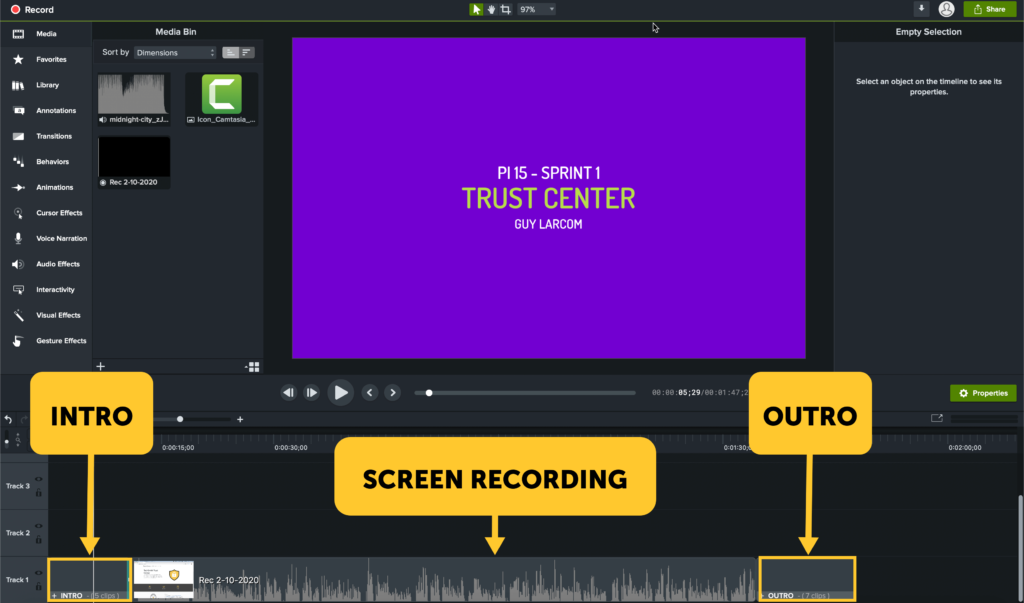
Step 1: Find your effect
All of Camtasia’s effects are accessible in tabs along the left side of the editor. They’re broken up by categories to make it easy to find the one you want.
Click one of the tabs and then scroll through the options in the panel. Some effects, like Transitions and Behaviors, will display a simple preview when you hover your mouse over them and move it from left to right.
Step 2: Add the effect to an object on the timeline
To add an effect, simply click and drag it to the media, annotation, or content group on your timeline. Camtasia highlights the objects that the selected effect can be applied to in blue.
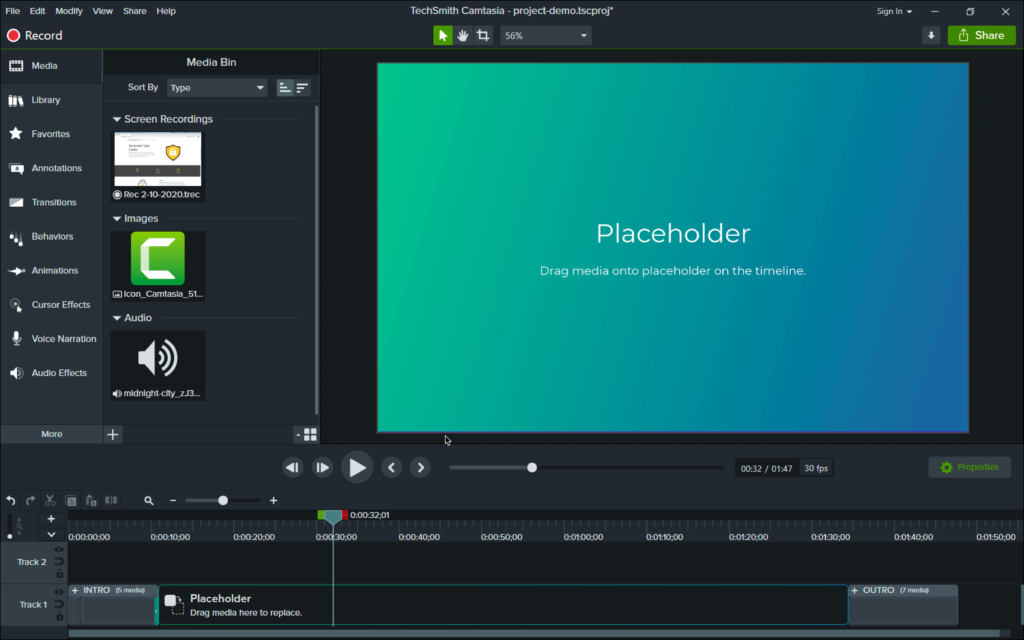
Step 3: Customize how the effect looks or behaves
After you add an effect, you can customize it using the settings in the properties panel.
With the clip selected, adjust the settings to achieve the look you want. For example, I’m using a spotlight effect in the clip below. By adjusting the properties and position, I can achieve a nice visual focus on the URL bar, which is exactly what I want my audience to notice.
Depending on the effect you’re using, there will be different adjustments you can make. The options you have depend on the type of effect and range from color changes to timing and positioning of the effect on your clip.
After adding an effect and editing it, you may want to make additional changes later on. No problem, simply select the clip that contains the effect and start editing the properties. In some cases, you can make an effect only appear on part of a clip.
All of this can be done from the effects drawer. Click the small arrow on media containing effects to open the effects drawer and see all that have been added. Then, to change the duration and when an effect appears, click and drag the handles at the edges to shorten it, or click and drag the entire effect to move it around on the clip.
You can get really creative when customizing your effects. You’re also not limited to one effect on media or annotations. Feel free to get super creative with the properties and combining effects, or keep it simple and stick with the defaults.
Effects you should start using right now
Now that you know how to add effects to your videos, you’re probably wondering when you should use them. Here are three types of effects you can start using right now.
Transitions
Transitions are probably the most important effect to know how to use. They let you seamlessly move from one video clip or image to another, but that’s not all. They’re also great for bringing annotations and other graphics on or off the screen.
Camtasia has tons of transition effects. There are, of course, the classics like fades and gradient wipes. But when you’re ready for more, you can try out whip spins, ripples, dissolves, and numerous other options.
They’re all found in the Transitions tab and applied just like I demonstrated above. The one unique aspect of transitions is that they’re only applied to the beginning or end of a clip.
Camtasia helps you see where the transition will be added. Then, once it’s on the clip, you can edit the duration by clicking and dragging.
Here’s an example of adding a transition and editing it.
Create stunning text animations with Behaviors
Cool text animations are one of the best ways to wow your audience. In some cases creating animated text can be tough, but Camtasia’s Behaviors make it easy to do.
Behaviors are easy to apply packages of animations that can be used with any media on your timeline. That said, they’re most often and impressively used with text. Add behavior effects to make text fly, slide, jump, bounce and appear in different ways.
You can get incredibly creative with behaviors using the customization settings in the properties panel and even layering behaviors on top of one another. If you want to learn more, we have a great tutorial on Camtasia Behaviors.
Use Cursor Effects to direct your audience’s attention
In videos that use screen recordings, like tutorials and other software demonstrations, the cursor is the star of the show. It literally drives the action with every movement and click.
Camtasia’s Cursor Effects make it easy for your viewers to follow the cursor and know exactly what’s happening on screen. Use them to make clicks easier to see, change the size of the cursor, and even smooth out its movements.
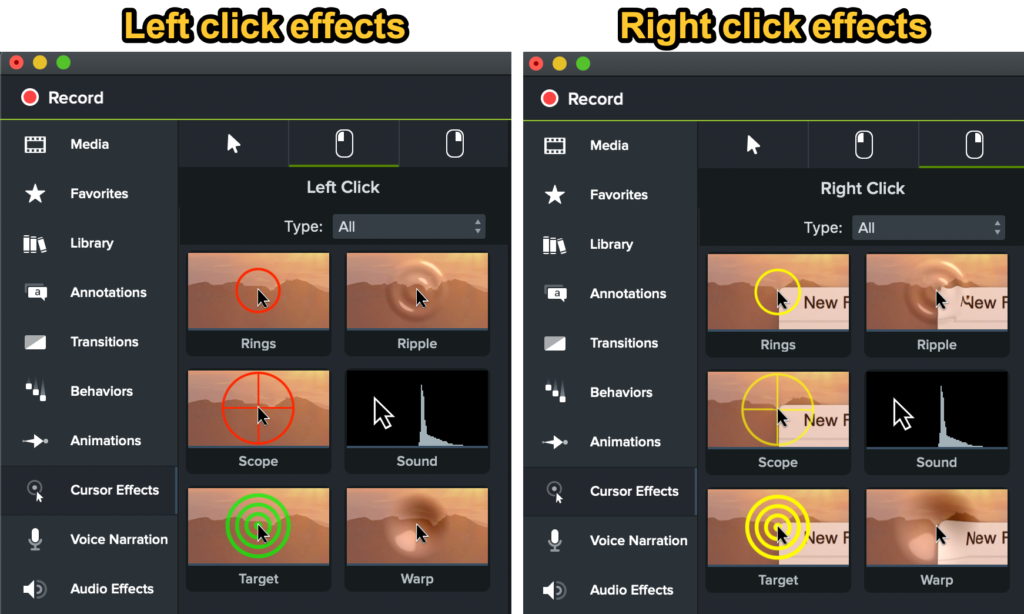
The Cursor Effects tab has three panels to choose from. The first, shown below, contains effects that change how the cursor looks or moves.
The second two panels contain effects that add visual or audio indications for left and right mouse clicks.
Apply these effects to screen recordings to make it dead simple for your viewers to follow along. Cursor effects can be especially useful if you’re demonstrating software or processes that make it hard to see when and where you are clicking.
That’s definitely not all, folks!
Camtasia has too many effects to cover in a single blog post, but that doesn’t mean every single one isn’t useful at the right time. For example, the Remove a Color effect is great if you’re looking to work with a green screen.
There are also Audio Effects that can be incredibly useful if you add music, include sound effects, or need to edit your narration.
No matter the kind of videos you’re creating, I am sure there is a place for adding video effects. If you haven’t yet, start experimenting with effects in your videos by downloading a free trial of Camtasia.
Camtasia helps you add effects fast!
Download a free trial of Camtasia for an easy way to add effects your videos.
As online programs grow in importance, it’s crucial that faculty have the tools and guidance they need to create quality online course videos.
With the right strategies, however, you can interact with online students, pay attention to their questions, and give personalized feedback, all while measuring participation and comprehension.
If you follow these seven strategies, you can easily build a great online course!
Below are first-hand experiences plus tips and techniques from faculty on how they ensure that they are empowered to create online course content that engages students.
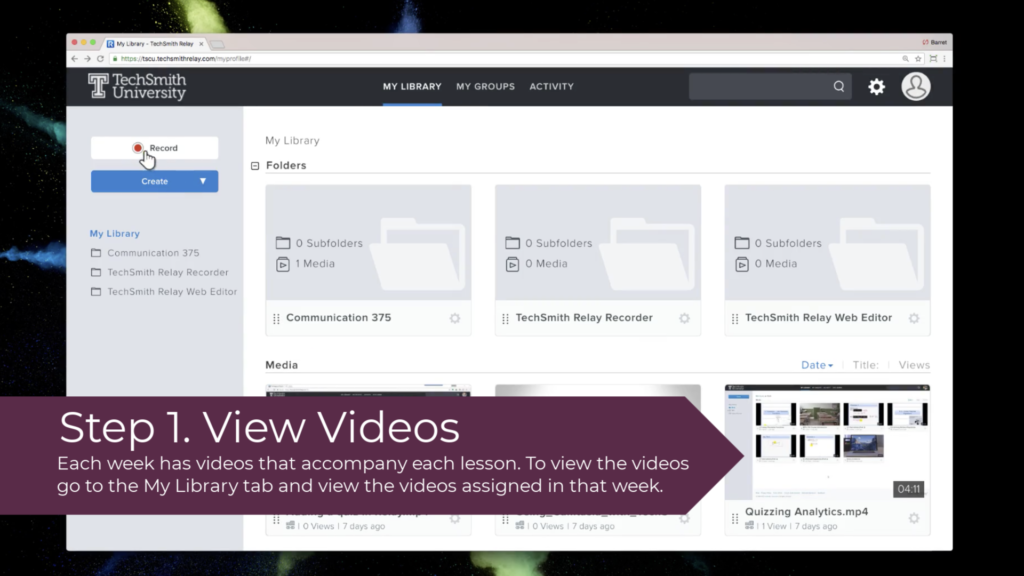
1. Integrate video creation and sharing with your LMS
One of the keys to training faculty to create quality online course videos is to start with a video platform that is easy to use.
If at all possible, make it a priority to choose a video platform that integrates seamlessly with your Learning Management System, or LMS. Being able to create and view videos within the system that faculty already use is one of the single biggest things you can do to increase faculty adoption.
At the University of Colorado Denver, administrators rolled out a new video platform, but didn’t immediately ‘turn on’ the LMS integration. Before the integration, their staff spent a lot of time training faculty how to use the systems together.
Creating and sharing lecture videos wasn’t as easy as it should have been, and often infringed on faculty’s already-packed schedules. Administrators knew they needed to try a different approach to make it easier to create and share videos without adding more overhead to the workflow.
Once they turned on the integration, including single sign-on, they quickly started to see broad adoption. Alex Karklins, CU Online Academic Services Senior Professional, explains the faculty impact of integrating their video platform with the LMS: “It wasn’t until we installed the LTI integration into all of our Canvas courses that faculty usage really took off.”
With single sign-on and a simpler process for video creation and sharing, administrators noticed smoother onboarding, fewer refresher training sessions, and significantly more usage by faculty. Instructors were able to use their own existing laptops and computers to record from any classroom, and they could control their ‘start’ and ‘stop’ times.
Ease of use made a huge difference.
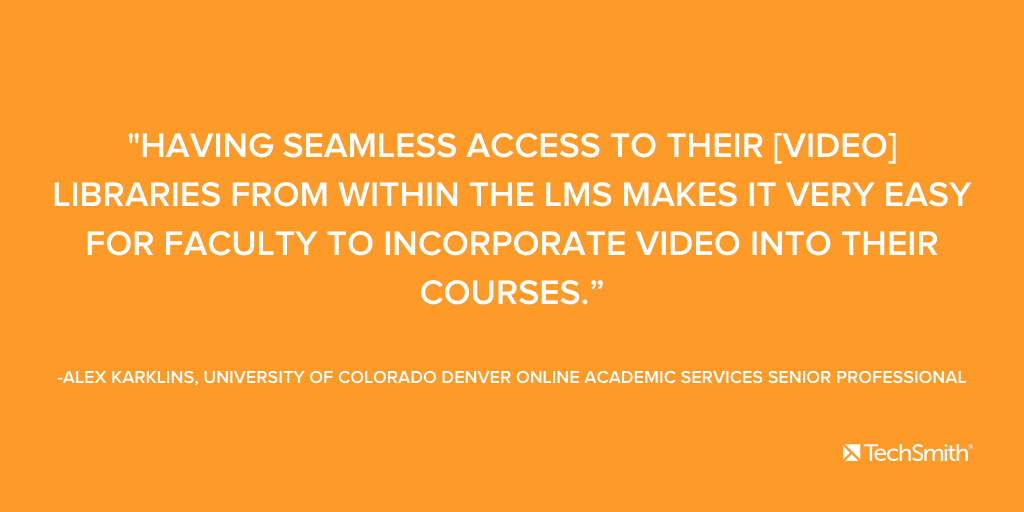
“Having seamless access to their libraries from within the LMS makes it very easy for faculty to incorporate video into their courses.” After the integration, even hesitant faculty were creating and sharing videos with their students in both online and blended courses.
2. Create videos for online courses
With the right strategies, instructors can interact with online students, pay attention to their questions, and give personalized feedback, all while measuring participation and comprehension.
3. Encourage faculty to create accessible course materials
In their fourth year with an accessibility awareness committee, the University of South Carolina Upstate had a significant challenge – to make sure all of the user community is educated about the need for captions, and to encourage faculty to generate them when they create recordings.
As part of a five-year-plan to ensure accessibility, they realized it’s a lot to ask of faculty, who already have a lot on their plates. So far, they’ve found the most success by emphasizing the benefits of inclusive design strategies instead of simply meeting the legal requirements.
Emphasize advantages, not authority
“We approach it from the perspective of accessibility assurance,” said Cindy Jennings, Director of Learning Technologies. “We very rarely talk about legislation or compliance. Sometimes we have folks who want to know why [we require captions], and occasionally we’ll pull out the ‘ADA hammer’, but we try to stay away from that as much as possible.”
Very quickly, they realized the right accessibility tools can make all the difference in whether faculty can fit into their already-busy schedules.
Ease of use is key
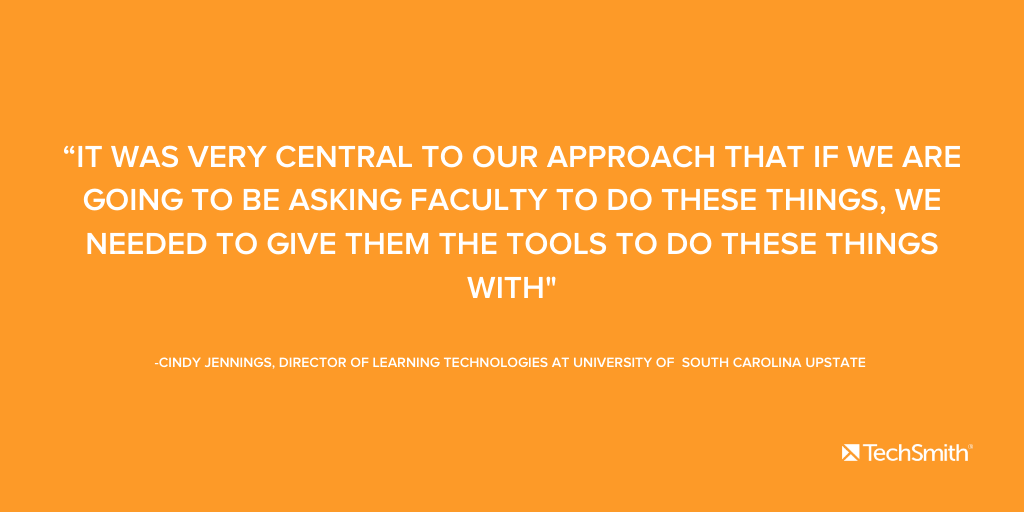
“It was very central to our approach that if we are going to be asking faculty to do these things, we needed to give them the tools to do these things with,” explained Cindy. “We were really looking for the ability to have automated, integrated captioning that was easy and helpful for faculty and fairly low-threshold to adopt as their standard practice, not as an add-on. The rollout of TechSmith Knowmia last fall was very much a driver of that whole strategy. We have excellent adoption of Knowmia, better than we ever dreamed of the solution itself.”
Due to feedback from faculty that captioning can be time-consuming, the committee suggests ways to yield the most accurate captions at the first pass, including:
Record quality audio. Choose a quiet place to record course videos. Shut windows and doors, turn off background music, and avoid any nearby air conditioner that might kick on halfway through. Although a built-in laptop microphone is fine, even an inexpensive USB mic goes a long way to improve audio quality.
Speak slowly and clearly. Doing this lets the caption engine recognize your words and phrase patterns. More accurate captions at the first pass results in less caption editing later. If humans are captioning videos, speaking clearly helps them understand what you’re saying.
Create shorter, focused videos. Best practices for online course videos show that shorter videos not only help get the course material across, they also make captioning easier. “We’re still in the throes of educating faculty about shorter, more frequent videos, as opposed to recording two-hour-long lessons,” said Cindy. “We show them how shorter videos are better for your students. It’s easier for students’ overall cognitive load, and makes it easier for faculty to edit captions.”
Along with holding departmental training sessions, the committee also developed a group called Access Advocates. It’s one extra layer of assurance that each department has someone identified to be a communication channel and assist others if they have a question.
Faculty are finding new ways to use video in their courses, explains Cindy. “Now, we’re beginning to have faculty request how they can utilize the Knowmia recorder for students to record and do multimedia projects in the system,” which opens up new opportunities for student-centered learning and multimedia expression.
4. Get data to share effective online teaching practices
Winner of an Aspen Prize Rising Star Award based on student engagement, retention, and performance, administrators at Odessa College carefully monitor success rates, but not just of students. They monitor success rates of faculty as well.
Young, dual-enrolled demographic
Low regional unemployment is a good thing overall; however, in this region, it can present a challenge for community colleges. As the price of oil goes up, enrollment tends to go down since there are plentiful, high-paying jobs in the oil fields. Due in part to this, dual credit enrollment is a growing trend, with about one-third of students at Odessa still in high school.
Set up for success
It can be challenging to serve such a diverse community in age, from fifteen years old up to seventy years old. The youngest generation may be in classes with just high schoolers, or they may be in a mixed class of all ages. Successful engagement strategies are more important than ever, especially in online programs.
Rich stores of valuable data
With data driving the project, Odessa carefully tracked course pass rates. After analyzing a large amount of data, they soon uncovered retention patterns. For example, while eight or ten biology instructors may all teach the same course across different time slots, some have a higher success rate than others. Success rate is defined as students getting a ‘C’ or better in the course.
Shawn Shreves, VP of Information Technology, explains the discovery process: “We try to find the traits that are more successful – they’re still giving the same tests, yet the outcomes are better. We talk to faculty who have high success rates and ask ‘How are you engaging the students?’ vs instructors who have lower engagement and lower success rates. Based on that, we try to coach them up. We say, ‘Here’s what the successful teachers are doing,’ and we share those strategies across the entire college.”
Based on success with that process, administrators use the latest analytics to pull data from their LMS and their TechSmith Knowmia video platform to see what students are doing online – how many course videos they’re watching, how often they’re watching, and more.
“We see a lot more of our students are used to learning through videos,” explained Shawn. “It’s part of being in that generation, like my teenage sons at home growing up with video programs like Snapchat. They’re not just photo-based, it includes video. For the next generation – whatever they’re going to be called – video is very engaging to them. We’re going to try to leverage that mindset.”
Their high-engagement strategies include creating and sharing videos with TechSmith Knowmia not just for core course content, but to establish a personal presence with students. They highly encourage all faculty to:
Create an introduction video, where instructors introduce themselves to their class and share a little bit about themselves. “The students see them as a person and it helps develop those personal relationships. Some faculty even require the students – especially if it’s a fully online course – to do so as well.” Knowmia’s administrators also recommend creating a course navigation video, lab and demo videos, and to record shorter, more focused core lecture videos by topic.
Get to know students by name. Taking the time to learn students’ names, interests, and personalities goes a long way to helping them feel engaged in the course. Knowing that their instructor cares enough to check in with them before a quiz to see if they need help, or notice when they struggle, makes a huge difference in whether or not they fully commit to a course online.
Measure learning with quizzes and analytics. Add Knowmia’s quizzes at key points within course videos to measure participation and gauge how students are learning the material. Knowmia’s analytics let faculty see which students are watching videos, which are struggling, and when they need help.
Overall, administrators continue to see results and highly encourage faculty to use every digital tool, including Knowmia. “I would have killed for Knowmia years ago when I was teaching,” said Shawn.
5. Engage the reluctant online learner
After ten years of teaching online and face-to-face classes, Tracie Lee hit a trifecta of hurdles – teaching online Introductory Business Statistics. As is common with many intro courses, students resisted taking it on general principle because it’s a mandatory course (and therefore considered dull) for all business majors, and similar enough to math to be considered difficult by entering students.
Combined with challenges inherent in online-only teaching, this course is a particular challenge. Despite following a previously-successful online model of longer video lessons along with grade points based on exams, assignments, discussions, and projects, students just weren’t learning. By midterms, fifty percent of the class was failing. “Looking back,” confessed Tracie, “it’s clear I didn’t understand the demographic.”
Tracie adjusted her approach to include much more video interaction. Specifically, she recorded video walkthroughs to show students how to think through and solve the problems. By the end of the semester, most of the remaining students passed the course. But Tracie knew it could be much better.
For the next semester, Tracie gave students more chances to practice the problems before exams. She added forty-minute video lessons, video walkthroughs, graded quizzes, and additional online discussions. Still, it wasn’t enough – students struggled.
Many weren’t watching the videos and avoided assignments until the last minute.
Coupled with unsustainable video maintenance and storage issues, Tracie knew there had to be a better approach.
Interaction tactics make all the difference
Access to the next-generation, cloud-based video platform TechSmith Knowmia provided Tracie the missing component. Now, she could measure (and require!) participation.
From the makers of Camtasia, Knowmia let Tracie easily:
Record shorter videos. “It was shocking to me to see the statistics on the ideal video length,” Tracie explained.” There are some concepts in statistics that have too many steps to go through in five minutes. Ten minutes was a nice compromise between my original forty minute videos and the ideal three-minute attention span.”
Embed graded quiz questions at key points within her videos. To maximize the attention span window, Tracie purposefully engages students frequently. “I try to add a quiz an average of every two minutes,” said Tracie. Now, she could measure learning as students went along, instead of just at the end of each week. At the same time, the quizzes ensure students are watching and paying attention to the entire length of videos.
Report quiz results directly to the LMS gradebook. This makes the process easier for everyone.
Measure participation online: for each student, and her class as a whole. “I couldn’t get students to watch videos until I made them worth points,” said Tracie. Measuring participation made a huge difference in getting students to watch attentively.
Bolstered by these new capabilities, Tracie re-recorded the older, longer videos into concise, 10-minute video lessons and added quiz questions throughout. She also began hand-writing key points on her presentation slides (as opposed to just displaying text on the screen). Tracie used an inexpensive graphics tablet with a stylus, then recorded her screen with Camtasia, and the writing showed up on the video.
The tactics worked. She quickly began to see that the students watching the videos did very well. For the future, she plans to continue embedding graded quiz questions into short videos, hand-writing more phrases, and consider reworking videos that analytics shows are not resonating with students.
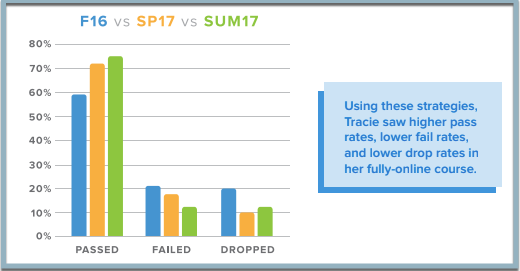
Using these strategies, Tracie saw higher pass rates, lower fail rates, and lower drop rates in her fully-online course.
“I’ve recorded videos several times trying to figure out the best way to explain something. It forces you to be extremely focused.” Based on how students are learning, Tracie adjusts the material. “Especially when students are asking the same question over and over again, that’s really a good sign to say ‘I need to add something here.’ Sometimes that’s an extra two-minute video that I send out to the class, or sometimes I re-record the lecture instead.”
She plans to keep making improvements to achieve an 80% pass rate.
This material is shortened from Tracie Lee’s webinar “Engaging the Reluctant Learner”.
6. Encourage reluctant faculty to create quality course videos
Training faculty to create quality online courses can be challenging. It can involve overcoming barriers in technology, workflow, student-instructor relationships, and mindset. Here are some tactics from other colleges on how they encourage faculty to begin creating course videos.
Getting comfortable with their own voice
Not being comfortable with their own voice is a common complaint you may hear while training faculty to create quality online course videos. When Stephanie Entringer began recording videos at Southeast Technical University, she was hesitant. “When I was new, video freaked me out. No one likes to hear themselves.”
Soon, she realized that her voice helps build a unique relationship with her online students, and any perceived imperfections weren’t anything to worry about. “We’re all human. It doesn’t have to be perfect.” Encourage them to not only accept their voice, but let their personality shine as they build quality online course content.
Employ your rock stars
Have some rock star instructors? Faculty who have been creating videos for a long time can sometimes be the best promoters of your new software system. Encourage them to contribute a few video tips and mentor other faculty to create their first videos.
When they’re scared
Some instructors, especially those who tend to struggle with learning new technology systems, feel more comfortable asking questions in person. Administrators at Odessa Colleges also offer personalized training sessions as a final approach to onboarding.
“These sessions are usually short and focused, but the faculty seem to find them very helpful,” said Jennifer Lee, Web Design and Instructional Technology Specialist. They notice that technology confidence often plays a big part in getting these instructors on board. Once they are walked through the process and see how easy it is, they get the hang of it much more quickly.
“For many of them, once we show them how easy it is to create that first video, it boosted their confidence a great deal (and even got them excited). They started doing more and more on their own with less guidance from us.”
This is another way to get your rock-star instructors involved – encourage them to help strugglers. Often, they can answer their questions and make them feel at ease even more quickly than formal training staff.
When they just don’t want to
Some instructors philosophically resist new technology. This is usually the most challenging set to turn around; however, they are usually a small group.
Do your best to offer them all the resources you can. One-on-one training can be very useful for this group. Provide specific reasons why online courses will benefit them and their department, professionally and personally. Show examples of how other professors have created online courses as inspiration.
Remind them that instructors are the most important part of the online course – technology doesn’t replace professors; it amplifies their importance. Leif Nelson, Director of Learning Technology Solutions at Boise State University, has extensive experience onboarding and training faculty on lecture capture systems, and explains that it doesn’t always happen all at once. “There’s definitely a step approach to get people used to what’s possible with technology.”
No matter what, keep encouraging them. Sometimes the best progress happens slowly.
7. Create mobile videos for effective, in-the-moment instruction
Instructors at Aims Community College needed a way to create valuable, in-the-moment video lessons for students, beyond traditional lecture capture. After adopting software-based TechSmith Knowmia, faculty jumped at the chance to create engaging video lessons from any location, at any time.
Chalese Nelson, Learning Resource Technician, explains how faculty embraced having an easy way to record videos. “It’s a tool that has so many possibilities,” said Chalese. “There really aren’t any boundaries. If you can put it on your computer screen or film it, you can use Knowmia to record it.”
Recording on their smartphones was a hit, thanks to the TechSmith Fuse app that lets faculty send videos directly to Knowmia and their LMS. “Fuse is something faculty got really excited about because they record it right from their device,” said Chalese.
Especially in the health sciences, where instructors frequently demonstrate clinical skills, instructors embraced mobile video recording wholeheartedly. “The nursing program just grabbed it and ran,” Chalese explained. The EMT and Nurse Aide programs use Fuse to evaluate skills in scenario training.
Not only do instructors record phone video to show hands-on skills, they also use video to record and evaluate nursing students’ competency. “It’s been revolutionary for those students,” said Chalese. “It’s put a lot more accountability in the students’ hands because they can actually watch their skills. They’re seeing themselves. They see what they’re doing wrong, what they’re doing right, and what they need to work on before it even gets to the instructor.”
Moreover, nursing faculty told administrators that it changed the way students look at themselves and the skills that they work on. It helps significantly with them taking ownership of sharpening and improving their skills before the final evaluation. Using mobile devices to create effective online videos is also working in other departments. “Our speech teacher is saying the same thing,” said Chalese. “Students are seeing their own skills ‘live’, right now, and can adjust their performance immediately.”
Combined with Knowmia’s robust, yet simple screen recording, faculty can choose how much interaction they want to include in their video content, and make it work in their current course flow.
“You can capture another video and include that in your lesson,” said Chalese. “You can put your own spin on it, add graphics to it, put your voice on it, even interject your face [with a webcam]. It’s a great tool to share information in a variety of ways. Whether you have a video lesson or a class update, TechSmith Knowmia is robust and versatile. There are so many different things that can be done with it!”
Faculty also love the autonomy – they can use Knowmia on any computer or mobile device, and without download support from IT. “Being web-based is awesome. Being able to switch from whatever computer or device I need to without having to have a recorder downloaded is awesome. Having access to the file management system from any computer, tablet, or phone to work wherever I’m at is incredibly helpful.”
Instructors also like being able to choose how much recording they will do and when it makes sense to customize content. “Between Techsmith Knowmia, Snagit, and Camtasia, you can do anything. You can edit a picture, edit a video, upload media, and even grab educational content from YouTube.”
Ready to see online course success similar to the colleges in this blog? TechSmith Knowmia’s ease of use, accessibility, powerful analytics, and unparalleled customer service are why TechSmith is the market leader according to Frost and Sullivan and the Campus Computing Project.
Learn how TechSmith Knowmia can help increase video adoption, student engagement, and student outcomes at your institution, including migration services to help transition your existing content.
Whether you are training employees or teaching students, it can be hard if you rely too much on text.
Have you ever had to sit through a boring presentation for a class or compliance training?
It’s awful.
We’ve all been guilty of creating text-filled presentations.
But it can be difficult to effectively communicate this way when you’re not seeing people face-to-face and have fewer individual interactions with them.
If you want people to listen and understand what you have to explain to them, you have to make it interesting.
To help bridge this gap, you need to create images and videos to help others learn a new topic, product, or skill.
That way, you’ll have both audio and visual instructions to help people of all learning preferences pick up on your material faster and more accurately — and they’ll actually enjoy it.
In this post, we break down the best ways to use images and videos to educate others.
Here are three of them:
1. Keep visuals purposeful and relevant to your audience
If not done correctly, visuals can potentially distract from rather than clarify information for your viewers and leave them confused and overstimulated. Images and video should work to simplify the concepts you’re teaching and make learning faster and easier for audiences.
Don’t just place images or videos into your lessons for the sake of having something colorful. Each visual should have a clear purpose and enhance the learning experience for your viewers.
Not all visuals work the same way for all audiences. It’s important to tailor your content to the specific needs of your viewers in a way that makes learning the material as clear and efficient as possible.
For example, if you’re creating an online course or walking viewers through a product, you wouldn’t use the same visuals and instructions for your beginner lessons as your advanced lessons.
Both groups will require different levels of explanation and terminology.
In fact, you’ll likely need to create two completely different sets of visuals and corresponding instructions. Make sure that you take each audience’s unique situations and perspectives into account.
Remember to avoid wordy slides: that’s the fastest way to lose interest. Which Excel tutorial would you rather click through?
Odds are, you chose the first one.
“We’re in a bullet-point using, emoji sending, Instagram scrolling, ever-distracted society. We are an image society these days, and people want to see it quickly and they want to move on,” says Kati Ryan, founder of A Positive Adventure.
Moral of the story? Keep slides short and sweet.
2. Use different visual elements throughout your course
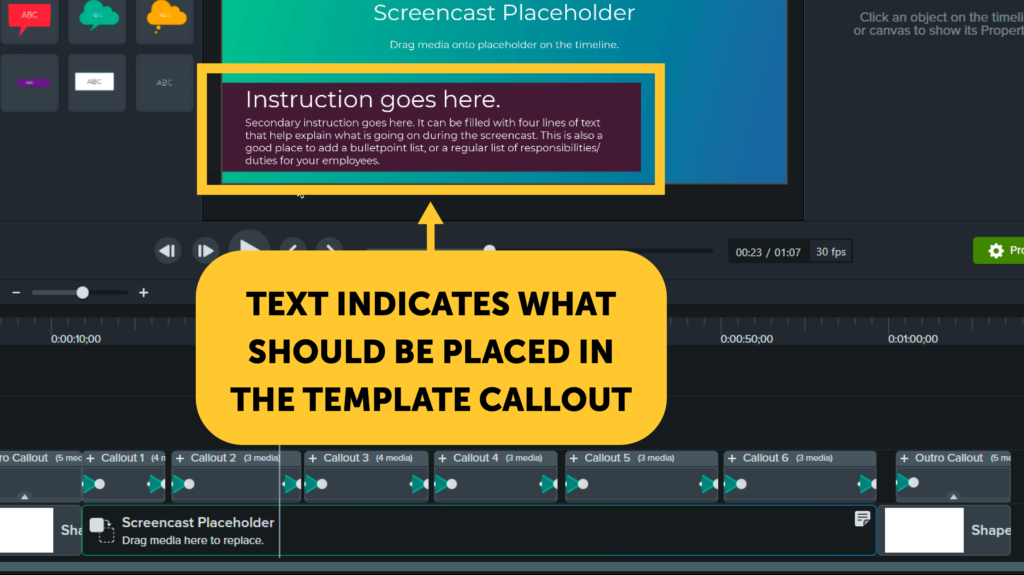
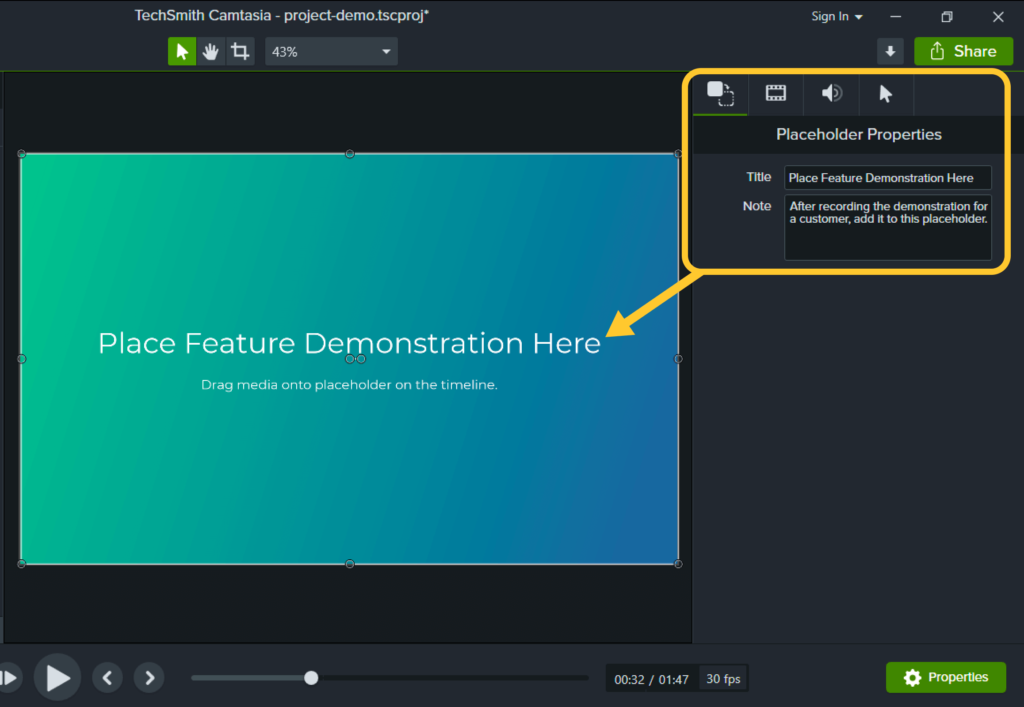
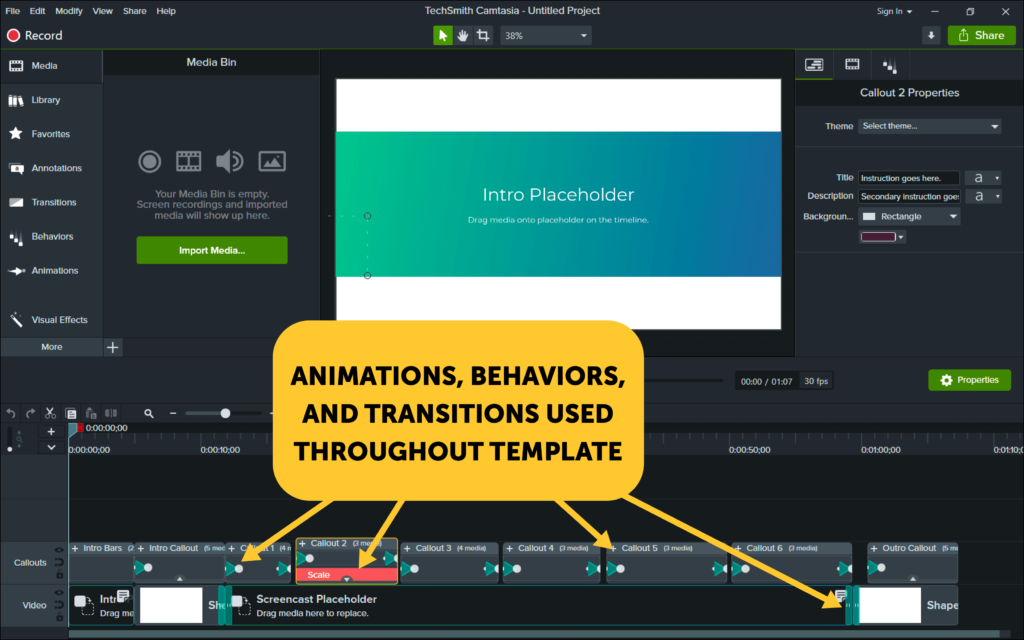
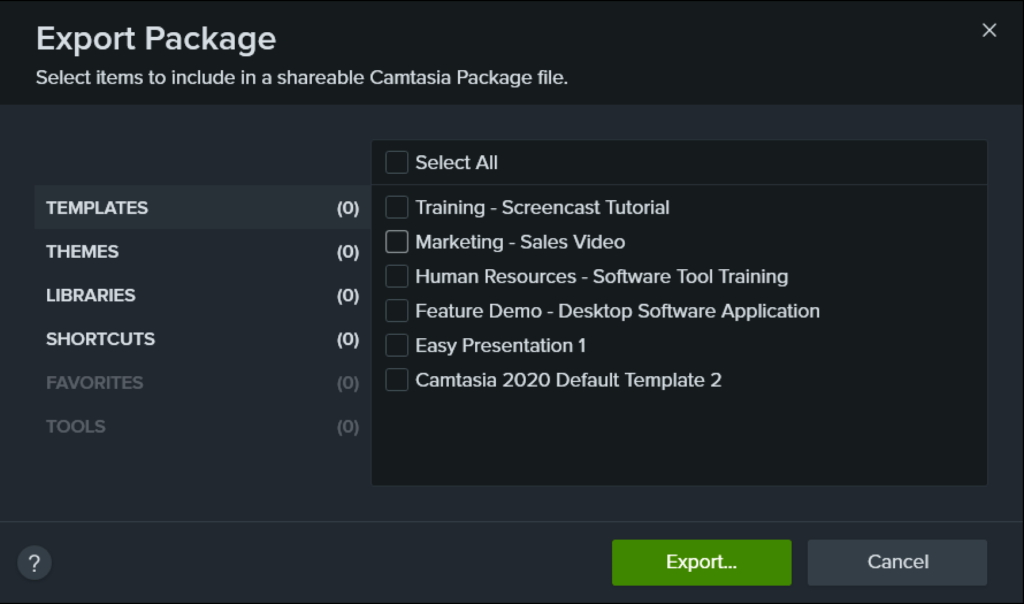
Not sure what to include in your image or video elements? We’ve got you covered! Here are a few ideas to get you started.
Image and video templates
Creating how-to content or tutorials can be made much easier with templates. All you have to do is pop in new information and add it to your presentation.
This is especially useful if you’re an instructor for multiple topics or courses and need to quickly update presentation information. Just swap out the text or elements from the previous walkthrough and insert the information for your current one.
That way, you don’t have to worry about the little details of each slide anymore: they’re pre-created for you! If you don’t want to create your own templates or need some help starting out, TechSmith Snagit and Camtasia offer great image and video templates for everything from basic walkthroughs to online quizzing.
Animated GIFs
As people become busier, it’s the author’s job to make sure that created content is scannable and easy to follow. Nobody likes long, drawn out instructions.
GIFs are being used more frequently than ever in professional and learning environments to convey information.
GIFs are easier to follow than a series of still images.
Animated GIFs are easier to create than a polished video (and have less expectations from your audience).
GIFs play automatically.
You can explain a process without any narration.
You can use GIFs to answer questions, give comparisons, demonstrate processes, provide entertaining answers, and more.
The good news is that it’s never been easier to get high-quality GIFs. You can use sites like GIPHY and Tumblr and get premade, ready-to-roll GIFs. Those are great spots to go if you want to add a quick GIF to your lecture or presentation, but if you want a custom GIF to show something on your screen, you can even create your own animated GIFs.
Bonus Elements
You can also consider color coding or fun patterns to sort your information. That way, your viewers will be able to easily remember the topic you’re on and easily organize their note taking.
3. Include yourself in the content
The goal of using images in your presentations is to engage your audience and help them learn more efficiently. Studies show that people learn much faster and have better retention when provided with both visual and audio information.
A good way to frame your audio content is by thinking about your audience’s experience as much as possible. How would you want to be taught the information? It’s likely that you’d respond well to some more personal touches.
You don’t have to have a “great voice” to make great audio. Just be yourself! Viewers will appreciate the authenticity and engage more with your content.
For an extra personal touch that will really help boost engagement, consider including your webcam in instructional videos. People are more engaged and learn better when your face is visible to them.
You’ll also be able to showcase your personality and be spontaneous with recordings to make them more memorable.
Additionally, webcam recordings help with accessibility: those with hearing impairments or watching in a room with background noise will be able to read your lips and better understand your messaging.
As always, make sure to provide captioning for any images or videos that you create!
Not sure how to record your screen? We can help with that! Here is a step-by-step guide with detailed instructions to get the ball rolling.
Bonus! Focus more on learning than cool effects
With all the amazing technology out there for video creation, it can be easy to get lost in the movie making aspects of video production and ignore the learning part.
Remember that your top priority is education, not entertainment.
Even if a visual isn’t ‘red carpet ready’ in terms of effects, if the information is clear and presented in a memorable way, viewers will much prefer it to a heavily edited but confusing piece of content.
While throwing in some cool transitions and effects here and there can help make your content stick in viewers’ brains, don’t get hung up on the flashy options your software provides. Focus on providing viewers with clear, memorable instructions that will set them up for success.
Video is the fastest, most effective, and efficient way to highlight new product features, provide quick and easy customer support, or teach someone a new skill or concept.
Your customers and colleagues don’t want to wade through wordy documentation or how-tos. They want to quickly and easily grasp new concepts and get on with their lives.
And video makes that easy.
But how do you know you’re doing video right?
We analyzed nearly 100 great instructional and information videos to see what made them great.
And we found five essential (and easy!) elements you can add right now to make sure your videos are the best they can be.
What we did and why we did it
In the research for our ebook, Video Viewer Habits, Trends, and Statistics You Need to Know, we asked survey participants to submit examples they believed were great instructional and informational videos. In all, we received nearly 100 submissions!
Using a common rubric to ensure we looked at the same things and assessed the videos in the same ways, a team of TechSmithies then watched and analyzed all of the submitted videos to identify common elements.
But why did we do it? We already had a wealth of information from our survey that detailed viewing habits, viewer preferences, demographic information, and more.
Record professional videos with Camtasia
Camtasia’s features make video recording and editing super easy
The answer is simple: To see what real people thought about real videos.
It’s one thing to ask people about their habits and preferences, it’s quite another to see those preferences play out in the videos they choose to view.
Remember, we didn’t choose these videos, our survey participants did. These are the videos they identified as great. We wanted to see if we could pick out the things they had in common to help you, the video creator, identify ways you can make your videos better, more engaging, and more effective in 2020 and beyond.
Some of it was surprising and some of it wasn’t.
But most importantly, all of it reinforced what we already knew: Your videos don’t need to be perfect to be effective.
With the right tools, anyone can create useful, engaging, and powerful videos, no pro-skills required.
What makes a great video in 2020?
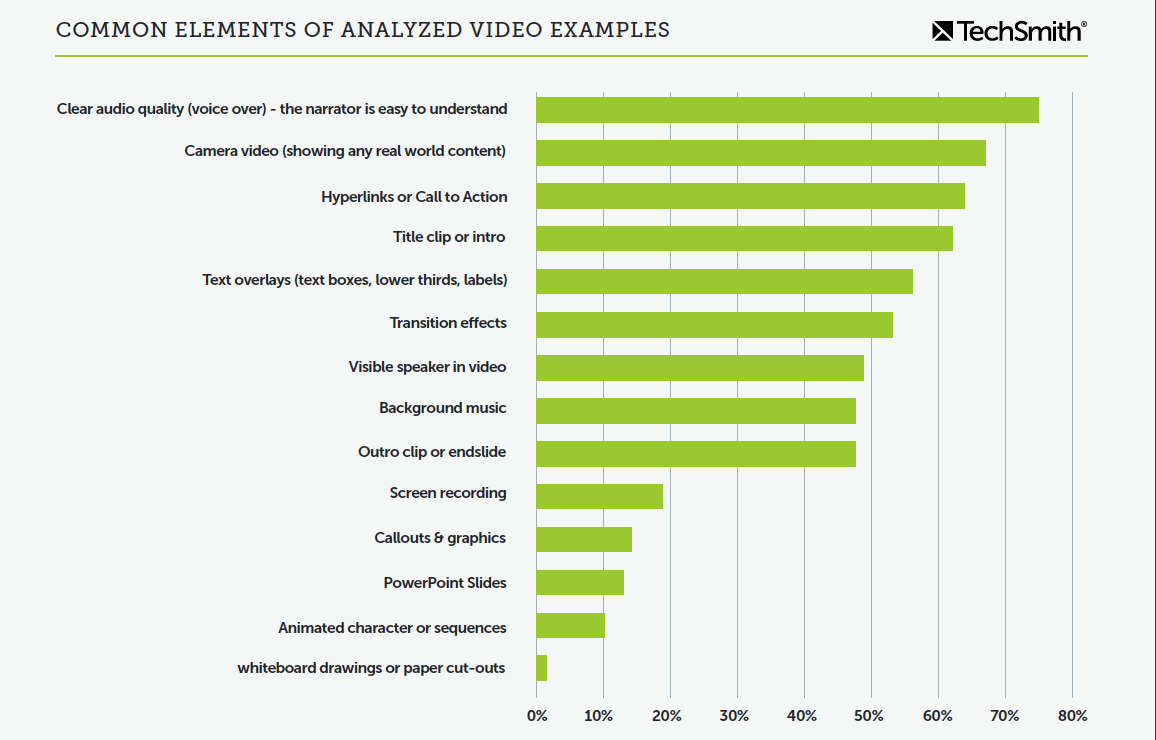
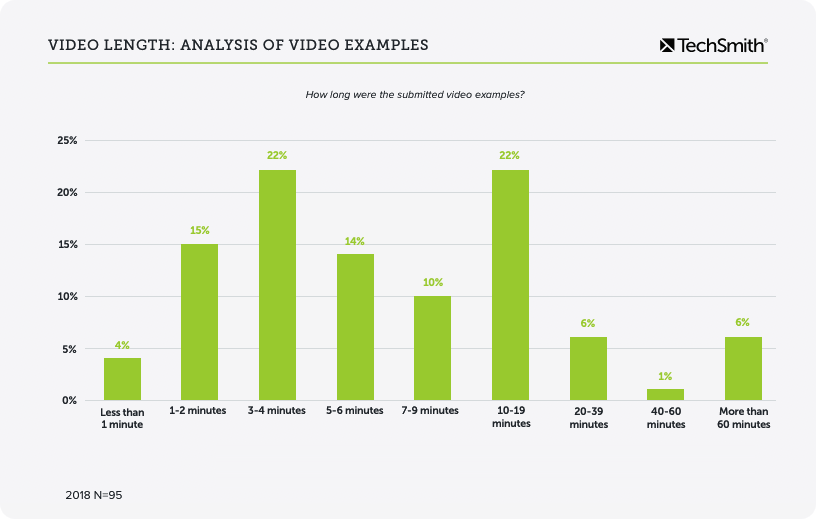
The chart above illustrates the most common elements of the nearly 100 videos we analyzed. It’s not exhaustive, but it shows some interesting data.
For example, PowerPoint Slides is relatively low on the list, showing up in just over 10% of the videos. This is especially telling because many informational and instructional videos use PowerPoint and other slide presentations to relay important information.
That doesn’t mean you can’t include a slide deck in your video, but you may also want to think about what other elements you can include to increase interest and engagement.
In fact, that’s really the point. This list isn’t about making sure you include one (or all) of these elements to make your video better. Your true goal is that viewers enjoy your videos enough to watch until the end and get the information they need.
Including all these elements is a field-tested way boost your video engagement.
1. Proper video length
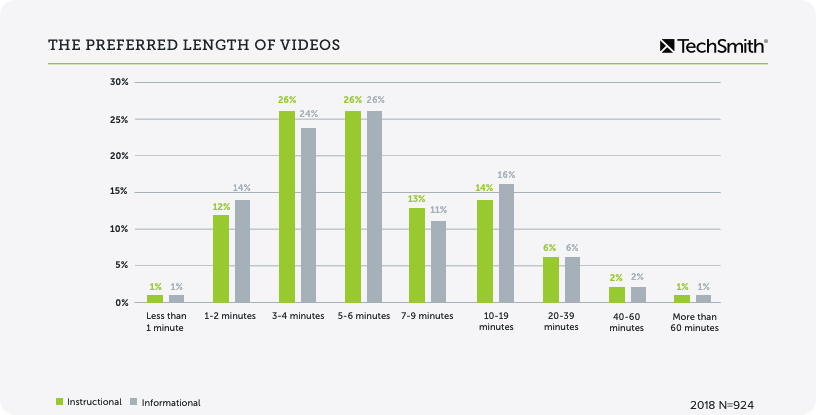
For quite some time, the conventional wisdom about video length has been “the shorter the better.” And, that’s mostly true. The vast majority of the videos we analyzed — 92% — came in under 20 minutes. But deeper analysis found some exceptions to the typical advice.
While it’s true that people generally prefer videos less than six minutes in length, this chart shows an appetite for videos that are considerably longer. In fact, people preferred videos that were 10 to 19 minutes long just as much as the three to four minute ones.
So why the seeming discrepancy?
Because asking about the ideal video length is the wrong way to frame the question. It’s not about what length is best for all videos. It’s about what length is best for each video.
In other words, you want to ensure your video is the right length to accomplish its goal. For some topics and audiences, a longer video works great. For others, shorter is better.
It’s called right-sizing your video. Don’t try to do too much and don’t try to do too little. Just like Goldilocks, you want your video length to be “just right.”
Want to make a great video? Make sure you have great audio. A whopping 75% of the videos we analyzed had clear and easily understandable voiceovers. But that’s not all. Almost 90% of the videos that submitters rated four or five stars for “how accurately did the video achieve its goal” and “how did you personally rate the video” had clear audio.
While our research didn’t show that people will stop watching a video for poor audio quality, it’s clear that good audio helps a video perform better overall.
But how can you be sure your voiceover is the best it can be?
The short answer: Get a microphone.
While your computer’s or smartphone’s built-in microphone works for video calls, etc., to ensure your audio quality hits the mark, invest in a stand-alone mic. Luckily, you don’t have to break the bank to get a decent microphone. Even a cheap standalone mic will likely outperform a built-in one.
Oh, and don’t forget about music. While it’s not nearly as important as clear voiceover audio, nearly 50% of the videos we reviewed included music either at the beginning and end or throughout the whole thing.
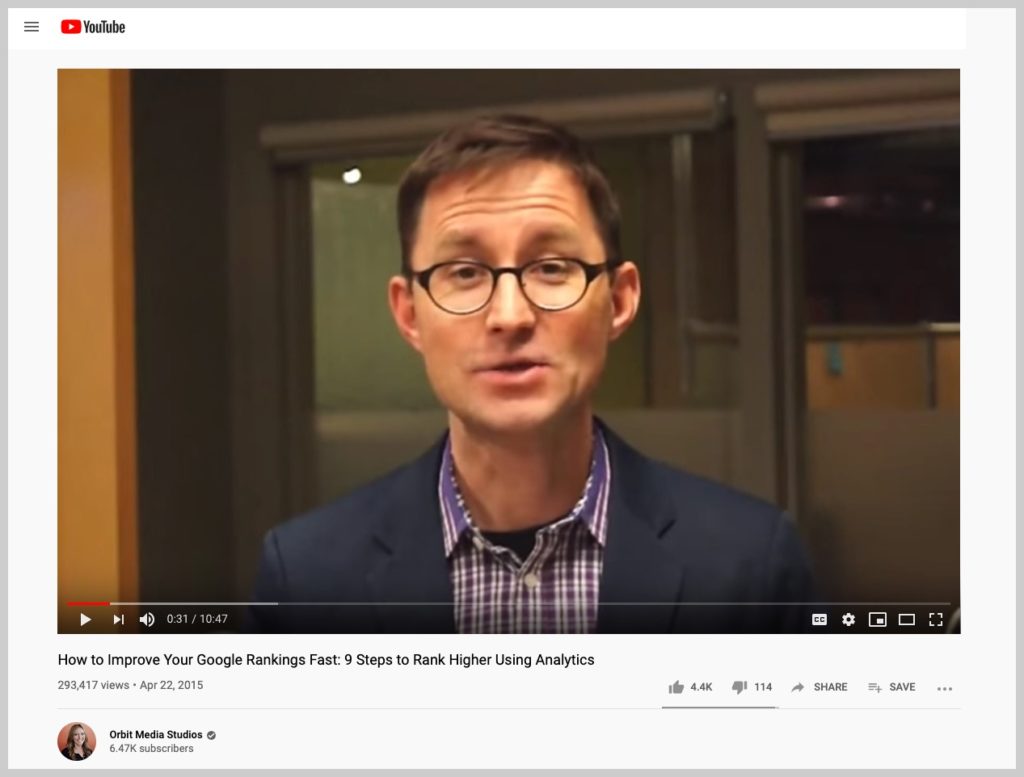
While a screen recording can enrich software demos and training videos, other types of instructional and informational videos benefit from camera video. In fact, more than 70% of the videos we reviewed had real-world video included somewhere in the clip.
Camera video is great for showing how your product works, demonstrating a physical process such as how to perform CPR, showing a physical space, and more.
Remember, you don’t need a fancy camera to shoot great real-world video. Your smartphone is almost certainly enough for most applications.
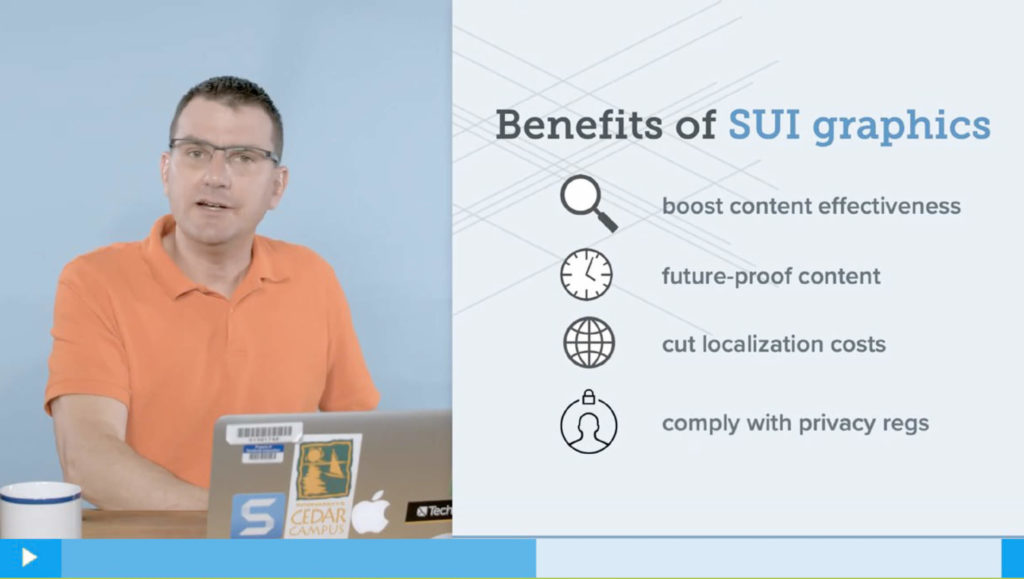
Even if you don’t need to show the real world, adding a friendly face to your video also greatly increases engagement and interest for your viewers.
Nearly half of the videos we analyzed had a visible speaker at some point.
Don’t worry if you’re a bit camera-shy. The speaker doesn’t have to be you! Feature one of your subject matter experts to help put a face to the message.
Nearly 65% of the videos we analyzed contained an intro clip or title card.
An intro clip or a title card at the beginning of your video can provide good information to help anyone watching the video understand what they can expect. They also add a touch of professionalism, branding, and consistency.
A title card also gives you a nice frame to use as your video thumbnail.
Pro tip: Keep your title card or intro clip as short as possible. One to three seconds should be long enough.
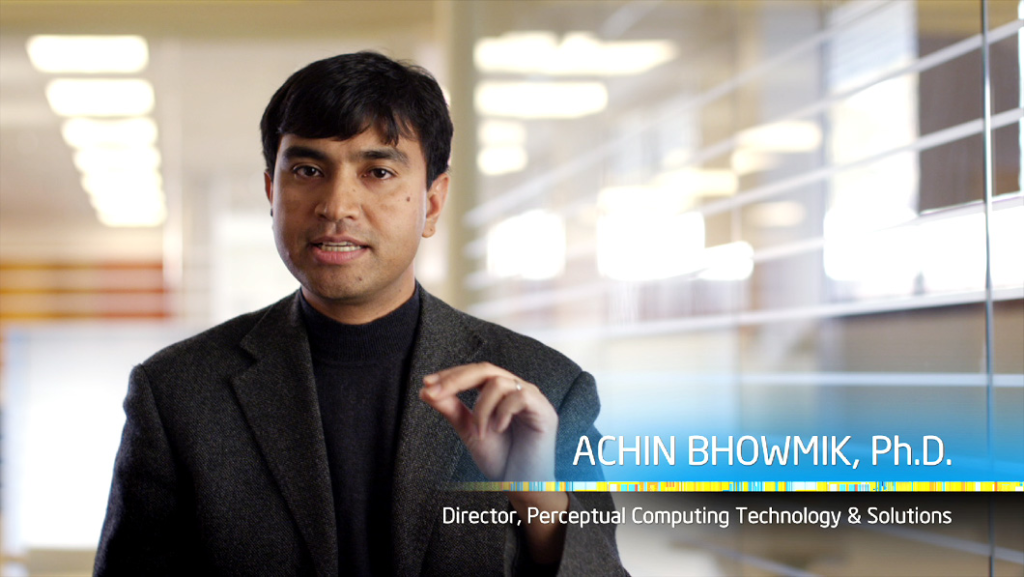
Viewers also benefit from further context and information during the video. Text overlays, including information such as warning signs, part numbers, instructions, and the name of a speaker can add interest and provide valuable information to help viewers learn the most from the content.
More than 55% of the videos we analyzed included this kind of text information to provide more details. Graphical callouts, including arrows, icons, and highlights that are placed within the video, are also an effective tool to direct attention and provide context to viewers and learners.
So they watched your video. What’s next? What do you want them to do? Do you want them to continue their learning experience with the next video in a series? Can they go somewhere for more information or to buy your product?
Tell them!
It’s not always clear to viewers what they should do after watching your video if you don’t let them know.
Add a call-to-action to instruct the viewer to watch a related video, take a quiz, fill out a worksheet, download related resources, or actively apply the knowledge in the real world.
More than two-thirds of the videos (64%) we analyzed included such a call to action, giving viewers clear direction on next steps or where they can learn more.
Keep in mind, depending on where you host your video, you may not be able to link to other content from within the video. Instead, you can put your links in the video description and refer to it in the video.
It’s time to take your videos to the next level (and it’s way easier than you think)
Video is essential. And, even the most rudimentary videos can be much better than wordy and hard-to-follow documentation, learning materials, emails, and more.
But, by analyzing nearly 100 great instructional and informational videos, we learned a ton about what makes them great and why they were so effective.
Best of all, it shows once again that you don’t have to be a video pro to create pro-quality videos. Take advantage of what we learned to help take your videos to a whole new level.
Your viewers will retain more the information they need and they’ll be more likely to come back for more!
Record professional videos with Camtasia
Camtasia’s features make video recording and editing super easy
Ryan Knott is a Marketing Content Strategist at TechSmith, where he creates content about easy, effective, and efficient video creation, editing, and tips and tricks, as well as audio editing for creators of all kinds. He/him.
As you are quickly working to shift your courses online, you face numerous challenges. Engaging students can be difficult in remote settings, and you might not be experienced in online teaching.
So, what are your options as an educator when moving courses online? To engage students, it’s imperative that you go beyond basic discussion boards and bring additional tools to your remote classroom.
Video is a key tool in remote learning.
But there’s a problem.
Video can be intimidating. Especially if you’ve never made one before.
Luckily, there’s a way you can create consistent videos for your online courses without being a video pro: video templates.
Templates are easy to edit and can be customized for each new lesson, unit, or project. Best of all, you don’t have to start from scratch. Simply download or create the template, add in your content, and publish to your course.
We put together a list of five video templates that can help engage students in your online course material.
Record professional videos with Camtasia
Camtasia’s features make video recording and editing super easy
Video templates are pre-built video projects that allow you to quickly edit individual pieces rather than start from scratch. You can pre-make them for later dates when you need to quickly and easily pop in your information with a consistent look and feel.
Here is how to use video templates in Camtasia
The five video templates you can download for your online course
1. Intro/outro
Using an intro/outro template is especially helpful if you juggle multiple courses at once. That way, you can easily edit your intro/outro slides to fit the course you’re creating content for. Simply pop in the course title and any additional information you’d like to include.
You can also include some information about yourself, such as professional background or hobbies, and a photo of yourself.
This will help students see you as more personable and will humanize their online learning experience.
This type of video is a perfect way to signal to your students that it’s time to switch gears and begin a new topic or unit. By using a template for these videos, your students will associate this content with a shift towards new material and prepare themselves for the next step in your course structure.
This is also a great placeholder for a quick webcam video.
A new topic/unit video is a great time for instructors to share enthusiasm about the upcoming section of the course. It’s also an opportunity for you to go over what’s going to be expected or learned in the new unit.
Regardless of the specific structure you use, it’s important to remember that this is a great time to connect with students, which is incredibly important when teaching a remote course.
Use this template as a go-to for any video lesson slide.
Here, you can easily pop in any text, images, or links of your choice and not waste time creating new structure and backgrounds for each individual slide. Plus, you can add fun transitions or elements to keep your students engaged.
Remember to avoid hour-long lectures.
Try to shorten your videos and make them interactive. It can be hard to keep students engaged, and shorter clips are easier to focus on (and faster for you to produce and caption).
Make sure you also include a placeholder for your webcam. This will help students see your facial expressions while you talk through the material, which can help improve their understanding.
This template is great for when you need to demonstrate to students how to use a tool or piece of software. Ideally, your how-to template will have smooth transitions that make it easy for students to follow the directions that you’re giving.
This template can also be used for course navigation videos, where you show students where to locate important information on your course page, such as the syllabus, assignments, etc. Again, make sure your webcam is visible so students can understand you more easily.
One of the best ways to engage students during your online lectures is by inserting quizzes. Having a quiz template ready to go makes it much easier for you to frequently use this method as a way of engaging students and keeping their attention during presentations.
Make sure that your template includes an intro slide to let students know that it’s time for an assessment, slides for the quiz questions, and places to fill in the answer options.
Looking to quiz students directly within a video without creating a new template? TechSmith Knowmia and Camtasia feature the ability to create quizzes as pop-ups within videos for fast and easy quiz creation.
The shift to online learning is a challenge, but that doesn’t mean that your courses have to be less engaging.
With video templates, you’ll be able to consistently create content that will keep your students’ love for learning strong, no matter where they are.
The world may be changing, but the need for engaging, interactive education isn’t slowing down.
With quality course content, you’ll break free from the boring, repetitive nature of plain lecture slides and videos and play an important role to help your students progress as they transition to online learning.
For engaging video templates that will help you create your own online course templates, check out the TechSmith Camtasia asset library.
Record professional videos with Camtasia
Camtasia’s features make video recording and editing super easy
During this unprecedented time of remote learning, creating effective, engaging online courses can be challenging.
Educators are quickly moving to adapt courses to online platforms, but because the shift has been so sudden, many struggle to engage students and provide interactive resources in a remote learning environment.
One of the best ways to provide engaging, remote learning experiences is to use video.
When content is provided as a video, students can consume it on their own schedule. Then, scheduled, online face-to-face time can be used for discussion, questions, and other interactions that are more conducive to synchronous delivery.
So, what kinds of videos are best to create for your online courses?
We put together a list of 7 types of videos you can easily create for your online courses that will grab (and hold) your students’ attention — no matter where they are.
1. Intro video
It’s always helpful to share an introductory video at the beginning of any online course. It’s often a quick and easy video to create, and it can be incredibly helpful to students. Use this video to introduce yourself and explain the class syllabus, schedule, goals, and expectations.
It’s also a great opportunity to share some fun facts about yourself and your background. This can help you seem more “human” and accessible to your students, which can be harder to do when teaching in a remote setting. Sharing what makes you a unique individual can jump-start a student’s interest in the course material and cultivate a strong teacher-student relationship.
2. Course navigation video
It’s important that students understand the online course organization and how to access the materials you’ll be sharing with them. This video should cover how to navigate to the course calendar, where to find the syllabus, where to submit assignments, and other commonly used online pages or tools for your course.
The more in-depth your online course navigation video, the fewer repetitive questions you’ll get from students about where to find materials.
3. New week, topic, or unit video
This video is your opportunity to give students an overview of what to expect in the coming week, topic, or unit. Students appreciate knowing what to expect and will feel more connected to you and your online course if they’re consistently made aware of the course content and schedule.
This is also a great opportunity for you to express your excitement about the upcoming material. It can be tough to engage with students during an online course, so sharing some highlights can really help. Tell students what you’re looking forward to teaching, perhaps even including some cliff hangers. These previews can help to facilitate and maintain a personal connection throughout the duration of your course.
4. Walkthrough videos
Consider making simple how-to videos to accompany online course materials or assignments. There’s no need to get dressed up or go all out with production — students will respond best if you seem more personable and approachable. In fact, some informality is encouraged!
“Students don’t really care if I make a mistake, have a bad hair day, or sneeze on video,” says Tracy Schaelen, Distance Education Faculty Coordinator at Southwestern College. “They want to see me —the real person, not a professional spokesperson.”
Here are just a few suggestions of what to cover in your walkthrough videos:
Syllabus
Course Schedule
Lab procedures
Project or report details
Using class discussion forums
Submitting assignments
Taking quizzes and assessments
Due dates, timelines, and other goals
5. Assignment and project feedback videos
Rather than sending students written feedback, consider recording it as a short video. That way, you can explain your markups and comments about an assignment and give students a better understanding of how they can make improvements. It’s also a great opportunity to give extra demonstrations or explanations for a particular student if you observe a repetitive error.
Students taking online courses will appreciate the additional time and effort you made to connect with them. This personalized and conversational feedback will help them feel valued and engaged with your course.
6. Student-created videos
A great way to involve students in your online course is by including them in the video-making process! Asking students to create videos rather than submit written assignments encourages creativity and adds to their digital skill set.
Consider having your students create welcome videos of their own, or even video responses to a discussion thread. This can increase student-to-student engagement, which can be very difficult to foster in a remote setting.
7. Concise video lessons
Video lectures are the backbone of any effective online course. Your students rely on these videos to learn course material and understand the topics of discussion.
Rather than recording hour-long lectures of yourself simply talking over presentation slides, try to shorten your videos and make them more interactive. It can be hard to keep students engaged, and shorter clips are easier to focus on (and faster for you to produce and caption).
Show your face! While you can record just about anything on your screen, it can be a really nice touch to include your webcam, too. Adding interactive components, such as quizzes, can also help engage students and make them feel more involved with your online course.
You’ve got this!
We’re all feeling the stress of shifting to remote work, but that doesn’t mean learning has to stop or become less effective.
And now, you don’t have to be overwhelmed by creating videos, either.
With the information shared here in mind, you can easily start creating high-quality and engaging videos for your students.
Need more tips on creating effective and engaging online courses? Read more here:
As online and distance learning continues to grow, it’s more important than ever to make sure instructors know how to create quality online courses, including custom videos.
Faculty who are new to video need guidance on how to use new technology and connect with students online, while tech-savvy instructors can find new ways to make their online courses more engaging.
Training faculty to create quality online courses, however, can be challenging.
Overcoming barriers in technology, workflow, student-instructor relationships, and mindset all come into play.
From colleges across the country, here are strategies and techniques to help get all your faculty to create quality online courses.
How to Train Faculty to Use New Video Software
With numerous schedule and research obligations, it can be tough to motivate instructors to learn yet another new software tool. It really helps to provide training options for different learning styles and preferences, so each instructor can self-serve as much as possible and pick the method that works best for them to learn the software needed for quality online courses.
Provide readable and watchable instructions (plus FAQs)
Create clear, written directions with high-quality screenshots. Create video tutorials, screencasts, and other instructional videos. Both the readable and watchable versions should show faculty where to click for each step, and what to do next.
Including visuals is key. According to new research by behavioral economist Dr. Alastair Goode, two-thirds (67%) of employees are better at completing tasks when information includes text with images (screenshots) or video than by text alone. House instructions in an intuitive place – preferably, in your LMS or other hosting location that is near where they’ll be making their own quality online courses.
Make training relatable with webcam
Include your face from your webcam when recording training videos. Researchers from MIT and the University of Rochester in the United States found people pay more attention to videos with a ‘talking head.’ Insert webcam footage as picture-in-picture, or toggle between the webcam and screen when demonstrating steps.
Video training is also a great way to reach out-of-town instructors. “Many of our adjuncts aren’t local in Odessa, they are all over the United States,” explained Jennifer Lee, Web Design and Instructional Technology Specialist at Odessa College in Texas “It’s easier to reach adjuncts with video – record workshops and put them in BlackBoard.” Include a table of contents, so faculty can quickly click through topics to watch or re-learn content.
Explain the entire workflow across tools (not just each separate tool)
One of the most common errors when training instructors is showing faculty how to use each digital tool, but not the overall workflow across all tools. Once they record their video, what file type should they save it in, so it’s an acceptable file format for the Learning Management System (LMS)? How do they go back and make changes once a video is saved? Make sure to include enough instructions about every step along the way.
Work with what you have (but plan to get integrated video)
It’s worth saying that one of the keys to successful training is to start with a video platform that is easy to use in the first place. Being able to create and view videos within the system faculty already use (LMS, etc.) is one of the single biggest things you can do to increase faculty adoption.
At the University of Colorado Denver, administrators didn’t see broad adoption until they made their video platform work with their LMS. “It wasn’t until we installed the LTI integration into all of our Canvas courses that faculty usage really took off,” explained Alex Karklins, CU Online Academic Services Senior Professional. Boise State University had a similar experience. They saw much greater adoption after making the switch to an easier-to-use lecture capture system.
Skip all-university invites
Instead, train select groups at a time. Training by department, unit, or other work-related group lets faculty learn in a familiar setting with people they know (as opposed to a huge group of people from all departments who they may not know very well).
“We found that some users who were uncomfortable using new technology were a little more open to trying it if they had friends/coworker who were also going to be trying it,” explains Jennifer. This also lets you provide specific instructions for each department’s particular software programs and workflow (such as nursing faculty who use their smartphone to capture practical skills).
Where do I host training?
Host training in a place that replicates the tools (internal network, or other department-specific system) they’ll need when they’re on their own. Computer labs are great for this. You can also provide dedicated recording areas, or just have faculty meet anywhere and bring their laptop.
Plan for online-only training, too
Remote instructors need more than just on-demand instructions. Record a hands-on workshop session and include it along with written and watchable instructions, as the core training package. When they need assistance, record just-in-time video responses to their questions, and share with the entire remote group.
One-on-one, case-by-case
A smaller percentage of staff will need one-on-one assistance. Plan for this ahead of time – budget the resources to meet with them about their specific questions.
Odessa College offers these personalized training sessions as a final approach to onboarding. “These sessions are usually short and focused, but the faculty seem to find them very helpful,” explains Jennifer. “For many of them, once we show them how easy it is to create that first video, it boosted their confidence a great deal (and even got them excited). They started doing more and more on their own with less guidance from us.”
Some instructors philosophically resist new technology. They’re a challenging set to turn around, however, they are usually a small group. Provide specific examples of how quality online courses will benefit their department and them, professionally and personally. Remind them that technology amplifies the instructor’s importance within a course (not the other way around). Sometimes the best progress happens slowly. Leif Nelson, Director of Learning Technology Solutions at Boise State University, explains that it doesn’t always happen all at once. “There’s definitely a step approach to get people used to what’s possible with technology.”
Pro tip: Employ your rock stars
Faculty who have been creating quality online courses for a long time can be great promoters of your new software system. Encourage these ‘rock-star instructors’ to mentor other faculty to create their first videos.
How to Train Faculty to Build a Quality Online Presence
Now that faculty know how to use the technology-side of things, it’s time to tackle the next step – the elements they’ll need to build quality online courses.
With the right strategies, instructors can interact with online students, be attuned to their questions, and give personalized feedback, all while measuring participation and comprehension. Here are time-tested components you can guide faculty to include when they begin creating quality online courses.
Recommended as the first video to create and share in any online course, this lets faculty introduce themselves and talk about goals for the course. Plus, instructors can share a bit about what makes them unique, so students get to know them right away.
Tracy Schaelen, Distance Education Faculty Coordinator at Southwestern College, provides a basic welcome video to all her online students.
Course navigation video
In this video, faculty can cover common questions such as ‘Where do you go to find the syllabus?”, “How do I submit an assignment in the LMS?,” and “Where is the lab schedule?” Instructors will notice fewer repetitive questions being asked about course logistics, contact scenarios, and office hours (virtual or in person).
One Odessa College nursing instructor created a quick smartphone video when her blended learning students had trouble locating her on campus. It walked students through the labyrinth of office hallways to get to her door. “It was different, but people loved it because it showed she’s a real person,” said Shawn Shreves, VP of Information Technology, Odessa College. “It made it personal.”
New week, topic, or unit video
Faculty can share their excitement about what’s coming up, so students know what to expect for the unit or week, and feel connected. It sets the right tone for a quality online course, and starts building a personal connection, from the beginning.
Ryan Eash introduces week two of his EDU 651 online course, walking students through what to expect.
When they don’t like the sound of their own voice
Not being comfortable with their own voice is a common complaint you may hear while training faculty to create quality online course videos.
When Stephanie Entringer began recording videos at Southeast Technical University in South Dakota, she was hesitant. “When I was new, video freaked me out. No-one likes to hear themselves.” Soon, she realized that her voice helps build a unique relationship with her online students, and any perceived imperfections weren’t anything to worry about. “We’re all human. It doesn’t have to be perfect.” Encourage them to not only accept their voice, but let their personality shine as they build quality online course content.
Walk through documents
Direct instructors to create personalized ‘explainer’ videos to go along with core course documents (assignments, etc.). These work best as informal, off-the-cuff clips; frequent and personable.
“Students really don’t care if I make a mistake, have a bad hair day, or sneeze on video,” says Tracy Schaelen, Distance Education Faculty Coordinator, Southwestern College. “They want to see me—the real person, not a professional spokesperson.” Instructors can walk students through:
Syllabus
Course schedule
Lab procedures
Project or report details
Due dates, timelines, and other course goals
Assignment and project feedback videos
Instead of writing assignment feedback, have faculty record their feedback as a quick video. Instructors can record a video of themselves explaining notations in a marked-up written essay, narrate their response to a report or practical skills assignment, or walk through how to correctly do a calculus equation. Students love this type of individualized, conversation-style feedback as part of quality online courses.
Student-created videos
Whether it’s to create a video essay response on literature, prove a complex theorem, or record a group lab project in a blended learning course, tasking students to create their own video assignments helps foster creativity about the subject matter and build digital skills. Faculty can also have students create their own welcome videos, or video responses within discussion threads or forums, for increased student-to-student engagement in a quality online course.
Be responsive
Lastly, it’s hugely important that faculty are reachable and respond quickly to student questions. Huss and Eastep’s study of college students found that students expect email responses from their instructors within 12-24 hours.
In addition to email response times, guide faculty to proactively communicate with students weekly or several times per week, turn around assignment feedback as quickly as possible, and share quiz scores promptly.
How to Train Faculty to Create Engaging Core Course Videos
A huge part of quality online courses are personalized video lessons. Simply assigning PowerPoints, textbook reading, or other written lessons just isn’t enough. Video is essential to bridging the digital distance between instructor and students.
Aim for short, concise video lessons
Instead of recording hour-long lectures at the podium, encourage faculty to create shorter video lessons (around 10 minutes each, or less, according to a study from MIT and University of Rochester) for quality online courses. These mini-lectures are easier for students to comprehend, keep their attention much better than a full-class-length lecture, and make it easier to rewatch topics for test prep.
Faculty can record anything on their screen, right from their own computer – presentation slides, documents, webpages, or any other documents. Or, they can hand-write equations for calculus, physics, and more, right on their screen, as if they are writing on a blackboard.
It’s easy to see why students learn the function of a hydrogen fuel cell more easily with narration and the above image, as opposed to with words alone.
Direct faculty to:
Use colorful visuals that help students understand concepts (as opposed to only words, or simple icons)
Include images, graphs, and diagrams
Include their face from their webcam (picture-in-picture, or switch back and forth)
Use words sparingly on presentation slides
Compared with a podium lecture, instructors have more control of how they present video lessons in quality online courses. They can use colorful visual aids to make their points, which are often difficult to use effectively in a big lecture hall, as well as music, backgrounds, animations, green screen, and more, to make topics easier to learn.
Pro tip: Bring in content from the web
In addition to their own video lessons, faculty can harness educational video content from YouTube and other places to help demonstrate course concepts. Also known as “bookend-ing,” instructors can add their own introduction clip (to preface the external content) and outro clip (to wrap up what’s been learned), as a supplement to their core lessons.
Using their existing smartphone, tablet, or another mobile device, they can capture labs and practical skills in healthcare, chemistry, culinary, and more.
Instructors at Mott Community College use the power of video to teach hands-on applications, as seen here by health science professor Heidi Clippard.
Make room for discussions
Have faculty include ways to discuss topics with students, and for students to discuss topics with each other. Discussion boards, forums, and email threads can all work for this within quality online courses. Here’s a few ways to keep discussions lively:
Ask open-ended questions (avoid “yes” or “no” questions).
Have students add their thoughts to discussions regularly, or set minimums to spark interaction.
Faculty can have students lead discussions.
Have students record video responses to questions, and share with the class.
Use chat or messaging apps, live video cams for group discussions, and video commenting.
Carl Weckerle, Online Learning Director at Macomb Community College in Michigan, is focused on retention and success in online classes. “Anything that enhances that idea of social presence, especially for online students, would be beneficial. It’s an area of growth for us and I think for online in general, and for community colleges in general.”
Regardless of the method, it’s imperative that faculty are active in class discussion, checking in often, asking meaningful questions, and stirring more conversation.
How to Train Faculty to Measure Quality Online Courses
A crucial component to quality online courses is measuring student outcomes. Are students learning? Are they showing up consistently?
Participation
Video viewership is a clear way to gauge basic attendance and ongoing participation. Guide faculty to track (and grade) each student individually regarding:
Who watched each video
How much they’ve watched
When they’ve watched
At Odessa College, instructors monitor viewing percentages to measure online participation and to help identify at-risk students. “We need to know when those students are struggling, when they’re not watching a video, or when they blow a quiz in BlackBoard,” said Shawn. “All that data just gives us more information so we can provide a much quicker response.”
Direct faculty to include quiz questions directly in their video lessons, to measure learning early and often. Scores can go directly into instructors’ LMS gradebook, and can work for any subject or major of study. Have faculty:
Embed quiz questions within their videos (as opposed to have a quiz only at the end). This lets the faculty make sure students are actively watching the entire video – they can’t just press ‘play’ and walk away.
Ask a mix of choice-type questions and open-ended (essay-type) questions. Quizzes can be formative, summative, qualitative, or quantitative. They can be multiple-choice, true/false, fill in the blank, or open-ended.
Tie grade points to quiz results. Tracie Lee, Lecturer in the College of Business and Economics at Boise State University, has found that students won’t take optional quizzes. Instead, she scores them as part of their participation/attendance grade. “Short videos with embedded quiz questions let students interact with the material and get instant feedback on their understanding of a concept,” said Tracie.“It’s amazing how their scores on the video quizzes track how they will do on their exams.”
As seen in Tracie Lee’s Business Statistics 207 video above, interactive quizzes throughout measure student comprehension while increasing engagement in the lesson.
Faculty can also do survey/polls after each video lesson to see how many students grasp a specific concept. All of these metrics together show instructors which students are doing well, which ones are getting by, and which are struggling.
Student Feedback, Perception, and Retention
Encourage faculty to gather feedback early and often on the effectiveness of their quality online courses. What are they hearing from students? Faculty can ask for student feedback:
At the end of each video and/or video lesson (What did you like about this video? What helped you learn the best?)
At the end of each week, unit, or theme
Mid-term, or before exam prep
At the end of each course
The goal is to ask for feedback often, learn from all feedback, and adjust instruction accordingly.
Ideally, you want an LMS and video platform that allows you to create and share accessible content and includes accessible navigation, screen-reader-friendly web design, playback, and more.
When training faculty to create quality online courses, have them include:
Captions for each video – These can be translated by a third-party, automatically generated by your video platform, or written in by hand. An easy-to-use, web-based editor is a huge help to make corrections that are ADA-compliant.
Clear titles and descriptions for course videos, syllabus, written assignments, and other materials, so screen readers can navigate the material.
Verbal descriptions of anything they are displaying on video (charts, graphs, medical diagrams, etc.), so that visually-impaired students can learn the concepts.
Next steps
We hope this has been helpful in sparking ways to train your faculty on the technology needed to create quality online courses, the course elements needed, and the mindset for building a quality online course that engages students.
You’ll find the methods that work the best for your faculty and staff, and can continue to iterate as you find the best way to do things for your institution.
Editor’s Note: This post was originally published in 2018 and has been updated for accuracy and comprehensiveness.
If you want a simple, repeatable way to make videos for your audience, video templates are the answer.
The reason is simple: it’s always easier to “edit” than it is to start from scratch — even if you’ve worked with video before.
As you or your organization look to create more videos, you face a new set of challenges:
One person can only produce so many videos.
New video creators need to get up to speed.
Teams need to maintain a consistent look and feel in their videos.
The dreaded blank canvas.
If you want to make consistent videos (and not spend a ton of time on them) the simple solution is to create video templates.
Templates are helpful because they can be designed for a purpose. A company might have one template IT uses to train employees on new software, another for HR policy updates, and a third used to share quarterly sales data. And templates allow those departments to create quality videos in minutes, not days.
What makes up a video template?
Video templates can be made up of a few different elements, which generally fall into the four following categories:
TechSmith Camtasia 2020 comes with one sample video template. Open the sample template by choosing New from Template in the welcome window.
If you’re already in Camtasia, access the templates menu by going to File > New Project from Template and the templates menu will open.
You can download more, pre-made templates from TechSmith Assets for Camtasia, where there are a number of free templates.
A premium subscription offers even more video templates along with access to hundreds of thousands of video assets like intros, outros, stock footage, images, and music.
How do you make your own video template?
A great way to create a video template is to use a video project you already have or customize a template downloaded from TechSmith Assets for Camtasia.
Here’s how to create a video template in three steps.
Step 1: Choose a video or download a template from Camtasia Assets
The first step is to open a video or video template in the Camtasia editor.
Recently I created a video to show off a project I’ve been working on. The video was a perfect format for future demos. Even better, it could help other members of my team quickly create demos for their projects.
You can see the video project below. It has an intro and outro, both of which I downloaded from TechSmith Assets for Camtasia, with narrated screen recording in between. A perfect outline for future videos.
Step 2: Add media placeholders
To quickly turn this video into a template, there is one key step to take: replace the screen recording with a placeholder. This is done by right-clicking any piece of media on the timeline and choosing Convert to Placeholder.
Alternatively, if you want to add a brand new placeholder, instead of converting already existing media, right-click anywhere on the timeline and choose Add Placeholder.
A media placeholder indicates a space on the timeline where a video, image, graphic, or another form of media should be placed. Once added, a placeholder can be treated like any other piece of media on the timeline.
All someone has to do when creating a video from the template is drag and drop their media onto the placeholder. Camtasia automatically expands or trims the clip.
After adding placeholders, it’s helpful to clean up the project by deleting any unnecessary files in the media bin. For example, I deleted my screen recording from the bin. The rest of the media I left because I want it to be part of the final template.
Step 3: Save and export a Camtasia Template file
The final thing to do is go to File > Save as Template and provide a name for the template file. This saves the template in Camtasia on your computer.
To produce a template file to share, go to File > Export > Template… and name the file.
Camtasia exports a Camtasia Template file, known as a CAMTEMPLATE. Send the file to colleagues or place it in a shared location. All they have to do is download the template file and double click. Camtasia will add the new template to their templates menu, where it can be selected any time.
The Camtasia template file works on both Windows and Mac, so no worries about sharing between different platforms.
Two tips for making even better templates
Now that you’ve seen how to quickly make a video template. Here’s how you can make your templates even better.
1. Add instructive placeholder text in annotations
When you make a template from an already-existing video, all of the content that you have in the project when you save it as a template is included. That means if you have text written in annotations or callouts, it will be the same in the template as it was in the video.
Make your templates even more helpful by writing in annotations or callouts exactly what someone should put there when they create a video.
2.Customize placeholders
Placeholders are a super flexible tool for individual and collaborative video creation.
When using placeholders in your templates, it’s helpful to utilize the Title and Note attributes found in the Properties panel.
Just select a placeholder on the timeline, navigate to the Placeholder tab in the Properties panel and add a title along with any notes you want to include.
Whatever is placed in the title will appear in the preview on the canvas before media is added to the placeholder. For example, if you want screen video about a particular process or feature in a specific placeholder, you can say that in the title and notes.
Go beyond the basics
Templates can be as simple or as complex as you like.
In many cases, a simple template with just one or two placeholders will do the trick. In time, though, your team’s ability to produce videos and the demand will increase. Templates let you and your team create a variety of consistent styles that can be used for the right situation.
Here are a few things you can do to get creative with video templates.
Use multiple placeholders in a video template
There’s no limit on the number of placeholders you can have in a template. For example, take a look at this template.
Using multiple placeholders creates a flexible template that can display different features. Include scene changes or show where different recordings or pieces of footage should be placed throughout a video.
This makes it possible to collaboratively build videos. Camtasia projects can be saved with placeholders still empty. One team can place their content in an assigned placeholder, save the Camtasia project file, and send it on to the next team to add their footage.
Use all of Camtasia’s features in templates
There’s nothing you can do in Camtasia that you can’t do in your video templates. Add animations, annotations, text, transitions, you name it.
You can even add effects, behaviors, and other elements to placeholders and they’ll be applied to the media or annotations added to the placeholder.
Share multiple templates (and more), all at once
Sharing one template is dandy. Giving your team a quiver of templates to work with is a downright superpower.
Camtasia Packages, a new feature of Camtasia 2020, let you share everything someone needs to start creating videos with the right style, look, and feel.
Export a Camtasia Package by going to File > Export > Package…
Camtasia Packages are an easy way to make available to your team everything they need to make great videos. Include templates, favorites, themes, libraries, shortcuts, and more. All in a single file. They just download, double click, and everything is installed in Camtasia. Like magic for video creation.
Get professional-looking videos with less effort
The beauty of Camtasia’s video templates is that they don’t just speed up the creation of almost any video. They make it so any video can be made to look clean, professional, and attractive. Even new and novice creators can do it.
There is no need to spend time messing with intros and outros, getting the timing just right, and choosing all the perfect annotations. A well-crafted template takes care of all of this, with just some footage or screen recording, a few text tweaks, and then production.
Make your own video with a template!
Ready to get started? Download Camtasia 2020 and start creating your own templates today.
TechSmith has helped millions of first-time digital content creators create and share images and videos across corporate and academic settings.
There are easy changes you can make to incorporate videos, screencasts (a video recording of a screen), screenshots, and images into your communications workflows to help maintain business and academic continuity while transitioning to full-time distance learning and remote work.
Use this list of resources as a guide to help you transition to effective remote work and learning environments.
How to Prepare for Remote Work with Asynchronous Video-Based Discussions
Learn how you can effectively use asynchronous communication to communicate without needing a face-to-face meeting.
How to Flip Your Meetings (With Video!)
Learn how to get the most out of your meetings by flipping them with video!
A flipped meeting will save time and improve performance for your entire team. Snagit makes it easy to record your information ahead of time so everyone can come to the meeting prepared.
Other Resources
Blog Posts
The TechSmith Blog provides actionable tips and expert advice to anyone who wants to create and share images and videos for better training, tutorials, lessons, and everyday communication. Not seeing what you’re looking for above? Browse our blog for other topics or reach out to us on Twitter or Facebook where we can provide quick responses to your questions.
Learn more about Snagit or Camtasia, and boost your knowledge of general visual content creation. We offer various webinars each month aimed at making you a better creator.
We get the question all the time: “What’s the ideal length for a video?”
It makes sense. Grabbing and keeping a viewer’s attention is challenging, and creators want to be sure they aren’t making videos that are too long (or short).
The thing is, there is no ideal length for all videos — no one video length to rule them all.
But, viewers definitely have a preference.
How long should instructional videos be?
The majority of viewers want informational and instructional videos to be less than 20 minutes, with a preference toward the 3-6 minute ranges.
And when we analyzed over 50 of our tutorials to measure our videos’ engagement and found that the average length of our tutorials is 3:13.
Ultimately, the ideal length of a given video is determined by the content and the target audience. The optimal video length for a YouTube video is different than a Facebook video.
Every video has its own perfect length. Some times you need a long video. Other times you need a short video.
The key is finding the sweet spot.
But that doesn’t mean there aren’t ways to ensure each video you make is the right length.
New Research: Video Statistics, Habits, and Trends You Need To Know
Learn how to create instructional and informational videos that get watched.
The default answer you hear about video length is that shorter is always better. And, while that’s a good notion to keep in mind, it’s not quite gospel.
That’s not really surprising — and it’s in keeping with the notion that shorter is better.
But, that’s not the whole story. The next highest preferred length was for videos in the 10-19 minute range. This strongly suggests that people will watch longer videos if the content is what they’re looking for.
The research also analyzed nearly 100 videos that participants identified as examples of “great videos.” Of those, 22% were in that 10-19 minute range — the same percentage of those videos that were in the three to four minute range.
The verdict? People will watch longer videos, and they’ll even identify them as “great.”
So, if video length isn’t the best way to determine whether your video will be successful, what is?
Content is (still) king
As I noted in a recent post, coming at your video with a length in mind is, in many ways, putting the cart before the horse.
Think of it like cooking. The amount of time you need depends on what you’re making. You can’t make a homemade baked lasagna in 10 minutes and you don’t need three hours to make a box of macaroni and cheese.
The dish determines the length of time it takes to cook.
Similarly, your content should inform the length of your video.
Before creating any piece of content (not just video), ask yourself two questions:
1. What do my viewers need to know? 2. How can I best cover this topic in the most efficient and useful way?
Then, create a video that does that. That may seem simplistic, but using the tips and information highlighted in this post, you can turn those questions into a winning formula for determining the best length for your video.
When we ask about the perfect video length, what we’re really asking is, “How can I keep my viewers’ attention long enough to give them the information they need?”
We all know attention spans are shrinking, but that doesn’t mean it’s impossible to keep someone watching.
Turns out good content is still effective — we just have to provide it!
The number-one reason that people stop watching a video has nothing to do with the video length. In fact, 83% of the people we surveyed will continue to watch a video if they’re genuinely interested in the topic.
So the first step in keeping your audience engaged is to know what they’re looking for. You want to know these things:
Who is my audience?
What problem are they trying to solve?
What are their goals?
What will they need from me to accomplish those goals?
What is their skill level?
Then, figure out the goal for your video based on the answers to those questions. How can you address them in the most effective and efficient way?
When you know what your audience needs and how to address it, you can plan your video accordingly.
But be careful. If you’re anything like me, when you have something you’re excited about, you want to talk about it at length. To everyone.
It can be the same with your content. You’re excited to share your knowledge, so it’s natural to want to share ALL of it. But remember, you want to create a video that addresses a specific problem or topic. Make sure you create a video that does that and nothing more.
That doesn’t mean the other information isn’t important. It just means that you’ll want to share other information with other videos. No one ever said you had to make just one video. Make as many as you need to address as many topics, problems, pain points, etc. as necessary.
How to get their attention (and keep it)
So, now you know that video length isn’t the reason people stop watching videos. But, how do you keep them watching? Give them what they need and expect.
People stop watching a video because they didn’t get the information they expected. Whether your video is a minute long or 30 minutes, if your viewers don’t get what they came for, they will click away.
Be sure your video’s title accurately describes what your viewers will get when they watch. It’s tempting to use click-bait to get people to watch, but what good is that if they drift away after 30 seconds? And, once you’ve burned them, they’re much less likely to come back for more.
Additionally, here are a few things to keep in mind if you want to grab and keep your audience’s attention:
1. Be interesting
Use storytelling techniques and/or an engaging speaker/voiceover to help even dry topics seem less boring. You can also try adding some personality to your video by featuring a real person speaking.
Include practical, real-life examples your viewers can easily apply and be sure to make extensive use of good visuals like images and icons to illustrate your concepts.
2. Be funny
Who doesn’t like to laugh? Humor can be a great asset to keep viewers engaged and entertained. But, be careful of being silly or too off-the-wall, which can make your content seem less useful.
Also, be wary of humor for international audiences. What may be funny in one culture can be bland (at best) or offensive (at worst) in another.
3. Use plain language
Use familiar, everyday language in your script. One of the biggest mistakes we make when we’re trying to teach a new concept or show someone how to do something is use language terminology, or jargon that is unfamiliar to the audience.
Using big words and long, drawn-out sentences may seem scholarly, but it can come across as pompous, out of touch, and even just confusing.
Bonus tip: Video quality isn’t a game-changer!
One thing from our research that may surprise you about keeping and engaging viewers: Video quality was not a common reason for viewers to stop watching a video.
In fact, only about 5% of viewers listed poor video quality as the main reason they stopped watching a video.
At five years old, the video still ranks well and has nearly 300,000 views!
Remember, good content trumps perfect production. You don’t have to be a video pro to make great videos.
There’s no such thing as the perfect video length
Video creators spend a lot of time wondering if their video is the right length.
While video length IS an important consideration for creating great instructional and informational videos, the real question to ask is, “How can I best cover this topic and drive value for my viewers?”
Then, plan your video to achieve that specific goal.
New Research: Video Statistics, Habits, and Trends You Need To Know
Learn how to create instructional and informational videos that get watched.
Ryan Knott is a Marketing Content Strategist at TechSmith, where he creates content about easy, effective, and efficient video creation, editing, and tips and tricks, as well as audio editing for creators of all kinds. He/him.
The following session was presented at Educause 2019 by Vince Kellen, Chief Information Officer (CIO), University of California San Diego; Orlando Leon, CIO, California State University, Fresno; Helen Norris, Vice President & CIO, Chapman University; and Phil Ventimiglia, Chief Innovation Officer, Georgia State University.
To serve a growing and diverse student population, Georgia State University takes on more than its share of digital innovations in higher education. For Phil Ventimiglia, Chief Innovation Officer, achieving greater efficiencies is a must to provide the best experience across campus.
“We have to leverage technology,” Phil said. “There just aren’t enough people and staff to provide students everything they need otherwise.”
Easily record your screen with Snagit!
Snagit is the ultimate tool for recording presentations, creating video tutorials, or sharing quick updates.
Now named one of the most innovative universities in the United States, it’s not surprising that many of Georgia State’s changes qualify as digital transformation (DX). Phil, however, knows no single term can convey the multi-faceted layers of work needed for lasting change.
“The term ‘digital transformation’ itself is meaningless other than for marketing an ongoing concept in a new package. Innovation is a continual process,” he said.
Chapman University Vice President and Chief Information Officer Helen Norris holds a similar view. Mostly, Helen wants to make sure the term goes beyond the current buzz to communicate the full magnitude of its impact, and prefers a more universal term.
“I would focus more on innovation than digital transformation,” she noted. “With digital transformation, it sounds that tech is leading. Instead, strategy should be leading. Specifically, it should be rooted in the strategic plan of the university.”
Protect new ideas, together
As the third-fastest-growing research university in the country, Phil sees everyone at Georgia State contribute to an innovative mindset.
“You can’t say that some people are innovators and some are not,” he explained. “Everyone in the organization has to be focused on innovation.”
To that end, Georgia State encourages all faculty and staff to work together on new ideas. “We have a DNA within our university to experiment, to try new things,” he said. This often includes working cross-departmentally on challenging projects. “We have to step out of our silos. We work very closely across all areas.”
The teamwork aspect is especially important. “Innovation cannot be owned by anyone,” Phil said. “In my experience when you try to have one person drive innovation, it’s like having someone run up against a brick wall. Collaboration is what is true, and what works.”
“Innovation is a tricky thing,” he confessed. “Not everyone likes to do innovation. Some like to do it, and they shouldn’t.”
Sometimes, the opposite is also true, he explained. “Some innovate, and don’t know they’re doing it.”
For example, although not their goal, faculty who launched a new Cloud Optimization Center found that the pilot inadvertently turned up some groundbreaking new information and processes.
To avoid human nature’s tendency toward status quo, new ideas often need extra support.
Presenting at Educause 2019, from left to right: Orlando Leon, Chief Information Officer (CIO), California State University, Fresno; Phil Ventimiglia, Chief Innovation Officer, Georgia State University; Vince Kellen, CIO, University of California San Diego; and Helen Norris, Vice President & CIO, Chapman University.
“Putting innovation on the agenda is important,” Vince emphasized. “Sometimes the best innovations need extreme defense and protection. Sometimes other parts of the organization will try to kill that innovation.”
Vince also noted that, if not supported from the top-down, sometimes change agents themselves fall into the target as well. For change to survive, it’s important to defend it while it’s young.
“The people doing the innovation need the protection,” he counseled. “We shield them from the instincts of the organization to either execute [innovation] too early, or kill it.”
Relationships as resources
In some ways, smaller universities have an advantage when it comes to transitions. Helen noted that smaller environments can be more agile.
”You don’t have the same amount of bureaucracy to get the same things accomplished,” she explained.
Part of this dexterity comes from more well-established human connections. “Because you’re smaller, you personally know half of the faculty,” Helen said. “You can leverage those relationships as you do innovative things and create change.”
There are disadvantages to being at a smaller organization, though. “You have a smaller staff,” Helen noted. “You just don’t have the resources to do some of the fun things. So you do partnerships with vendors and others in the community.”
Vince cautioned that larger institutions have a similar mixed-bag of pros and cons, when it comes to digital transformation.
“We have the illusion of more resources at a larger university,” he said. “But innovation is ‘garage band’ stuff.”
With more than $1.4 billion in research funding per year, there are a lot of other distractions, and it can be hard to grab faculty’s attention. You have to find points of collaboration and know your faculty to promote lasting changes. Ideally, it can translate to an opportunity for the faculty or staff, to make their experience better, or better for their students. “Having relationships with those faculty is key,” he said.
Orlando Leon, Chief Information Officer, California State University, Fresno, agrees, but emphasizes the importance of campus leadership willing to take some risk.
“Digital transformation needs to be top-down and bottom up,” Orlando urged. ”It’s got to start somewhere. You’ve got to be able to lead this level of change.”
Even amidst resistance, it’s important to rally support, even if it means starting small. “Partner with colleagues,” Orlando advised. “You don’t have to start with jumping over the moon.”
Complexities with change
A key up-front challenge is to not chase after all the new digital solutions available. Although tempting, it often results in using a shiny tool for the wrong thing.
“I think everyone gets enamored with the technology and fails to understand that the complexities are enormous, Vince explained. “All of ed tech is consistently underestimating the last 10 percent of support needed for digital transformation.”
For projects that do make the cut, having a solid IT team helps. Phil noted that Georgia State typically does 40-50 new integrations per year, and that their strong IT team allows them to quickly integrate new technologies.
Similarly, a strong IT team can keep everything else running smoothly at the same time new systems are being installed. “Core systems still need to work,” Orlando said. “I encourage our teams to do all our core functions well.”
IT’s meta challenge — rework its own foundation
Higher education must scale an undeniable tech ‘hump’ to truly be in a great place for the digital transformation of today. Vince noted that getting rid of mainframe systems can be a huge leap forward.
“The biggest digital transformation is within IT work itself,” he said. “That will be moving from a ‘homebrew’ software engineering environment to DevOps, namely we’ll be managing data and analytics and no longer doing software development.”
Cloud services allow better focus on other program goals as well. “Undergraduate growth is a priority,” Vince said. “There are interesting strategies we’re putting together online.”
Phil noted that Georgia State focuses on the student perspective, aiming to make the entire student journey easier. “We’re dedicated to making a place where students can succeed,” he said.
The human element of change
In all types of process transformations, face-time with faculty is a necessity.
“In spite of the fact that it’s digital, the human touch is really important,” Helen explained. “You need to work digital projects hand-in-hand with the faculty who will be impacted.”
Supporting already-busy faculty ensures they have the intellectual and emotional incentive to go through tough change in the first place.
Phil agreed, noting that with most innovative changes being done not by research faculty but full-time faculty, his goals include welcoming those efforts in a way that matters to instructors. He wants to ensure instructors have help to work through issues. “We want to give them more support. When there are stumbling blocks, they need the time to go work through that,” he said.“We need to make sure we’re not penalizing risk.”
The human aspect is critical. “How do we make sure we’re shining a spotlight and they’re getting credit for the great work they’re doing?,” Phil asked. “Ultimately, we want them to have rewards and to progress their career.”
Vince agreed that nurturing the motivation to change is a fundamental component to encourage faculty to adopt new ways of doing things.
“How do humans commandeer tech to serve their social biological instincts?,” he asked. “Because that’s really what’s going on here. To keep the humanistic element and work from there.”
Transforming students with new digital skills
Phil notes that successful digital transformation should foster the next level of digital literacy in students. Albeit openly amenable to try new digital tools, the challenge is to provide the best tools and activities for each degree program.
“How do we get students ready to compete in this 21st century economy?,” he asked.“As leaders in higher education we are in the fourth industrial revolution and it’s fundamentally changing higher ed. We’re already seeing these glacial shifts. How we deliver teaching and learning is changing.”
For example, after launching a digital literacy pilot in the honors college, Georgia State students completed a visualization project using Tableau/mapping software to help them better understand the significance of a historical event. The university is exploring digital literacy paths that include experiential learning, project-based learning, and real-world projects in partnership with organizations within Atlanta. Phil sees an obligation to help usher in this change.
“It’s a continual wheel of how we move the needle,” Phil said. “How can we continually up-level students’ skills so they’re not just competitive, but they’re ahead. As the tech leaders, it’s incumbent on us to be that thought leader and ask how we can serve those students better to be successful in this new world economy,’” he said.
In Fresno, students at California State University are working with a wellness bot, doing interdisciplinary learning, and teaming up with pre-K12 students to study blockchain. Particularly in their geographical area, familiarity with digital tools can potentially make a big difference to these students.
“These skills are great. Only 11 percent of jobs in the valley require a four-year degree,” Orlando explained. “Our students need to be ready to avoid being replaced by automation.”
Working on the administrative IT side of things, Orlando tries to make it easy for instructors to know about new tools and resources — and awareness is growing.
“We find that faculty didn’t know they had this support,” he said. “Our capability to change and do things is increasing.”.
Better data to improve outcomes
Already, digital transformation has put processes in place that collect strategic information and use it to the advantage of student outcomes. Phil commented that Georgia State has seen a significant increase in graduation rates.
Notably, his team used data to help figure out which class times are most needed, and then determined how to optimally distribute classes to best use the prime time.
“We keep looking at what is the next piece we can look at, to get that next half-percent of improvement,” he said.
Change happens slowly
Vince said that not all changes will happen quickly, and that’s okay. While some things have changed significantly, others — such as face-to-face meetings — remain the same.
“Compared to the combustion engine for farmers, which led to 1,000% increased productivity, the digital transformation in higher ed is much more nuanced,” he said. “There’s digital infusion, but a lot of modest steps forward.”
A step-approach to change is another good way to set expectations. “Think of the SAMR model,” said Orlando. “First you substitute digital for paper-based. Technology is there today, you just have to do it.”
Perhaps most importantly, for all digital transformations, ensure everyone understands the true role of technology is to use data and systems to amplify the best parts of higher education.
“I see this as similar to what’s happening in retail,” Phil said. “There was lots of hype that all brick and mortar will go away. Instead, we see companies like Amazon building a physical presence. Digital has increased the value of retail, so it’s extended the relationship with the consumer.”
The same is true in higher education, as it expands possibilities in teaching and expands the choices of students.
As far as how to be successful with digital transformation, it takes many people working together toward the bigger picture. “It’s not *one* thing you need to do for DX success,” Phil noted. “It’s hundreds of things.”
Easily record your screen with Snagit!
Snagit is the ultimate tool for recording presentations, creating video tutorials, or sharing quick updates.
But, what happens when there’s something in the screenshot you don’t want to share? Meet the blur screenshot tool.
Once you start using screenshots, they form a helpful routine that makes it easy to be clear and concise. As you use screenshots more and more, it’s important to have a set of tools that allow you to identify what is important in an image. You don’t need fancy image editing tools just to blur an image.
Additionally, you will run into times when there is content in a screenshot that you’d prefer not to share, but cannot be completely removed. When this happens, it shouldn’t stop you from using screen captures.
There are many ways to hide or de-emphasize content in a screenshot. My colleague, Dayna, has an excellent post detailing some great ways to do this. She suggests blurring out undesirable portions of images. Most high-quality screen capture software has a tool that lets you blur out part or all of an image.
Here are five ways TechSmith employees use blurring with their screenshots.
Get the best screenshot blur tool
Snagit is high-quality screen capture software that lets you blur your images. Try it today for free!
Our tech support team does awesome work every day, providing chat, email, and phone help to our users. This work requires them to take a lot of screenshots. Often, the screen grabs include email and other account information.
Our agents use Snagit’s blur tool to remove personal information, like their email address, from a screenshot.
In the screenshot above, one of our techs needed to show a user how to change an account setting on Screencast.com. He was able to blur out his email address and display name without the capture losing any of its context or meaning. Pretty sweet.
One of the most important parts of our software building process is listening to our users.
We run beta tests, communicate with user groups, conduct surveys, and maintain a feedback community, among many other input-gathering strategies. While planning new features, we make sure everyone working on our software has heard the voice of our users.
To do this, we create resources and share them throughout the team. The names or information of individual users, often collected in surveys, is not necessary to include. So, we usually blur it out.
The screenshot below is from a spreadsheet containing user feedback with the ‘email address’ column blurred out.
3. Remove unnecessary information
Sometimes the reason for blurring isn’t about hiding identifying or sensitive information.
Instead, there is irrelevant or unnecessary content that you want to de-emphasize. This is a tactic one of our trainers uses to direct the focus for example screenshots.
He grabs an image to include in a presentation and then blurs out the parts that could distract from the subject. In the screenshot below, he blurred text that was not pertinent to what he was explaining.
4. Use blur to highlight
I’ve talked about how blur tools can hide information. But blurring also can be used to emphasize a particular part of a screenshot or video.
By blurring out the unimportant parts of any image, you can draw a viewer’s eye to a particular section of an image or video. This technique is useful when you still want to maintain context in your screenshot.
In this example, I’ve blurred the rest of the interface in order to draw attention to the menu in the upper left.
5. Progressive reveal
When explaining a complicated interface or diagram, some people like to use blur to do a progressive reveal of portions of an image. This is a great tactic in slide decks and presentations.
It also works well in step-by-step processes. By blurring parts of the image, you can be sure the people you’re presenting to know exactly what part of the interface or image you are talking about. Below is a GIF I created to show how a progressive reveal can be done with a screenshot.
There are tons more ways to use blur in images. Download Snagit to start capturing images and try out the blur tool for yourself!
Get the best screenshot blur tool
Snagit is high-quality screen capture software that lets you blur your images. Try it today for free!