


Did you know that human beings can make sense of a visual scene in less than one-tenth of a second?!
You did? Well, in that case, it’ll come as no surprise that including images and screenshots throughout your content will make it easier for your audience to quickly understand the information you’re trying to convey – whether that’s on a slide deck or a Microsoft Word document.
So while some people might say a picture is worth a thousand words, we’d say that when you’re trying to efficiently present information that’s easy to understand, pictures are worth a lot more. (But, with cool tools like scrolling screenshots, you can literally capture 1,000 words in a single image!)
Now, with the world of modern digital technology constantly changing, anyone who uses screenshots regularly will know that they can quickly become outdated. Does that mean you have to discard and retake each one of your screenshots? Well, you could, but we have a better idea.
Instead of spending lots of time retaking screenshots as and when you need them, you might find it easier and quicker just to update them. In other words, you simply need to know how to edit a screenshot.
In this article, we’ll take you through the basic steps of screenshot editing. So rather than asking yourself “How can I edit a screenshot?” the next time an image becomes outdated, you’ll rest assured that you can edit screenshots quickly and with ease.
Edit your screenshots – fast and easy!
Download a free trial of Snagit to quickly and easily keep your screenshots up to date.
How to edit a screenshot?
You’ll be glad to know that editing screenshots is a wonderfully simple task – it’s certainly easier than retaking them! So now, let’s take a close look at some of the steps of how to edit screenshots.
Choose a screenshot editing tool
First, you’ll need to choose a screenshot editing tool that best suits your needs.
This might sound like the easiest step of editing screenshots, but the truth is, it could be one of the most difficult. Having to choose between the wide range of basic built-in tools and more advanced third-party software can be overwhelming.
Whether you’re a technophobe or a tech pro, we’d recommend using a tool like Snagit, which is easy to use for beginners but comes packed with advanced tools for more discerning users.
For the context of this article, we’re going to explore some of the ways in which you can edit screenshots with Snagit – though it’s worth noting that this is more than just a screenshot editor.
Don’t worry if you don’t own Snagit yet. A 15-day free trial is available to new users, so you can still download it to follow along with the steps below and play around with its features to decide if it’s right for you.
Ready to Embrace Asynchronous Communication?
How do we have fewer, better meetings? We decided it was time to reboot our meeting culture and communication norms at TechSmith.
Update the UI in your screenshot
Snagit’s smart move tool allows you to move objects around in your screenshot, such as logos, icons, and other visual elements – even the placement of text! This is great for mocking up website redesigns.
Alternatively, you can also resize visual aspects or delete them altogether. And don’t worry, this isn’t going to leave some strange blank space in your image, as Snagit will automatically fill in the background for you – because it is just that clever.
To use the smart move tool, click on the move tool and toggle on Smart Move. Snagit will then analyze your screenshot to detect the objects in your image, including text.
Now all you have to do is click and drag objects around the screen to move them or tap the delete key to get rid of them entirely.
If your object doesn’t look completely crisp, you can always undo it with CTRL+ALT+DELETE (that’s CMD+Z on a Mac) and adjust the Detail slider slightly, and try it again.
Edit text in your screenshot
As well as being able to move text on a screenshot, with Snagit you can edit it too! In this step, we’re going to teach you how to edit text in a screenshot, which is useful if you have information written out in one language, such as English, but you need to send it to someone in Spanish.
To make things even more challenging, let’s pretend for a moment that you also don’t have access to the original screenshot, just a JPG or PNG file.
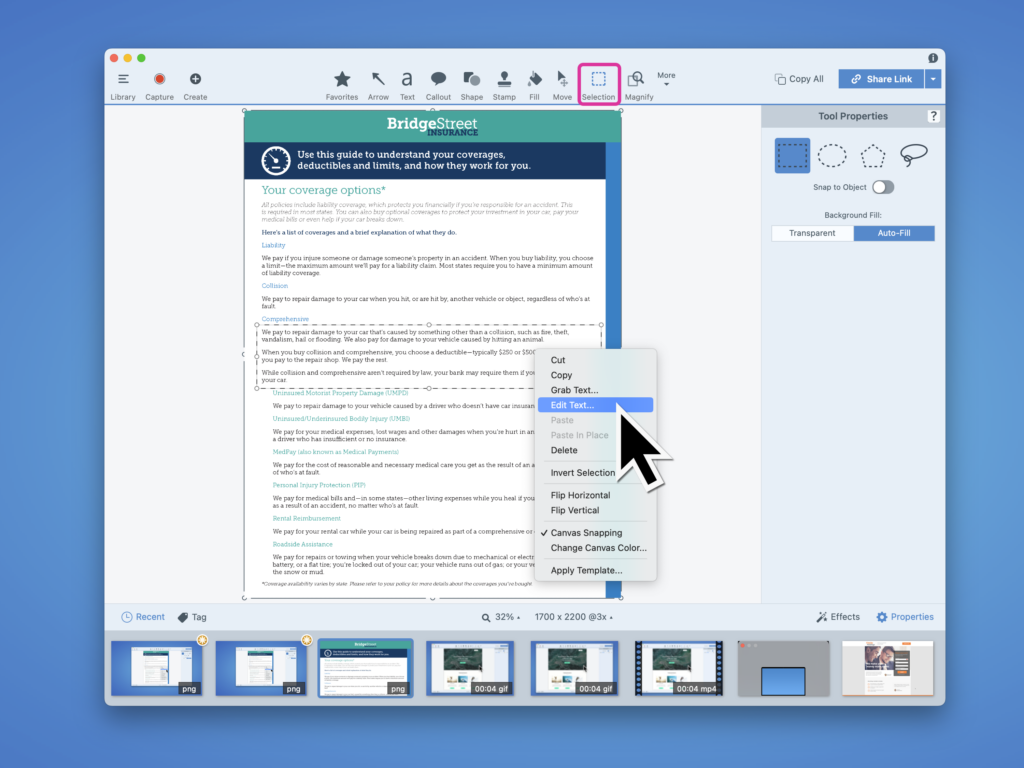
First, click on the Selection tool, stretch a square over the text you want to edit, right-hand click on the box, and select Edit Text. In just a couple of seconds, Snagit will create one or more editable text boxes that you can use to make changes to the words directly on the screenshot. We told you it was easy!
Alternatively, if you need help with the translation part, you can use the Grab Text option to copy and paste the text into an email or message to someone who can translate it for you. Once you’ve got the translated text, you simply click the Edit Text button and paste the new version.
Hide sensitive information
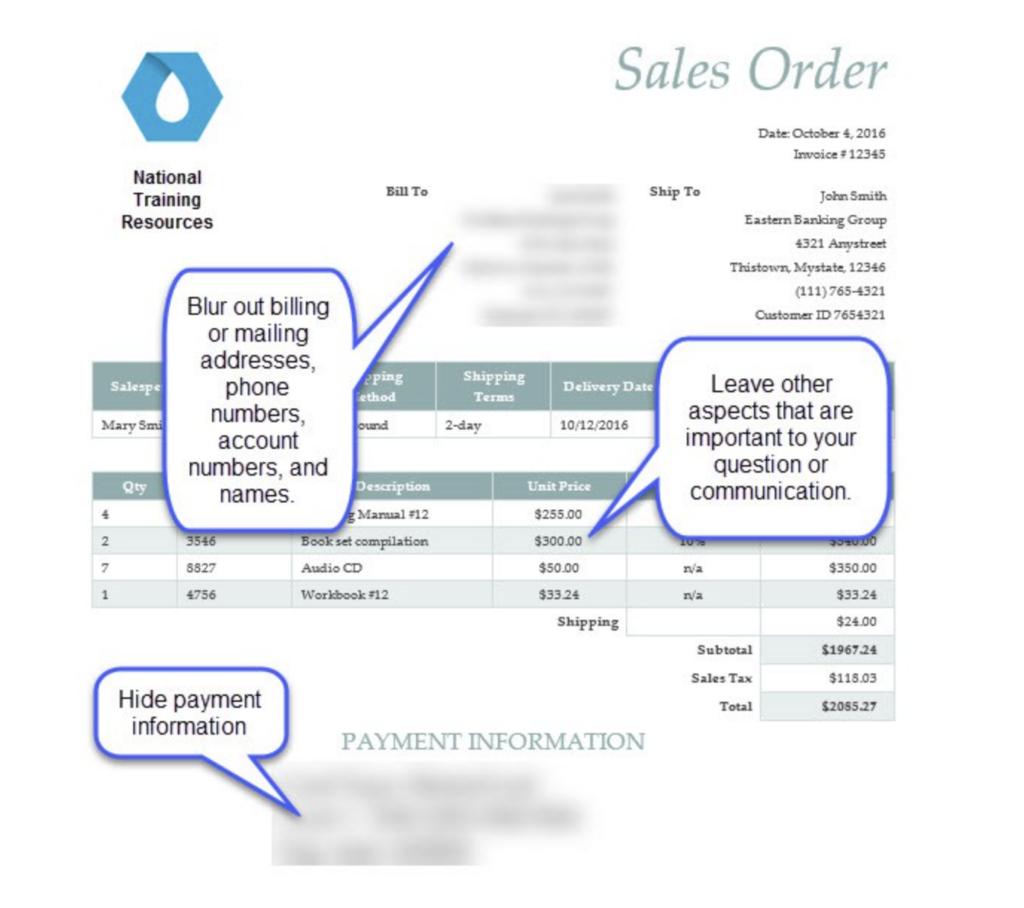
Sometimes, you might need to share some of the information on a screenshot, without sharing all the information. For example, the image you need to send might include personal information about a customer that needs to be kept confidential. This is where the blur tool comes in handy.
To use the blur tool in Snagit, simply click on it in the toolbar (you might have to click on More to see it). Then, drag a box over the content that you want to be blurred out. Snagit will even let you choose between different blurring effects.
Change the color of your screenshot
If you find yourself needing to make a particular part of your screenshot stand out, one easy way to add emphasis to an area is to update the background color.
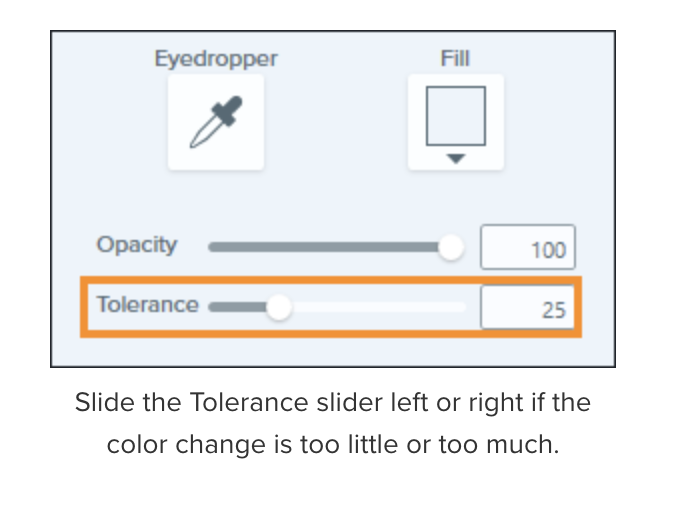
To change the color in your screenshot, select the Fill tool and select one of the preset colors. Alternatively, you can use the eyedropper tool to select a color from anywhere on your screen.

If you find the fill tool changes too much or too little of your image, try experimenting with the tolerance slider.
Why do you need to edit a screenshot?
There are a whole bunch of reasons why someone might want to edit a screenshot, and too many to list here!
That said, most reasons revolve around saving time and communicating in a clear and effective manner. For example, editing screenshots saves you from having to retake them when the information becomes out of date, while the visual aspect of a screenshot helps to clarify points certain points and provide additional context.
Edit your screenshots – fast and easy!
Download a free trial of Snagit to quickly and easily keep your screenshots up to date.
It saves you time
Perhaps one of the most common reasons to edit a screenshot is the amount of time it can save you, time that might otherwise be wasted trying to capture the perfect screenshot. This is especially useful if you need to capture multiple screenshots for a project or presentation.
Of course, taking a basic screenshot isn’t that much of a hassle and doesn’t even take that much time. However, recreating the right scenario on your screen can be frustrating and time-consuming. This is where having the power to edit screenshots becomes useful, as it allows you to skip the process of setting up your screen.
Improve the quality of your screenshots
Editing your screenshots can greatly enhance the quality and visual impact of your images.
By using editing tools to adjust brightness, contrast, and color levels, you can make your screenshots more vibrant and appealing to the eye. Additionally, cropping and resizing your images can help you focus on specific details and eliminate distracting elements from the background.
Another benefit of editing your screenshots is the ability to add annotations and text overlays – also known as Callouts in Snagit. These can be particularly useful when creating tutorials and instructional materials, as they allow you to highlight key areas of the image and provide additional context or instructions.
Ultimately, by taking the time to edit your screenshots, you can create more professional and effective visual aids that better communicate your message.
Edit your screenshots – fast and easy!
Download a free trial of Snagit to quickly and easily keep your screenshots up to date.
Hide sensitive information
Editing your screenshots can be an effective way to keep sensitive or confidential information secure. With Snagit’s redaction tools, you can blur, pixelate, cover, and even remove certain areas of an image to avoid sharing sensitive data. This can be particularly useful in the healthcare, finance, and legal industries where client privacy is of the utmost importance.
However, you don’t have to be a lawyer to benefit from these tools. If you ever find yourself needing to share screenshots, either publically or with your peers, you might prefer to play it safe by protecting potentially sensitive information. Because why take the risk?
Create document variants
Another awesome advantage of editing screenshots is how easy it is to create variations of the same document. With the ability to copy and edit specific text in a screenshot, you can quickly and easily create multiple versions of a document that contain similar information but are customized to different audiences.
This is particularly useful in industries such as marketing and advertising, where multiple versions of a document are often needed for different audiences and demographics.
Edit your screenshots – fast and easy!
Download a free trial of Snagit to quickly and easily keep your screenshots up to date.
Editing screenshots, the FAQs
To edit a screenshot on a Mac with Snagit, open the image in the Snagit Editor. From there, you can use a variety of editing tools to crop, resize, add text or shapes, and blur out sensitive information. Once you’re done editing, you can save the final image as a file or share it directly with others.
To edit a screenshot on Windows using Snagit, you can use the Snagit Capture window to capture and edit your image. Once you’ve taken a screenshot, it will automatically open in the Snagit Editor, where you can add annotations, text, shapes, effects, and more. Snagit also offers a variety of editing tools, such as blur, crop, and resize, to help you get your screenshot looking exactly how you want it to.
The best screenshot editor is the one that best suits you and your needs. Tools like Snagit are great for beginners and pros alike, as it’s easy to learn how to use and offers a range of basic and advanced tools to suit every user.
