

Zooms are used all the time to create dramatic visual effects on the big screen. The process usually requires high priced cameras and recording equipment. Not to mention advanced expertise with film and video. Unfortunately, not everyone can be a Hollywood movie director with a zillion dollar budget and a once in a generation artistic eye. The good news is that modern video editors, like Camtasia, give you the full capability to zoom in on a video. Just like a big-budget movie.
Camtasia lets you zoom in or out in your videos by changing the size or scale of clips and images. In this post, you’ll learn how to zoom in on video and images with Camtasia. But the process can be used with whatever video editor you prefer. We add a zoom-in effect to many of the videos we make at TechSmith. Zoom is perfect for software tutorials and demonstrations when you need to display a detailed view of a user interface. It can also be used to create something like the Ken Burns effect, slowly zooming in or out on a still image.
Step 1: Set your project dimensions to zoom
There are two very important things when it comes to zooming:
- The dimensions of your project
- The dimensions of the video or images you are editing
The relationship between the two allows you to create “space” for zooming. Make sure to set your project dimensions (i.e. the size of the video you will produce) smaller than the media you’re working with. Any videos or images you choose will look best when displayed at their natural size, that is, 100% scale. The more you stretch a video or image, the more likely it is to become distorted or pixelated. Start with dimensions that are smaller than the media so your video stays crystal clear when you zoom in and out.
To set your project dimensions, first determine the size of the media you’re editing. If you recorded your screen, this is the recording dimensions you used. For video or images captured with a camera, take a look at the file details. On Windows, you can right click a clip or image right in Camtasia and choose Details to see it’s dimensions. If you’re on a Mac, right click the file on your computer and choose Get Info to display the media’s dimensions.
Once you know the size of your media, open the Project Settings.
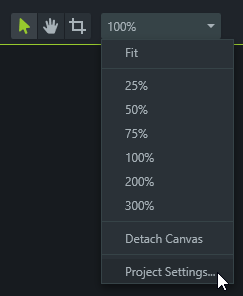
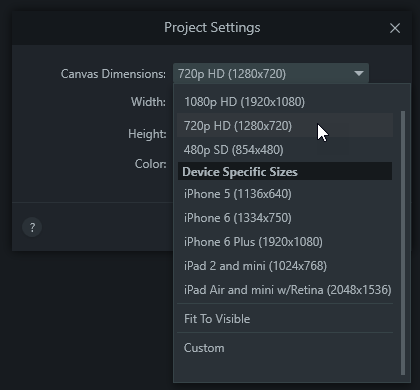
The Canvas Dimensions dropdown offers a variety of common video dimensions. Choose one of these that is smaller than your media or manually enter your own dimensions. If you’re not sure which to choose, the three standard video dimensions at the top of the list are good choices, particularly 720p HD.
Now that you’ve setup your project, let’s look at how to apply a zoom to a clip or image.
Step 2: Apply a zoom animation to your video
Add zooms to a video in Camtasia by changing the scale (think: relative size) of a clip over a period of time. As the scale of the clip increases or decreases, it gives the effect of getting closer to or farther away from the subject.
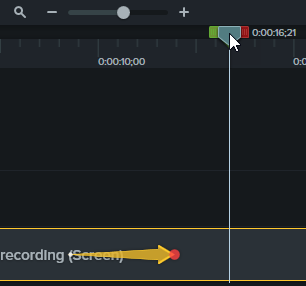
Create a zoom effect by adding an animation to a clip on the Camtasia timeline. Animations allow you to change the properties of a clip over a period of time. To add an animation go to the Animations tab and drag a Custom animation to a clip.

Step 3: Change the zoom duration
The animation appears as an arrow on the clip. The length of the arrow indicates where the animation will begin and end. Change the duration of an animation by clicking and dragging the circles on either end. Or, click and drag the arrow to move the entire animation.

Step 4: Edit zoom properties
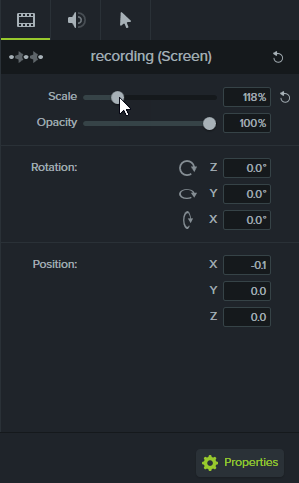
The next step is to edit the clip’s properties at the end of the animation. First, place the playhead to the right of the animation.
To create the effect of zooming in on the clip, go to the Properties panel and increase the scale by dragging the slider to the right. If you want to zoom out, decrease the scale by dragging the slider to the left.
A zoom has now been created on your clip. View the effect you created by placing the playhead at the beginning of the animation and then pressing play in the preview window. As the playhead moves across the animation, the video will zoom in or out.

This is only the beginning of what you can do with zooms and animations. Animations are often used to create unique visual effects, including panning across a clip, or changing the colors and positions of callouts and other elements in your videos. Use what we learned here to start playing around in your own videos and, if you’re interested in learning more, check out our tutorial on Animations & Effects. To learn about some other easy edits you can do with your video, check out these blog posts on How To Merge Videos, and How To Crop a Video as well.
Share