


By now you know that images are essential to creating great content and clear communication. Whether you’re trying to explain something, show how something works, or add elements to help grab a reader’s eye, images add interest and can help get your point across better and faster.
Images can even help you save time.
But there’s a big difference between using an image and using the RIGHT image. And while there are many ways to decide which image is right for what you’re trying to communicate, nothing ruins a potentially great image like a bad crop.
What is image cropping?
First, cropping has nothing to do with farming, so we won’t be asking you to plow or sow or anything like that. To “crop” an image is to remove or adjust the outside edges of an image (typically a photo) to improve framing or composition, draw a viewer’s eye to the subject, or change the size or aspect ratio.
In other words, photo cropping is the act of improving an image by removing unnecessary parts.
Chances are, you’ve already done some image cropping without even realizing it. If you’ve ever taken a photo with your phone’s camera and then posted that photo on Instagram, you might probably needed to choose how much of the overall photo to include in Instagram’s square traditional image format. That’s picture cropping!
Crop images quickly and easily with Snagit
Easily crop images into specific sizes and irregular shapes, and crop multiple images at once with Snagit!
Download now!The Rule of Thirds in image cropping
It may seem illogical, but the most interesting and eye-catching photos rarely have their subject smack-bang in the middle of the image. In fact, it’s a fundamental rule of photography that your primary subject shouldn’t be in the center.
But if it’s not in the center, where does it go? That’s where the rule of thirds comes in.
The rule of thirds divides all images into three equal horizontal and vertical sections (or nine individual boxes) separated by grid lines. Generally speaking, you want to place the points of interest near the spots where these grid lines intersect.
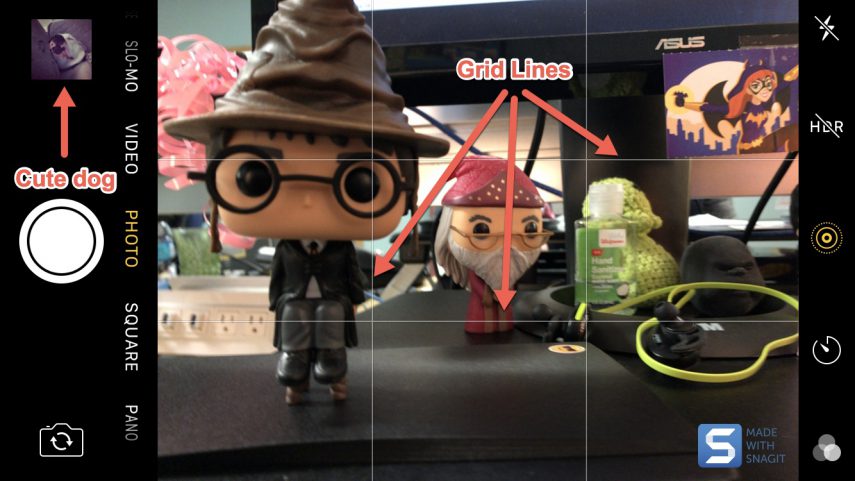
Have you ever wondered why the view on some phones and digital cameras has a grid? It’s all thanks to the rule of thirds. As demonstrated in the screenshot above, these grid lines are there to help you compose your image. The idea is that when you’re lining up your shot, you can use them to ensure your image follows the rule of thirds.
You can also see Reo from TechSmith’s doggo department. Isn’t she cute?
But composing your image when you take a photo is just the beginning. Many times you’ll want to adjust and edit your photos even further. The first step, however, is always cropping. There are many reasons why you might want to crop a photo, including:
- The discovery of background elements you didn’t realize were there
- Issues with the framing or composition
- To better focus on your subject
To crop your image, you’ll need a photo editor to act as your image cropper. For the sake of this article, we’ll be using TechSmith’s Snagit, but most editing software and apps (even the ones on mobile devices) will offer basic picture-cropping functions.
So, without further ado, here’s how to crop a picture with Snagit.
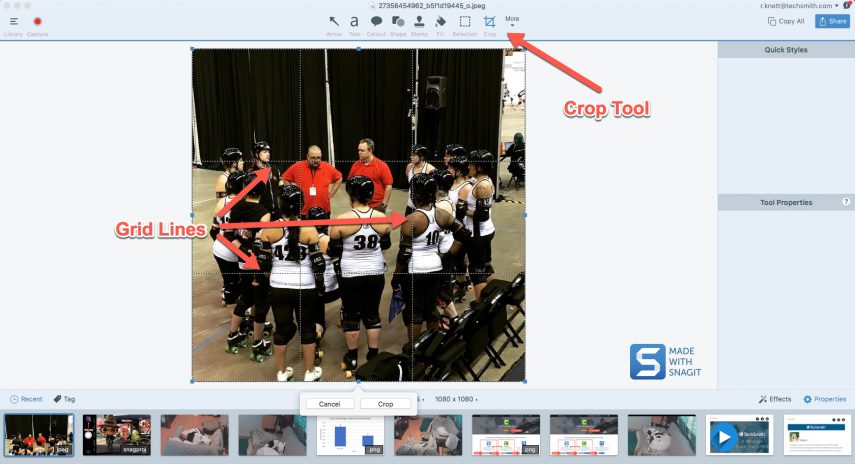
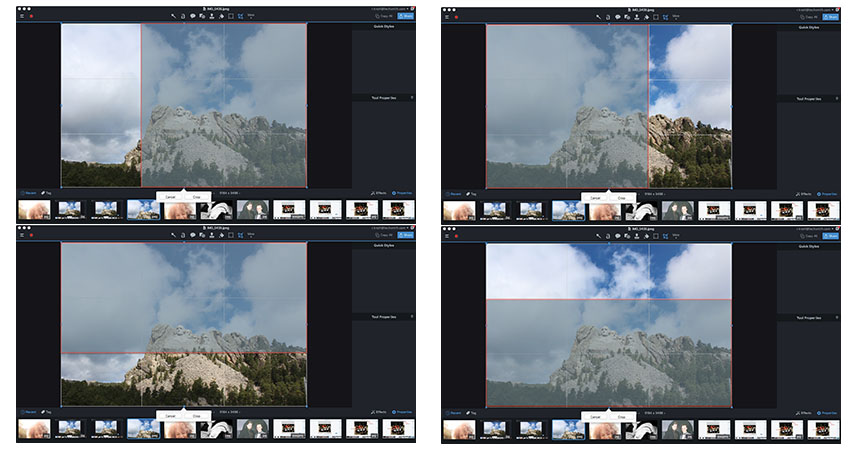
Firstly, open your image in Snagit and click on the Crop tool.
Similarly to your phone’s camera app, photo editing tools provide grid lines to help you make your crop according to the rule of thirds. The photo above is a computer screenshot of Snagit — taken with Snagit (how meta!) — and, as you can see, there’s a photo open that definitely needs to be cropped.
In the next screenshot, you can see our adjustments:
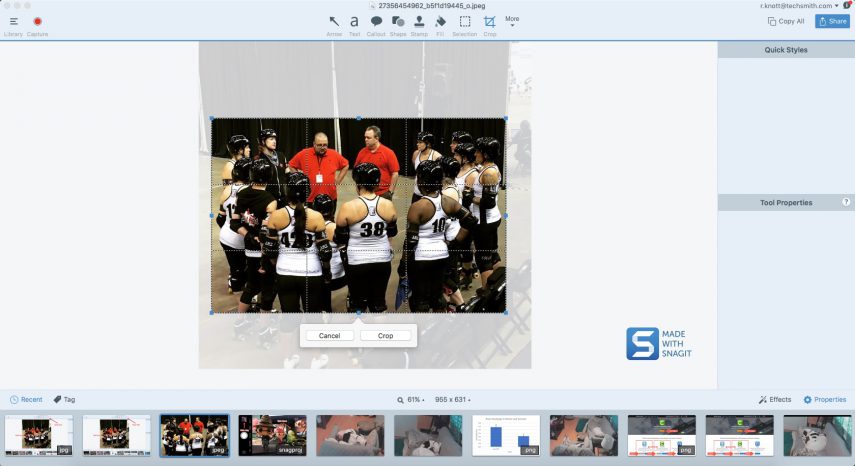
Here, you can see that the grid lines have moved as that image has been cropped, to show how it fits with the rule of thirds now that it’s been adjusted.
Which photo do you think is better? The original image…
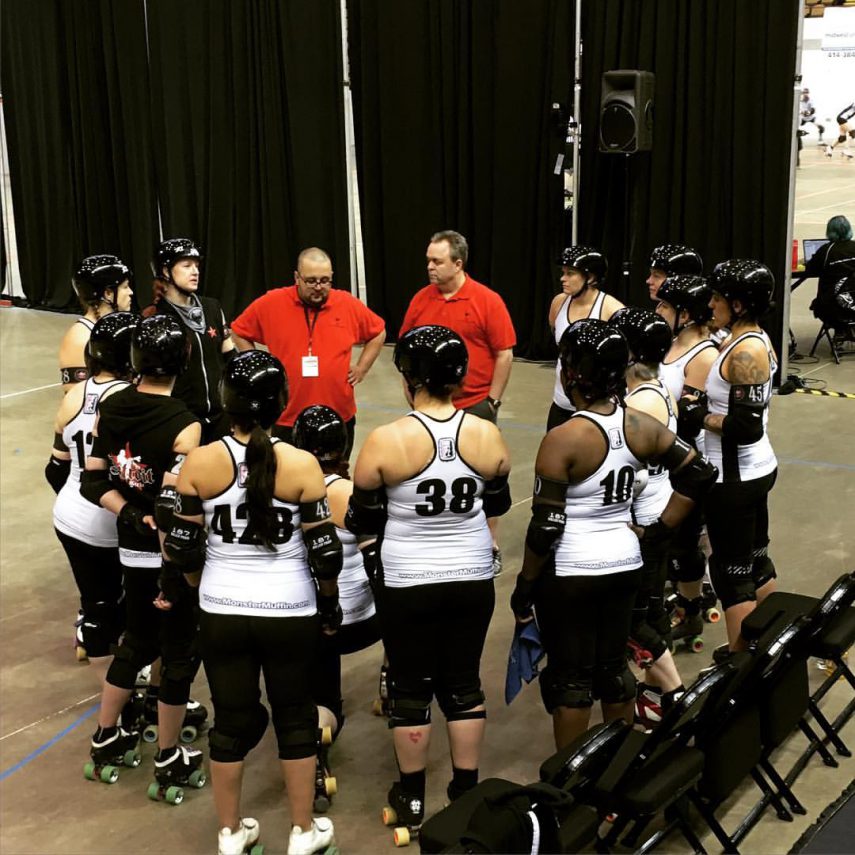
… Or the cropped image?

The cropped image brings us closer to the subjects and cuts out unnecessary elements from around the outside of where the skaters and coaches are standing. What’s more, all the visible faces are in the outer or upper thirds of the image. It’s not quite perfect, but it’s definitely a lot better.
It’s important to point out that the rule of thirds does not dictate that your subject can only be in one-third of the photo area. You can easily divide the image into two-thirds areas, as well, like so:
Other image cropping tips
But the rule of thirds is just the beginning.
Take a look at this photo of two friends at senior prom:
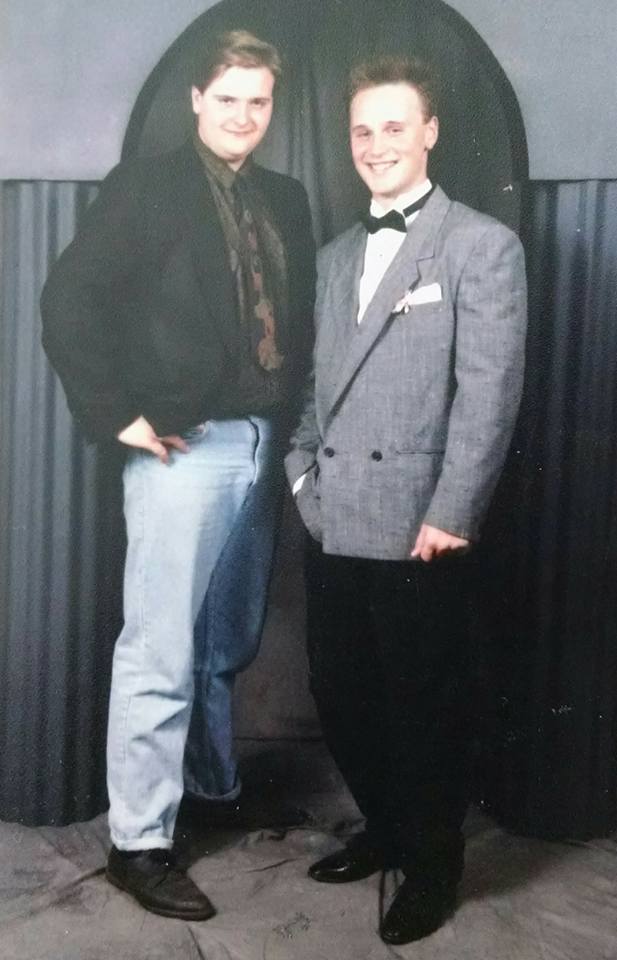
First off, the photographer chose to show the subjects’ entire bodies because, unlike our very own rebel Ryan Knott who provided the photo, most people at prom are dressed in beautiful dresses and tuxedos. So it makes sense that they would want the photo to show their whole outfit, including the shoes.
However, Ryan’s clothes aren’t really that important (sorry Ryan!), which gives more freedom to play around with cropping to emphasize different aspects of the photo.

This cropped version brings more attention to Ryan and his friend’s face (and amazing early-90s hair!) and distracts a bit from the fact that Ryan wore his teen angst on his sleeve (or, on the lower half of his body, as the case may be).
Generally speaking, when using photos of people or animals, the closer the crop, the more “dramatic” the photo.

For example, in this photo of a smiling woman, you get a complete view of what she’s doing and where she is. We have a lot of context of her surroundings, which helps tell the story of the photo.

But in this cropped version, we’re drawn more to her face and the fact she’s focused on her phone. The setting isn’t as important as the subject herself. We’ve narrowed the story a bit to capture only what she’s doing.

Cropping it further takes the phone out of the image entirely and now we’re left with just her face to contemplate. What is she thinking about? What’s making her smile? Did we catch her in mid-laugh? By taking out parts of the overall story, we’re left to create it for ourselves.
This also provides another great example of why you might want to crop an image: to change its shape and/or aspect ratio. The original image was horizontal. The first crop turned it into a vertical image and the final crop made it square. Depending on how it’s going to be used, the shape of an image can be very important.
Ready to Embrace Asynchronous Communication?
How do we have fewer, better meetings? We decided it was time to reboot our meeting culture and communication norms at TechSmith.
Download now!
Potential pitfalls of image cropping
So, we’ve learned the basics of how to crop a photo, but what’s the downside?
Firstly, when you crop an image and save it, you’ve deleted the original image. For that reason, we suggest saving a copy of your image and making any edits to the copy, rather than the original. At TechSmith, we’ve all lost great images to bad editing at some point, and we can’t stress this strongly enough.
Secondly, the closer you crop, the smaller the actual image becomes. If the original image is 1280×1024 pixels and you crop it down to 640×512, you have reduced the size by half. So, always make sure any cropping you do will leave an image large enough to fill the space you need to fill.
Remember, with photos, you can’t simply adjust it back up to the size you need. If you don’t resize your photo properly, you risk losing resolution and ending up with a pixelated, blurry photo.
Third, it’s really easy to over-crop a photo. Especially when cropping close to a person’s face. Give the subject some room to breathe. In the final photo of the smiling woman above, that crop is probably a little too close, but we wanted to show what would happen when we removed the phone. If we were using that photo for publishing in another capacity, we probably wouldn’t have cropped it quite so tightly.
Finally, don’t get too caught up in rules. Play around with cropping and see what pleases your eye. Rules are rules, but rules can be broken, sometimes to great effect.
Image cropping, the FAQs
In Photoshop, cropping an image is a breeze. All you need to do is open your image, select the Crop Tool, drag the corners to mark out the part of the image you want to keep, and hit Enter on your keyboard. It’s easy, just be sure to save or export your image when you’re done.
In Illustrator, begin by placing the image you’d like to crop with File > Place, then select your image. Once the image is in place, use the Selection tool to choose the image, before clicking on Crop Image in the Control panel. Next, adjust the crop boundaries by dragging the corners, and finalize your changes by pressing Enter on your keyboard.
If you’re using a Mac then you’ve already got a secret weapon for picture cropping — the Preview app. First, find the photo you want to crop and double-click on it, this should open it in Preview by default.
With Preview open, you’ll notice that your mouse cursor turns into crosshairs when hovering over part of the image. This is the Selection Tool, which you can use to drag a rectangular shape over your photo. Once you’ve outlined the part of your image you want to keep, push Cmd + K on your keyboard to make the crop, then Cmd + S to save it.
In InDesign, you can crop an image by first selecting a frame with the Selection tool. Then, go to Object > Fitting and choose between ‘Fit Content Proportionally’ or ‘Fill Frame Proportionally’ to adjust the image within your frame. To maintain your cropping when resizing the image later, select Auto-Fit and remember to save your changes.
PowerPoint provides easy-to-use tools to help you accurately crop images. Upon selecting your image, head to the Format tab and click on the Crop tool. This will bring up some adjustable handles around your image that you can use to cut out the parts of the image you want to crop.
Once you’ve made your adjustments, simply click the crop button again to set your crop — it’s that easy!
