

There’s nothing more frustrating than blurry pictures. While you can try tinkering in a photo editing program, or shrinking the image and crossing your fingers in hopes that no one looks too closely, the best strategy is to start with crystal clear pictures.
We’ve rounded up some of the best info we have on capturing high quality images – whether it’s a photo from a camera, or a screenshot on your computer screen. The following articles will help ensure you don’t end up with blurry pictures or images. To make it so that you don’t have to read every post, we’ve pulled out some of the highlights.
Start with the Basics
![]()
What is a pixel? Pixels are the small dots that make up your computer, TV, and phone screen. Digital displays are comprised of pixels. Pixels work together by switching colors extremely fast to create a persistent and smooth viewing experience.
A few important terms related to pixels you might come across include:
- Resolution: size of the image in pixels (ex: 1920 x 1080)
- Color depth: how many colors are being used to display the image (ex: 32-bit)
- Pixel density: the relationship between resolution and physical size of screen (ex: 1080p, or ppi: pixels per inch)
More on pixels in the post: All About Pixels: Resolution, Color Depth, and Pixel Density
Resolve Confusion with High Resolution
![]()
Do you ever grab a logo and print it only to discover it looks choppy or “pixelated”? Or taken pictures with your phone, and tried printing them but they just don’t turn out clear? It was probably a low resolution image that wasn’t intended for print. When taking pictures or images, it’s important to start by thinking about where the image will be used: on the web, or printed? You may also need to adjust your phone camera settings to be sure it’s set to take higher-resolution photos if you intend to print them. (I’m looking at you, Mom…)
A few things to keep in mind regarding resolutions:
- Low resolution is around 72 pixels per inch (ppi) – perfect for on-screen
- High resolution is around 300 pixels per inch (ppi) – good print quality
- A low resolution photo may look great on screen, but look blurry when printed
Learn more about the difference between low and high resolution, how to determine which your image is, and when to use each in the blog post: What is hi-res?
How to Resize Your Image

We’ve all been there. You need an image a little bigger, you grab the corner and drag, and are sorely disappointed when it looks like your eyesight has suddenly deteriorated. Or your image looks like it belongs in a fun-house mirror. Remember how we talked about pixels and pixel density (“dpi: dots per inch” or “ppi: pixels per inch”)? Those things determine the limits you can stretch your image to without it being blurry.
Tips for resizing images:
- Maintain aspect ratio (ex: 4:3) to avoid distorting your image (stretching or squishing)
- Know how large you CAN make your image: What are the dimensions, how big do you need it to be?
- Use an image editing program to resize when possible to get the right size, rather than inserting an image and trying to resize in-program (ex: WordPress, Google Docs, etc.)
Learn more about stretching images, resizing larger or smaller, and aspect ratios in the blog post: How to Resize an Image Correctly.
Cropping Your Image
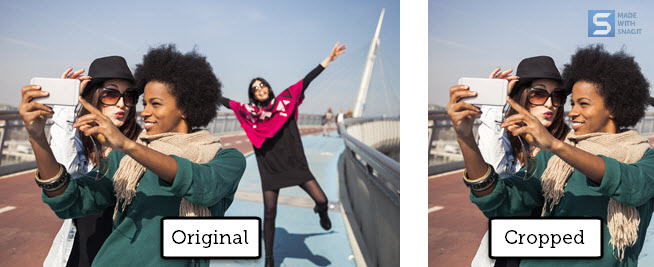
Resizing and cropping an image are not the same. Cropping is adjusting the edges of an image to cut out that unwanted background distraction to focus on what’s really important. It’s best to edit your image with a plan in mind. Keep those tips you picked up about resolution and resizing in mind as you photo crop as well.
Tips for a good crop:
- The closer you crop, the smaller the image becomes. Will the dimensions of the cropped image still work in the space you need it?
- Cropping doesn’t have to be removing something, it can also be to re-shape an image. (ex: portrait vs. square)
- Generally speaking, when using photos of people or animals, the closer the crop, the more “dramatic” the photo.
Learn all about cropping, the rule of thirds, and potential pitfalls in the blog post: Image Cropping 101: The Basics.
PNG vs JPG

Now that you know how to make the perfect, not-blurry picture, you need to save it! But there are, indeed, a bajillion different file types. Which one should you use? Two of the most common formats: PNG vs JPG.
The main benefits of JPG and PNG:
- JPG uses lossy compression, compromising some quality, but making the file size smaller and more easily shared
- PNG files support transparency, and are lossless (necessary if there is still editing to be done on the file)
You can read more on the difference between .JPG and .PNG files in the blog post: JPG vs. PNG: Which Should I Use?
And for bonus reading on additional image file types, check out: Understanding Image File Formats.
Do you have any helpful tips for preventing blurry pictures? Share them with us @Snagit!
Share