Camtasia Recorder captures your screen, camera, and audio.
Set Up Your Recording
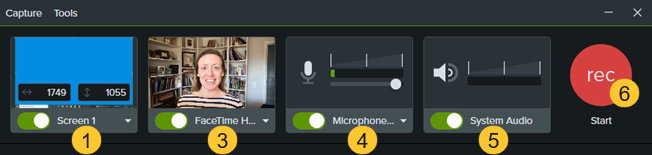
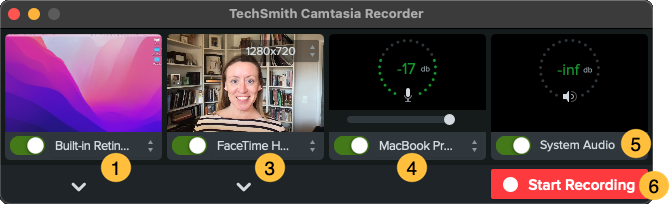
Select the recording area:
Click the toggle to turn screen recording on or off.
Click the dropdown and select a recording area option.
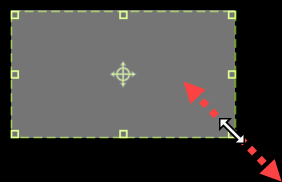
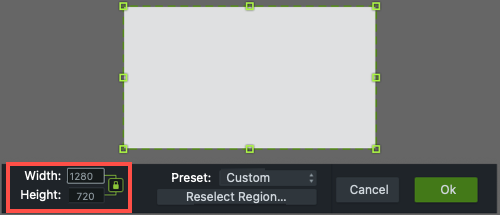
Camtasia highlights the selected recording area on the screen. To edit the recording area:
Drag the handles to adjust the selection.
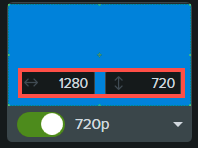
To enter a specific size, type the dimensions in pixels into the Width and Height fields.
To move the selected area on the screen, click the center handle (Windows) or within the selected area (Mac) and drag to the desired location.
If your computer is connected to multiple displays, you can drag the selected area from one screen to another.
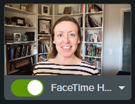
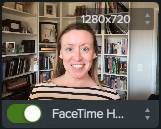
To record video from a built-in or connected camera device, click the toggle to turn camera recording on or off and select a camera device from the dropdown. See Record & Edit Camera Video (Picture-in-Picture).
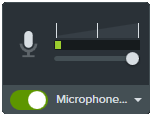
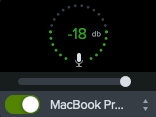
To record audio from your computer’s built-in microphone or from a connected USB microphone:
Click the toggle to turn microphone recording on or off and select an audio device from the dropdown.
Drag the slider to increase or decrease the audio level.
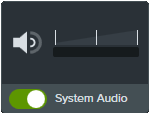
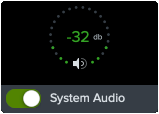
Turn system audio on or off. System audio captures the sound from your computer such as application alerts or audio playing from your computer speakers.
Start recording:
Windows: Click the Record button or press F9 on the keyboard.
Mac: Click the Start Recording button or press Command +Shift+2 on the keyboard.
Stop recording:
Windows:
Click the Stop button on the recording toolbar.
Or, press F10 on the keyboard.
Or, click the Camtasia Recorder icon in the taskbar and then click the Stop button.
Mac:
Click Stop Recording on the recording toolbar.
Or, press Command+Option+2 on the keyboard.
Or, click the Camtasia icon in the menu bar and select Stop Recording.
Recording Tips
Hide desktop icons (Mac only): Before recording your desktop, hide app, folder, and file icons. In the menu bar, select Camtasia icon > Hide Desktop Icons.
Run a sample recording to test the audio:
No Microphone Audio: Select an audio device in the dropdown or enable the Microphone option in the recorder.
No System Audio: Enable the System Audio option in the recorder.
Low Microphone Audio: Drag the audio slider to increase the audio level and make sure the connected audio device is positioned near the speaker.
Customize shortcuts: Speed up your workflow with recorder shortcuts. See Customize Shortcuts.
Record with a connected USB microphone: For greater reliability, use a connected USB rather than Bluetooth microphone.
Set maximum frame rate (Windows only): To ensure quality video recording, set the maximum capture frame rate. In Camtasia Recorder, select Tools menu > Preferences > Inputs tab > Maximum capture frame rate. See Crisp & Clear Screen Recordings and Camtasia Target Capture Frame Rate.
Select a recording encoder (Windows only): Consider whether the default TSC2 encoder or H264 encoder is better for your situation. In Camtasia Recorder, select Tools menu > Preferences > Inputs tab > Recording encoder. See When to Use TSC2 vs H264 in Camtasia for Screen Recording.
2. Accelerate Video Creation with Camtasia Rev
After recording, Camtasia Rev opens. Rev makes it easy for creators to deliver on-trend and compelling video content. Implement your own personal style with just a few clicks.
Size Set the video size based on where you want to host or share the video. Rev provides size options to target standard video sizes for all your channels.
Layout Choose from a series a layouts based on the content in your recording.
Background Choose from a variety of colors, patterns, and animations for the background to make your content more visually engaging.
Effects Apply multiple effects to the cursor, camera, and screen recording to draw attention or set the tone.
Filters Apply visual filters to enhance the appearance of camera video.
Note: You can turn off some of the automatic selections in Camtasia Rev, such as backgrounds. Click to deselect the option on the Background, Effects, or Filters tabs.
3. Export Your Video or Edit in Camtasia
Export your video directly from Rev, or click Edit in Camtasia for further editing and enhancements.
Add a title or one of the 100 million customizable and creative assets available in Camtasia. From right within Camtasia, access intros, templates, graphics, music tracks, animations, footage, and more! See Enhance Your Video with Camtasia Assets.
Use text-based editing to edit and improve your audio and generate captions in Audiate. See Speed Up Editing with Audiate.