


Video transcripts may not be top of mind when creating video, but it is vital for professional, educational, and workplace settings.
They are incredibly important for faster referencing, better accessibility for diverse teams, and easier content repurposing. You can copy and paste the transcript from one document to another, like Microsoft Word or Google Docs.
Accessibility is important for individuals who need to read along with your videos, such as those with hearing impairments. However, it is also important to include a transcript for people who would just rather watch the video on mute – we don’t judge!
So, let’s check out the four main methods for creating transcripts: YouTube’s built-in transcript, Camtasia’s editable transcripts, mobile workarounds, and manual transcription.
If you can edit a doc, you can edit a video
Stop fearing the timeline. Camtasia Audiate transcribes your recording so you can edit your video just by editing the text.
Free Download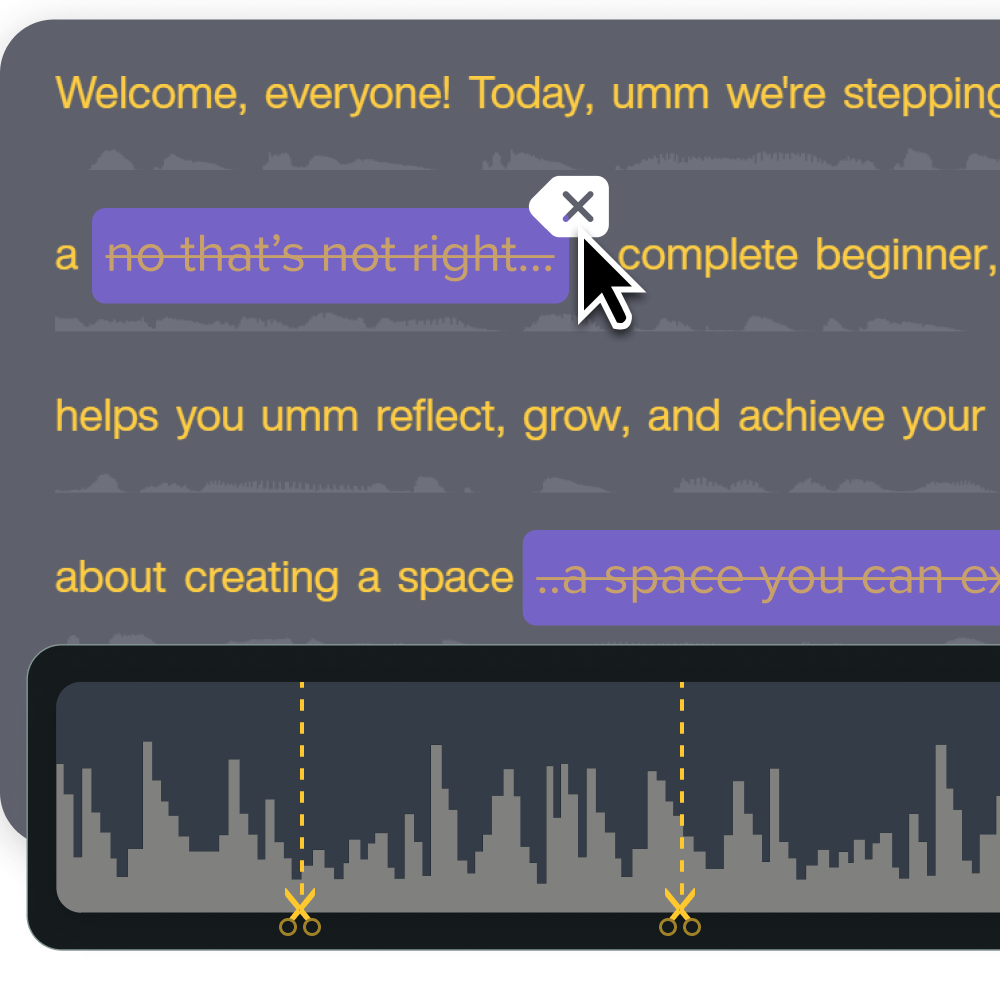
Why should you transcribe a YouTube video
There’s a few reasons people may search for video transcripts.
Transcripts let viewers quickly scan or search for specific sections. They’ll be able to easily look back to sections they want to reference without dredging through an entire video.
You will also improve accessibility for people with hearing impairments or language differences. Reading assistance while listening is incredibly helpful, and viewers can listen on mute if they are in an environment where listening is not possible.
Teams can document tutorials, webinars, or training sessions for internal use without re-referencing the video every time.
Writers can repurpose spoken content into written guides, dynamic captions, subtitles, or blog posts, which ensures that the content matches across platforms. Transcripts serve as summaries for other written content or creative outlets like podcasts.
These reasons, and more, are why AI-powered transcripts, closed captions, and translations are essential AI tools for accessibility and comprehension.
How to use YouTube’s built-in transcript generator
YouTube makes it easy to find a video’s transcript directly from the video’s URL page.
YouTube auto-generates transcripts for most public videos and is the fastest and easiest method to extract a transcript. It’s ideal for casual users, most beginner content creators, or light documentation needs.
However, formatting may be inconsistent and accuracy varies depending on audio clarity and speaker accents.
This step-by-step guide will help you find the text transcript in the YouTube transcript generator.
Step 1: Open the video you want to transcribe
You can access a video’s transcript right from the YouTube website. To do so, open the video you want to transcribe by clicking on it. It’ll start playing.
Step 2: Click the “Show transcript” button
Locate the description box under the title. Click the “more” option to open the whole box.

There, you will click the “Show transcript” button option, which will open the transcript box with the text inside.

If transcripts are disabled, this button will not show, and you will not be able to find a transcript for the video.
Step 3: Copy and paste the transcript
Highlight the text you want and right-click it. It doesn’t have to be the entire transcript, it can be a section.
Select the “Copy” option in the menu. Or, with the transcript highlighted, press Command+C keys on a Mac or Ctrl+C keys on Windows. This will automatically copy the text to your clipboard.
To paste, right-click where you want to place the text, for example Microsoft Word or Google Doc, and select the “Paste” option. Or use the Command+V keys on Mac or Ctrl+V keys on Windows.
YouTube includes timestamps next to each section of text, allowing you to jump to specific parts of the video, making it easier to access. This is useful for identifying the key points of a video at a glance. However, if you do not need the timestamps, you can easily remove them by deleting them from the document.
As mentioned before, this transcript may require clean up if repurposed since YouTube’s transcription isn’t perfectly accurate.
How to generate high-quality transcript with Camtasia (for editing and accuracy)
Camtasia is a powerful tool for transcribing video content. With this tool, you can automatically generate transcripts from any video you upload. This creates more accurate transcripts than YouTube’s automated captions, making it a great option for professionals who need clean, editable, exportable transcripts.
Sometimes transcripts need editing, which is why Camtasia includes Audiate features that automatically transcribes audio and allows you to edit video by editing the transcript. Delete words, sync your edits, and watch as correlating sections of your video get cut out.
Plus, you can use Camtasia’s transcript generation and editing even if your video is not on YouTube, making it a versatile tool for content creation.
Go from screen recording to polished video
A screen recording is just the start. Camtasia’s editor helps you add the callouts, animations, and edits you need to create a truly professional video.
Free Download
Step 1: Download the video from YouTube
To download videos from YouTube, select the video you want to download and hit “Download” from the menu. This only works for your own videos.
Step 2: Import the YouTube video into Camtasia
Import the video into Camtasia by dragging and dropping the file into the media library or right-clicking on the library.
Once your video is imported into the library, drag and drop it onto the editing timeline.
Step 3: Open the Audiate tool within Camtasia to transcribe automatically
Right-click the video on the timeline and click “Edit in Audiate.” This will export the video’s audio, where it will be transcribed in real time.

Step 4: Edit and polish your transcript in real time
Audiate automatically generates an editable transcript, allowing you to correct any errors and polish the final text.
Although errors are rare, you can correct proper names and difficult-to-understand terms to reflect the true meaning. Simply click on the words you want to change, then backspace to delete them altogether or write in the correct word to replace it.
Since the audio is transcribed in real-time, Audiate has the option to play the video’s sound over the transcript’s sound while you edit. This makes it easy to spot mistakes and correct them so you can ensure high-level accuracy every time.
If you can edit a doc, you can edit a video
Stop fearing the timeline. Camtasia Audiate transcribes your recording so you can edit your video just by editing the text.
Free Download
Step 5: Export the transcript
To export the full transcript as a text file, select the File menu, then “Export”, then “Export Script.” This will download transcripts to your device.
You can export in the following formats:
- TXT file for universal use
- DOCX file for documentation
- SRT file for captions
To export a selection of the transcript, click and drag the desired portion of text from the transcript and follow the same instructions until you reach “Export Selection as Script.”
How to get YouTube transcripts from a mobile device
To access the transcript from a mobile device, you can do so on the YouTube app. However, you can’t download the transcript on your mobile device.
1. Request the desktop site in your browser
You can access a video’s transcript right from YouTube. To do so, use Chrome or Safari’s Desktop option by clicking this link to access the full YouTube experience and find the transcript as described above.
2. Use speech-to-text tools
You can also leverage mobile dictation tools while playing a video out loud. For example, play a video on a laptop while having your phone’s Google Docs voice typing or Apple’s Notes dictation apps open.
Headphones and short clips should help with accuracy.
3. Try cloud-based transcription tools
Note-taking apps like Otter.ai, Nott.ai, or Temi can transcribe uploaded audio and video files or generate transcripts from YouTube URLs.
4. Save and sync your notes
Once you get your transcript through the method that works best for you, save it to Google Docs, Notion, or a notes app with cloud sync for easier editing later on a desktop.
After your initial capture, try to format your transcript and add time stamps to help navigation down the line.
How to transcribe a YouTube video manually
If you prefer to manually transcribe YouTube videos, you can do that too. This option is not for the faint of heart. Although it gives you full control over the transcription, it is extremely time-consuming.
This is the most accurate method to generate a transcript, which is especially useful for legal, academic, or technical videos with poor audio or speakers with thick accents.
When automation falls short and simply doesn’t turn out how you want it, this is the option for you to resort to.
1. Set up for success
First, create a setup that will help you succeed. Implement the following strategies:
- Use headphones
- Set playback to 0.75x
- Use a distraction-free text editor with auto-save
- Position windows side by side or use two monitors for efficiency
When actively transcribing, try the chunking technique, which means playing the video 10-15 seconds at a time, then writing is down. To make it easier, use pause and play shortcuts right from your keyboard.
2. Type and format your transcript
There are a few formatting options to consider.
- Verbatim: for legal or research
- Cleaned-up: for blogs or training
- Time-coded: for syncing with video
Don’t forget to label speakers, add correct punctuations for clarity, and flag unclear words with [inaudible]. This will make your transcript clearer and easier to navigate.
Start transcribing YouTube videos with confidence
Transcription is a must-have when sharing your videos out to your viewers. It improves accessibility, clarity, documentation, and reuse across your organization.
The good news is that no matter what device you use or what your experience level is, there’s a method that will work for you.
Camtasia is built with professionals and beginners in mind with its advanced capabilities and user-friendly interface. It combines screen capture, dynamic captioning, and transcript exports all in one platform, so you don’t have to bounce around between tools. Camtasia is the best way to turn YouTube content into usable, shareable resources.
Check out Camtasia and the rest of TechSmith’s tools and start creating today
Share