Basic Edits After Recording

Learn how to apply our recommended edits after completing your recording and enhancements in Camtasia Rev.

Camtasia product icon
 

After applying the desired look, layout, and effects in Camtasia Rev, click the Edit in Camtasia button to continue editing your recording in Camtasia Editor.

Rev offers two options for displaying media on the timeline in Camtasia Editor.

Edit in Camtasia button

Editing Options

Select how you want to edit media in Camtasia:
Editing options with menu expanded

  • Rev Media option Rev Media (Recommended): Combines the recorded streams (screen, camera, and audio) into a single media package. This option allows you to quickly apply automated enhancements, layouts, and basic edits. See Introduction to Rev Media.
    Rev media on the timeline
  • Unpacked Media option Unpacked Media: Edit the recorded streams (screen, camera, and audio) as separate tracks. This option provides more editing control.
    Unpacked media on timeline

Basic Edits to Rev Media

Try these quick edits after recording to remove mistakes or to enhance your video.

Change Looks & Effects

Camtasia’s flexible recording allows you to change the layout or effects anytime.
Rev layout examples

Click the Modify button on the Rev media to reopen Camtasia Rev to quickly edit the look, layout, or effects.
Modify button on Rev media

Apply Different Looks & Effects to a Video Section

To apply different looks and effects to a section in your video, split the Rev media into separate clips on the timeline. For example, if you want one section of your recording to focus on the screen content and another section to focus on the camera.

  1. Click to select the Rev media on the timeline.
  2. Drag the playhead to the desired position on the timeline.
    split Rev media on timeline
  3. Click the Split button.
    Split button
  4. Camtasia splits the Rev media into two separate media clips. Click the Modify button to open the media in Camtasia Rev.
    Modify button on Rev media
  5. Make the desired changes to the layout and effects selections in Rev.
  6. Click the Save button.
    The video section is updated on the timeline with the latest changes.

Position Media within a Layout

To make adjustments to your content within a layout in Camtasia Editor, select the media stream (screen, camera, or background) in the Properties pane or edit its position directly on the canvas.

See Position Media on the Canvas.

Rev Media Streams tab in properties

For example, center the speaker within the frame.
camera video example where speaker is off center and centered

Or, adjust the layout if the camera covers important areas of the screen recording.
move camera frame in video example

Trim
Remove any extra content at the beginning or end of a recording.

  1. Click to select the media on the timeline.
  2. Drag the end of the clip in.
  3. To restore content that was trimmed too far, drag the end of the clip back out.
    Trimming does not affect the original recording in the media bin.
 

Customize an Effect or Background
Customize the effects applied in Camtasia Rev. For example, change the background color to match your brand or adjust the border width. See Customize Media & Effect Properties.

View Steps
  1. Click to select the Rev media on the timeline.
  2. In the Properties, select the screen, camera, or background stream to view and edit the effects applied in Rev.
    select Rev media stream in properties
  3. Double-click the effect name or dynamic properties to view the available customizations.
    expand effect properties
Annotation example

Add an Annotation
Annotations are visual elements and text to emphasize, direct viewers’ attention, provide additional information, or cover up areas in your video.
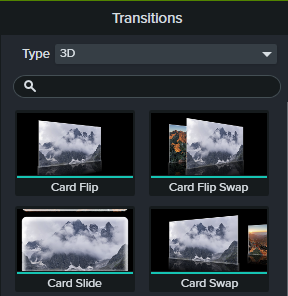
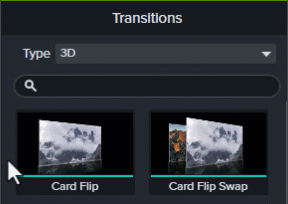
See Add Arrows, Shapes, or Callouts.

Drag Fade transition onto media

Add a Transition
Create a smooth visual transition between media. See Add a Transition.

View Steps
  1. Select the Transitions tab.
  2. To find a transition, complete any of the following:
    • Browse the list of transitions.
    • To filter the list of transitions, select an option from the Type dropdown.
    • Enter a type or transition name in the Search field.
      Transitions tab with Type dropdown and Search field
  3. Drag your cursor across the transition thumbnail to preview it.
    Drag cursor over transition to preview
  4. Drag the transition onto media on the timeline.
    Transition dragged between scenes on the timeline
  5. The drop location on the media impacts where the transition is applied:
    • Drag to the left end of the media to apply the transition to the beginning.
      start transition
    • Drag to the right end of the media to apply the transition to the end.
      end transition
    • Drag between media to apply the transition to both the beginning and the end.
      transition between clips
  6. To change the duration of the transition, drag the end of the transition in or out.
    Drag end to change transition duration
    Tip: Drag the Timeline slider to make it easier to select and edit the transition.
  7. Some transitions have additional properties you can customize. Click to select the transition on the timeline and click the Properties button to view the properties available.
Suggested Edits

Remove Mistakes in Camtasia Audiate
Click the Edit as Text button to quickly remove mistakes with AI and text-based editing.

See Speed Up Editing with Camtasia Audiate.

lower-third title

Add a Title
Add a title or lower-third from Camtasia assets to introduce your video, a speaker, or scene.

See Add Text to Your Video.

Export & Share

When you are ready to export or share your video, click the Export button in the upper-right corner of Camtasia Editor, then select a destination. See Export & Share Your Video.
Export menu

Camtasia Icon Logo

Get Camtasia

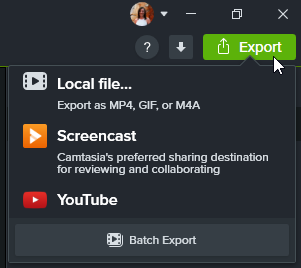
Unleash the world’s most powerful screen recorder and video editor.

* Already a Camtasia user? Learn how to update to the latest version.

All Camtasia Tutorials