Add Markers & Video Table of Contents

Add markers to indicate points on the timeline or to create an interactive table of contents for navigation for your viewers.

Camtasia product icon

In this tutorial:

Working with Markers

Markers indicate points on the timeline or within media.
markers on timeline

Use markers to:

  • Add interactive table of contents to your video to create navigation points for your viewers. See Create a Video Table of Contents.
  • Mark editing points such as mistakes during recording, sections to cut out, etc.
  • Set points to split a long video into multiple videos.
  • Automatically mark each slide on the timeline when recording a PowerPoint or Keynote presentation.
OptionDescription
Add a marker while recording Press Ctrl+M (Windows) or Shift+Ctrl+Option+Command+M (Mac) while recording.
Add a timeline markerTimeline markers always maintain their original location on the timeline and are not impacted by timeline edits.
  1. Drag the playhead to the desired location on the timeline.
  2. Press Shift+M.
Add a media markerMedia markers are attached to the media. If you move the media on the timeline, the marker moves with the media.
  1. Press Ctrl+M to open the marker view.
  2. Click the plus icon on the media.
    Plus icon on media
Show / hide marker viewWhen the Marker view is shown, Camtasia displays the Marker track and the marker names on the timeline. Show the Marker view to edit markers.
Marker track

Press Ctrl+M.
Next markerCtrl+]
Previous markerCtrl+[
Timeline select to previous markerPress Ctrl+Shift+[ to make a timeline selection between the playhead and the previous marker.
Timeline select to next markerPress Ctrl+Shift+] to make a timeline selection between the playhead and the next marker.
Change marker name

Note: If you include a table of contents when you export a video, the marker names appear as the table of contents entries within the video.

  1. Click to select marker.
  2. Enter new name in Properties.
    Marker name field in Properties
  3. Press Enter.
Turn a timeline marker into a media marker

  1. Press Ctrl+M to show the marker view.
  2. Hover over the media to display the Plus icon icon.
  3. Click the Plus icon icon where the vertical marker line crosses the media.
    Turn timeline marker into media marker
Turn a media marker into a timeline marker
  1. Press Ctrl+M to show the marker view.
  2. Hover over the Marker track to display the Plus icon icon.
  3. Click the Plus icon icon where the vertical marker line crosses the media.
    Turn media marker into timeline marker
Move the location of a markerClick and drag the marker to the desired position.
Delete a marker
  1. Click to select a marker.
  2. Press Delete.
Delete all markersSelect Modify > Markers > Remove all Markers.

Create a Video Table of Contents

Add markers on the timeline as navigation points in your video table of contents. The marker names appear in the table of contents in the video.
Table of Contents example

  1. To show the Marker track, click the Quiz/Marker dropdown and select Marker or press Ctrl+M.
    Marker dropdown
  2. Drag the playhead to the desired location on the timeline. To add a marker, click the Marker track or press Shift+M to add a timeline marker.
  3. Enter a name in the Properties panel and press Enter.

Export Video with Table of Contents

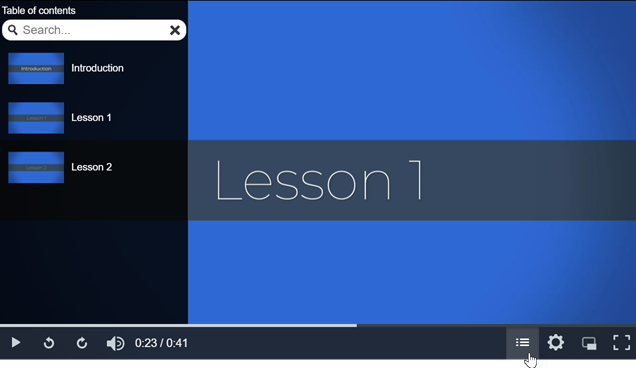
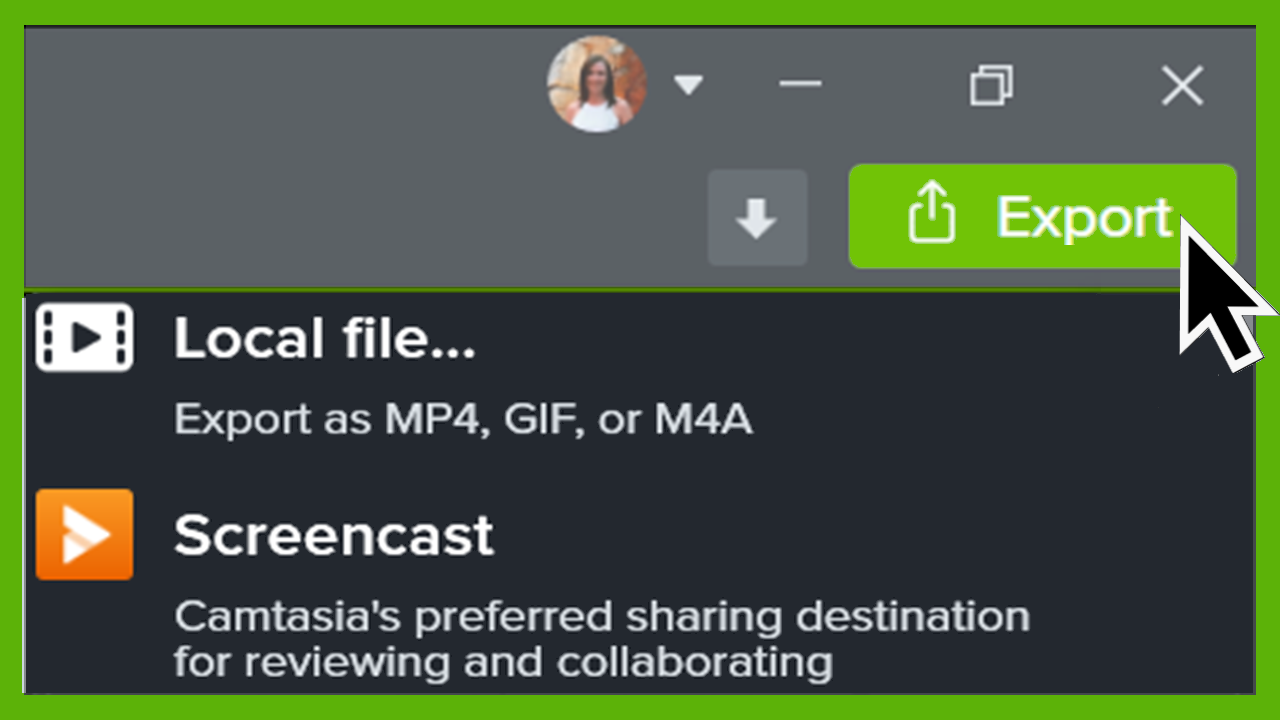
Note: The TechSmith Smart Player is required for table of contents, closed captions, search, quizzing, and hotspots in a video. To include the TechSmith Smart Player, export the video to Local File, Knowmia, or Screencast.

Windows

Export to one of the following locations:

  • Knowmia: Select Export > Knowmia.
  • Screencast: Select Export > Screencast.
  • Local File: See below for your version.

Local File – Camtasia Version 2022 and Later

View details
  1. Select Export > Local File.
  2. In the Export Local File dialog, select the MP4 with Smart Player option from the File type menu.
  3. Click Next.

Local File – Camtasia Version 2021 and Earlier

View details
  1. Select Export > Local File.
  2. In the Production Wizard, select Custom production settings and click Next.
  3. Select MP4 – Smart Player and click Next.
  4. On the Options tab, enable the Table of Contents option and click Next.
  5. Click Next to view Marker options.
  6. Select the desired marker options.
  7. Follow the prompts in the Production Wizard to complete the export process.
    The table of contents appears in the html files exported with the MP4.

Marker Options

Marker options in Production Wizard

Marker OptionDescription
Number marker entriesAutomatically number the table of contents markers sequentially in the exported video table of contents.
Table of contents initially visibleSelect the checkbox to show the table of contents by default.

If you disable this option, viewers must click the Table of Contents button on the video controller to view the TOC.
Table of Contents button

Disable markers for TOC entriesDeselect a marker checkbox to exclude the marker in the video table of contents.
RenameDouble-click the marker name in the list and type a new name.
Fixed LeftSelect to position the table of contents on the left side of the video.
Fixed RightSelect to position the table of contents on the right side of the video.
Marker Display
  • Text with thumbnail: Table of contents shows both the thumbnail and the marker name.
  • Text only: Table of contents shows only the marker name.
  • Thumbnail only: Table of contents shows only the thumbnail.

Mac

Export video to one of the following locations:

  • Knowmia: Select Export > TechSmith Knowmia.
  • Screencast: Select Export > Screencast.
  • Local File:
    1. Select Export > Local File > Export to MP4 (.mp4).
    2. Select the following options:
      • File format: Export to MP4 (.mp4)
      • Enable Export as Web Page option.
      • Enable Create table of contents from markers option.
    3. Click Export.

To view the video table of contents, viewers must click the Table of Contents button on the video controller.
Table of Contents button