Snagit’s scrolling capture allows you to take screenshots of entire web pages, long documents, wide spreadsheets, and any other window on your screen that requires scrolling to see everything in it.
Note: The names of scrolling capture options were updated in Snagit version 2023.2.0. To check if you are on the latest version:
- Windows: In the Capture window, select Help menu > Check for Updates.
- Mac: Select Snagit menu > Check for Updates.
There are two ways to capture a scrolling area:
- Scrolling Capture: Manually scroll down, up, or side-to-side to capture content that extends beyond the visible area on screen. Select this option for greater control of the capture area.
- Automatic Scrolling Capture: Automatically scroll a window horizontally, vertically, or in both directions to capture the entire contents of the window or web browser.
- In the Capture window, select the All-in-One tab.
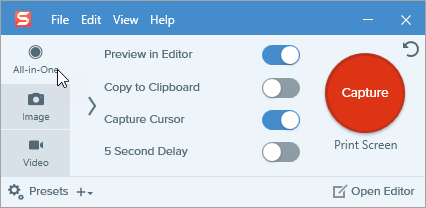
- Click the Capture button or press Print Screen (Windows) or Control+Shift+C (Mac).

- The orange crosshairs appear. Click and drag to select an area within a window on the screen. See Selection Area Tips.
- The All-in-One toolbar appears. Click the Scrolling Capture button.

- Use the window scroll bars or mouse wheel to scroll the content you want to capture, either vertically or horizontally. Snagit captures anything shown within the selected area. See Scrolling and Panning Tips.
- Click the Done button when you have finished scrolling.

If the toolbar is hidden, click the Capture window icon in the taskbar.

Snagit processes the capture and opens it in Snagit Editor where you can preview, edit, and share the capture.
Selection Area Tips
- Resize the web browser or application window to a larger size so it is easier to view the content as you scroll or pan during capture.
- To exclude the All-in-One toolbar from the capture, click and drag the toolbar out of the selection area.
- Exclude irrelevant content in the capture, such as scroll bars, blank margins, online ads, etc.
- Scroll smoothly. Do not scroll too fast or slow.
- Use the scroll bars rather than the mouse wheel to avoid capturing hover states while scrolling.
- Scroll or pan one direction at a time, either up and down or side-to-side. Try not to zigzag.
Tip: Save time with the Scrolling Capture preset and a custom hotkey.
By default, Snagit includes a Scrolling Capture preset. For details about capture presets and how to assign a keyboard shortcut, see Save Capture Settings as Presets.
- Open or set up what you want to capture (app, web page, desktop, etc).
- In the Capture window, click the All-in-One tab.
- Click the Capture button or press Print Screen (Windows) or Control+Shift+C (Mac).
- The orange crosshairs appear. Move the cursor over the window. If Snagit detects that it can scroll automatically, scrolling arrows appear.
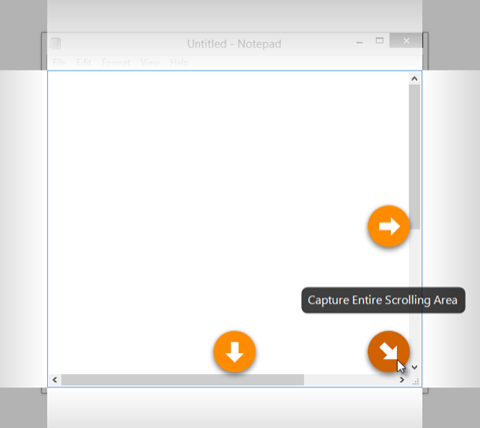
- Click an arrow to take a capture of the horizontal scrolling area, vertical scrolling area, or the entire scrolling area.
Snagit processes the capture and opens it in Snagit Editor where you can preview, edit, and share the capture.
Note: Scrolling Arrows may not appear if the application, browser, or website does not support automatic scrolling, or if scrolling capture is not enabled. To troubleshoot scrolling issues, see our technical support articles for Windows or Mac.
Note: This tutorial is for Snagit version 2024. Previous versions may look or function differently.
All Snagit Tutorials