In this tutorial:
Note: Effects are only available for images. Share your video to TechSmith Camtasia to enhance it with annotations and effects.
Add an Image Effect
Apply effects to an image or selection after capture:
- Click the Effects button.

- The Effects panel opens. Complete one of the following to apply an effect:
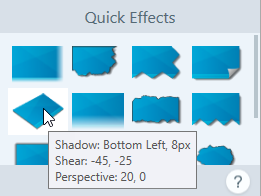
- Select a style from the Quick Effects.
- On Windows: Click to select an effect. Customize the settings in the dropdown and click Apply.
- On Mac: Click to apply an effect. Click the
 button to customize the settings.
Note: Effects applied in Snagit Mac are not currently supported by Snagit Windows when the image is saved as a SNAGX file. They will not display and will be lost if you open and save the SNAGX file in Snagit Windows. To preserve effects when sharing to Snagit Windows, save the file as a .png, .jpg, or other image file type.
Remove Effect from Image
- Windows: Select Edit > Undo to remove the last applied effect. If you need to remove multiple changes, select Undo multiple times.
- Mac: In the Effects panel, click a blue effect to turn off the effect.

To turn off all effects, click the No Effects Quick Effect.

Snagit Effect Types
Tip: Save a custom effect as a Quick Effect or Favorite for future use.
Windows: After you edit the settings, click the Add to Quick Effects button in the settings dropdown.
Mac: As you edit the settings, a new effect appears at the bottom of Quick Effects. Click the  icon to save the effect for future use. Click the
  icon to save the effect to Favorites.
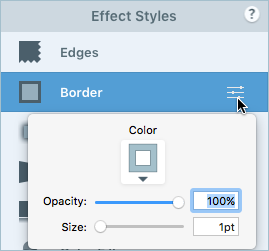
Border

Add a border to the outside of an image.
- To change the color of the border, click the Color dropdown and complete one of the following:
- Click to select a color from the preset colors or from the color palette.
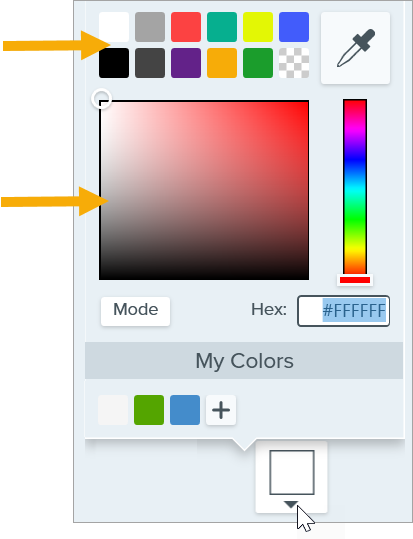
- Click the Eyedropper tool and then click to select a color from anywhere on the screen.
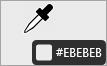
- Enter a HEX or RGB value into the field.
- Drag the slider to adjust the width.
- Click the Apply button to apply the effect to the image (Windows only).
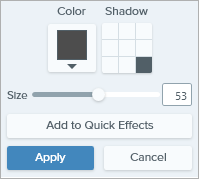
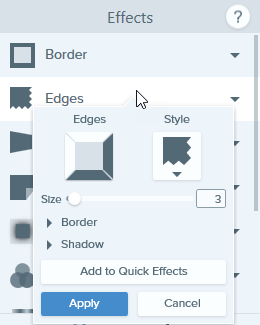
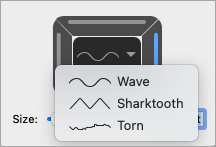
Edges

Add an edge effect to one or more sides of an image.
- To change the style of the effect, select a style from the dropdown.
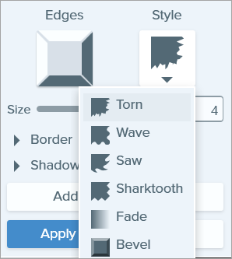
- To change the size of the effect, drag the Size slider.
- To indicate where the effect is visible, click one or more edges of the bevel.
- Expand the Shadow dropdown to select the color and location of the shadow for the effect (Windows only).
- Click the Apply button to apply the effect to the image (Windows only).
Capture Info
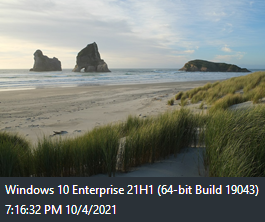
Automatically add information to your screenshots such as application name, capture date and time, and operating system.
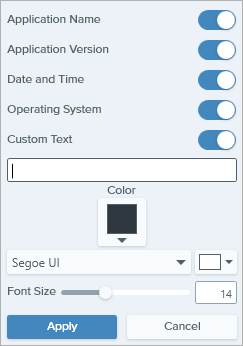
Note: Capture Info can only be added to images captured with Snagit.
- Select Capture Info properties to include in the caption:
- Application Name
- Application Version
- Date and Time
- Operating System
- Select the Custom Text option to enter text into the text field below.
- To change the Capture Info background color, click the Color dropdown and complete one of the following:
- Click to select a color from the preset colors or from the color palette.
- Click the Eyedropper tool and then click to select a color from anywhere on the screen.
- Enter a HEX or RGB value into the field.
- Font Properties:
- Font: Click the dropdown to select a font.
- Font Color: Click the dropdown to select a color.
- Font Size: Drag the slider or enter a value to adjust the font size.
- Click the Apply button to apply the effect to the image (Windows only).
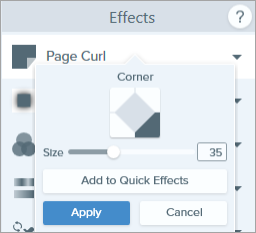
Page Curl (Windows)

Add an effect that curls the corner of an image. Click the Apply button to apply the effect to the image.
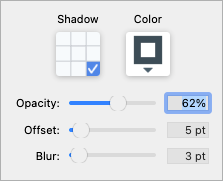
Shadow

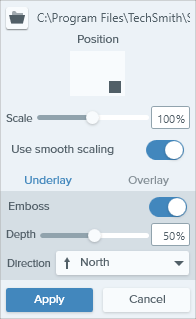
Perspective

Distort an image to give the appearance of being viewed from a different angle.
- Select a style from the dropdown.
- Drag the Horizontal/Rotation or Vertical/Tilt sliders to adjust the effect.
Reflection (Mac)

Add a mirror-like reflection to an image.
- Drag the Size slider to adjust the percentage of the image that is reflected.
- Drag the Opacity slider to adjust the transparency of the reflection.
Apply a filter effect over the entire image. Select a filter type in the dropdown:
- Soften – Blur details in an image.
- Sharpen – Adjust the contrast in an image to improve blurriness.
- Opacity – Adjust the transparency of an image.
- Monochrome – Apply a black and white filter to an image.
- Grayscale – Convert colors in an image to shades of gray.
- Invert Colors – Invert colors in an image creating a negative effect.
Apply a filter effect over the entire image. Change the following image colors with this effect:
- Grayscale – Convert colors in an image to shades of gray.
- Sepia Tone – Convert colors in an image to shades of a single color creating a monochrome effect.
- Invert – Invert colors in an image creating a negative effect.
- Sharpen – Adjust the contrast in an image to improve blurriness.
- Opacity – Adjust the transparency of an image.
Enhance or correct the color and tonality (lightness, darkness, and contrast) in an image. Change the following properties for this effect:
- Brightness – Adjust the overall lightness of an image.
- Contrast – Adjust the difference in the color and brightness between image elements.
- Hue – Adjust the dominant visible color in an image such as Red, Green, or Blue.
- Saturation – Adjust the intensity of visible colors in an image.
- Gamma – Adjust the overall darkness of an image.
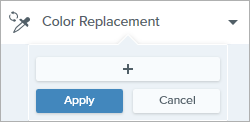
Color Replacement (Windows)
Swap two colors in an image or replace one color with another color. Click the  to select colors to swap before you apply this effect.
Spotlight and Magnify (Windows)
Draw attention to an area in an image by highlighting and enlarging the area.
- Drag an area on your image with the Selection tool.
- Select Image > Effects > Spotlight and Magnify.
- Adjust the effect properties for the desired effect.
- Click the Apply button to apply the effect to the image.
For Mac, see the Spotlight Tool.
Watermark (Windows)

Fade (Mac)

Apply a gradual dimming to the edges of an image.
Note: This tutorial is for Snagit version 2024. Previous versions may look or function differently.