Add Audio Effects

Learn how to apply an audio effect to adjust the volume on different tracks, remove background noise, or even change the pitch of the speaker’s voice.

Camtasia product icon

In this tutorial:

Audio Effects Example: Reduce Background Music

Add and Edit Effects

  1. Click the Audio Effects tab.
    Audio Effects tab
  2. Drag an effect onto an audio clip on the timeline.
    • To view applied effects, click the Show Effects tray icon on the media.
      Show Effects Tray icon
    • To hide applied effects, click the Hide Effects tray icon on the media.
      Hide Effects Tray icon
  3. To adjust the duration, drag either end of the effect on the timeline.
    Drag effect handle to adjust duration
  4. To customize the effect, click Properties.
    Properties button

Note: Some effects have audio points instead of properties which are adjusted by clicking and dragging audio points on the track. See Edit Audio.

Effect Types

EffectCustomize Properties
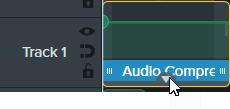
Audio Compression
Helps even out audio levels.
  1. Click Properties.
  2. Select a level from Volume variation dropdown menu or manually adjust Ratio, Threshold, and Gain to get the desired effect.
Clip Speed
Change audio and video clip to play back faster or slower.
Complete one of the following:
  • Click the Show Effects tray icon on the media and drag the effect handles on the timeline.
    Drag effect handles to adjust clip speed
  • Click Properties and enter an amount for Speed or Duration to get the desired effect.
    • Adjust speed higher for the video to play back faster.
    • Adjust speed lower for the video to play back slower.
Emphasize
Emphasizes the audio for the applied media by decreasing the volume of all other audio tracks.

For example, apply the effect to voice-over audio to decrease the volume of the background music for the duration of the voice-over clip.
  1. Click Properties.
  2. Drag the Emphasis slider to change the volume for all other audio tracks on the timeline. 100% mutes the audio of the other tracks for the duration of the applied clip.
  3. Select Ramp Position to set where the volume transition starts and ends on the timeline.
    • Outside: Complete audio change before and after applied media.
      Audio changes are completed before and after media plays
    • Span: Complete audio change over the start and end of the applied media.
      Audio changes during the start and end of the media
    • Inside: Complete audio change at the start of the applied media and before the end of the applied media.
      Audio changes occur while the affected media plays
  4. Enter an amount in seconds to set the duration the Ramp In and Ramp Out volume transitions occur.
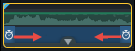
Fade In / Fade Out
Creates smooth transition in to or out of audio.
Automatically applied to beginning or end of audio clip. Grab audio points and drag to adjust.
Pitch (Mac Only)
Adjust frequency of sound waves to change voice sound.
  1. Click Properties.
  2. Manually adjust Pitch, Ease In, or Ease Out to get desired effect.
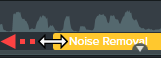
Noise Removal
Helps reduce background noise.
  1. Click Properties.
  2. Click Analyze to automate noise removal process (Windows only) or manually adjust the Sensitivity, Reduction (Mac), or Amount (Windows) to get desired effect.