Learn how to create and manage libraries to speed up video creation in Camtasia Editor, maintain consistency across your videos, and share assets with your team.
Library Overview
The library stores assets and media to reuse across Camtasia video projects. Create custom libraries to save intros, animated backgrounds, icons, titles, music, groups, annotations, and more. Export libraries to share assets with your team.
To open the library, select Media tab > Library subtab.
To add a library asset to your video, complete one of the following:
Drag the asset from the Library subtab onto the desired location on the timeline.
Right-click (Windows) or Control+click (Mac) the asset in the library and select Add to Timeline at Playhead.
Create a Custom Library Organize assets based on a project, video type, asset type, or brand.
Select Media tab > Library subtab.
In the Library dropdown, select Create New Library.
Enter a name.
Select an option in the Start from dropdown to create a blank library or create a copy of an existing library.
Click Create.
Add an Asset or Group to a Library
Right-click (Windows) or Control+click (Mac) an asset or group on the timeline and select Add to Library.
Enter a name.
Tip: Best practices when naming assets
Keep the name short.
Avoid generic names such as “callout1”. Use descriptive cues such as video purpose, asset type, or color in the name. For example, “blue-speaker-intro”.
Select a library from the Library dropdown.
Select Use Canvas Size to have the asset or group automatically resize based on the canvas dimensions or Use Visible Size to keep the original dimensions.
Click OK.
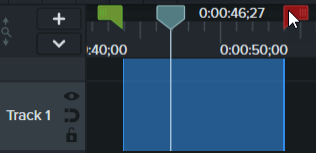
Add a Selection from the Timeline to the Library
Click and drag the green and red handles to select an area on the timeline.
Right-click (Windows) or Control+click (Mac) the selection and select Add Timeline Selection to Library.
Enter a name.
Select a library from the Library dropdown.
Select Use Canvas Size to have the asset or group automatically resize based on the canvas dimensions or Use Visible Size to keep the original dimensions.
Click OK.
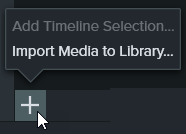
Add Media from Your Computer to the Library
Select Media tab > Library subtab.
Click the + icon and select Import Media to Library or drag the desired assets into a library or folder.
Add Media from the Media Bin to the Library
Select the Media tab > Media Binsubtab.
Right-click (Windows) or Control+click (Mac) an asset in the Media Bin and select Add to Library.
Select a library from the Library dropdown.
Click OK.
Add a Folder to the Library
Select the Media tab > Librarysubtab.
Select a library from the Library dropdown.
Right-click (Windows) or Control+click (Mac) within the library and select New Folder.
Enter a folder name.
Press the Enter key.
Move Assets or Folders within a Library
Select the Media tab > Library subtab.
Select a library from the Library dropdown.
Click to select the asset or folder. Ctrl+click (Windows) or Command+click (Mac) to select multiple assets or folders.
Drag the selection to the desired folder or location in the current library.
Note: To nest a folder in a library, click and drag the folder onto another folder.
Move Assets or Folders to Another Library
Select the Media tab > Library subtab.
Select a library from the Library dropdown.
Click to select the asset or folder. Ctrl+click (Windows) or Command+click (Mac) to select multiple assets or folders.
Right-click (Windows) or Control+click (Mac) the selection and select Move To > the desired library.
Delete an Asset or Folder
Right-click (Windows) or Control+click (Mac) the asset or folder in the library and select Delete.
Find Assets
Search within a library or across all libraries to find assets based on file names.
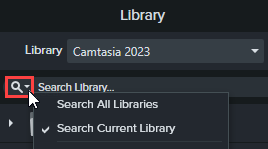
Search for Assets in Library
Select the Media tab > Library subtab.
Click the Search icon and select the scope of the search: Search All Libraries, Search Current Library, or select a recent search term from the dropdown.
Type in the Search Library field.
The search results appear. To sort the search results, right-click (Windows) or Control+click (Mac) a result and select Sort By.
Sort Assets
Right-click (Windows) or Control+click (Mac) a folder or asset in the library and select Sort By. You can sort by name, type, date added, date used, or reverse the order.
Preview an Asset
Double-click the asset in the library. A preview window appears.
Share a Library
To maintain a consistent video style across a project or organization, share your library assets with others.