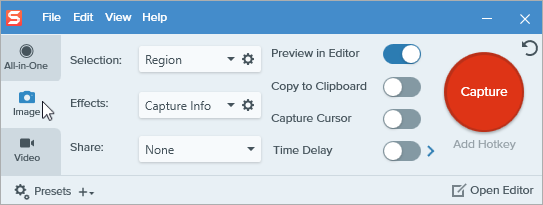
Common Captures with Snagit

Discover ways to capture with Snagit to meet your needs and learn about capture settings.

3d Snagit icon

Tip: Save a preset of the capture settings for future use.

In the Capture window, select Add Preset dropdown > New preset from current settings.


Capture an Image

Capture an image snapshot of anything on your screen. See Capture an Image.
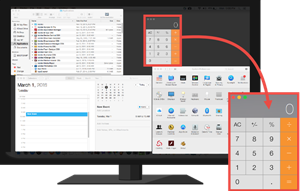

Capture a Region
Capture a Region example

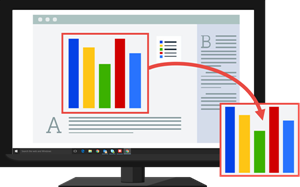
Capture a portion of the screen. See Capture an Image.


Capture a Fixed Image Size
Capture a Fixed Image Size example

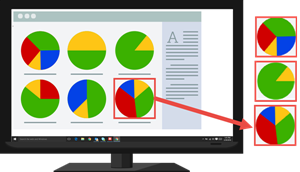
Save editing time by selecting the required dimensions during capture. Use this option to capture a consistent size across your images.

View steps:
  1. In the Capture window, select the Image tab.
    Image tab in Capture window
  2. In the Selection dropdown, select Region.
  3. Click the Selection Properties button.
    Selection properties button
  4. Select the Fixed region option.
  5. Enter the dimensions in pixels into the Width and Height fields.
  6. Disable the Set position option to select any area on the screen.
  7. Click the Capture button or press Print Screen.
    Capture button
  8. A box with the selected dimensions appears on the screen. Move the box over the area you want to capture on the screen. Click to select the area.

Capture a Specific Location on the Screen

Set Snagit to capture a specific location on the screen.

View steps:
  1. In the Capture window, select the Image tab.
    Image tab in Capture window
  2. In the Selection dropdown, select Region.
  3. Click the Selection Properties button.
    Selection properties button
  4. Select the Fixed region option.
  5. Enable the Set Position option.
  6. Enter the position in the X and Y fields or click the Select Region button to click and drag an area on the screen.
  7. If you set the X and Y position, click the Capture button or press Print Screen.
    Capture button

Snagit captures an image of the position selected on the screen.


Capture the Entire Screen

Capture the full screen. See Capture an Image.

Note: On Mac, if you have multiple monitors you can only select one screen at a time.


Capture a Window
Capture a Window example

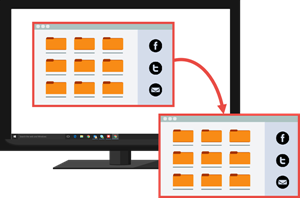
Capture an open window, dialog, or area in an application on your screen. See Capture an Image.


Capture an Open or Hidden Window (Mac)
Capture an Open or Hidden Window example

Capture an image of an open or hidden window on the screen.

View steps:
  1. In the Capture window, select the Image tab.
    Image tab in Snagit Mac Capture window
  2. In the Selection dropdown, select Mission Control.
  3. Click the Capture button or press Control+Shift+C.
    Capture button
  4. Snagit displays all the open windows on the screen. Move the cursor over the window to capture. Click to capture the window.

Capture a Scrolling Window
Scrolling capture example

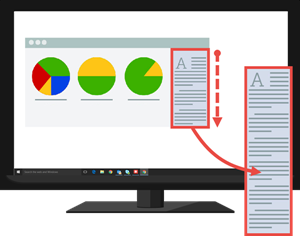
Capture the contents of a web browser or application that extend beyond the visible area in the window.

See Capture a Scrolling Area.


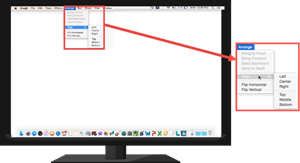
Capture a dropdown or cascading menu.

View steps:
  1. In the Capture window, select the Image tab.
    Image tab in Capture window
  2. In the Selection dropdown, select Advanced > Menu (Windows) or Menu (Mac).
  3. On Windows, click the Menu Properties button.
    Menu Properties options

    • Capture opened sub-menus: Capture the open flyout or submenus.
    • Capture menu bar: Capture the menu bar label with the menu capture.
  4. Enable the Time Delay option for additional time to open a menu before capture. Click the options arrow and enter the number of seconds for the delay.
    Time Delay options arrow
  5. Click the Capture button or press Print Screen (Windows) or Control+Shift+C (Mac).
    Capture button
  6. The countdown begins in the bottom-right corner of the screen. Open the desired menu.

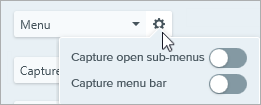
Snagit captures an image of the opened menu.


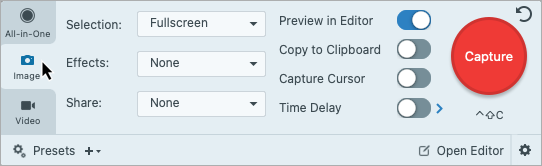
Set Up a Time-Delayed Capture

Delay the start of the capture by a number of seconds to allow for additional setup time before capture for items such as dropdown menus.

View steps:
  1. In the Capture window, select the Image tab.
    Image tab in Capture window
  2. Choose an option from the Selection dropdown.
  3. Enable the Time Delay option. Click the options arrow and enter the number of seconds for the delay.
    Time Delay options arrow
  4. Click the Capture button or press Print Screen (Windows) or Control+Shift+C (Mac).
    Capture button
  5. The countdown begins in the bottom-right corner of the screen. Open or set up what you want to capture on the screen.

Snagit captures an image of the selected area of the screen.


Schedule a Capture (Windows)

Schedule a date and time for Snagit to take a capture of the selected area on the screen.

View steps:
  1. In the Capture window, select the Image tab.
    Image tab in Capture window
  2. Choose an option from the Selection dropdown.
  3. Add an effect, select a share destination, or customize the other capture options on the Image tab.
  4. Enable the Time Delay option.
  5. Select the Schedule option and set the time to capture.
  6. Click the Start button or press Print Screen.
    Start button
  7. Click and drag to select an area to capture.

Note: If you set the Selection dropdown to Fullscreen, Menu, Clipboard, or File, you will not click and drag to select an area to capture.


Set Up a Time-Lapse Capture (Windows)

Capture an image from the same location on the screen at a continuous time interval.

View steps:
  1. In the Capture window, select the Image tab.
    Image tab in Capture window
  2. Choose an option from the Selection dropdown.
  3. Add an effect, select a share destination, or customize the other capture options on the Image tab.
  4. Enable the Time Delay option.
  5. Select the Interval option and set the time interval.
  6. Click the Start button or press Print Screen.
    Start button
  7. Click and drag to select an area to capture.
  8. Snagit captures an image based on the time interval set. To end the time-lapse capture, click the Stop button in the Capture window.
    Stop button

Note: If you set the Selection dropdown to Fullscreen, Menu, Clipboard, or File, you will not click and drag to select an area to capture.


Repeat the Last Capture

Make a new capture with the same settings as the previous capture.

View Windows steps:

Set a shortcut for this option.

  1. In the Capture window select File menu > Capture Preferences > Hotkeys tab.
  2. For the Repeat last capture option, select the preferred modifier key(s) and hotkey from the dropdown.
  3. Click OK.
View Mac steps:

Press Control+Shift+R.


Capture a Free Hand Area (Windows)
Freehand capture example

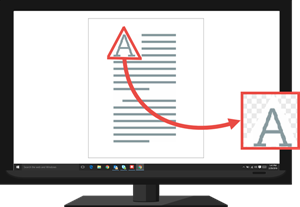
Capture an area drawn with the cursor.

View steps:
  1. In the Capture window, select the Image tab.
    Image tab in Capture window
  2. In the Selection dropdown, select Advanced > Freehand.
  3. Click the Capture button or press Print Screen.
    Capture button
  4. The cursor changes to a Scissors icon. Click and drag around the area to capture. Release the mouse button to end the capture.

Capture Multiple Areas on the Screen
Capture multiple areas example

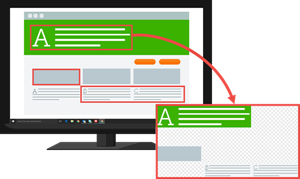
Capture multiple areas on the screen in a single capture.

View Windows steps:
  1. In the Capture window, select the Image tab.
    Image tab in Capture window
  2. In the Selection dropdown, select Advanced > Multiple Area.
  3. Click the Capture button or press Print Screen.
    Capture button
  4. The orange crosshairs appear. Complete one of the following to select the areas to capture:
    • Window: Move the cursor over the window to capture. When an orange dashed border appears around the window, click to select the highlighted area.
    • Region: Click and drag to select the desired area on the screen.
  5. To complete the capture, click the Finish button at the top of the screen.
    Finish button
View Mac steps:
  1. In the Capture window, select the All-in-One tab.
    All-in-One capture tab
  2. Click the Capture button or press Control+Shift+C.
    Capture button
  3. The orange crosshairs appear. Hold the Command key and click and drag to select the desired areas on the screen.
  4. Release the Command key to end the capture.

Capture from a Webcam (Mac)

Capture a still image from a built-in webcam or another camera device.

View steps:
  1. In the Capture window, select the Image tab.
    Image tab in Capture window
  2. In the Selection dropdown, select Webcam.
  3. Connect a webcam to your computer or use the built-in webcam.
  4. Click the Capture button or press Control+Shift+C.
    Capture button
  5. The webcam dialog appears. Select the camera device from the Camera dropdown.
  6. Click the Capture button.

Capture an Entire Webpage (Mac)

An alternative method to scrolling capture to quickly capture an entire web page.

View steps:

Drag the URL from the address bar onto one of the following locations:
Web address bar

  • Menu bar icon
    Snagit icon in menu bar
  • Snagit Dock icon
    Snagit icon in dock

Snagit captures the entire web page including the area not visible in the current web browser window.


Capture with a Preset and Keyboard Shortcut

Presets automatically remember your capture settings. Use presets to:

  • Save commonly used capture settings.
  • Quickly switch between capture types based on the task at hand.
  • Automatically add effects or share captures to a specific location or application.

See Save Capture Settings as Presets.


Record a Video

Record the action on the screen, the web camera, or audio (from a microphone or system audio) as a MP4 video file.

See Record a Video with Snagit.


Record a Picture-in-Picture Video
Picture-in-Picture example

Record your screen and webcam at the same time to connect with your viewers.

See Record a Picture-in-Picture Video.


Capture Text

Capture text from anywhere on the screen to paste into a document or another application.

View steps:
  1. In the Capture window, click to select the Image tab.
    Image tab in Capture window
  2. In the Selection dropdown, select Grab Text.
    Grab Text selection
    Note: Capture settings not compatible with Grab Text are disabled in the Capture window.
  3. Click the Capture button or press Print Screen (Windows) or Shift+Ctrl+C (Mac).
    Capture button
  4. The orange crosshairs appear. Click and drag to select the desired area on the screen.
    Grab Text selection

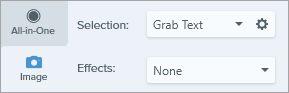
The capture opens in Snagit Editor where you can preview the text in the Grab Text Results dialog. Click the Copy All button to copy the text to the Clipboard to paste into a document or another application. See Grab & Edit Text.


Copy Capture to Clipboard and Bypass Snagit Editor

Copy an image capture directly to the clipboard to paste into another application and do not open Snagit Editor.

View steps:
  1. In the Capture window, disable the Preview in Editor option.
    Capture window with Preview in Editor deselected and Copy to Clipboard selected
  2. Select the Copy to Clipboard option.

Snagit Printer Capture (Windows)

Send content from an application into Snagit Editor using the application’s Print option.

View steps:

Set Up a Snagit Printer

  1. In the Capture window, select File > Capture Preferences > Capture tab > Printer Capture Settings.
  2. The Selection Properties dialog opens. On the Snagit Printers tab, select Snagit 2022 or click Add a Snagit Printer. Click the Properties button to edit the settings for the printer output.
  3. Click the OK button.

Send Content from an Application into Snagit Editor

  1. In the application, select File > Print (or the equivalent in the application).
  2. From the list of printers, select Snagit 2022.
  3. Click OK to send the capture to Snagit Editor.

Note: This tutorial is for Snagit version 2024. Previous versions may look or function differently.