It’s no surprise that, according to a study by Google, users are three times more likely to watch a tutorial video on YouTube than read written instructions for a product.
Why would anyone want to drudge through paragraphs of dense text when they can watch step-by-step instructions that visually guides them through the process?
Tutorial videos, instructional videos, training videos, and explainer videos have all become an integral part of the digital learning experience.
Make your own tutorial videos today!
Download Camtasia and FREE templates to quickly and easily make your own tutorial and training videos.
Download nowBut what is it that makes a tutorial video truly stand out? What elements need to be incorporated to ensure that the video is not just informative, but also engaging and easy to follow? In this guide, we’ll delve into the essentials of creating good video tutorials, and show you how to make a tutorial video, step by step.
Whether you’re an entrepreneur looking to explain your product, an educator aiming to make learning fun, or simply someone trying to share your skills with the world, we’ve got you covered.
But before we dive into the how, it’s important to understand the what. By knowing exactly what a tutorial video is, you’ll have a stronger foundation to build on and be in a better position to fully grasp the key components of creating a fantastic tutorial video.
What is a tutorial video?
At its core, a tutorial video is a multimedia resource that is specifically designed to teach or guide viewers on how to complete a task, understand a concept, or use a product or service. It’s a dynamic digital tool that provides clear, concise, and visually engaging instructions to help viewers learn at their own pace.
The true magic of a tutorial video lies in its ability to answer the ‘how-to’ question in the most efficient way possible. Tutorial videos do much more than just deliver information, they walk viewers through processes one step at a time. By providing practical insights, this thorough approach reinforces the learning experience and delivers real value to the viewer.
From how to send an email, to how to send objects into space — there’s no limit to what a video tutorial can teach.
And, as 31.3% of internet users watch at least one tutorial video each week, there’s no doubt that people find them useful for learning new things.
Make your own tutorial videos today!
Download Camtasia and FREE templates to quickly and easily make your own tutorial and training videos.
Download nowHow to make a tutorial video: A step-by-step guide
To create tutorial videos, there are steps you need to take to ensure the content you create is the best it can be. Essentially, this all boils down to providing value to your viewers.
As a concept, putting your viewers first is simple, but there are some best practices to follow that will help ensure you’re keeping your content focused on providing the right information in the best possible way.
Let’s take a look at the key steps to producing a good tutorial video.
Step 1: Define your audience
To start, ask yourself three questions, which you’ll find at the top of the script template:
- Who’s my audience?
- What specific problem will this tutorial solve?
- What will the audience be able to do after watching?
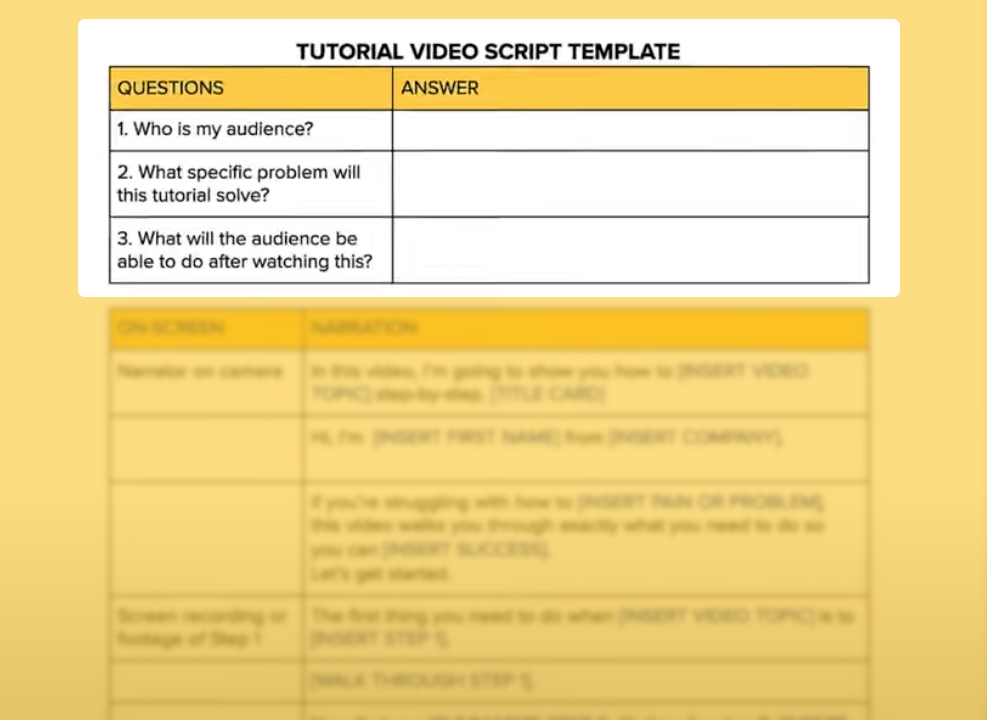
You want to develop an understanding of your target audience’s general skills and get a sense for their comfort level with the content you’re teaching. You don’t want to make a tutorial full of advanced instructions and long winded explanations if your viewers are just getting started.
After you have a clear sense of your audience, focus on the specific problem the tutorial will help them solve.
Each video should help solve one problem, and only one problem.
For example, showing users how to add a follower in our project management software. I’m not giving an entire overview of the project management software, I’m just showing how to add a new follower.
If you have more subjects to cover, consider making more than one video to keep each tutorial well-focused.
Step 2: Set clear goals
Then, define the goals for the video. Think about what you want a person to be able to do when they’re finished watching and then write it down. An example might sound something like this: “After watching this video, a user will be able to add a new team member to a project management board.”
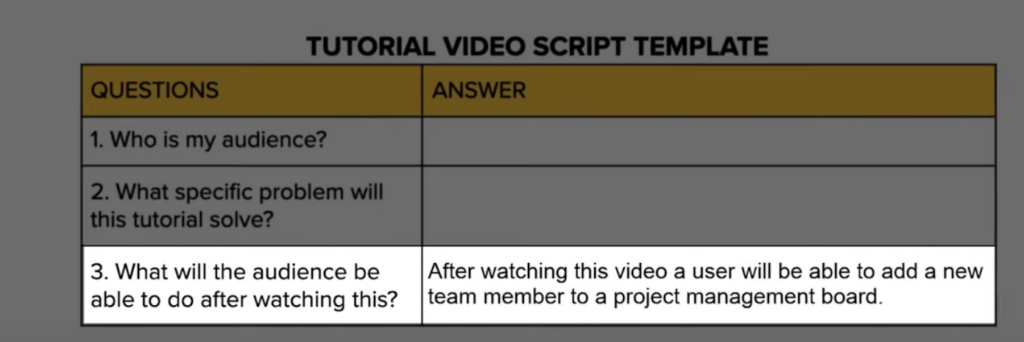
It’s clear and the goal is simple. This goal statement will provide the foundation for the rest of your content.
Step 3: Write a script
When you’re finished with your goals, it’s time to move on to the next key step in making a tutorial. Scripting. Writing a script is an opportunity to test out what you plan to say, so that you can revise and improve the narration before you record.
This might sound like a lot of work up front. Because it is if you start with a blank screen. We’ve eliminated that pain and included a fill-in-the-blanks script template that you can use to quickly start writing.
This is just a starting guide. After you fill in the blanks, read it out loud, and if it doesn’t sound like something you’d say, it’s okay to change it.
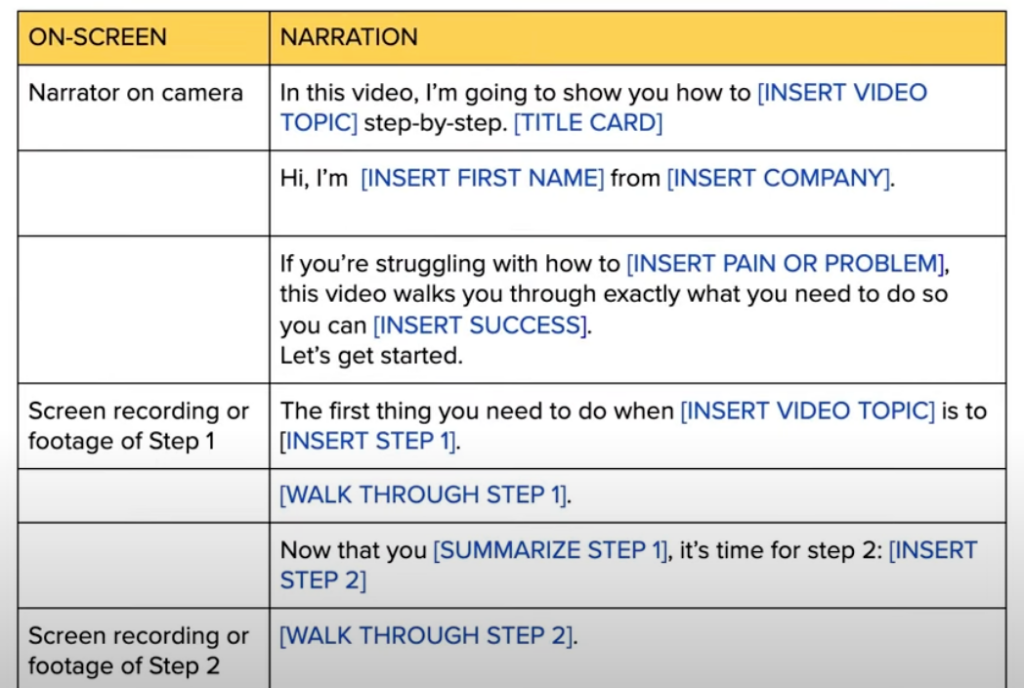
In our template, there are two columns you’ll use to write the script.
The left side is for visual cues (what will be on screen). In the template, we’ve made it so that you can see the narrator at the beginning and at the end of the video, but the rest is mostly screen-recorded content, but this can be adjusted to your liking.
The right side of the script is for your narration. Starting with the obvious, your introduction. We cut past a lot of fluff to just immediately let your viewer know they’re watching the right video.
Make your own tutorial videos today!
Download Camtasia and FREE templates to quickly and easily make your own tutorial and training videos.
Download nowStep 4: Record your narration
At TechSmith, we find success in recording narration first. So if you’ve listed your steps as having screen recording as the visual element on screen, we’d recommend you record those bits of audio first. You can leave the camera off and even use Camtasia Audiate, our software that makes editing your audio as easy as editing a text document.
It transcribes your narration as you speak. If you hesitate or say, um, too many times, it marks those for you to easily remove all at once when you’re finished. Once you’ve cleaned up your audio, export it into Camtasia, where you’ll record your intro and outro on camera for that personal touch.
Step 5: Record your screen
Once you’ve completed recording on all of your audio, the next step is recording your screen.
Start by minimizing distractions. Clean up your desktop screen by hiding your icons, choosing a neutral colored background or a branded wallpaper. Close any applications you don’t need, and turn off any notifications that might pop up, including on your phone next to you.
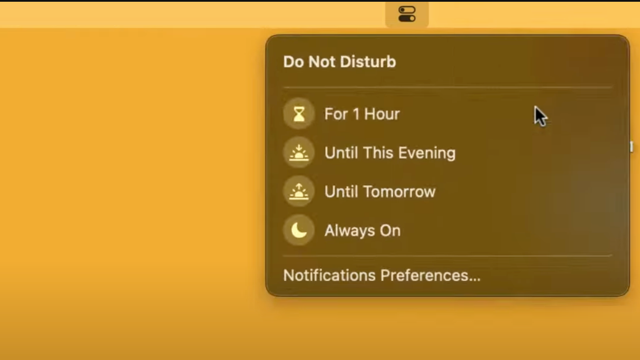
Then, open the application that will be the subject of your tutorial, and practice walking through the steps you’ve listed in your script.
Practice a few times until you can comfortably make it through the entire workflow, with minimal mistakes. This will make for less editing in the end, and better recordings. When you’re comfortable with your walkthrough, open the Camtasia Recorder. Select the region or window you want to record, turn on system audio if your demo has sound, Otherwise, you can leave that off and hit the red start recording button.
Keep in mind, you can edit the recording when you’re finished. So if you make a mistake, simply pause and then start at the place in your script, right before the mistake happened. Removing mistakes is simple and quick with Camtasia. Which leads us to the next key step in making a tutorial, editing the video.
Step 6: Edit your video
Editing a video, huh? If that sounds intimidating, don’t worry. It’s a skill anyone can build with a little practice. But to get you started, we have a free template pre-built tutorial video template with almost everything you need to start your video immediately.
Best of all, it will match up with the script you just completed, so all you need to do is fill in the blanks.
We’ve built in placeholders for your footage, title cards, lower thirds, and more. Everything in this template is totally customizable, from the duration of each section, to the colors and fonts used.
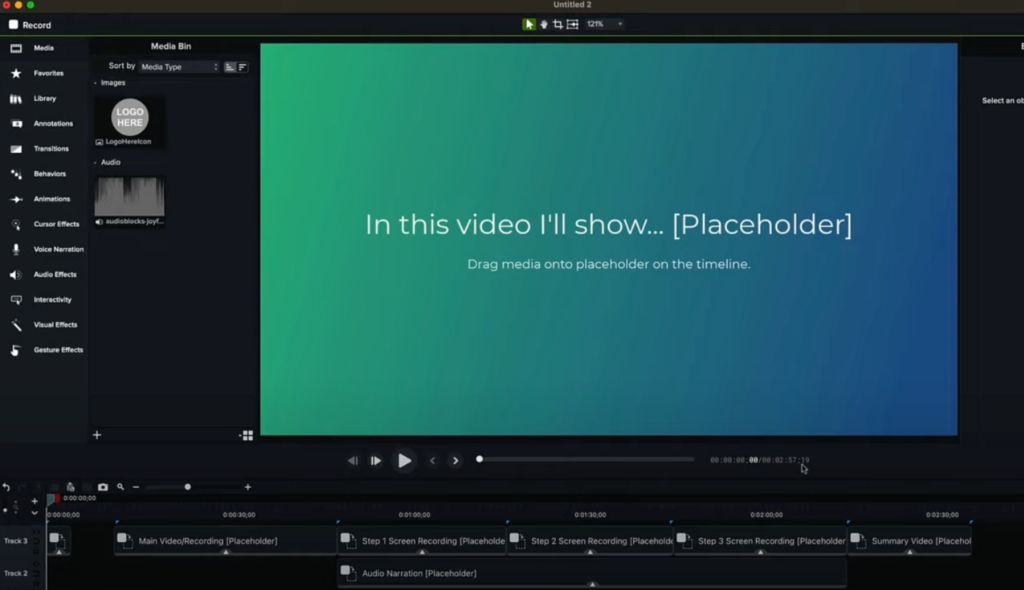
Don’t like the music? Right-click and convert it to a placeholder, and you can bring in your own royalty-free song that will retain all of the properties for fading in and out that we’ve included, which, again, are still totally customizable themselves.
When I say editing, I mean a few different things.
- Remove mistakes and extra footage from the screen recording.
- Sync the narration with the video so that what you’re saying lines up with what you’re showing.
- Use animations and annotations to call viewers’ attention to important elements.
- Add any other finishing touches you want to make your own.
1. Remove mistakes
Let’s start with removing mistakes. Once you’ve added your screen recording to the placeholder line of the template it belongs in, If you want to remove a mistake from the middle of a recording, hover over the front of that mistake with the playhead and click cut. Move to the end of the mistake and again cut.
You can do this as many times as you need and if you make a mistake while editing, simply click undo. To remove mistakes or trim off extra footage from the beginning or end of your recording, click and drag the end of the clip in.
Cutting and trimming this clip probably will adjust the other assets in your template, leaving gaps. Just make sure to tighten everything back up when you’re finished cutting.
2. Sync your audio and video
Now let’s focus on syncing your audio and video. Start by clicking and dragging your audio narration to the timeline, lower placeholder, cleverly labeled audio narration, and drop. Once there, use clip speed and extend frame to sync the video to your audio.
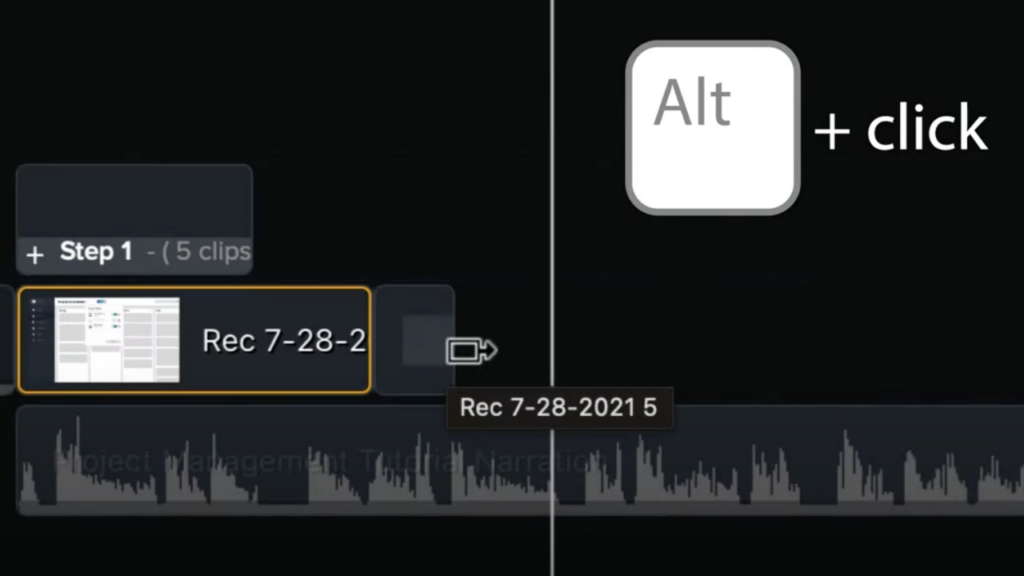
What I mean is if the narration takes more time to explain the concept than the screen recording takes showing it, split the video clip and use extend frame, which is option click on Mac or alt click on windows. and drag it out to essentially pause the video as you continue your narration. Or, if you want to speed up a part of your recording, maybe you’re showing a longer process that you want to sum up quickly.
Make your own tutorial videos today!
Download Camtasia and FREE templates to quickly and easily make your own tutorial and training videos.
Download now3. Use animations
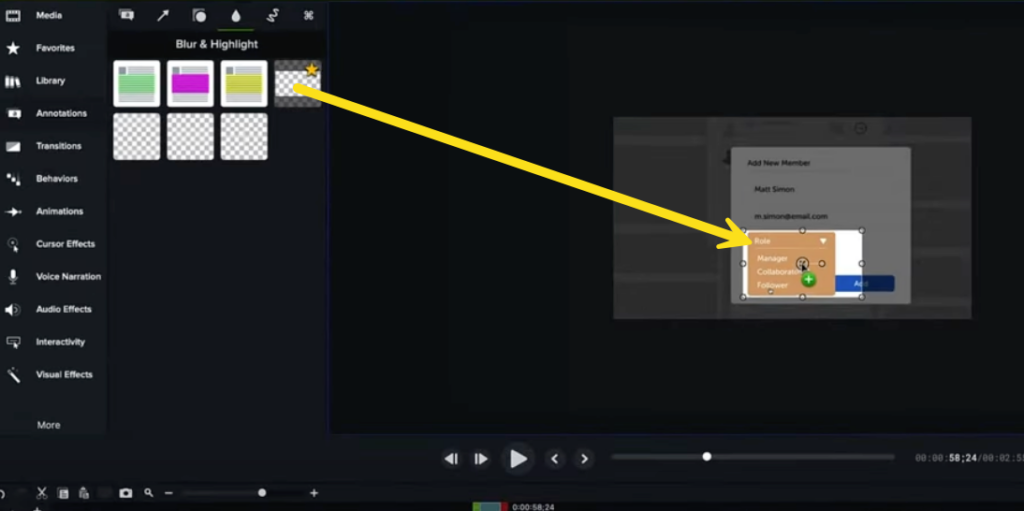
Once you have your audio and video synced up, let’s work on focusing your viewers attention. To do this, use animations to zoom in on your screen and annotations to point out or highlight important information.
For example, here I show some information that’s a little hard to read, so I’ll add an animation, then make sure the playhead is after the animation arrow, And then scale up in the properties, essentially zooming in to show detail. Next, I’ll add a highlight annotation to feature only the setting I want to highlight.
Do this throughout your video, when you need your viewer to focus on something important.
4. Add your final touches
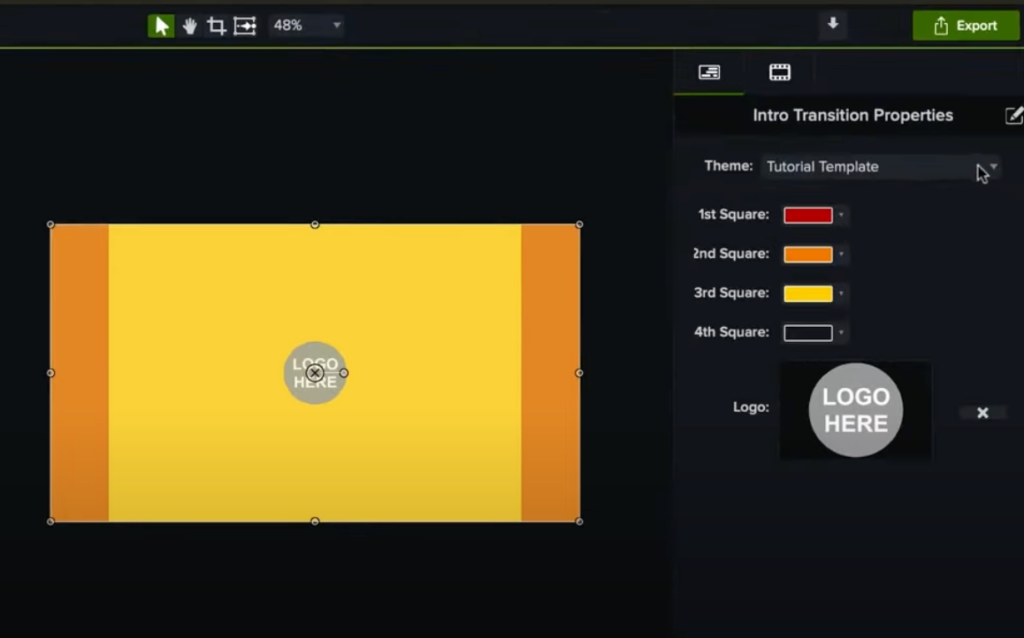
When you’re done with that, it’s time to edit those finishing touches. All of the graphics in this template are totally customizable. If you start with the intro transition, just click on the group, and the properties panel show you that all of the colors can be changed.
All that said, I know that editing is no easy task, and to help you along, we have free tutorials to help you get started quickly.
Step 7: Save and share
The last step in creating a tutorial is to save your video.
Think about where you want this video to be watched, and either choose a shared destination like YouTube, Vimeo, or Google Drive, or choose to save the video as a local file on your computer. As an extra last step, we recommend you save your Camtasia project. So if you need to go back and make some edits, it’s quickly on hand.
Selecting the right tutorial video equipment
High-quality videos also depend significantly on the technical aspects, namely the equipment you use and how you use it.
While we don’t believe that the quality of a video rests solely on expensive equipment, making sure your video has good audio and visuals can make it more engaging and professional, ensuring your message is delivered effectively.
Microphone
The importance of clear, crisp audio in a tutorial video cannot be overstated.
TechSmith’s Video Viewer Study shows that viewers are more willing to suffer through blurry video than poor-quality audio.
If you can, it’s worth investing in a good-quality microphone that can capture your voice without any distortion or background noise. But, you don’t have to spend a fortune. You can get some very good quality microphones for less than $100.
Position it close enough to capture your voice clearly, but far enough to avoid any harsh sounds. Be sure to run a few mic checks to ensure the sound is just right.
Webcam
Before you push the record button, be sure to place your webcam at eye level. This will make your video feel more natural as it gives the impression that you’re speaking to your audience face-to-face. You should also ensure your background is free of clutter, and ideally a neutral color.
Lighting
Getting the perfect lighting in your video is arguably much more important than getting the best webcam. With good lighting, you’ll add depth to your footage and ensure you and your products are clearly visible.
Natural light is always best, but if your busy schedule keeps you busy in the daytime, then you might want to consider getting a ring light or softbox.
Be sure to face your source of light and make sure it evenly illuminates the area you’re recording to reduce harsh shadows and overexposed areas.
9 tips to make a great tutorial video
So now you know the basics of how to make a tutorial video, and where to publish it. While you’re probably raring to get started — and practice is the best way to hone your video making expertise — there are a few more things we think you should know.
In this section, we’ll explore some tips that will help your video tutorials go from good to great.
1. Pick a good title for your tutorial video
Giving your video the right title is more important than you might think. As it’s the first point of contact between your video and potential viewers, the best titles intrigue users and encourage them to click on your video. Meanwhile, a poorly chosen title may cause users to scroll past it, even if the content is top-notch.
Compelling titles are concise, descriptive, keyword-rich, and should give viewers a clear idea of what to expect from the video. Include keywords that your audience might use when searching for the information your video provides. This will improve your video’s visibility not only on YouTube but also on Google.
It might be a relatively simple step, but it’s not one that you can afford to miss. If you do plan on uploading your video to a platform like YouTube, you should also spend some time working on a good video thumbnail to further entice potential viewers.
2. Use both video and narration
Leveraging video and narration in your tutorial is a powerful way to deliver information more effectively. This dual-channel approach caters to different learning styles, ensuring your tutorial can be understood and appreciated by a broader audience.
Video visuals provide a concrete demonstration of the steps or processes being taught. Seeing the steps in action can make the procedure much easier to follow, especially for complex tasks.
Meanwhile, the narration provides essential context and explanation that visuals alone can’t deliver. It offers the opportunity to explain why certain steps are taken, provide background information, and give additional tips.
However, it’s vital that the video and the narration work together in harmony. What’s shown should align with what’s being said, with each element reinforcing the other.
3. Add a table of contents
Including a table of contents in your tutorial video helps viewers navigate your content with ease and find the parts of the video that they’re most interested in. This is especially useful for longer videos that answer multiple questions or explain processes with several steps.
Some tables of contents will simply display the timestamps of different sections at the very beginning of a video. However, with tools like Techsmith Camtasia, you can easily create interactive tables of contents that allow users to quickly jump between sections at the click of a button.
4. Highlight/emphasize important aspects
Emphasizing key points or steps in your tutorial helps viewers recognize the more important aspects of your video without getting lost in the details.
A great way to highlight important parts of a presentation or screen recording is to make the most of Camtasia’s cursor effects. By enlarging, highlighting, or creating a spotlight around your cursor, you can effortlessly draw the viewer’s attention to specific on-screen actions, making complex processes easier to follow.
Make your own tutorial videos today!
Download Camtasia and FREE templates to quickly and easily make your own tutorial and training videos.
Download now5. Add some background music
Adding music to your video can go a long way to making your tutorial more engaging. While the right music can help set the tone and fill in any silence, it’s important to make sure it doesn’t distract from the visual content or your narration.
If the background music is too loud, or too “in your face” (or ears!), it can do more to detract from your video than add to it. With this in mind, you might need to adjust the volume of the music and make the actual video louder, to maintain the right balance between audio tracks.
Camtasia offers a massive library of royalty-free music, categorized by genre and mood, that you can use as the background to your video.
6. Add captions
By adding captions to your videos, you ensure that your content is accessible to the widest possible audience. From people with hearing impairments to those watching your video on their phone in a public space, captions help ensure that everyone can follow along with your content no matter who or where they are.
Captions also improve comprehension as it’s easier to follow along and digest information when it’s being read as well as said out loud. Tools such as Camtasia, and TechSmith Audiate, can help you create captions for your videos automatically — so there’s really no reason not to include them in your video!
7. Number each step
If your video contains a lot of different steps, we’d recommend numbering each of them as you go along, as this will help viewers follow along more effectively. Numbers provide structure to your content and can make complex procedures easier to understand — a bit like numbered subtitles in a how-to guide.
8. Add a table of contents
Including a table of contents in your tutorial video helps viewers navigate your content with ease and find the parts of the video that they’re most interested in. This is especially useful for longer videos that answer multiple questions or explain processes with several steps.
9. Invest in a good microphone
Sound quality plays a significant role in the overall impression and effectiveness of video content. Poor audio can distract from your message, make your tutorial harder to follow, and even cause viewers to click away.
On the other hand, the best microphones for recording video will capture sound more accurately and deliver clearer, more professional-sounding audio. They reduce background noise and enhance the clarity of your voice, making your narration more engaging and easier to understand.
So, naturally, investing in a professional microphone will make a huge difference to the quality of your audio and will work to keep your audience focused and engaged. That said, it’s important to note that while a good microphone can improve your audio quality, it’s not a necessity for creating a video tutorial that stands out.
Making tutorial videos, the FAQs
The ideal length of a tutorial video depends largely on the topic. However, it’s generally best to keep videos as short and sweet as possible. Aim for between 3–5 minutes for simple topics and up to 15–20 minutes for more complex subjects, always focusing on clarity and value.
Yes, you can! There’s a wide range of free software for making video, screen recording, and video editing, though they usually offer limited functionality. For anyone looking to create a lot of videos, more powerful software, such as Snagit and Camtasia’s video editor, can be well worth the investment — and both offer free trials!
Software like Camtasia or Snagit allows you to capture your entire screen, a selected area, or a specific window, and have the ability to capture audio and webcam footage simultaneously.
Not necessarily… While professional video editing tools can enhance your video quality, you can create effective videos with basic software, recording equipment, a thought-out plan, and good lighting. The most important element is clear, helpful types of videos that provides value to your viewers.


Share