


Why should you add subtitles or captions to your videos? Well, it’s simple.
Adding subtitles or captions makes your videos more discoverable, helps them stand out, and improves accessibility for people watching your videos. Captions not only give you a better ROI but allow you to help more people with your videos.
Luckily, it’s super simple to add captions to YouTube videos, social media videos like TikToks, and any other content you create!
How to add captions to a video clip
You’ve definitely seen dynamic captions on social media videos.
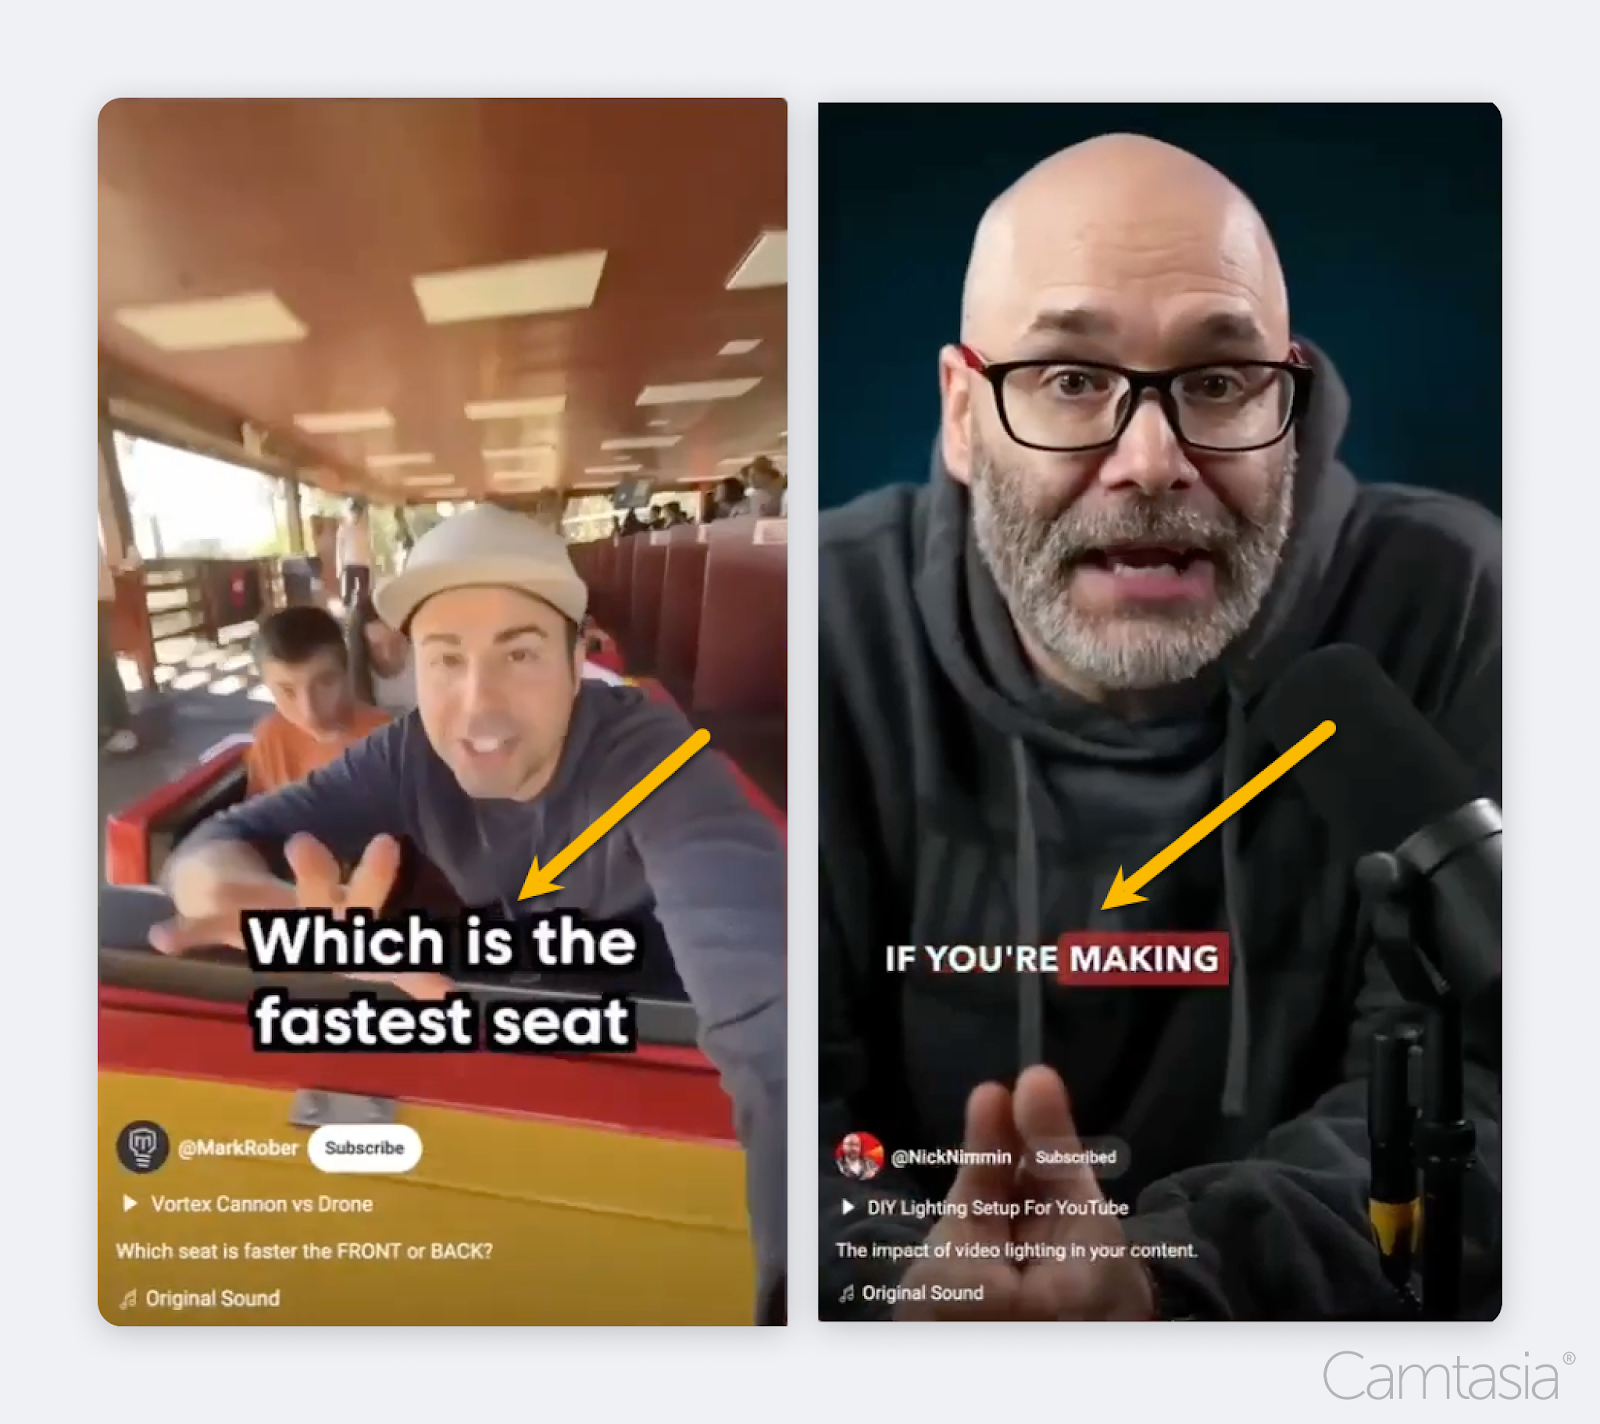
Today I’m going to show you how you can get this text effect by just dragging and dropping with Camtasia.
To follow along with this one, you’ll need to get your hands on the latest version of Camtasia.
1. Import or record your video
First, add your footage to the timeline. You can drag and drop your pre-recorded media to the canvas, or record your screen if needed.
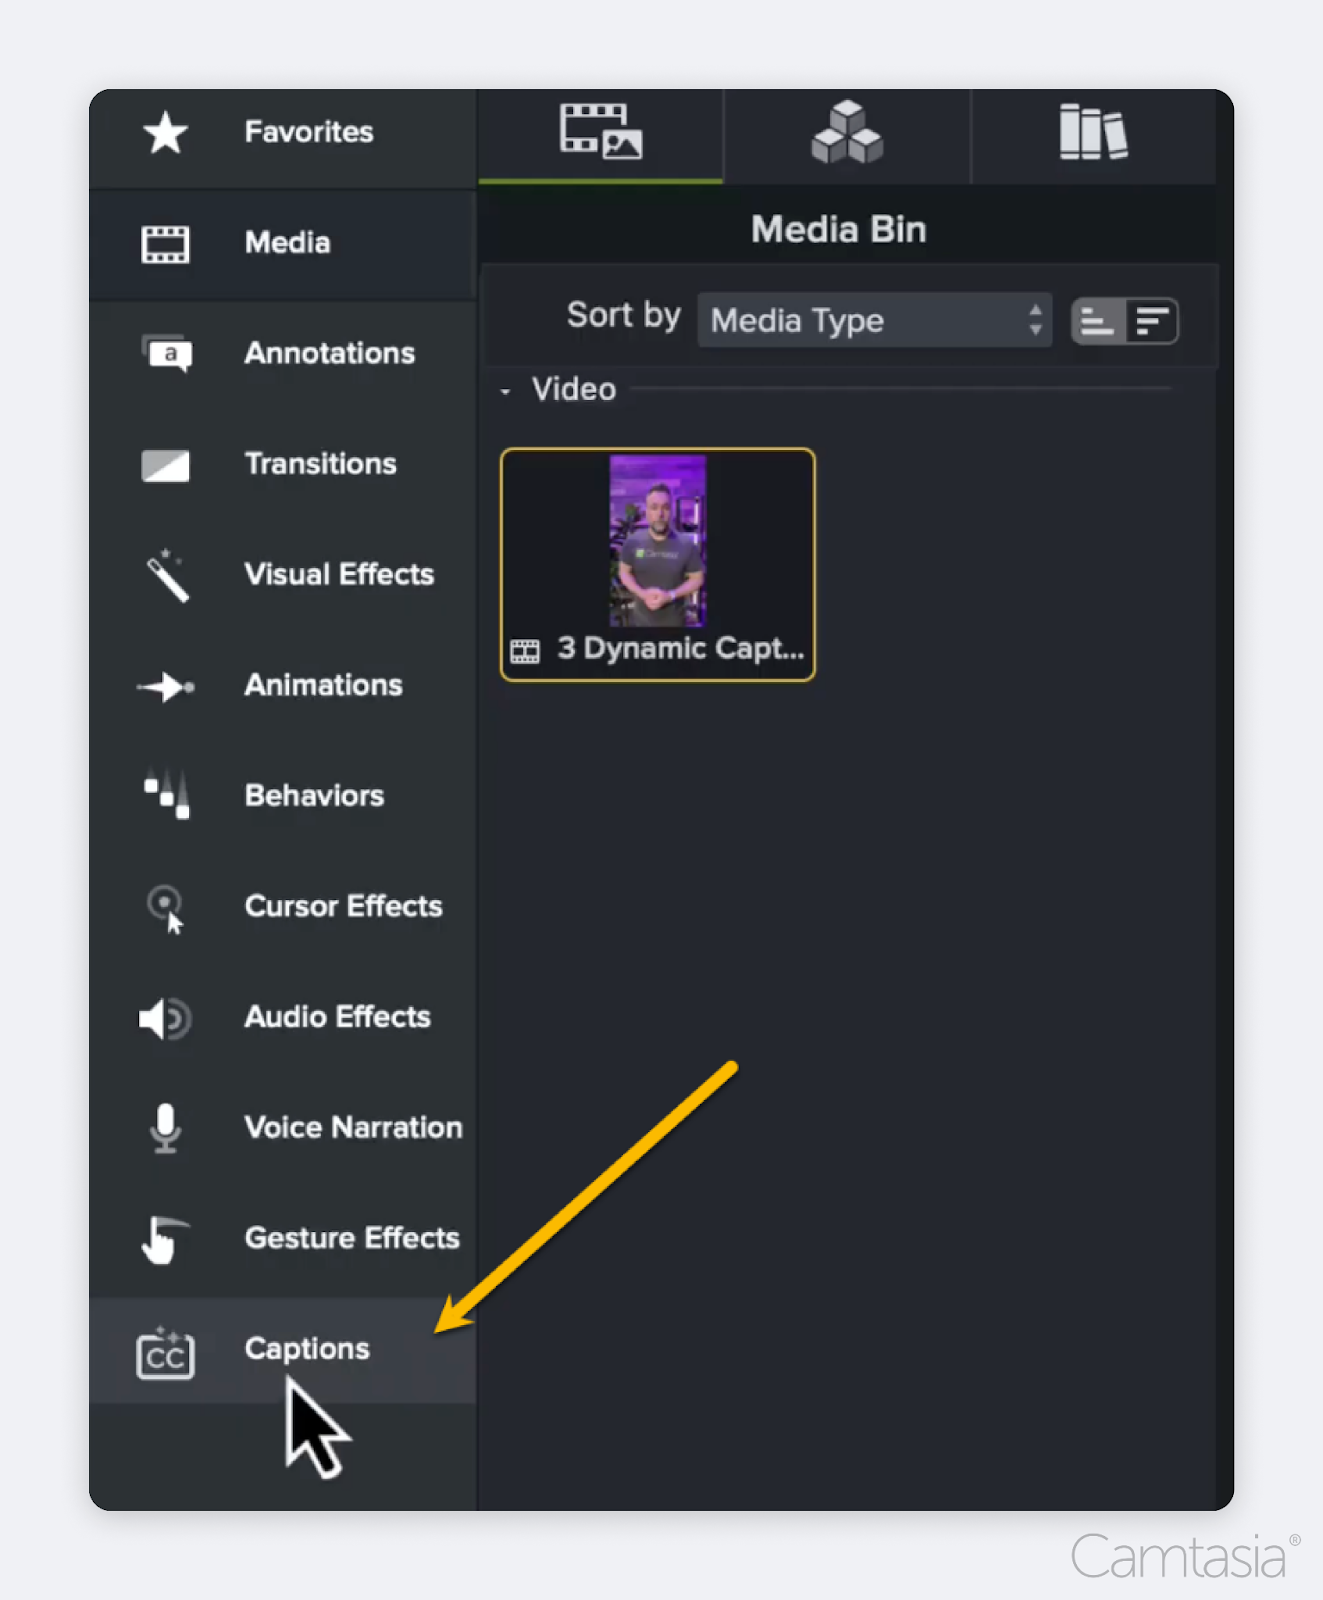
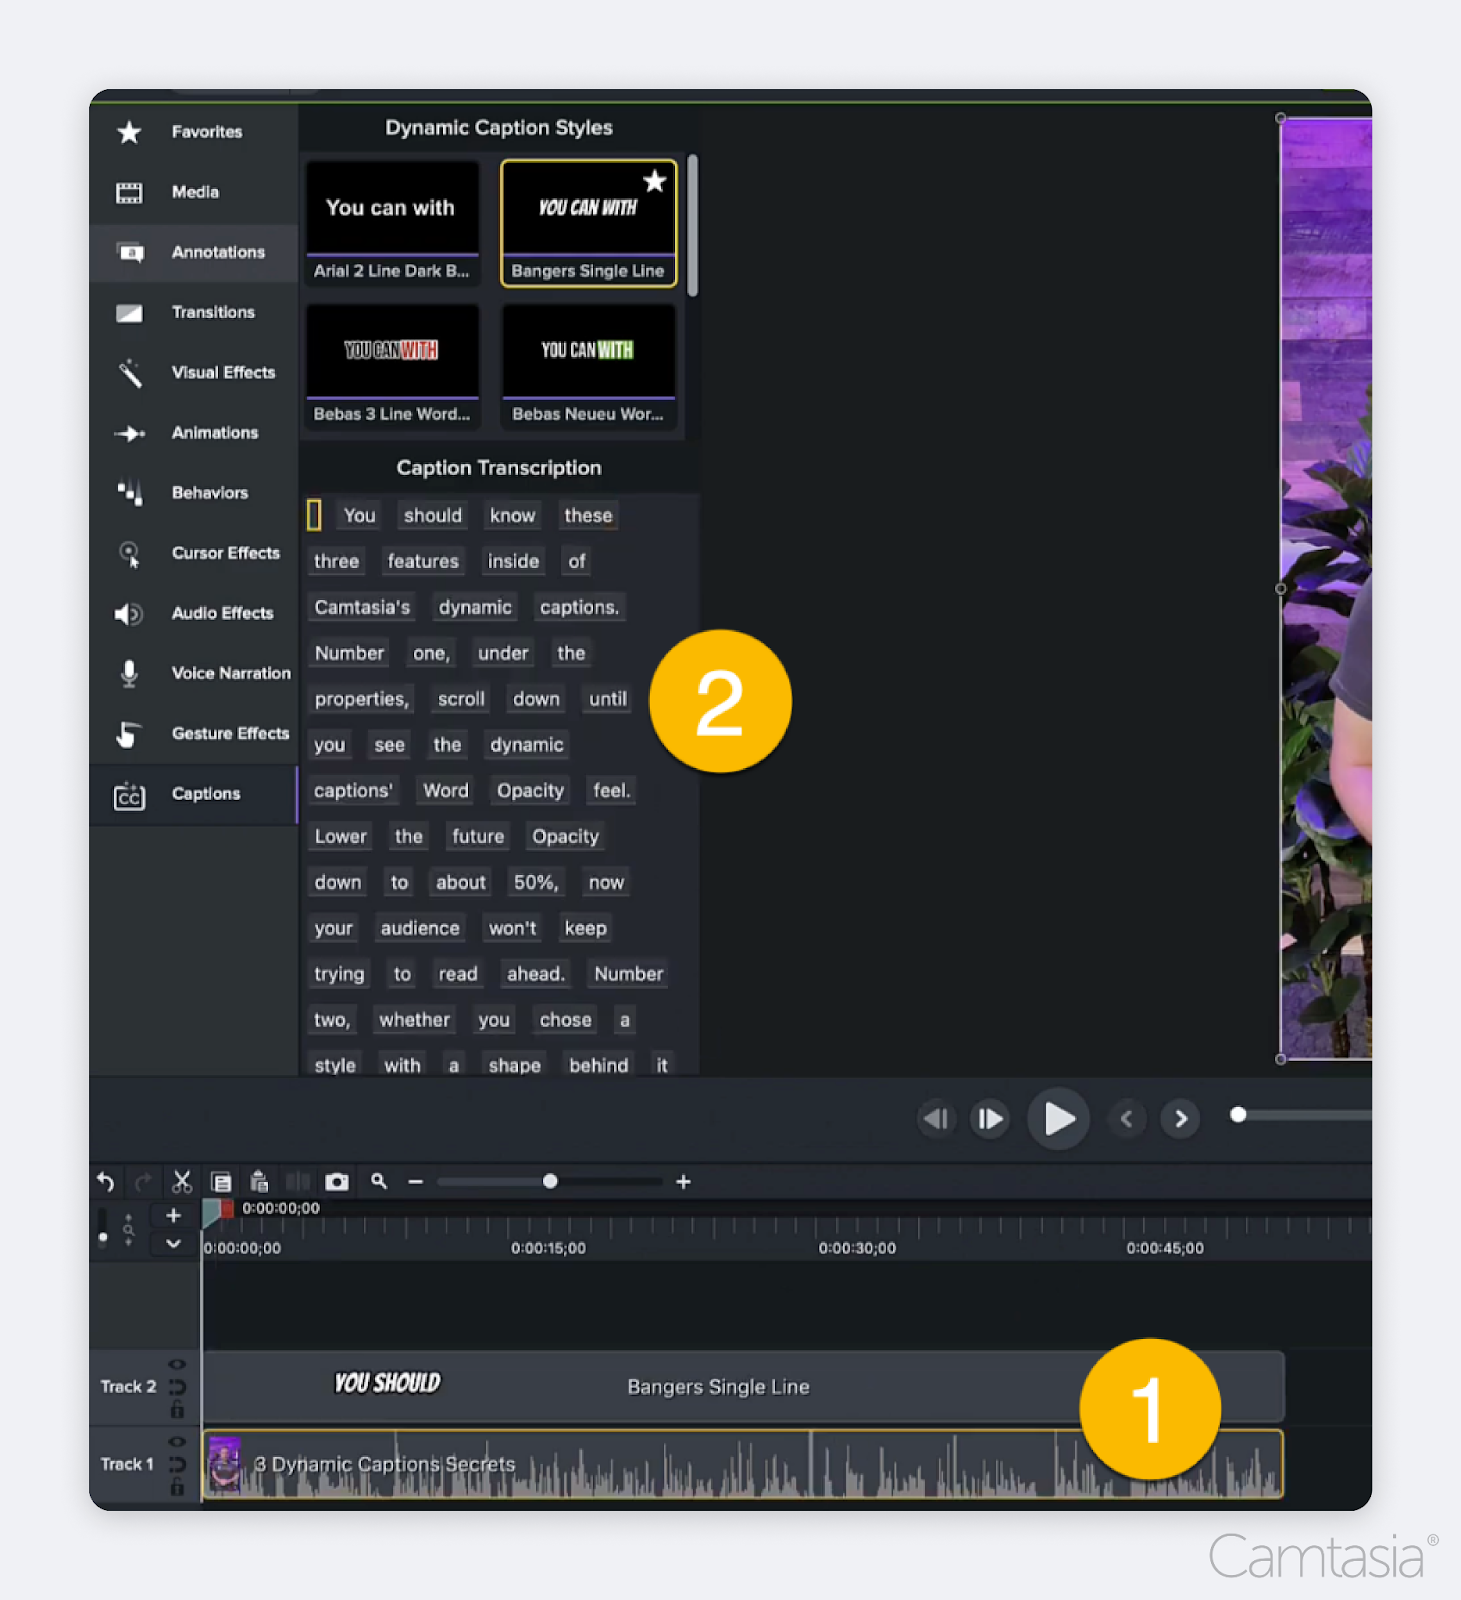
2. Access the Captions Bin
Click on the Captions Bin tab. If you don’t see it, you need to either click on “more” or upgrade to the newest version of Camtasia if you haven’t done so already.
3. Choose Dynamic Captions
Inside the captions bin, there are two tabs. One for captions and one for subtitles. You want to select the dynamic captions, which is the dynamic auto-captioning feature.
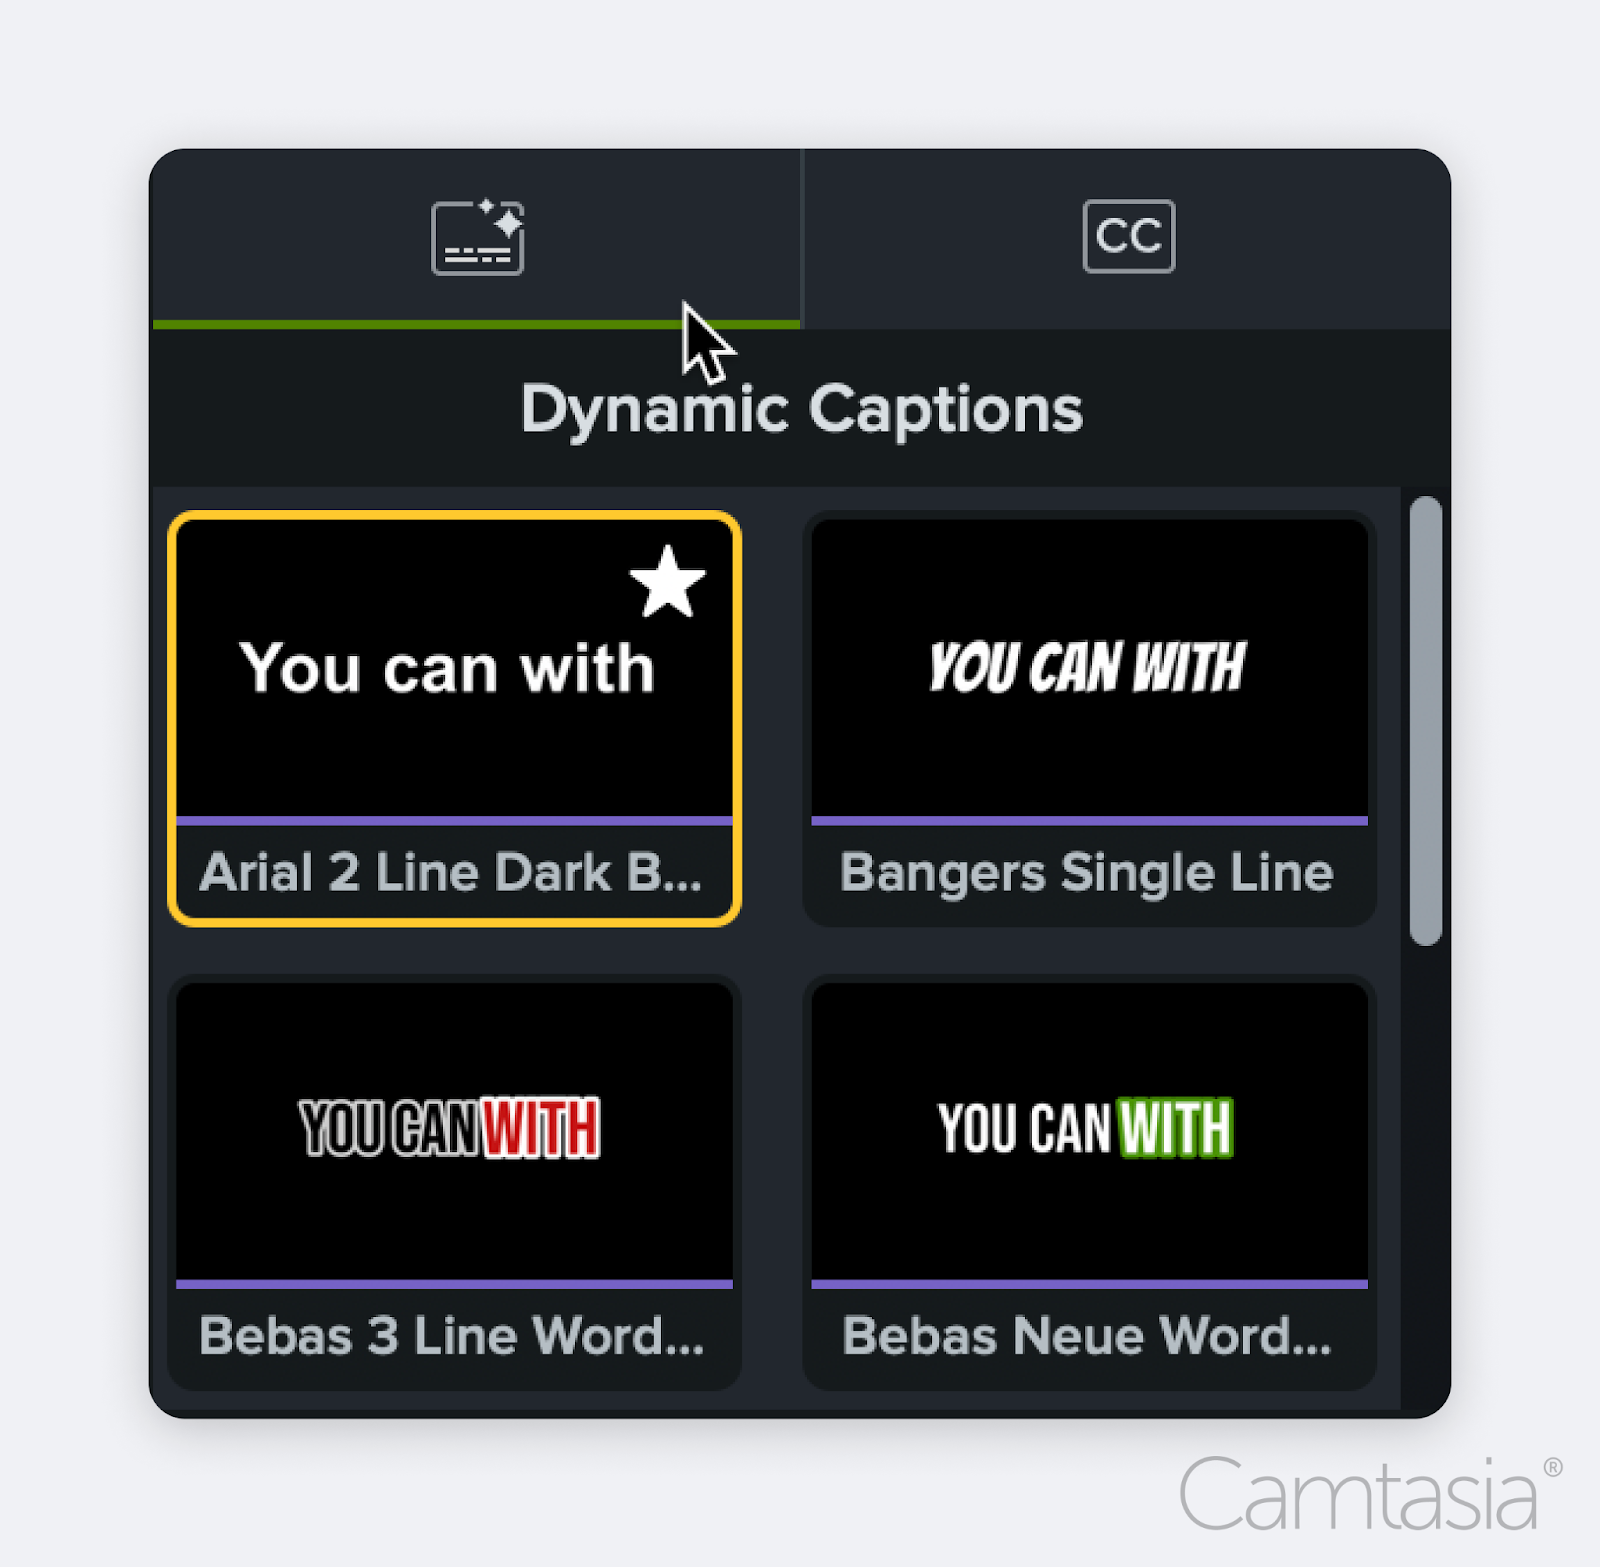
You’ll see a variety of styles to choose from.
4. Trim and customize your captions
Camtasia uses speech recognition technology and transcribes the audio as captions synced to your video.
By default, the caption track is a set duration, and it most likely won’t be as short or as long as your video, so make sure to trim it or extend it as needed.
5. Edit your text
To edit your text, click on the caption track to open the text properties panel. You can add a highlight to the words and how many lines of text appear on the screen at once. We recommend one at a time.
Additionally, edit the font size, the alignment, the font style, and more!
With Camtasia Audiate, you can also choose the language and translate your content for an international audience.

To combine, delete, or edit the words in the caption, click the audio track and make your edits under the Caption Transcription section in the bin.
You can swap out styles in multiple ways. But it’s easiest to drag the new style on top of the one already in the timeline, hover over it until it turns green, and select replace, which will retain the duration.
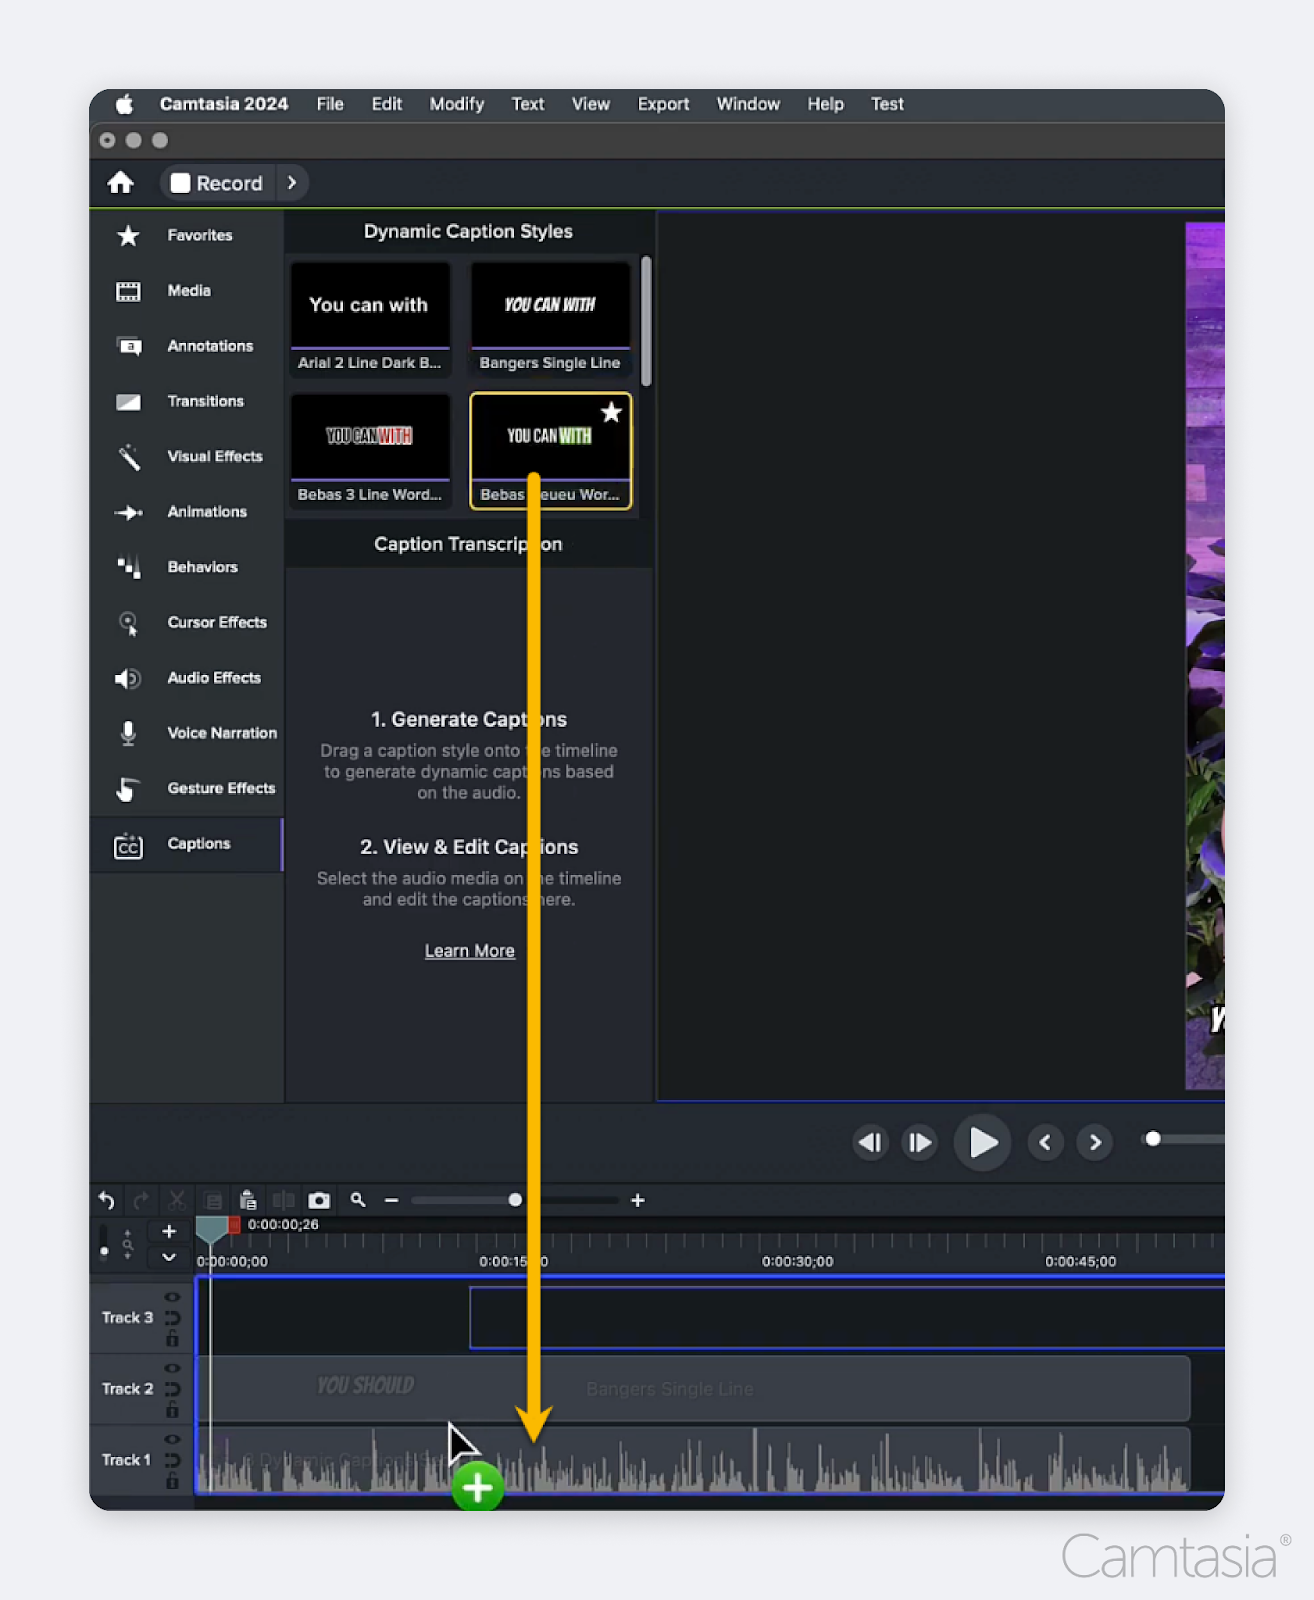
You can also just delete one and put a new one on the timeline. The nice thing about captions being attached to the audio track is even after deleting your captions and replacing them with a new style, any edits you make to the text are still there.
7. Save your style
After you’ve made your changes, you may look at this caption and say: “Wow, this is it.”
If the caption you created is the one you want to use from now on but you don’t want to customize it each time, you don’t have to!
At the top of the properties panel, click the plus button and name your new style. It saves in your dynamic captions bin. You can even star it so it’s easy to find with all of your other favorites.
Once you have all your captions ready to go, you can save your video in your desired file format, download it to your device, or share it directly to YouTube, Google Drive, and other destinations.
Go from screen recording to polished video
A screen recording is just the start. Camtasia’s editor helps you add the callouts, animations, and edits you need to create a truly professional video.
Free Download
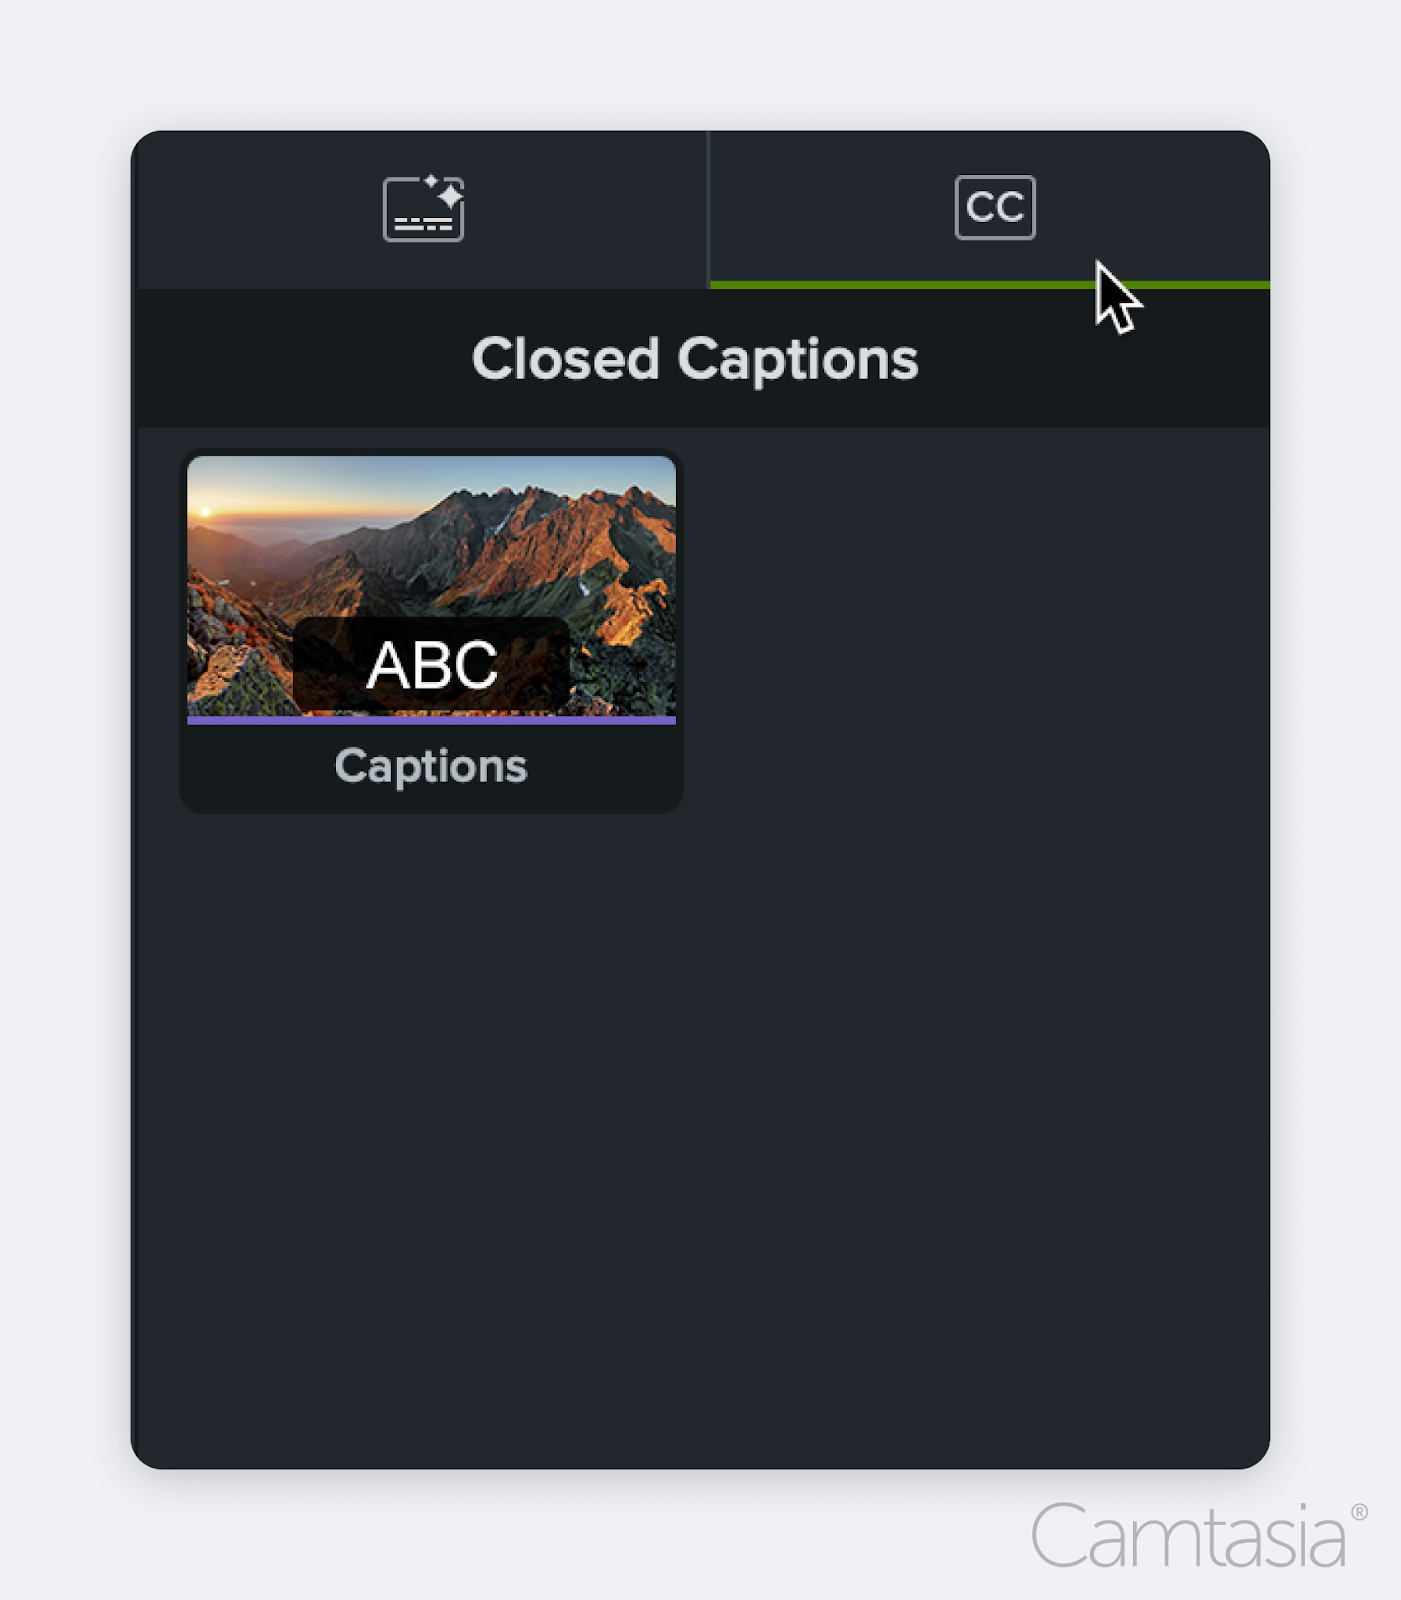
How to add closed (subtitle) captions to a video
The dynamic captions outlined above do not meet accessibility standards because they are burned into your exported video. For captions to meet these standards, the user needs to be able to turn closed captions on and off at will.
You can achieve this by choosing the Closed Captions tab in Camtasia instead of the Dynamic Captions.
Then, follow the same instructions above. You will have fewer editing options since these captions are more regulated, but simple text edits are allowed.
Use this option to create captions that meet accessibility standards.
Go from screen recording to polished video
A screen recording is just the start. Camtasia’s editor helps you add the callouts, animations, and edits you need to create a truly professional video.
Free Download
How to add captions to YouTube video
One of the most popular ways to add captions involves using the world’s largest video platform — YouTube!
Once you make a YouTube video, upload your video file and head over to the YouTube studio editor. From there you can go to the captions panel and choose to add new subtitles or closed captions.
For this example, we’ve already added different languages but now we’re going to look at adding one more language captions as well.

To add captions (for any supported language), make a selection from the dropdown menu.
The first option, ‘Upload a file’ allows you to add premade captions by uploading an SRT file. You can also auto-sync, type the captions manually, or auto-translate from another language.
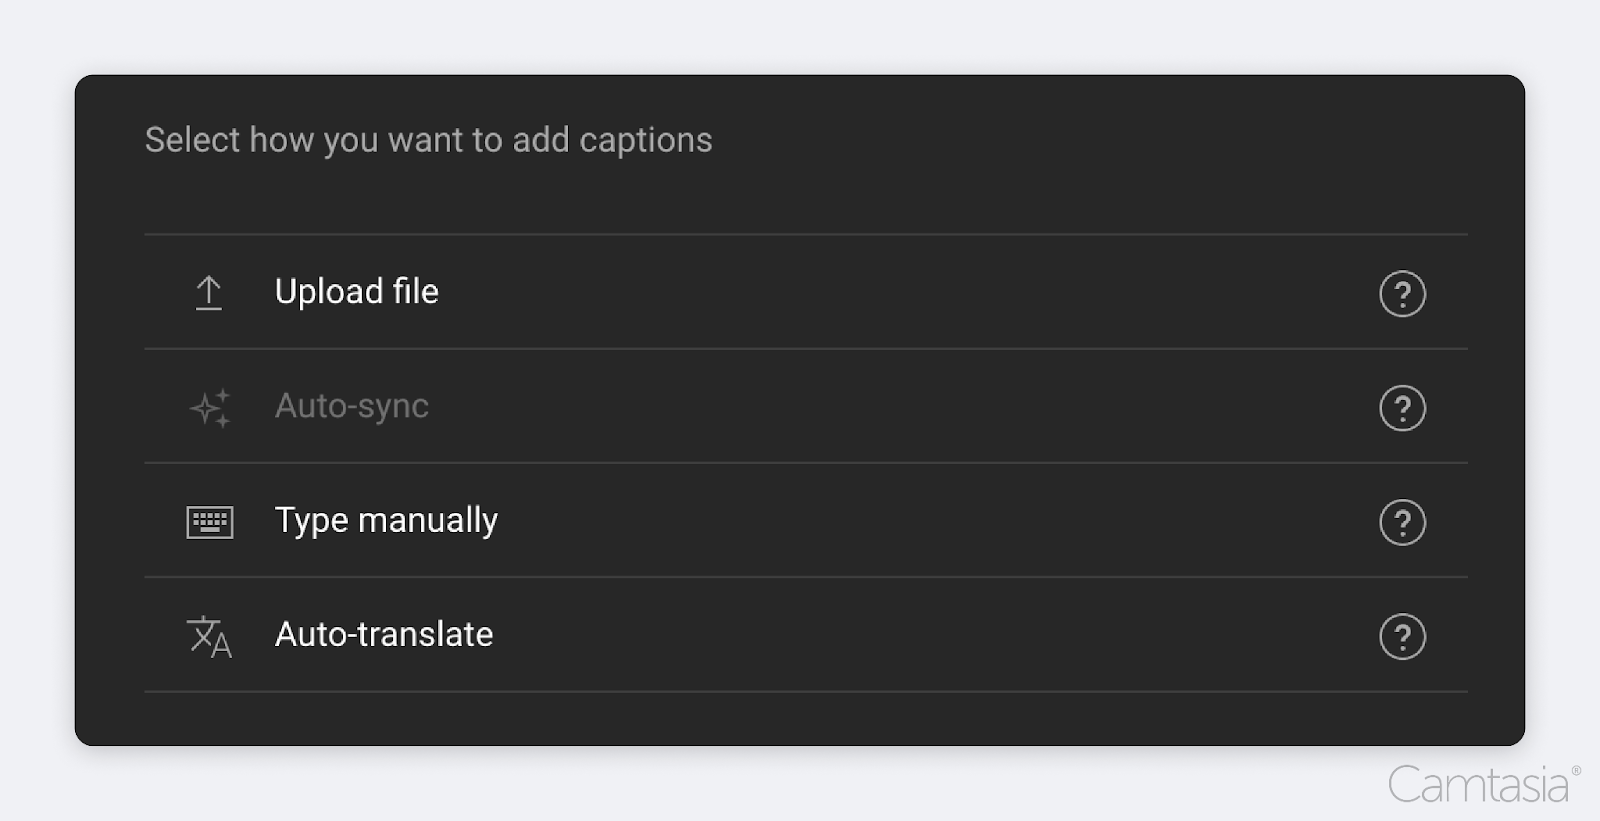
If you’ve already created a caption file, click ‘Upload file’.
If you choose to use YouTube’s auto transcription or translation it’s simple to make any edits you need to once it’s finished! Plus, these captions make your videos accessible.
How can I make captions accessible?
In this guide, the dynamic captions do not meet accessibility standards, but the closed captions and YouTube captions tutorials do.
Think of dynamic captions as a text effect rather than captions. You can edit the style, color, size, etc to make them pop, which is great for content that does not need to meet accessibility standards.
However, you need to keep in mind that having accessible captions is important since it includes everyone who may be deaf or hard of hearing and needs the captions to aid their comprehension. This includes when (and what type of) music is playing and any background noises such as loud crashes, cars honking, or dogs barking that may be integral to understanding what’s happening on the screen.
With Camtasia, you can create either type of captions! Get started with your content creation for free today.
Go from screen recording to polished video
A screen recording is just the start. Camtasia’s editor helps you add the callouts, animations, and edits you need to create a truly professional video.
Free Download
Share