


These days, it seems that no matter where you look online, you’re bombarded with live content. Whether it’s a video on Facebook Live, a live webinar at work, or a Live Stream on YouTube.
With so much content available in real-time, how is anyone supposed to process it all? Especially when there’s a chance it’ll disappear the second you scroll, without little hope of ever finding it again… Well, fortunately, there is a way to record streaming video before it’s lost to the void.
Screen recording software like TechSmith’s Snagit, and even the tools that come built-in with most computers, make it easy to capture streaming video while it’s being broadcast live.
In this guide, we’ll discuss the different ways in which you can capture your screen so that you know how to record streaming content.
Once you know how to record an online video, you can save it for later or share it with your friends, family, and coworkers. It’s easy, fast, and will bring order to a chaotic media landscape.
How to record a live video with built-in recorders
Computers and laptops are more versatile than ever. While we may use them predominantly for everyday tasks such as answering emails, browsing the web, creating Word docs, and playing the odd video game — there is so much more you can do.
For example, you can make a decent YouTube video in less than a day. If you’ve got a good microphone for recording, then plug it into your laptop, and BOOM! — you’ve got a mini recording studio. The sky is the limit!
But before we get distracted by all the awesome stuff you can do with your computer, let’s get back to the matter at hand: How to record a live-streaming video.
There’s no need to dive into the deep end of the software pool here; both macOS and Windows have integrated tools that are great for recording streaming video. Let’s jump in!
Video recording built-in tool on Mac
If you’re a Mac user, the built-in screen capture tool — aptly named Screenshot — is an easy and simple solution for recording a live stream. Provided you’re using macOS Mojave or later, here’s how you can record a live video on Mac in five simple steps:
- Open Screenshot: Press Shift+Command+5 at the same time. This will open the Screenshot toolbar.
- Choose your recording area: There’s no need to capture your whole screen if you don’t need to. Instead, select the specific part of your screen that you want to record.
- Don’t miss the sound: Want to capture audio as well? Head to Options and make sure to select Microphone. This way, both visuals and sounds from the stream will be recorded, provided they’re loud enough to be picked up by your microphone.
Note: The built-in Screenshot tool on a Mac doesn’t have an option to record the system audio. This means you’ll need to turn up the volume on your machine to ensure the microphone picks it up (so try not to sneeze!).
- Record your screen: When you’re ready to start recording, hit Record. Then once you’re done, click the Stop symbol that will have appeared in your toolbar at the top of your screen.
- Review your recording: You’ll see a thumbnail pop up in the bottom-right corner of your screen. If you click on it, you can trim your video, share and save it.
Video recording built-in tool on PC
Windows users have access to a similar built-in feature: The Game Bar.
Originally created for the gaming community, the Game Bar can be used for a wide range of tasks — even those that have nothing to do with gaming! This nifty little screen capture tool is perfect for recording live streams across browsers, applications, and other programs on Windows.
Here’s a step-by-step guide to recording a live video on your PC:
- Activate the Game Bar: Press Windows+G together. This will open up the Game Bar on your screen.
- Personalize your preferences: Navigate to Settings, then to General. Here, you can turn specific features on or off depending on your needs.
- Ready. Set. Record: Once you’re all set up, hit Start Recording to begin capturing your live video.
- End and save: After recording, your video will be auto-saved as an MP4 file, making it universally accessible across devices and platforms.
How to record a live video with Snagit
Step 1: Find a desktop capture tool
First, find a great screen recorder and screen capture tool. There are many tools that will let you record your desktop screen, but some are better than others — and Snagit is one of them. It’s great for easily capturing screen recordings. You can even cut out the parts you don’t need.
If, however, you need a tool with greater editing capabilities, check out TechSmith’s Camtasia. While Snagit is perfect for non-complex recordings and basic editing, Camtasia comes with the advanced functionality of a professional editing suite that’s still easy to use.
With Camtasia, you can change the speed of a video, add captions and subtitles, and even sync audio and video sources in just a few simple steps.
Record your screen with Snagit
Snagit makes it easy to share quick updates and how-to’s by capturing exactly what’s happening on your screen.
Get Snagit
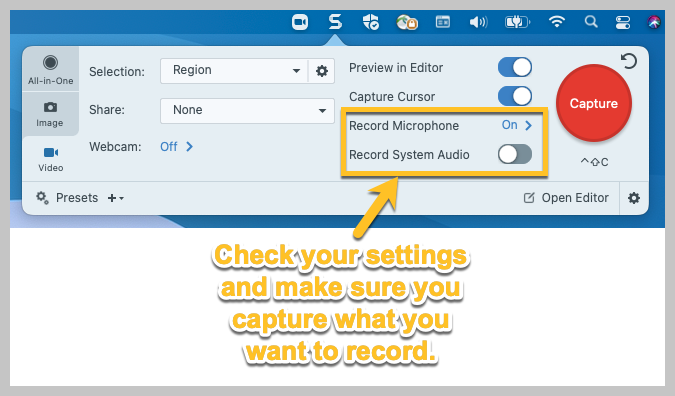
Step 2: Adjust your recording settings
Once you’ve downloaded Snagit, open it and check that everything is set up to record a video rather than capture an image.
After selecting the area of the screen you want to record, the screen recorder toolbar will appear. You can then select to record microphone audio or system audio (or both!) alongside the screen recording.
If you’re recording a video that’s streaming live, then there’s a good chance you’ll want to capture the audio as well. This includes any sound from your computer, such as application alerts and the audio playing from your speakers. So, if you want that included in your recording, make sure you’ve got the system audio selected.
Step 3: Select an area to record
Click the Capture button and then select your entire screen, a particular window, or a custom region. Here’s an example of a NASA live stream:
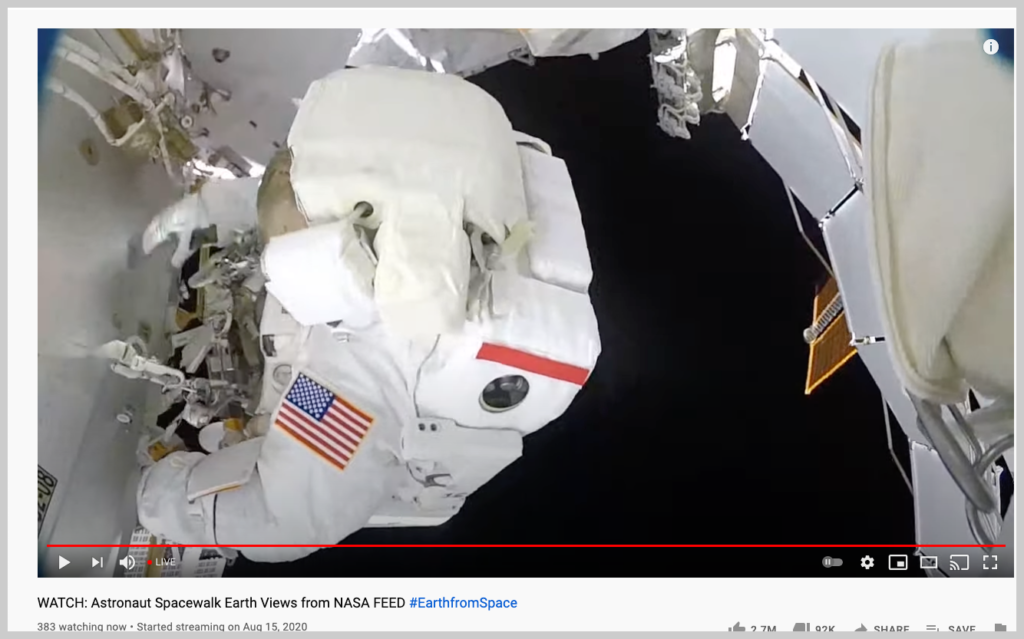
As you can see, we only captured the streaming video section of YouTube, rather than the entire browser window.
Step 4: Hit record
Once you’ve made your selection, click the Record button to start.
With Snagit, you can pause and resume the recording at any time. You can also record your webcam at the same time as your screen, which is what we like to call a picture-in-picture recording.
When you’re done recording, click the Stop button.
If you plan to record a long video stream, it’s worth noting that if your computer goes to sleep, or a screensaver starts running, your screen recording may be interrupted. So, if you plan to start recording a live stream video and walk away from your device, you may want to turn off screensavers and sleep mode in your computer settings.
Step 5: Save and upload
Once you have your video, you can save it to your computer as an MP4 or upload it to a platform, such as TechSmith Screencast, to share as needed. Snagit and Camtasia both have built-in export features for popular platforms such as YouTube, Slack, and plenty more.
Snagit even lets you turn a video into a GIF! But remember, GIF files don’t support audio.

Video captures can help you bring order to the chaos of live content and have many practical uses for saving and sharing both entertaining and useful footage. If, for example, you’re a remote worker, then you might find it useful to record Zoom meetings for future reference, or to share with colleagues that couldn’t attend.
It is, however, important to make sure you have permission to record and share content. If you were to ever pay to attend a webinar, record it, and share it with your coworkers, you and your organization could end up in trouble.
Record your screen with Snagit
Snagit makes it easy to share quick updates and how-to’s by capturing exactly what’s happening on your screen.
Get Snagit
Record a live streaming video, the FAQs
With Snagit and Camtasia, you can! Simply toggle the aspects you want to record, like your screen or system audio.
Yes, you can! To capture a live stream on your phone, download TechSmith Capture. Then, once you’re done recording, you can easily upload the video to Snagit or Camtasia for editing.
To record a live stream online, you can use built-in tools on like Screenshot on macOS or the Game Bar on Windows. Alternatively, specialized live streaming software, such as Snagit and Camtasia from TechSmith, offer enhanced recording and editing capabilities.
On Windows 10, you can use the built-in Game Bar to record live streams. All you have to do is push Windows+G, adjust your preferences, and click select Start Recording. Alternatively, you can use Snagit for more advanced tools.
Share