For a beginner’s guide of the timeline, see 3 Keys to the Timeline.
Cut or Remove
Complete any of the following video edits to remove unwanted parts or mistakes in your video.
Trim
Remove extra content from the beginning or end of a clip.
View Steps
- Click to select the media on the timeline.
- Drag the end of the clip in.
To restore the trimmed content, drag the end of the clip back out.
Cut
Remove an individual clip or a selection across tracks on the timeline
View Steps to Cut Media
- Click to select the media to cut or Shift+click to select multiple media on the timeline.
- Click the
 Cut button.
Camtasia Editor removes the selected media.
To paste the cut selection on the timeline, drag the playhead to a new location and click the  Paste button.
View Steps to Cut a Selection Across Tracks
- Click the
 Lock Track button to the right of the track name to lock any tracks that contain media you do not want to cut.
- Click and drag the green or red playhead handles to make a selection to cut on the timeline.
For a precise selection, drag the Zoom slider to zoom in on the timeline content.
- Click the Cut button.
The selection is removed from the timeline.
To paste the cut selection on the timeline, drag the playhead to a new location and click the Paste button.
Delete
Delete media or a selection on the timeline.
View Steps to Delete Media
- Click to select the media on the timeline.
- Press the Delete key.
View Steps to Delete a Selection
- Click the Lock Track button to the right of the track name to lock any tracks that contain media you do not want to delete.
- Click and drag the green or red playhead handles to make a selection.
- Press the Delete key.
Camtasia Editor deletes the selection from the timeline.
Ripple Delete
Delete a selection on the timeline and shift all media to the left to remove the gap.
View Steps
- Click the Lock Track button to the right of the track name to lock any tracks that contain media you do not want to delete.
- Click and drag the green or red playhead handles to make a selection.
- Press Ctrl+Delete (Windows) or Command+Delete (Mac).
Edit as Text
Camtasia Audiate transcribes your narration into plain text, making any issues easy to spot and remove.
Delete words, mistakes, or sections of your video. The edits are automatically synced to your Camtasia Editor timeline.
View Steps
- In Camtasia Editor, click to select media on the timeline.
- Click the Edit as Text button in the timeline toolbar.

- Camtasia Audiate opens. Select an option for how to display the transcript in Audiate and click Import.
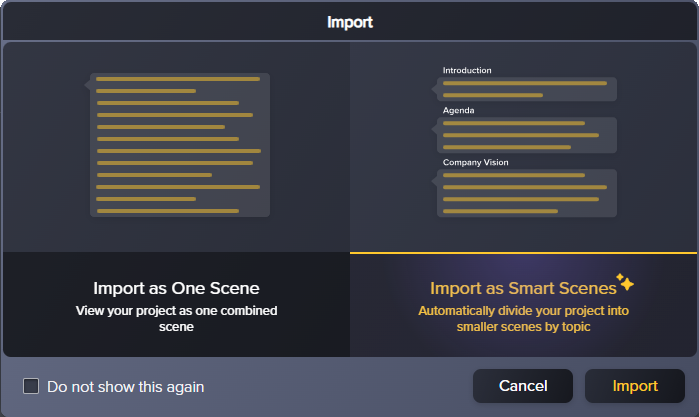
- Import as One Scene: Audiate displays your project as one combined scene.
- Import as Smart Scenes: Audiate automatically divides your project into smaller segments and generates titles for each. This option helps for navigating through longer projects.
- Audiate transcribes the audio from Camtasia Editor. Complete the desired edits in Audiate.
See Speed Up Editing with Camtasia Audiate and Edit Audio & Mistakes.
- In Camtasia Audiate, click the Sync button.
Audiate automatically syncs your edits to the linked media on the Camtasia Editor timeline.
Complete any of the following to insert, move, or rearrange media on the timeline.
Split
Separate media into multiple clips to:
- Move or rearrange media.
- Apply different effects, looks or layouts to a specific section in the media.
- Insert transitions or titles between sections.
View Steps
- Click to select the media to split.
- Drag the playhead to the desired location to split the media.
- Click the
 Split button or press the S key (Windows) or Command+T (Mac).
The selected media splits into two separate clips.
Move Media
Select media and move to a new position on the timeline.
View Steps to Move Media on a Track
Hold the Shift key and drag the media on the track.
Camtasia Editor moves all media to the right of the selected clip and maintains the spacing.
View Steps to Move Media Across Multiple Tracks
- To select media on multiple tracks, Shift+click to select the first media on each of the tracks above the media to move.
- On the track to move, hold the Shift key and drag the media on the track.
Camtasia Editor moves all media to the right of the selected clip on each of the selected tracks.
View Steps to Move All Media
- Drag the playhead where you want to start the move.
- Hold the Shift key and drag the playhead to move all media on the timeline.
Camtasia Editor moves all media on the timeline and maintains the spacing.
Insert Space at a Specific Point
Ripple split inserts a space at a specific point across all timeline tracks.
View Steps
- Drag the playhead to the desired location to insert the space.
- Hold the Shift key and drag the playhead.
Camtasia Editor splits the media across all tracks and moves everything to the right of the playhead to create space.
Remove Space
The Magnetic Track option automatically removes the gaps between media on a track.
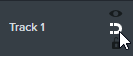
Click the  Magnetic Track icon to the right of the track name to enable this option for the desired tracks.
Stitch
Join two clips together to move or edit as one single media. Only clips from the same original media can be stitched together.
View Steps
- Ctrl+click (Windows) or Command+click (Mac) to select the two clips to stitch together. Make sure the two clips are next to each other on the same track.
- Right-click (Windows) or Control-click (Mac) the selected media and select Stitch Selected Media. Or, press Ctrl+Alt+I (Windows) or Commmand+Option+I (Mac).
Note: This option is not available for Rev media. You must unpack the media to apply this option. See Introduction to Rev Media.
Complete any of the following edits to sync your audio with the action in the video.
Note: These options are not available for Rev media. You must unpack the media to apply these sync options. See Introduction to Rev Media.
Auto Sync Media
Automatically align two pieces of media based on the audio.
View Steps
- Ctrl+click (Windows) or Command+click (Mac) to select the media to sync.
- Right-click (Windows) or Control-click (Mac) and select Sync Media.
Camtasia Editor syncs the two clips based on the audio.
Extend Frame
Extend a single frame in the video to match the voiceover or to provide more time for viewers to process the onscreen visuals or text.
View Steps
- Hold the Alt key (Windows) or Option key (Mac) and drag the end of the clip to extend the last frame.
- To extend a frame in the middle of the media clip, drag the playhead to the desired frame and press the S key (Windows) or Command+T (Mac) to split the media and then complete step 1.
Speed Up or Slow Down Media
Speed up or slow down video clips. This option is great to speed up long processes, such as process dialogs, or to slow down key sections for viewer comprehension.
View Steps
- On the Visuals Effects tab, drag the Clip Speed effect onto the media on the timeline.
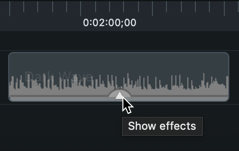
- Click the arrow to open the Effects tray on the media.
- Click to select the Clip Speed effect on the media.
- The effect turns yellow. Drag the end of the Clip Speed effect in to speed up the clip or out to slow down the clip.
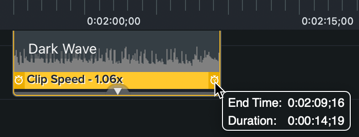
You can also adjust the clip speed in the Properties.
If you only want to change the clip speed for a section of the media, split the media first.
Get Camtasia
Unleash the world’s most powerful screen recorder and video editor.
All Camtasia Tutorials


