Screen Draw incorporates familiar tools from Snagit Editor – Arrow, Square Shape, and Step – into the video recording controls to highlight areas of the screen or clarify processes.
Apply theme colors from Snagit Editor to your Screen Draw annotations to reflect your company brand or set the tone for the video.
Screen Draw While Recording
- In the Capture window, set up a video recording.
- Click the Record button or press Shift+F9 (Windows) or Command+Shift+Space (Mac) to start recording.
- Click the Screen Draw button or press Control+Shift+D to enter Draw mode.

- (Optional) Click the color icon to select from available colors. See Colors and Themes.
- Complete any of the following to select and draw with a tool:
- Arrow: Click the Arrow button or press A on your keyboard. Click and drag on the screen to draw an arrow from tail to head.

- Square: Click the Square button or press S on your keyboard. Click and drag on the screen to draw a rectangular frame.

- Step: Click the Step button or press 1 on your keyboard. Click on the screen to add numbers sequentially.

- Pen (Mac only): Click the Pen button or press P on your keyboard. Click and drag on the screen to draw a freehand line.

- Click the Screen Draw button or press Control+Shift+D to exit Draw mode.
Colors and Themes
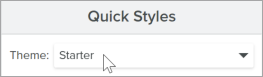
Screen Draw colors are determined by the theme that is currently active in Snagit Editor. Select a theme before recording:
- In Snagit Editor, select a tool that uses themes, such as Arrow, Text, or Callout.
- In the Quick Styles pane, select a theme from the dropdown.
To create a custom theme, see Snagit Themes.
Appearance and Behavior
- Screen Draw objects fade automatically after three seconds. To change the fade time, open the Screen Draw options in the Capture Window and enter a duration in seconds.

- In Draw mode you can scroll the content you are recording with the mouse wheel, but will not be able to click links, type text, or switch between tabs or applications. Click the Screen Draw button or press Control+Shift+D to turn off Draw mode and resume interaction with the screen.
- To reset the Step tool number sequence to 1, press 1 on your keyboard.
Tips for Effective Videos with Screen Draw
- Use Screen Draw when you do not need to interact much with the screen you are recording, for example to provide design feedback or to give an overview of an interface.
- For more polished videos with Screen Draw, turn off the Capture Cursor option in the the Capture Window settings.
- For in-depth training or videos that require more screen interaction, consider recording with the Capture Cursor option enabled rather than Screen Draw. To learn about the Capture Cursor option, see Record a Video with Snagit.
- When recording fullscreen video, the Screen Draw button may appear in the capture region. Drag the button to reposition it to another display if available, or to a location where it will not block the content you are recording.
Get Snagit
The best screen capture software for professionals
All Snagit Tutorials