


A noisy recording can quietly undo hours of instructional work. You finish a Zoom walkthrough for a new-hire onboarding module, export the file, and hear it: the low hum of an HVAC system under every sentence, or the steady whir of a laptop fan threading through your narration.
Learners can follow the slides, but they have to work harder to catch what you’re saying. In a training context, that extra effort can hurt comprehension.
You don’t need an audio engineering background or a separate tool to fix most recordings. Camtasia Editor includes a built-in noise removal effect that handles common problems like hum, fan noise, and room echo directly on the timeline. For longer recordings, like webinars or narrated courses, Camtasia Audiate speeds things up further by letting you clean up audio using a transcript rather than a waveform.
This guide walks you through both paths so you can choose the right one for your workflow and get cleaner audio today.
Key takeaways
- Most background noise problems in training and webinar recordings fall into predictable categories, including hum, fan noise, and room echo, and Camtasia can help reduce or remove them.
- Camtasia’s AI-powered noise removal can clean up a noisy recording without touching an equalizer or manually scrubbing a waveform.
- Editing audio through text in Camtasia Audiate can cut cleanup time on long narrations, webinars, and Zoom recordings.
- For L&D teams, noise removal is a practical compliance consideration: clean speech is a baseline accessibility requirement for instructional video.
- Combining Camtasia Editor for noise removal with Camtasia Audiate for text-based cleanup gives you two complementary paths to polished audio within a single workflow.
Audio quality makes or breaks videos
Poor audio can stop learning before it starts. Camtasia’s research shows that 35% of viewers cite high-quality audio narration as a key driver of engagement, and research on voice quality in training videos reinforces this point. In instructional settings, that number carries real consequences.
Picture a narrated onboarding module recorded near an HVAC unit. The hum competes with every spoken instruction. Learners miss steps, replay the video, and lose confidence in the content. That friction is preventable.
Clean audio reduces cognitive load. When learners strain to parse words through background noise, they have less mental bandwidth for the actual content. This matters especially for non-native speakers or anyone watching in a noisy environment.
For learning and development (L&D) teams producing content for diverse audiences, clean audio is also an accessibility consideration. The W3C’s Web Accessibility Initiative guidance on audio and video content recommends recording in acoustically isolated spaces and using high-quality equipment as part of accessible media production. For organizations subject to Section 508 requirements for video and multimedia content, including federal agencies and their contractors, accessibility requirements can also carry legal weight.
Go from screen recording to polished video
A screen recording is just the start. Camtasia’s editor helps you add the callouts, animations, and edits you need to create a truly professional video.
Free Download
Quick test: Play your recording without looking at the screen. If you can follow every spoken instruction on the first listen, your audio is ready. If you reach for the replay button, it needs work before anything else does.
Common noise problems in recording environments
Most background noise issues fall into a handful of recognizable categories. Camtasia can help reduce many of them, so you don’t need to diagnose the problem like an audio engineer before you start.
- HVAC hum and fan noise: A laptop fan spinning up mid-screen capture adds a steady low-frequency drone. It may sound subtle in headphones, but it stands out on speakers.
- Keyboard clicks: These are common in narrated software walkthroughs, where you’re typing and recording simultaneously.
- Room echo: Conference rooms with hard walls can turn a clear voice into hollow, reverberant audio. This is a frequent issue with webinar recordings.
- Background chatter: Hallway conversations can bleed into recordings during live training sessions, especially in open-plan offices.
- Wind noise: Field recordings often deal with unpredictable sound. For example, a mechanic recording a garage-based equipment tutorial on a tablet may capture wind bursts or shop noises along with the explanation.
Whatever noise you’re dealing with, start with Camtasia’s noise removal tools before you assume the recording is unusable.
Before you edit: Quick capture checklist
Even experienced video creators deal with noise in post-production. A few quick habits before you hit record can reduce how much cleanup you need later.
- Close CPU-heavy apps. Browser tabs, Slack, and cloud sync tools can trigger fan noise mid-recording.
- Mute system notifications before starting.
- Point a directional mic toward yourself, not at your monitor.
- Monitor with headphones to catch issues early.
A trainer recording a walkthrough from a home office should run this checklist every session.
Even good habits can’t eliminate every real-world noise issue, which is why the post-production steps below matter.
For deeper preparation, see how to soundproof a room.
Remove background noise in Camtasia Editor
Open your video in Camtasia Editor, select the audio clip, and drag the Remove Noise effect from the Audio Effects panel onto the track. For most recordings, the default settings do the job without any further adjustment.
Step 1: Open your video in Camtasia Editor
Open Camtasia Editor and load an existing project, or go to File > Import > Media to bring in an external file. This works for a native Camtasia recording or a Zoom export from last week’s compliance webinar. The same cleanup workflow applies either way.
Step 2: Drag the Noise Removal effect onto your audio track
Open the Audio Effects panel in Camtasia Editor, find Noise Removal, and drag it directly onto your audio track.
Camtasia analyzes the track and suppresses unwanted background frequencies. No manual EQ, no noise profiles to configure.
If your webinar recording picked up HVAC hum from a conference room, this single step can clear it without touching any other settings.
Step 3: Fine-tune if needed
Most recordings sound natural after the defaults are applied. Only adjust if the voice sounds thin, distorted, or still noisy.
In the Properties panel, lower both Sensitivity and Amount first, then increase gradually. A quiet narrator can sound over-processed after aggressive cleanup. Small upward nudges can restore warmth without letting too much noise back in.
Once your audio is clean, you can shift your attention to final production touches, like adding music, refining visuals, and prepping the video for distribution.
Need more volume alongside clarity? See how to make your video louder.
If you can edit a doc, you can edit a video
Stop fearing the timeline. Camtasia Audiate transcribes your recording so you can edit your video just by editing the text.
Free Download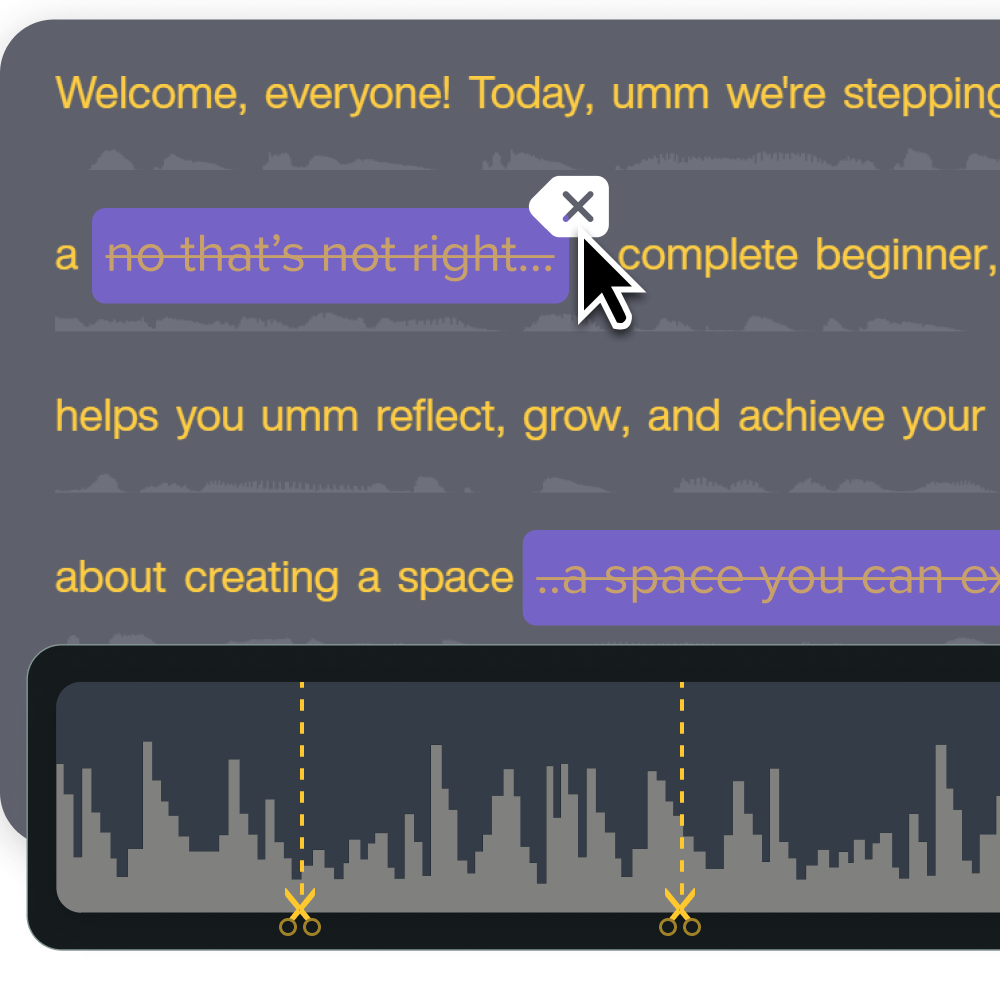
How Camtasia Audiate’s noise removal works
Camtasia Audiate uses AI to identify and suppress unwanted ambient frequencies, such as HVAC hum, keyboard clatter, and room echo, while preserving the speaker’s voice. Import your audio, narration, or voiceover, and Audiate handles the noise reduction process in the background. You don’t need to scrub waveforms or set up a manual noise profile.
Picture this: You record a screen capture narration on a built-in laptop mic in a conference room. Background chatter bleeds in throughout. In a manual tool, cleanup often means sampling noise floors and adjusting multiple bands. In Audiate, AI helps detect and reduce those unwanted sounds without touching your vocal track.
One honest caveat: noise removal has limits. Thin recordings or very noisy environments can sound over-processed if the cleanup is pushed too hard, leaving a hollow or “underwater” quality. If that happens, lower the intensity or re-record closer to the mic rather than increasing suppression further.
The practical payoff is speed. Instead of spending time on manual cleanup, you can focus on making the content clear and useful.
Faster cleanup with Camtasia Audiate
Scrubbing a waveform to find every filler word in a 45-minute onboarding webinar is slow. Camtasia Audiate lets you edit from a text transcript: delete a word on the page, and the audio updates accordingly.
Use Camtasia Audiate for long recordings. Stay in Camtasia Editor for shorter clips that only need basic cleanup.
Edit audio by editing text
Camtasia Audiate transcribes your spoken audio into editable text. Delete a word or passage in the transcript, and the audio updates automatically.
For an instructional designer updating a software training course, this saves real time. Open the transcript view, scan visually for the noisy tangent, highlight it, then delete it. That awkward section’s gone in seconds.
Remove noise and filler in one pass
Camtasia Audiate helps you handle noise and verbal clutter in the same editing session. Apply the Remove Noise effect, then use automatic filler-word detection to flag every “um” and “ah” in your transcript.
This matters most for subject matter experts (SMEs) and non-native speakers recording webinars off the cuff. Before sending the audio back to Camtasia Editor, review the flagged transcript yourself. Auto-detection can occasionally catch intentional pauses, so review suggestions before removing filler words.
Send clean audio back to Camtasia
Once you finish cleaning up audio in Camtasia Audiate, your edits automatically sync back to Camtasia Editor, keeping your timeline intact.
For an L&D team producing a standardized onboarding series, this means you can strip filler words and reduce background noise in Camtasia Audiate, then return to trimming visuals in Camtasia Editor without losing a single cut.
Clean audio is within reach
Most noisy recordings aren’t lost causes. They’re often just one or two targeted adjustments away from sounding clean and more professional.
One thing to remember: less processing is almost always better than more. A light pass that removes the worst of the background hum will serve your learners better than an aggressive setting that leaves voices sounding hollow and unnatural.
If your team produces training content regularly, the integrated workflow for recording, cleaning, editing, and publishing is worth setting up once so it runs smoothly every time.
Try Camtasia free and see how much ground you can cover in a single editing session.
FAQs
Can I remove background noise from a video without re-recording it?
Yes, you can clean up a noisy recording entirely in post-production. Camtasia Editor’s noise removal effect analyzes your audio track and suppresses unwanted ambient sound without touching the original footage. Most users can improve a noisy Zoom call or training video in under five minutes using the Sensitivity and Amount sliders.
Why does my voice sound distorted after noise removal?
Distortion usually means the Sensitivity or Amount setting is too aggressive for your recording. Try lowering both sliders until the voice sounds natural, then nudge them up gradually until the background noise fades. Recordings captured with a very low signal-to-noise ratio, such as those made on a built-in laptop mic in a noisy room, may need lighter processing to preserve voice quality.
Can AI remove background noise from Zoom recordings or webinars?
Yes. Camtasia Editor’s AI-powered noise removal works well for Zoom recordings and webinar exports, which commonly contain HVAC hum, fan noise, or room echo. Import the file, isolate the audio track, and apply the Noise Removal effect without any manual EQ work. For longer recordings, Camtasia Audiate may further speed up the process. It lets you edit and clean audio through the transcript rather than scrubbing a waveform.
Do I need a separate audio tool to clean up the audio in my video, or can I do it in my video editor?
With Camtasia, you can handle both tasks in one workflow. Camtasia Editor includes a built-in Noise Removal effect that works directly on your audio track inside the timeline. If you need deeper cleanup or text-based editing for narration-heavy content, Camtasia Audiate connects natively to Camtasia Editor. Your edits flow back to the timeline without a separate export step.
Share