


It’s happened to all of us: you recorded the perfect video after hours of work, but your audio sounds like TV static.
A bummer.
Beyond seeming unprofessional, poor audio quality makes it difficult for your viewers to understand the video. Your voice and the information end up lost in the staticky audio. Quality narration and audio keep people watching your videos.
Well, there’s no need to worry. In this guide, we’ll dive into the tools you need to soundproof your room and tips that’ll take your audio even further. It’s never been easier to get crisp audio from anywhere.
Why should you soundproof a room?
Soundproofing a room is essential for clean and crisp audio recordings. But why?
Sound moves in waves. When those waves hit something (like a wall), they bounce back. If you’re in a room with more than one wall (what room doesn’t), the sound wave will bounce back and forth. Over and over again.
As you might imagine, sound bouncing back and forth across a room doesn’t make for the highest quality audio. In fact, it starts to muddy up your audio very fast.
To fix this problem, we have two options: absorb the reflected waves or diffuse them.
Absorbing sound waves reduces the strength of the reflection. Absorbing all the errant sound waves may seem like a good idea, but if you absorb too much, your recording will feel unnatural or lifeless. The key is to find a balance that works well for you.
Diffusion is another word for scattering; sending reflected waves in different directions. Although this may seem like disorganized bouncing, it actually creates a smoothing effect. To get the best overall audio, you should use absorption and diffusion together.

Now, technically this process is called acoustics. But most people consider it soundproofing, so we’ll lump it all together to make it easier.
By definition, soundproofing blocks external sound from entering the room. When loud noises occur outside of the room, they can turn into those soundwaves that bounce all around.
So now that we have the basics covered, let’s go over soundproofing methods that’ll clean up your recordings every time.
What should you soundproof?
Soundproof floors, soundproof windows, and soundproof walls. The more you soundproof, the higher the chance those sound vibrations turn into high-quality audio.
Soundproofing materials include anything from professional materials to objects you probably already have in your house! So don’t worry, there are budget-friendly ways to soundproof a room.
Let’s look at some options you can try, whether you’re at home or in a recording studio.
Professional soundproofing
Professional soundproofing materials are designed to dampen noise. For example, acoustic window inserts, wool insulation, and mats all work to close off the room from outside noise.
Ideally, you want to soundproof big surfaces. We recommend using a window insert in every window in the room. Better yet, choose a room with no windows!
Next, you want to dampen the noise on the walls. Use sound-absorbing acoustical foam panels to do this easily. There are many options online in a wide range of fashion and prices.
Lastly, soundproof your flooring with specialized mats. Again, there are many different options for this. Don’t forget to wedge some material under the door! Options like door draft stoppers and door sweeps are great solutions.
Now that every surface is covered with the correct material, it’s time to add in some finishing touches. Acoustic caulk, for example, will seal off extra noise coming from outside the room. After these few steps, you should notice a drastic difference in your audio quality.
DIY soundproofing
There is no need for fancy home improvement measures! We’ve got you covered if you don’t have the time, money, or patience to soundproof a room from all-new materials.
Instead of wall paneling and flooring, try to hang thick blankets over your walls, and cover the floor with large area rugs (or a bunch of little rugs put together). Bookshelves and wall dividers work well at breaking up large spaces and creating a room divider with existing walls.
Instead of a door wedge, you can stick a towel or other soft material between the cracks to block sounds.
Plus, soft furniture like couches and blackout curtains work well to absorb some sound. This is the perfect time to get creative! Noise reduction does not have to be expensive. If all else fails, record in a closet or throw a blanket over your head. It may seem odd, but it can be just as effective as going in an actual booth.
Now it’s very important to keep in mind that too much soundproofing is just as bad as too little. You don’t want your audio to sound like you recorded it in a muffled cave. Remember to keep a balance and test out your recordings as you go until you find the perfect sound for your needs.
More tips and tricks
For a truly masterful voice-over, you’ll want to control for everything we’ve covered above: blocking outside noise, absorbing stray sound waves, and diffusing the rest. You’ll also want to use a professional microphone to pick up the best audio possible.
Block noise from outside
To block noise from entering a room, you need thick walls made out of a dense material. Think plaster instead of drywall. Since full-on construction isn’t exactly inexpensive, let’s focus on picking the best room you already have access to.
Choose a perfect location
Choose somewhere remote, preferably without windows. The best spaces can seem unconventional: don’t count out closets, storage rooms, or even your car. Most cars built these days have built-in soundproofing to minimize road noise. Use this to your advantage! No one will know if you record your voiceovers from the passenger seat.
Recording in a busy office can be a challenge, but if you can’t find somewhere quiet, you can always send a polite email reminder to your coworkers when you need to record something or let them know in person. This also works for other people living in your home.
Fine-tune the details
Next, assess how much extra noise you’re still hearing. The easiest way to do this is to plug headphones into your mic and listen closely for anything it’s picking up. Is a dog barking? Do you hear construction noise? Maybe the fan in your desktop is whirring? Any little noise can affect your recordings.
You’ll want to dampen any extra noise you hear: the goal is complete silence. You could buy acoustic foam and plaster it up in the room you’re using, but that’s not always necessary. Remember, any soft material can deaden noise.
Like we mentioned above, hanging heavy curtains or carpeting on the walls of your room is another option.
Small spaces tend not to need as much diffusion as larger spaces, but if your audio plays back sounding dull, throw some corners into your room. Again, acoustic panels work well, but anything with some angles on it will do.
Fix any remaining audio with Camtasia Audiate
So you’ve soundproofed your home as much as possible, but your audio is still not perfect? No need to panic! Camtasia Audiate is the perfect tool to add those final touches.
Remove noise from your audio today!
Audiate is the perfect tool to remove any noise remaining in your audio.
Learn MoreWith countless editing options, Camtasia Audiate makes it easy to silence room noises and other imperfections. Improve your audio files with professional, yet easy-to-use editing tools.
For example, the DeNoise option lets you control the background noise of your video clips so you can drown out any annoying hums in your recordings.
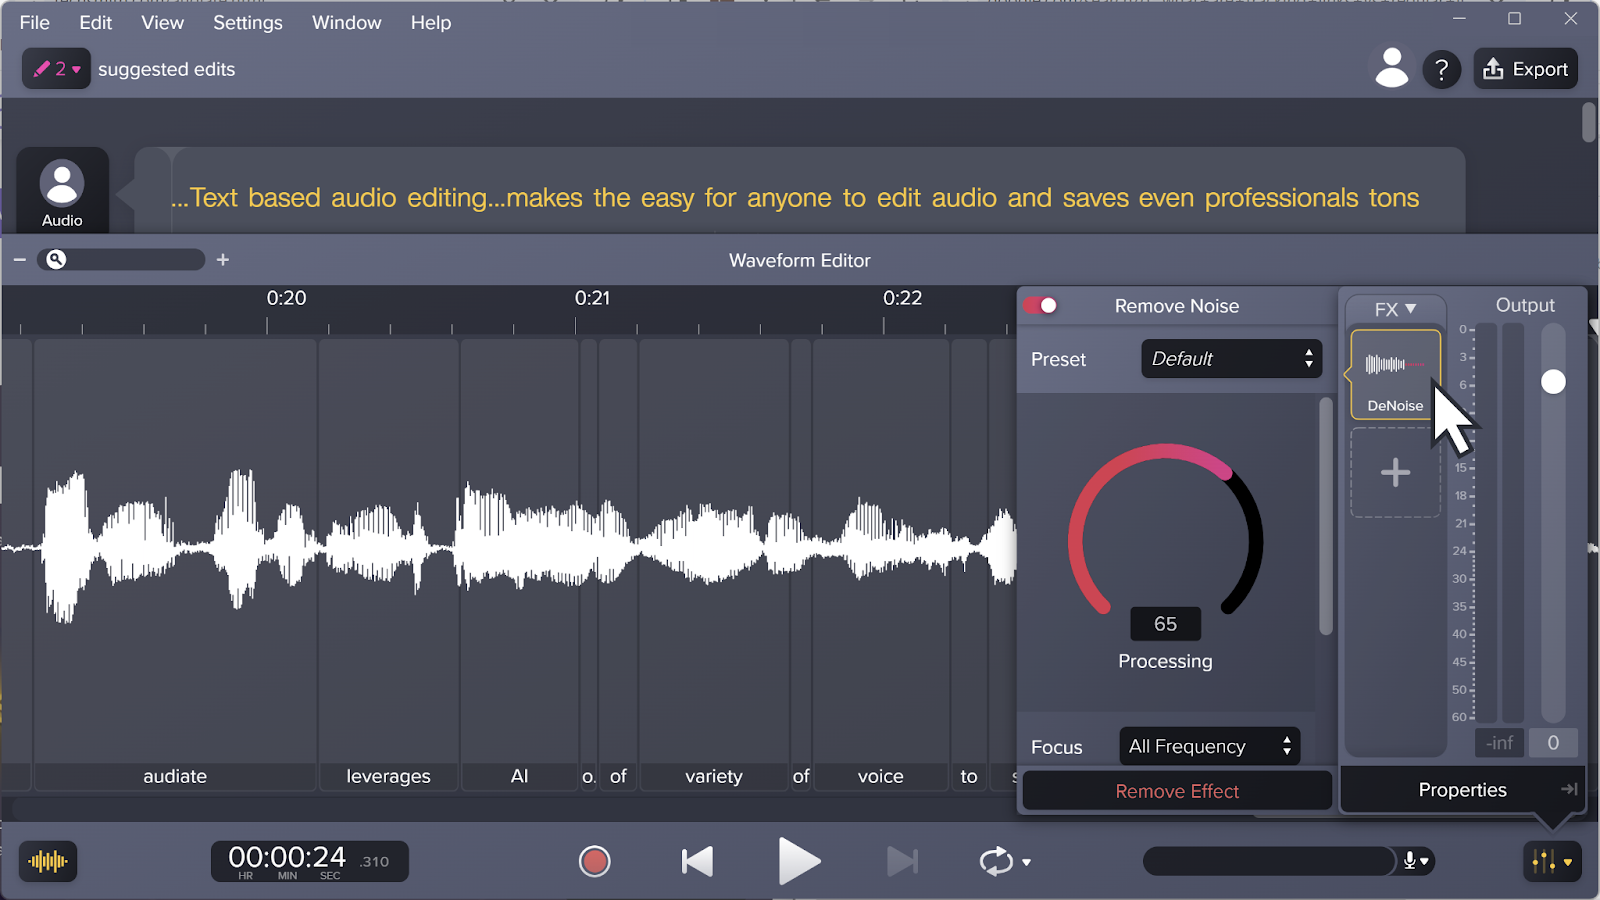
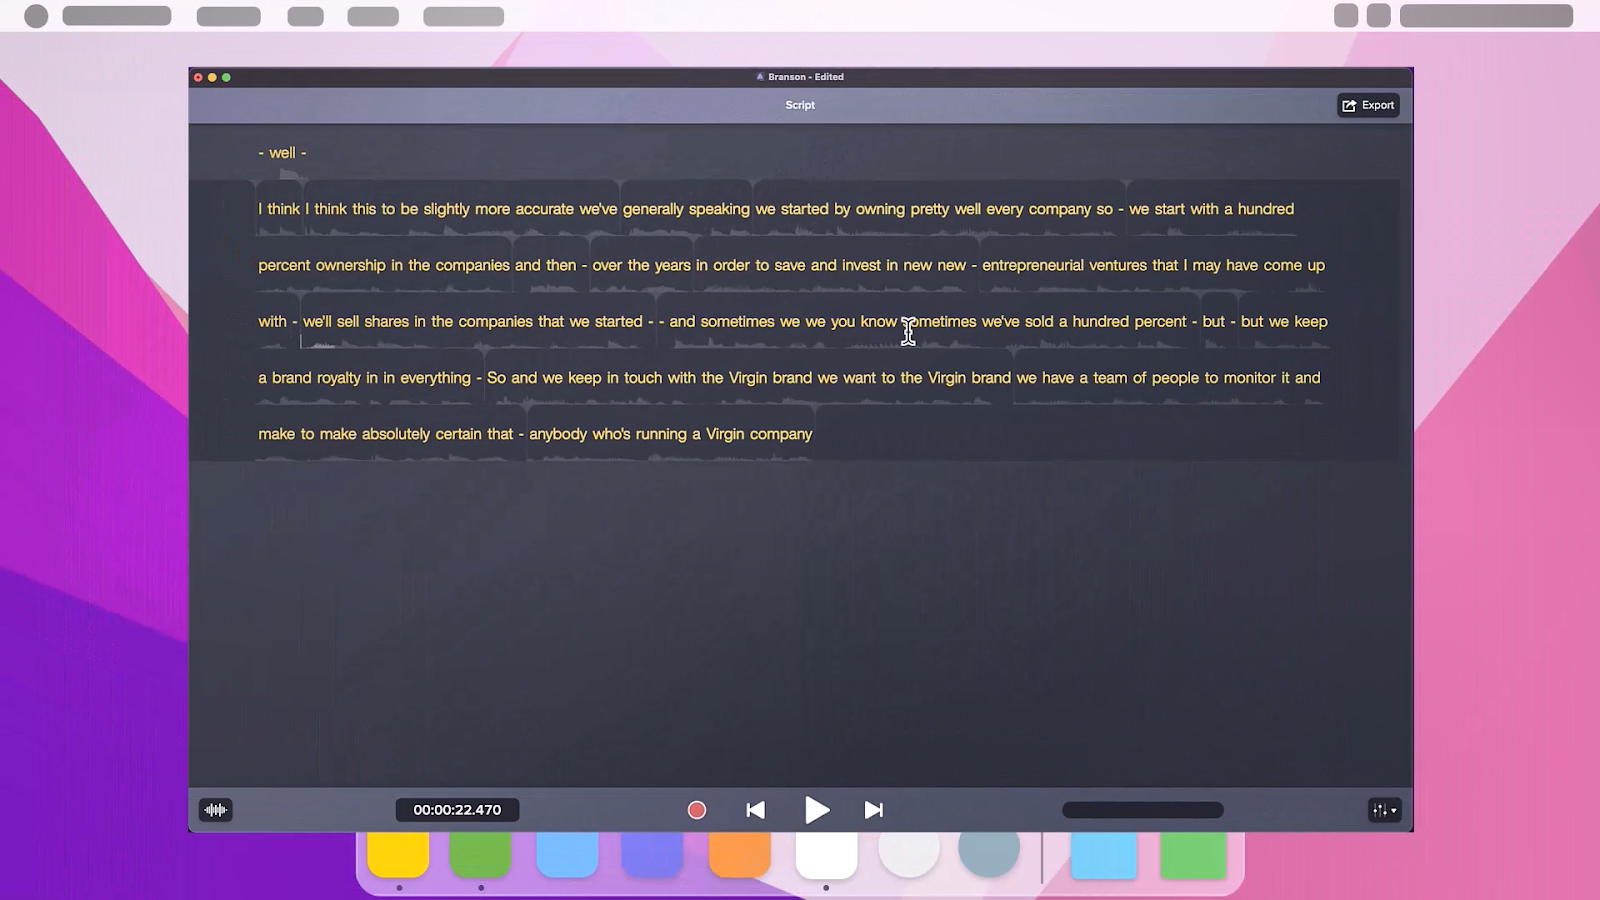
Plus, you can easily remove um’s and ah’s with the text-based editing feature. Just delete the instances from the text, and watch as your video magically syncs up with the updated text. It’s easy to use and takes any video back up a notch.
Now, you should have all of the tools to successfully soundproof your recording room and edit your audio recordings!
Share