Using a webcam recorder to add webcam footage to a video is an easy and effective way to increase engagement and help viewers better connect with your content.
Whether you’re trying to record webcam footage and add it to the corner of a training video or you want to start a video with a live introduction, this post will walk you through the steps to create a video from your webcam.
What is the best webcam recording software?
A webcam is a valuable and versatile tool in your video creation toolbox. You can use it to make YouTube videos, create instructional videos, and add personality to any other type of video.
When choosing software, you have two options: a dedicated webcam recorder, or a screen recorder. Now, we may be biased but we’d argue that a screen recorder is the better choice.
If all you need to do is make webcam videos, a simple webcam recorder might be enough, but if you are capturing a lecture, recording a live stream, or filming a webinar there’s a good chance that you’ll want to record your entire desktop, as well as your webcam.
That’s why we suggest using high-quality screen capture software, like TechSmith’s Camtasia, which comes with a full suite of editing tools, making it perfect for creating all types of video content.
Because Camtasia is both a webcam recorder and a screen recorder, we’ll be using it throughout this step-by-step guide. If you haven’t already installed Camtasia, you can download a free trial here.
Easily Record your Webcam with Camtasia
Capture every move with our online webcam and screen recorder. From your browser – record yourself and your screen.
Try Camtasia for freeHow to record video from webcam (on Windows or Mac)
Step 1: Set up your space
Whether you have an external webcam to install or a new microphone to plug in, make sure you have all of your gear ready before you record.
Clear out your desk from any clutter or distractions so your viewers can focus on the important information you’re sharing instead.
Step 2: Record your video
Open Camtasia and choose New Recording.
Choose whether you want your screen, system audio, and microphone on for the video or a combination of them. Then, hit the red record button to start recording.
Step 3: Position your media
Now you need to make a decision. Do you want your webcam footage to appear at the beginning of your video, or do you want it to appear on top of your video, using the Picture-in-Picture feature?
Don’t worry, we’re not going to force you to make that decision right now, but we are going to show you how to do both!
Webcam first, video second
Start by dragging your webcam footage from the Media Bin to the Timeline. Then, drag your other video files to the Timeline and make sure they’re positioned directly after the webcam footage.
When Camtasia produces the video, the videos will appear in the order shown on the Timeline. Remember, Camtasia will only produce videos that are on the Timeline, so be sure not to leave any footage behind.

Picture-in-Picture
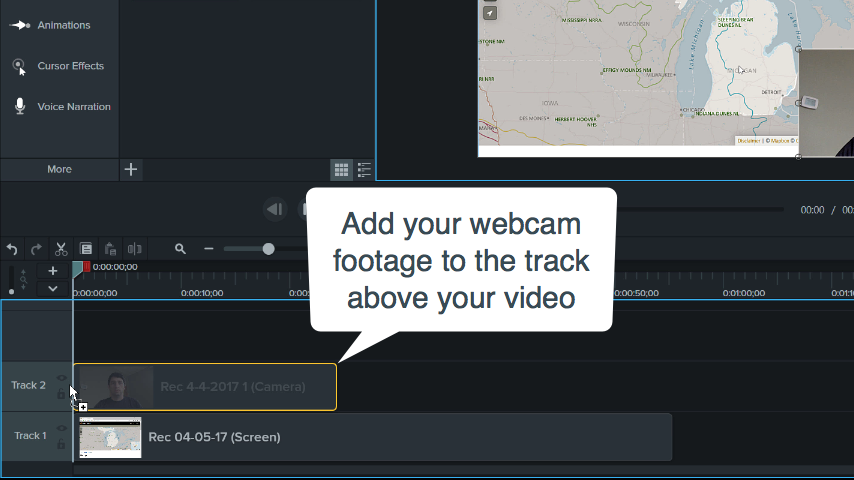
To create that cool Picture-in-Picture effect, start by dragging the video to the Timeline. Then, drag the webcam footage to the track above the video.
It might help to think of these tracks as pictures in a stack. The topmost track is at the top of the pile, meaning that anything underneath can be covered by what’s on top.

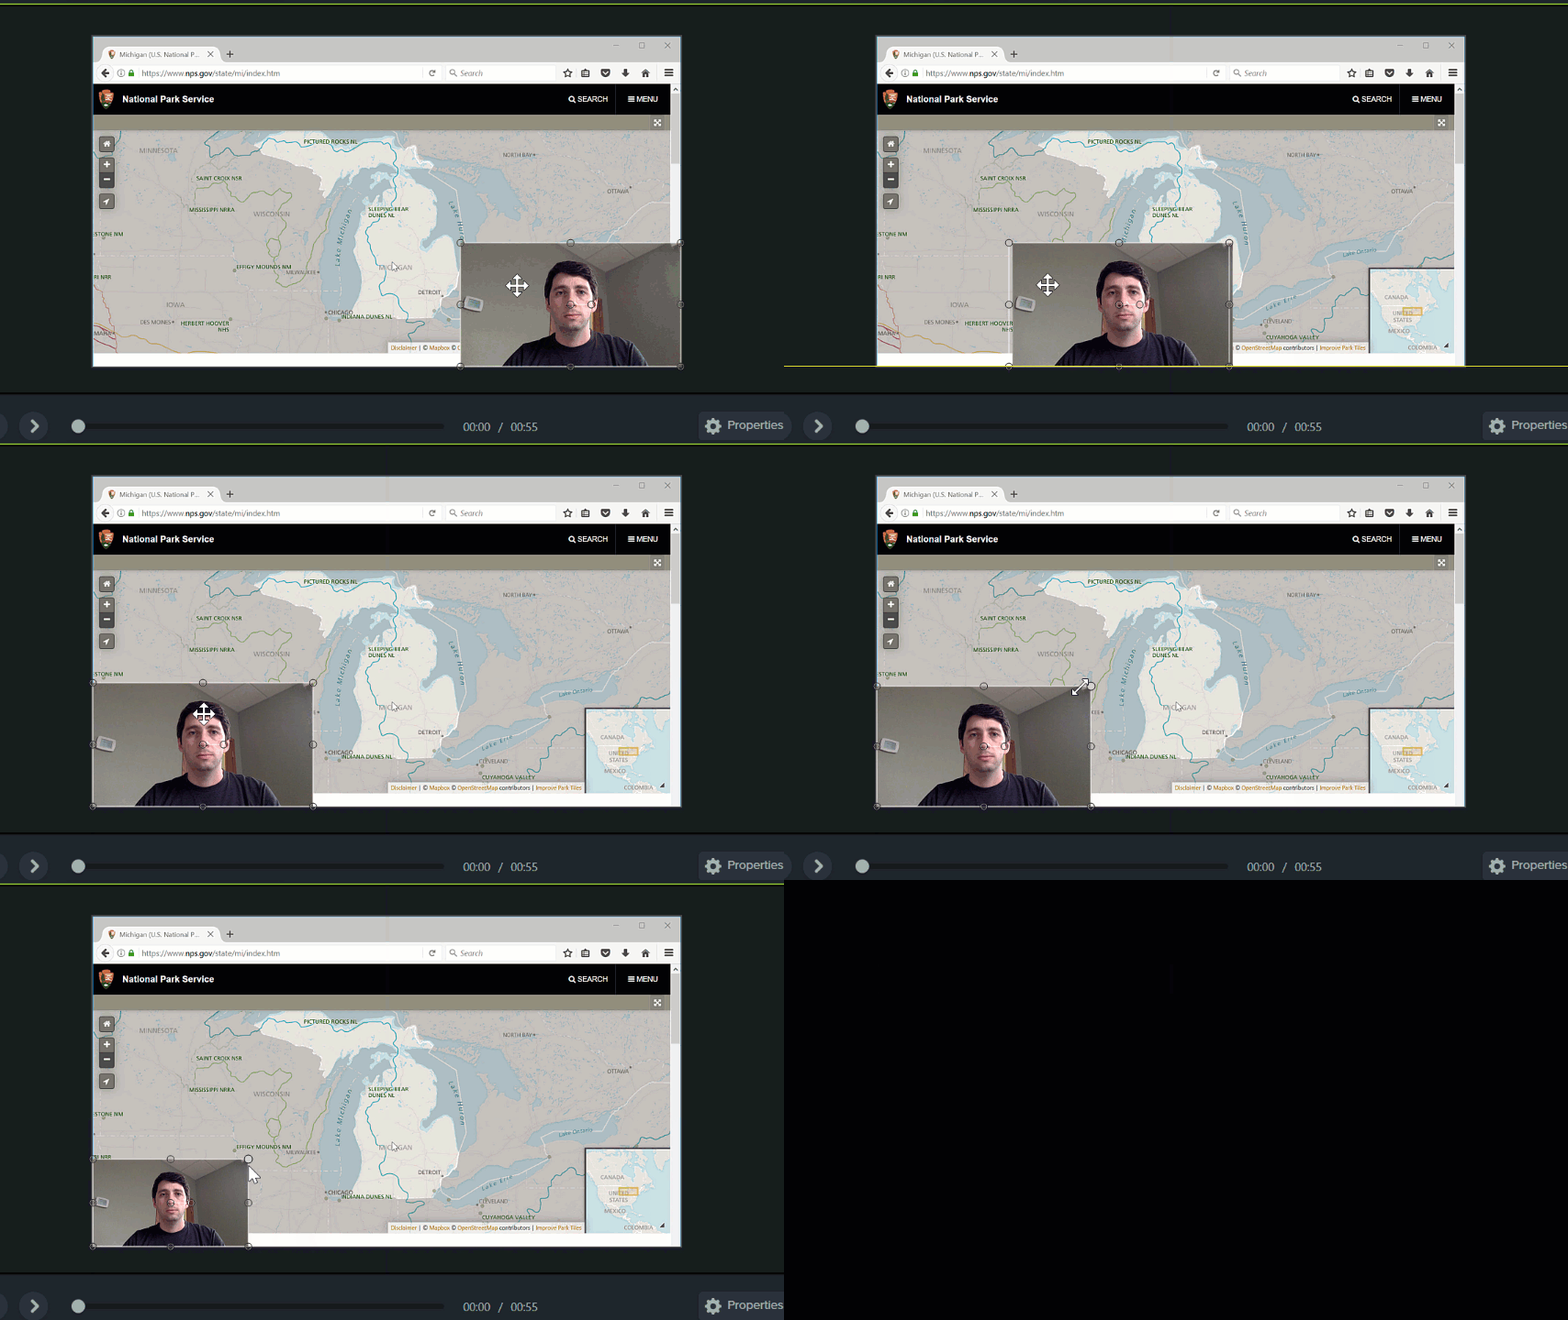
Once you’ve added the webcam footage, you can resize and position the Preview Window on the canvas to make it look just how you want it.

As cool as this is, we’re not evening scratching the surface of things you can do in the Camtasia video editor. If you want to learn more about Camtasia’s editing tools, as well as tips and tricks on how to use them, be sure to check out our video tutorials.
Easily Record your Webcam with Camtasia
Capture every move with our online webcam and screen recorder. From your browser – record yourself and your screen.
Try Camtasia for freeStep 4: Save your video
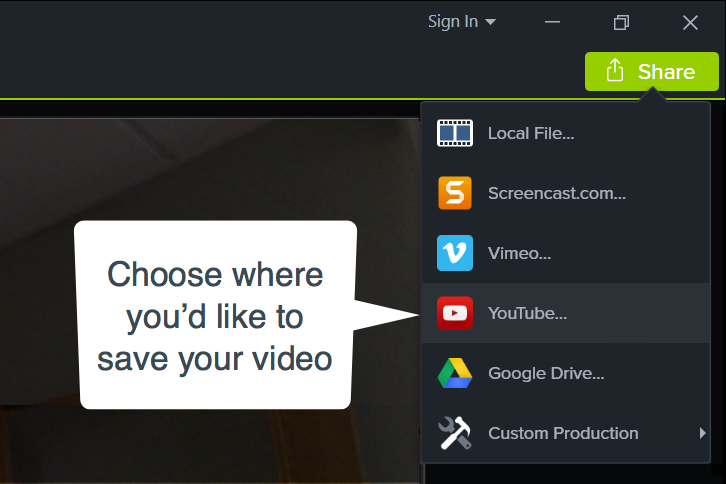
Once your webcam footage is set, export your video by clicking the green Share button. This produces your video and allows you to choose the format and where you’d like to save it.

3 tips to make your webcam recording awesome
Now that you know how to record webcam video, here are a few things to consider when creating your content:
1. Focus on your set-up
Tilt your webcam so that it’s at eye level, this way your viewers won’t feel like they’re looking up at you. You should also position yourself in front of a solid-colored wall or hang a sheet behind you. Busy backgrounds can be distracting, so this is a great way to help your viewers stay focused on what’s important: You!
Stick to the Rule of Thirds (which you can learn more about here) or position yourself in the center of the frame. If you need to check your position you can do so by hovering your mouse over the webcam view in the recording toolbar.
As a final tip, try to avoid making any quick movements while recording to ensure you don’t draw the eyes of your viewers away from your content.
2. Use proper lighting
Lighting can make or break a webcam recording, so be sure to pay close attention to your video lighting.
If you record near a window, try to avoid recording directly in front of it. Instead, position yourself either next to, or facing it. This will ensure you’re not washed out and will stop you from turning into a silhouette.
Ready to Embrace Asynchronous Communication?
Text: How do we have fewer, better meetings? We decided it was time to reboot our meeting culture and communication norms at TechSmith.
Download now!
3. Check your audio inputs
If you’re using the webcam built into your computer, there’s a good chance it will default to the computer’s microphone, which may not be the best quality. For the clearest audio, you might want to consider setting up a DIY recording studio.
However, if time and resources make that impossible, using an external microphone will make a huge difference in the quality of your audio. It doesn’t have to be expensive, even the mic built-in to your headphones will likely be better than the one on your laptop.
Just remember to check that Camtasia is recording your audio from the right source and always make sure you test your external microphone before recording your voice over.
Click here for more tips on how to record great audio.
While using a webcam recorder might not be the best choice for everyone’s content, it could help you communicate better with your viewers.
Here are a few questions to ask yourself:
- Will this help me get my message across better?
- Is it necessary to accompany your content?
Think about how you want to present not only your video content to your viewers but yourself as well.


Share