


Video content is everywhere, and let’s be honest, it’s not always engaging. There’s a certain magic in adding background music to your videos, no matter if you’re creating tutorials, training sessions, or walkthroughs.
It’s an easy edit, but often overlooked since it technically isn’t a core part of your content. However, music will make your content more emotionally resonant and engaging. It will enhance clarity and help keep viewers engaged without much extra work on your part.
How to put music on a video
Adding music tracks to your video clip is a simple, fast way to boost viewer engagement and polish your video content. The process involves layering your audio files, whether your own music or royalty-free content from a music library, over your visuals and narration.
TechSmith’s 2024 Video Viewer Trends Report found that people considered clear audio quality and camera video footage as content characteristics they felt were most important. Between narrative audio and supporting background music, you can easily enhance your video’s engagement.
When your added audio lines up with crisp visuals, users tend to absorb complex concepts more clearly and at their own pace. For example, a matching soundtrack for the intro and outro improves familiarity, guides attention, and establishes the tone for the upcoming video.
Simple steps to add audio and video together
Coupling audio and video is a straightforward process, so you don’t have to worry if you’re a new video editor. Beginner-friendly tools like Camtasia’s video editing software simplify the process down to a drag-and-drop workflow, which means you don’t need professional editing skills to get it done quickly.
1. Upload or record your video
First, get your video file ready for use. This file can stem from a pre-recorded screen recording and camera footage. There are a lot of video types that can benefit from music, for example, a video tutorial created from screenshots.
Check your video length: Know your video’s duration before selecting music. If your background music is subtle and repetitive, you can easily loop a piece for the length of the video; however, if you’re using bolder music, try to use it once so as not to become too repetitive for the viewer.
Review video quality: Your video quality should match your music’s, so ensure you have clear visuals to work with.
Consider file type and size: Make sure you use MP4, MOV, WAV, or AVI formats, which common editors handle well. Large music files can take a long time to process without compressing.
Test playback: Verify your video is playing correctly and as you expected before overlaying any audio.
Once you’ve ensured everything plays smoothly, you’re ready to add music to your file!
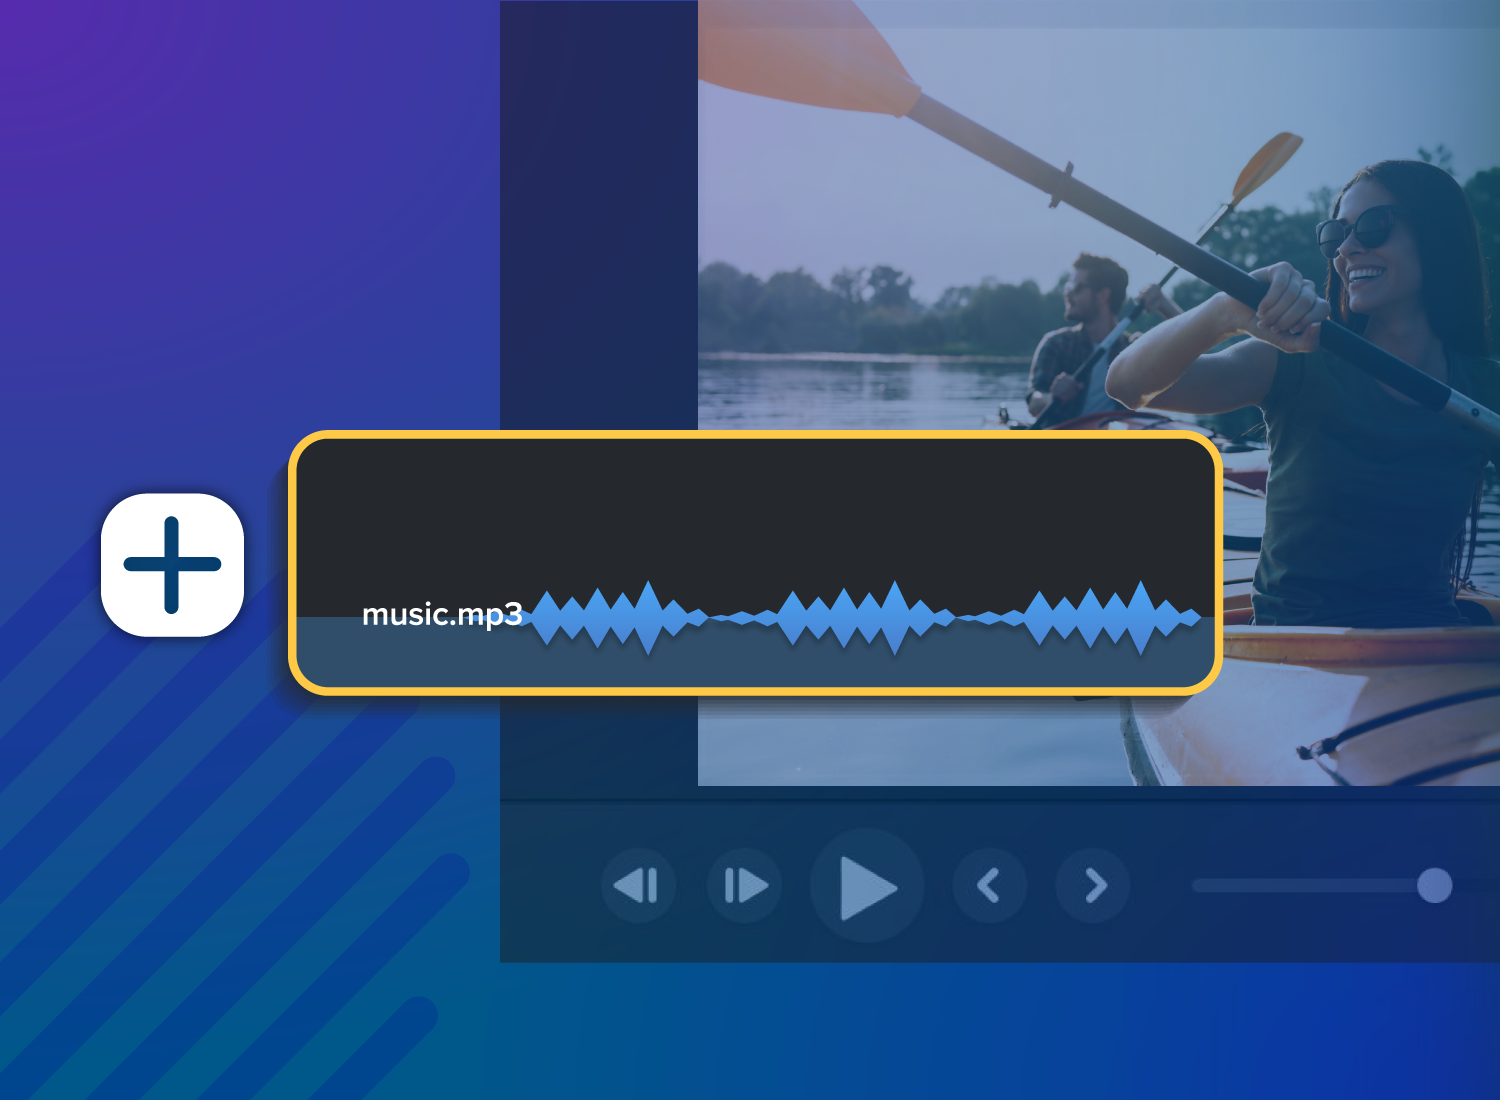
2. Import or select your audio track
Now, import your audio file from your computer library or browse a royalty-free music library. Camtasia offers an audio library full of copyright-free music and sound effects perfectly suited for training or social media use, like TikTok.
When using your own music, import the file directly into your editor.
When using royalty-free options included in your video editing tools, drag-and-drop the track right onto the editing timeline.
Importantly, always verify copyright and ensure a clean music license. Royalty-free options help avoid troubles like watermark or strike issues on socials and more serious legal infringement.
3. Position and trim your music
Once your track is in the video editor, you can drop it onto your timeline, then shape it to match your video.
Camtasia’s waveform view supports precise audio editing so you can line up everything perfectly. Pro plans include Audiate features, such as audio cleanup tools like background noise removal and hesitation deletion, which save creators time while improving clarity.
Start clean: Begin the audio slightly after the video starts. A 0.5-1 second delay blends the two tracks together seamlessly.
Match energy: Align musical peaks with visual or thematic transitions.
End smoothly: Just like the beginning, fade the audio before the video ends in order to avoid abrupt cuts.
Test thoroughly: Preview your video, especially the intro and outro, multiple times before finalizing.
Go from screen recording to polished video
A screen recording is just the start. Camtasia’s editor helps you add the callouts, animations, and edits you need to create a truly professional video.
Free Download
Tips for choosing the right background music
Choosing music may be the hardest part of this process. The wrong track distracts, while the right one amplifies your message.
The table below outlines the best practices for each common type of video.
| Video Type | Music Mood/Genre | Volume | Notes |
| Educational/Tutorial | Light, unobtrusive, consistent | 15-20% | Keeps focus on voiceover |
| Promotional/Product | Upbeat, energetic | 40-50% | Builds excitement |
| Emotional Stories | Dramatic/match narrative arc | 30-40% | Evokes feelings |
| Social Media | Contemporary music | 30-40% | Matches fast pace |
Pair music types with videos and audience preferences. Upbeat music matches well with tutorials and calm tones with explanatory content. No matter which types of music you choose, it’s always important to ensure your voiceover isn’t drowned out.
Ensure your voiceover is front and center, and use “ducking” to lower music during times when speaking. Audio ducking refers to the process in which one audio track is made quieter when another one reaches a specific threshold. Camtasia’s “emphasize” effect automatically adjusts the volume of background audio when speech is present, saving a lot of time during the editing process.
Editing and mixing songs in your video
Professional-sounding content creation involves more than slapping music on a timeline. There are different mixing tools you can use to refine the video. Here are three ways to do just that.
1. Adjust your volume and balance
Refer to the audio volume ranges in the table above for broad guidelines on how to balance your music. These guidelines are usually within the best ranges, but use your best judgment as you edit. You may prefer a quieter or louder background track. Just make sure you don’t overpower the rest of your video.
Video editing tools like Camtasia allow users to adjust music volume relative to narration and add automatic ducking to preserve clarity in voice-over-heavy videos.
2. Use fade effects for smooth transitions
There are different types of fade effects you can use to transition in your video. Below are common fade types and when to best use them.
Linear fade-ins and outs change volume at a constant rate. They’re predictable and often used because of their consistency. This type of fade is best for background music without emotional impact, neutral tone videos, and automated workflows.
Exponential fades increase or decrease the volume more naturally. Slow at first, then faster mimics how sound behaves in real life. Exponential fades are best for realistic sound environments, videos with voiceovers, and any storytelling.
Crossfades blend the end of one audio track with the start of another, perfect for blending music tracks. This trick works best for switching background music mid-video, creating a continuous flow, and polishing transitions.
Dip fades briefly reduce the volume, then brings it back up. It’s useful for emphasizing key moments in your video, drawing attention to a call-to-action, or making room for sudden narration or sound effects.
Camtasia’s visual waveforms and effects pane make music fading an intuitive process, which is especially important for team members who aren’t necessarily video editors.
3. Sync audio with key moments
Strategically sync audio and video to improve viewers’ engagement with key moments in your videos. For example, a product reveal can use a musical crescendo before the big reveal, or transitions between sections in a step-by-step tutorial video can benefit from a rhythmic beat to signal progression in the task.
You can easily use markers and timeline tools to place exact music cues in your video. Camtasia’s video editor makes it easy to track your audio file to cursor movements or animated overlays for cohesive storytelling.
Need to show your screen?
Skip the downloads. Use Camtasia online to record your screen, camera, and microphone right in your browser for free.
Start Recording
Adding music to video: online vs. desktop software
Deciding between video online tools and desktop editors? This table compares the biggest pros and cons between an online tool like Camtasia online and Camtasia’s desktop tool.
| Feature | Online tools | Desktop software | Best choice for… |
| Setup time | Instant access | 10- 30 minute installation | Quick projects: Online |
| File limits | 500MB- 2GB | Unlimited | Large files: Desktop |
| Processing speed | Internet-dependent | Uses computer power | Slow internet: Desktop |
| Advanced features | Basic to moderate | Professional-grade | Complex edits: Desktop |
| Collaboration | Easy sharing | Manual file transfer | Team Projects: Online |
| Pricing | Free/freemium | One-time/subscription | Budget-conscious: Online |
| Export quality | Sometimes compressed | Full quality control | Most options: Desktop |
How to solve audio and music problems in video editing
Video editing can come with a few issues along the way. By using a beginner and user-friendly tool like Camtasia, you’re usually already two steps ahead. Camtasia automatically separates screen, mic, system audio, and cursor tracks so you can edit each individually. That makes mistakes easier to spot and fix without affecting the rest of your video!
Preventative measures
Before we dive into solutions, let’s cover how you can avoid issues before they arise.
Always preview your video before you export it. That way, you can notice weird audio cuts and distortion or syncing problems. You can spot more issues if you preview everything on multiple devices.
Before you export, also save your project files for future adjustments. Editable versions make it easy for you to go back to previous edits.
If you find issues in your video, document them, how you believe they occurred, and how you fixed them. Keeping a log makes it easy for you to refer back to recurring issues and their matching solutions.
Specific solutions
Here’s how to spot and fix common hiccups using Camtasia’s tools.
Sync problems are common. Before you add in your audio, e-encode the video to a standard frame rate.
Audio cutting out is usually due to sample rate compatibility. Check whether your audio is compatible with 44.1kHz and 48kHz.
Distorted sounds can occur if your input levels are too high. Reduce input levels before processing to avoid this issue.
Silent exports are usually due to muted audio tracks. When editing, it’s common to mute audio here and there to focus on a specific track, so make sure you unmute them all before your export!
Luckily, professional video editing tools almost eliminate these common issues using built-in audio libraries and automatic sync features.
If you can edit a doc, you can edit a video
Stop fearing the timeline. Camtasia Audiate transcribes your recording so you can edit your video just by editing the text.
Free Download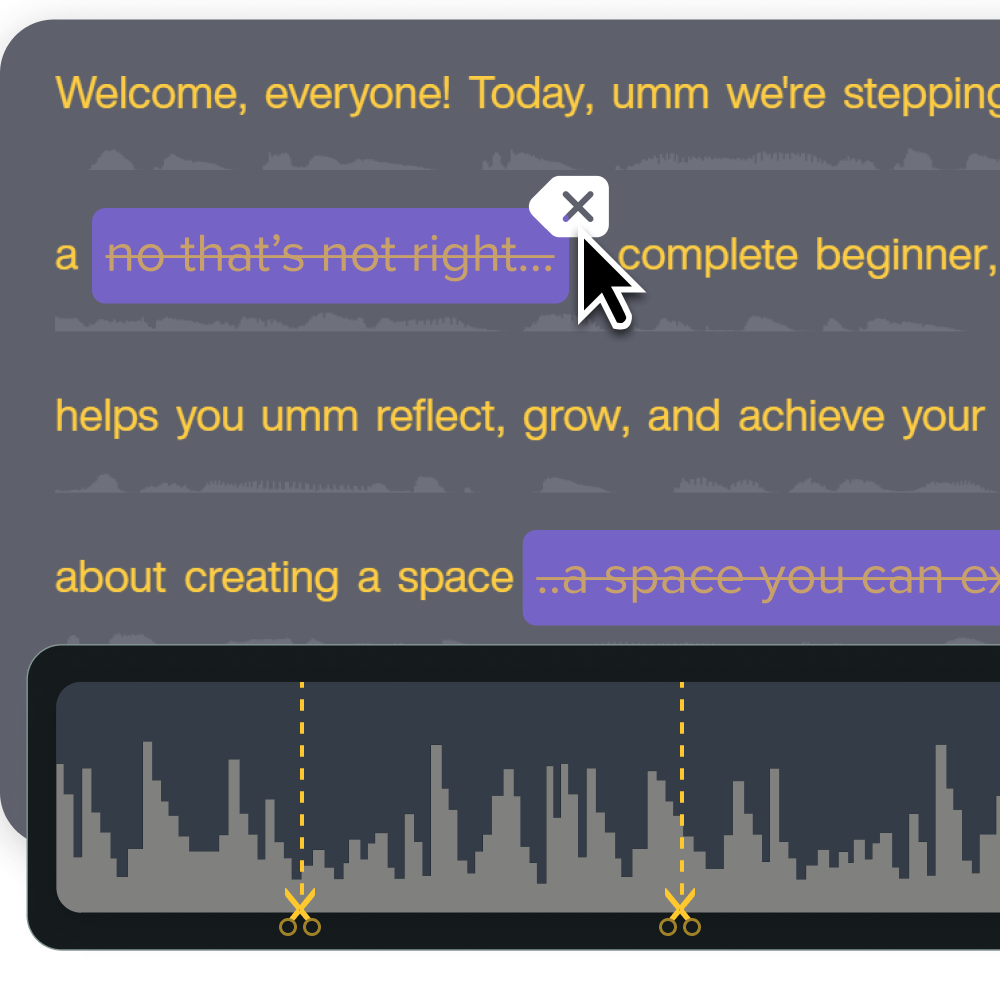
Elevate your videos with the perfect soundtrack
By mastering audio integration, you can create high-quality video content that stands out. A well-produced video enhances credibility and engagement.
Over time, your audio and video editing workflow will become second nature. Once you master the basics, you can explore multi-track sound design, dynamic sound effects, and layering custom voiceovers with background music, all of which will also become simple over time.
Then, it’s time to experiment! Try out different genres, pacing, and moods, and observe what resonates best with your audience.
Start building emotionally resonant, engaging videos today with TechSmith’s suite of tools.
Share