


Whether you are creating user documentation, giving a presentation, or building a website, high-quality, appropriately sized images will help you demonstrate competence and build trust with your audience.
You can resize an image in many ways, but not all methods yield the same results. If you don’t resize it correctly, your image could look stretched, blurry, or pixelated, making your finished product appear sloppy and unprofessional.
If you work with images often, knowing how to resize a picture correctly is critical. The good news is, it’s also simple.
Annotate and edit screenshots with Snagit
Professional mark-up tools and powerful features make it easy to create helpful images.
Try it Free
Why resize images without losing quality
While high-quality images can make your content look professional (and credible!), blurry or distorted images do the opposite and work to make your content appear amateurish or untrustworthy. Even for something as seemingly trivial as the profile picture on your social media account, the quality of your images can directly impact how your audience perceives you and your brand.
This is why understanding how to resize an image and keep quality can make all the difference. With proper resizing techniques, you can ensure your images maintain their aspect ratio, sharpness, clarity, and color accuracy, no matter what dimensions you need them to be.
This allows your images to continue to engage your audience, convey your message effectively, and represent your brand in the best possible light.
The best snipping tool for Windows and Mac
Don’t let clumsy built-in tools hold you back. Take and edit screenshots with Snagit!
Get Snagit
How to resize an image without stretching it
When working on a document in a program like Microsoft Word or Google Docs, it’s tempting to drag the corners of an image to make it larger or smaller, which you should not do.

Dragging the corners of an original image to resize it can make your new image look distorted and blurry.
When scaling your image, it’s crucial to maintain the ratio of width to height, known as aspect ratio, so it doesn’t end up stretched or warped.
For basic image editing, including cropping and resizing, TechSmith’s Snagit is the perfect solution.
Open your screenshot or image in the Snagit Editor, and select the ratio under the image. Before changing the dimensions, enable the lock symbol.
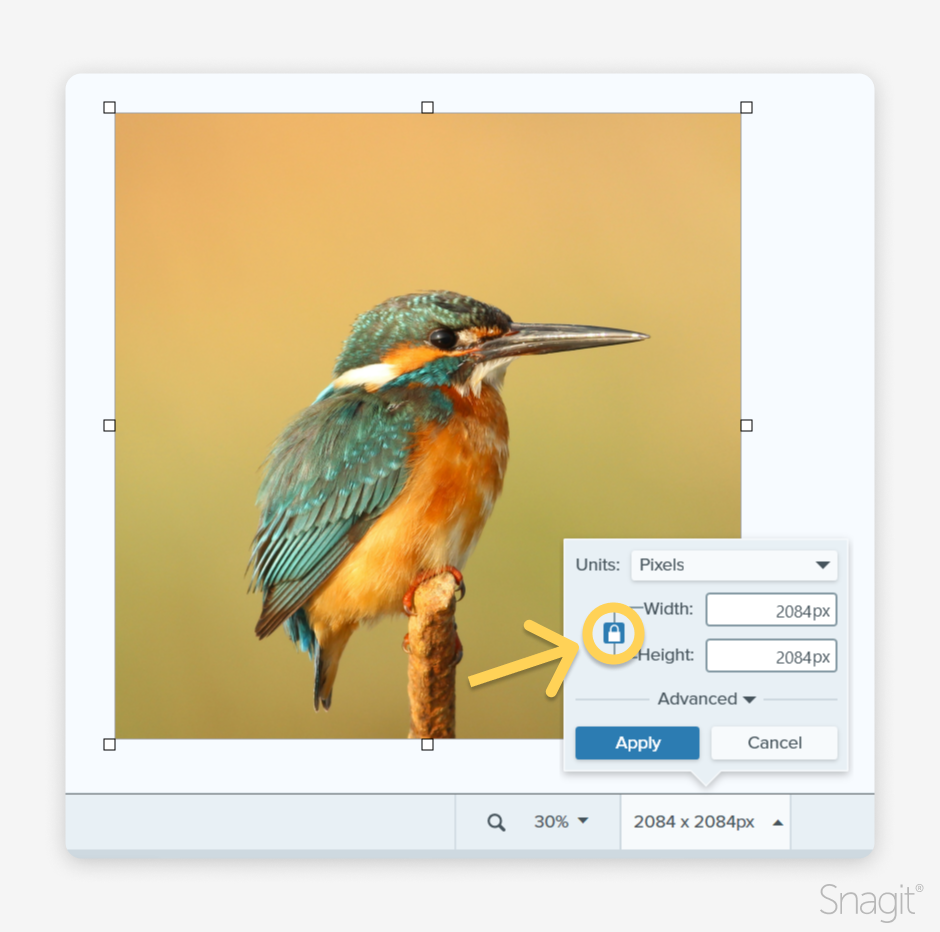
With the lock activated, Snagit maintains the image’s original proportions. Now, you can adjust the height or width of your image to the desired dimensions without worrying about stretching or warping it.
How to resize an image without losing quality
Making a photo smaller is much easier than making it larger because of the amount of pizels.
Most of the time, reducing an image’s size or dimensions won’t affect the image’s quality. However, making an image larger than its original dimensions can decrease overall quality.

In fact, rather than trying to increase an image’s size—which is rarely a good idea—you should start with a higher-resolution image: one that’s larger than you need it to be. Why? Because all you have to do then is crop it or make it smaller without worrying about the image quality.
However, it’s important to note that this is only true of bitmap images such as JPEGs, GIFs, or TIFFs. Vector files such as EPS or SVG can be resized and made larger or smaller without any loss in picture quality.
Bitmap files tend to be photos or screenshots, while vector images are typically graphics.
Tips for resizing images
Dimensions
Generally speaking, dimensions between 600 and 1200 pixels should be a good fit for most screens without compromising quality. However, you should tailor these dimensions based on your specific use case.
For example, the dimensions needed for an image to be used in a blog post will most likely differ from those of a webpage banner. Ultimately, the goal is to ensure that your resized image looks crisp and clear without causing layout issues or slowing down your website’s load times.
Lowest file size vs quality
The key to resizing images is finding the sweet spot between reducing the file size and maintaining the perfect quality.
As a general rule, we’d suggest aiming for a file size of 100KB or less. This size tends to provide a good balance between image quality and file size.
Annotate and edit screenshots with Snagit
Professional mark-up tools and powerful features make it easy to create helpful images.
Try it Free
JPG vs PNG
Understanding the differences between JPG and PNG files (and all file formats) is essential for finding the best format for your images.
JPG files are typically easier to resize and compress compared to PNG files. To compress a PNG file, it’s often better to convert it to a JPG beforehand. This change can help maintain high image quality while significantly reducing the file size.
One important exception to this rule is transparency. If any parts of your PNG image are transparent, you’ll need to keep the image as a PNG to maintain the transparency. JPG files don’t support transparent pixels.
On a similar note, if you’re trying to create an image with a transparent background, you might want to check out our article on how to remove the background from an image.
Editor’s Note: This post was originally published in January 2017 and has been updated in January 2025 for accuracy and to include new information.
Share