If you’re here, it probably means you’ve had enough of disappearing screenshots. There are only so many times we can ask ourselves: “Where do screenshots go?”
Plus. if you’re working with a new machine it can be even harder to get used to all of the quirks.
Trust us, we’ve all been there.
In this guide, we’ll go over where your screenshots go on different types of machines.
Where do screenshots go on Windows 10?
First, take a screenshot on your Windows machine. The quickest way to do so is to press the Print Screen Key, which is usually located by your space bar.
For more options, we have a complete guide on how to screenshot on Windows 10 & 11.
Once you take your screenshot with Snipping Tool, it’ll be automatically saved to your clipboard. You will be able to copy and paste it anywhere you need.

However, this also means that you usually can’t save your screenshot in a specific location right away. You’ll need to open the screenshot in the Snipping Tool, then right-click and select “Save As” to assign it a location.
To find your screenshots in your files, you’ll need to open your File Explorer and click on This PC. Then follow this file path:
Local Disk → Users → “your username” → OneDrive → Pictures → Screenshots

That’s a lot of work to find the screenshots saved on Windows machines!
It may be a good idea to consider saving your screenshots somewhere else. You can customize the location by pasting your screenshot into Paint. Then, click option Save As to customize the location.
We recommend creating your own folder so you can easily retrieve your screenshots later on.
However, it is quicker to use a third-party application like Snagit to follow an organized filing system. It makes a huge, time-saving difference and helps you organize your files more efficiently than Snipping Tool. More on that later.
Speed up your screenshot workflows
Stop wasting your time with built-in snipping tools, and try Snagit!
Learn More
Where do Mac screenshots go?
First, you’ll need to capture your screen using your Mac. The quickest way to do this is by using keyboard shortcuts like Cmd + Shift + 3, which captures your entire screen.
Access our guide for more in-depth information on how to screenshot on Mac, like how to capture a portion of your screen, crop your screenshot and even screen record!
The saving location of screenshots on Mac is much simpler than Windows. Once you take a screenshot with the built-in Screenshot app, it will automatically save to your desktop.
This makes it convenient for people with clutter-free desktops, but we all know that is rare! Although straightforward, this method invites a lot of chaos to your screenshots. Sometimes it can be hard to find desktop documents in the first place!

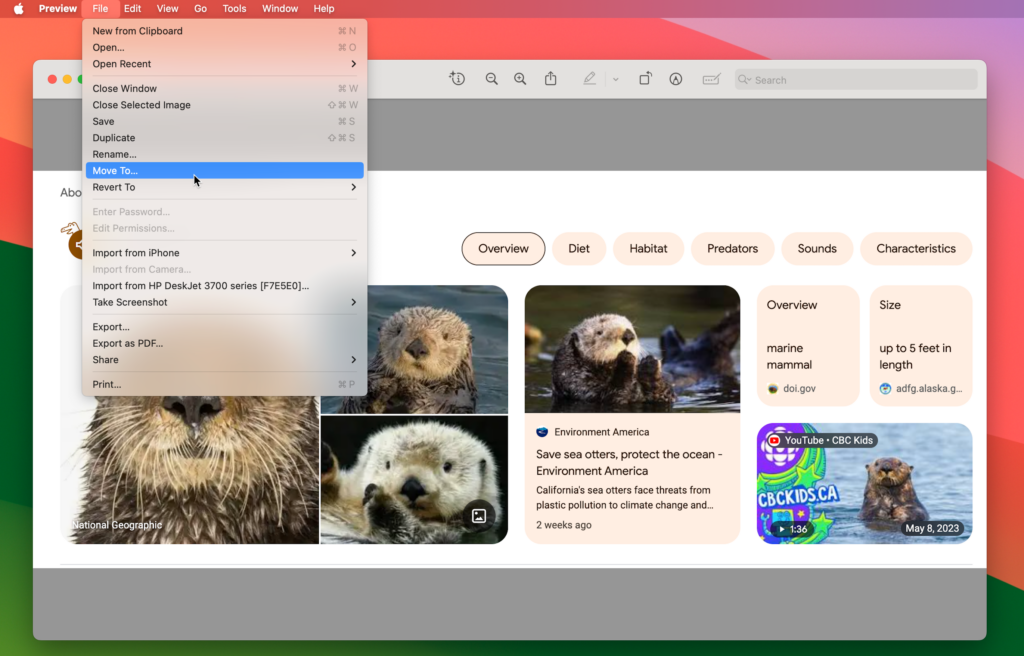
You can customize your screenshot saving location by clicking on the screenshot from your desktop. This will open Preview.
From there you can click on File, Move To, and select a new location. It’s a good idea to make a specialized folder for your screenshots so you can store them somewhere with easy access.

However, it is still a too-long process to capture, save, and find your screenshots that way!
Using a third-party screenshot and organization software like Snagit can really make a difference when capturing, filing, and sending screen captures. Snagit has so many filing options, that you’ll be able to save and find your screenshots in just a few seconds.
Find, organize, and send your screenshots like a pro
Now you know how to find your lost screenshots. But do you really want to deal with that hassle at all times?
Odds are, you don’t. It’s time you file screenshots somewhere else.
Luckily, Snagit is a great resource for people just like you. It’s super easy to use and makes organization almost too easy.
First, you’ll need to take a screenshot using Snagit. Snagit has a lot of different options like Region or Scrolling so you can capture everything you need and more.

After you take a screenshot with Snagit, it’ll automatically open in the Snagit Editor. From there, you’ll be able to make quick image edits if needed.
Use Callouts to add important information, the Step Tool to make an easy-to-follow tutorial, and more!
Most importantly, you’ll be able to file your screenshots however you want!
Snagit’s library has multiple filing options that fit your needs best. For example, you can look for your captures based on date and time, website, and application.

For more specialized organization, you can tag every image with customizable tags. Think of it as a highly customizable Pinterest board just for you. You can tag your images, and it’s almost certain you’ll never lose a screenshot again.
We love to use Snagit’s library to keep track of every document. You can upload preexisting documents to your library and tag them too so nothing gets lost again!
Speed up your screenshot workflows
Stop wasting your time with built-in snipping tools, and try Snagit!
Learn More
Never ask yourself “Where do my screenshots go on Mac?” or “Where do Windows screenshot go” ever again! We’ve got the solution for you.


Share