Shape Tool

Add a shape to an image. Set the Fill color to Transparent to make it a frame.

3d Snagit icon

In this tutorial:

Note: To add a shape with text, use the Callout Tool.

Note: Shape and other tools in the Snagit Editor toolbar are available to annotate and edit images. To draw a shape while you record video, see Screen Draw.

Draw a Rectangle or Ellipse (Oval)

  1. Click the Shape tool in the Snagit Editor toolbar.
    Shape tool

    Note: If the tool is not visible in the toolbar, click the More dropdown. To customize your toolbar, see Customize the Snagit Toolbar.

  2. Select a Quick Style or edit the tool properties to customize the tool. See Tool Properties.
  3. Click and drag on the Canvas to draw the shape.
  4. Complete any of the following to edit the shape:

Click and drag to move the shape.
Drag to move shape on canvas

Click and drag a white handle to resize the shape.
Resize shape on canvas

Click and drag a green handle to rotate the shape.
Rotate shape on canvas

Tip: Hold the Shift key to draw a perfect square or circle.

Select a rectangle or ellipse shape in the Properties panel. Hold the Shift key and click and drag on the Canvas to draw a square or rectangle.

  1. When you are finished with the Shape tool, click the Move tool in the toolbar to select, move, edit, or delete objects you added to your image.
    Move tool

Draw a Polygon Shape

  1. Click the Shape tool in the Snagit Editor toolbar.
    Shape tool
  2. In the Tool Properties, select Shape dropdown > Polygon.
    Polygon shape option
  3. Edit the Tool Properties to customize the tool.
  4. Click and drag on the Canvas to draw the first side of the shape. Click to anchor each additional corner of the shape.
    Draw polygram on canvas
  5. Double-click (Windows) or press Enter (Mac) to complete the shape.
  6. When you are finished with the Shape tool, click the Move tool in the toolbar to select, move, edit, or delete objects you added to your image.
    Move tool

Tool Properties

Edit the properties to customize the tool.

Tip: Save tool customizations as Quick Styles.

After you edit tool properties, save your customization as a Quick Style for future use. See Quickly Access Favorite Styles and Tools.
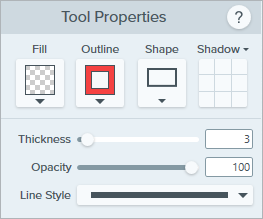
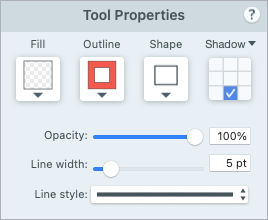
Shape properties on Windows Shape properties on Mac

Fill/Outline

  • Fill: Change the interior color.
    Fill dropdown
  • Outline: Change the color outlining a shape.
    Outline dropdown

Click the dropdown and select one of the following to set the fill color:

  • Click to select a preset or color from the palette.
    color selection
  • Enter a HEX or RGB value into the field.
    HEX field
  • Click the Eyedropper button and then click to select a color from anywhere on the screen.
    Eyedropper

Tip: Use Transparent to have no fill.

To create a frame or an empty shape with no fill, select Transparent as the Fill color.

Shape
Click the dropdown to select the shape style.
Shape dropdown

Shadow
Click to select a shadow direction. To turn off the shadow, click to deselect the shadow direction.
Shadow control

Advanced Shadow Properties
Click the dropdown arrow to access additional Shadow properties:
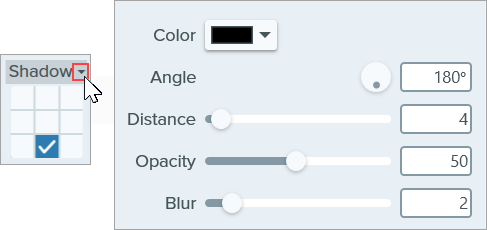
Advanced Shadow Properties

  • Color: Select a color for the shadow.
  • Angle (Windows only): Set the direction of the shadow extending from the tool.
  • Distance: Increase/decrease the distance between the tool and the shadow.
  • Opacity: Increase/decrease the transparency of the shadow.
  • Blur: Increase/decrease the clarity of the shadow.

Thickness (Windows) / Line Width (Mac)
Drag the slider or enter a value in pixels to adjust the width of the shape outline.
Thickness slider

Opacity
Drag the slider to adjust the transparency level.
Opacity slider

Line Style
Click the dropdown to select a style for the outline of the shape.
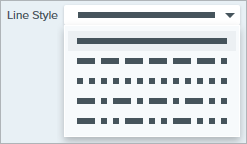
Line Style property for Shapes

Note: This tutorial is for Snagit version 2024. Previous versions may look or function differently.