In this tutorial:
Note: This tutorial covers exporting a video on Camtasia version 2023 and later. To learn how to export a video on Camtasia version 2022 and earlier using the Export > Local Legacy File (Production Wizard), see Export a Video (Version 2022 and earlier).
Export Overview
Export a video file based on the media on the timeline in your Camtasia project. The Export menu contains settings optimized to share videos to your local hard drive, Screencast, YouTube, and more.
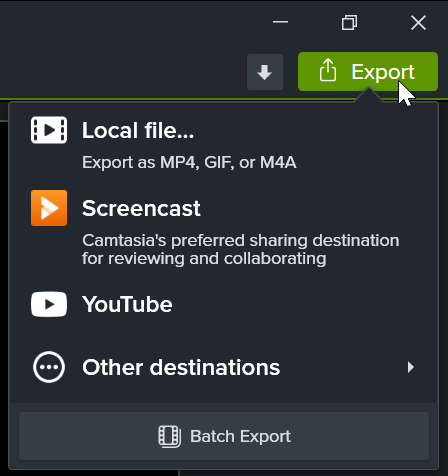
Click Export and select an option from the dropdown:
Export a Video to Your Computer
The Local File option is best for exporting a MP4, GIF, M4A, or a video with interactive features (such as table of contents, captions, search, quizzing, and hotspots) onto your computer. Then, upload to a video hosting site, your channel, or social media to share the video with others.
- Select Export > Local File.
- The Export Local File dialog appears. Customize the export options:
- Windows: Select an option from the Preset dropdown or select Custom to edit the export settings.

- Mac: Select a file format from the dropdown and click the Options button to customize the advanced settings.
- Click Export.
Tip: Batch export multiple videos.
Select Export > Batch Export button to quickly export a series of videos to repurpose the content to fit various platforms, video styles, or export quality requirements. See Batch Export Videos.
Export a Selection on the Timeline
Export a selection on the timeline to create a short video or to preview an effect.
Learn how to export a timeline selection
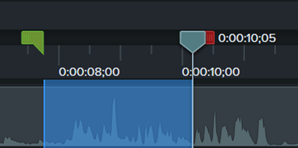
- Drag the green and red playhead handles to make a selection on the timeline.
- Export the selection:
- Windows:
- Right-click the selection and select Export Timeline Selection As.
- The Export Selection dialog appears. Choose the desired options. If the selection includes interactive features, select the Export with Smart Player preset or file format. See Export Videos with Interactive Features.
- Click Export.
- Mac:
- Select Export > Local File.
- A confirmation window appears. Click Continue to export only the selected portion of the timeline.
- The export dialog appears. Choose the desired options. If the selection includes interactive features, see Export Videos with Interactive Features.
- Click Export.
Export to Screencast
Upload your videos to Screencast to share with your audience. Screencast is a cloud-based solution for collaboration and feedback.
Your TechSmith account automatically gives you access to store up to 25 videos on Screencast for free. Or subscribe to Screencast Pro to upload unlimited videos and access additional features. Learn more about our Screencast account tiers.
Check out some of the benefits of sharing your content to Screencast:
- Supports Interactive Features
Screencast supports any interactive features you have included in your video, such as table of contents, captions, search, quizzing, and hotspots.
- AI-Assisted Titles, Descriptions, and Chapters (Screencast Pro)
Save time and use AI-generated titles, descriptions, and video chapters for your content. See Set Context Quickly with AI-Assisted Titles and Descriptions and Add Video Chapters.
- Auto-Generate Captions for all Videos (Screencast Pro)
Make your videos more accessible and easy-to-follow with AI-generated captions. For Screencast Pro accounts, captions are automatically generated based on the audio transcription for any videos uploaded to Screencast. See Add Captions in Screencast.
- Conversations & Reactions
Post a question to prompt feedback. Leave comments, annotations, and emojis on images or at specific times in a video. Your viewers can engage with your content without setting up an account. See Manage Conversations.
Learn how to export to Screencast
Note: You must have Camtasia Windows version 2022.4.0 or later or Camtasia Mac version 2023.0.0 or later installed.
- In Camtasia, select Export > Screencast.
- The Export to Screencast dialog appears. Enter a title and optional description.
- Click the Export button.
Camtasia uploads the video to your Screencast Library.
Export to YouTube
Upload your videos directly from Camtasia to YouTube.
Note: Recommended YouTube video resolutions vary. 720p or 1080p (HD) are best for playback on standard monitors.
Learn how to export to YouTube
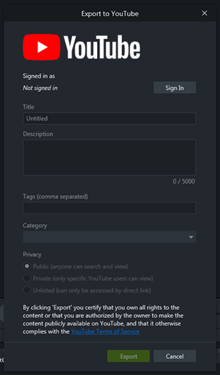
- Click Export > YouTube. You may be asked to sign in to your YouTube account.
- Enter a title, description, tags, privacy, and category.
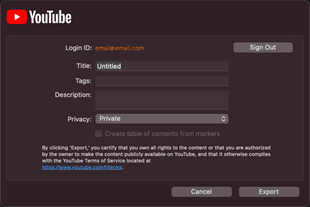
Tip: Add tags to improve improve search engine optimization (SEO).
Add keywords from your content as tags so YouTube can help users find your video.
- Set the privacy settings to the desired level.
- Click Export.
Note: If your timeline includes captions or a table of contents:
- Windows: Camtasia 2022.1.0 and later automatically uploads your captions and TOC to YouTube.
- Mac: Select Create table of contents from markers to upload your TOC. Camtasia automatically uploads your captions to Youtube.
Camtasia uploads the video to YouTube and opens the video in a browser window for playback.
Note: Quizzes and interactive hotspots in Camtasia are not supported on YouTube.
Export Videos with Interactive Features
The TechSmith Smart Player is required for videos with interactive features such as table of contents, captions, search, quizzing, and hotspots.
Learn how to export with the TechSmith Smart Player
To include the TechSmith Smart Player, export to any of the following options:
- Local File (Windows): Select the MP4 with Smart Player preset or file type option. On the Smart Player tab, select from these additional options:
- To report quiz results with SCORM, enable the Report using SCORM option and click the SCORM Options button.
- Exported vs. Hosted Smart Player Files:
For additional details about Exported vs Hosted Smart Player files, see Hosted TechSmith Smart Player FAQ.
- Export Smart Player files for hosting: The export includes additional CSS and JavaScript files required to run the Smart Player on your website. As web browsers evolve, it may be necessary to manually update or reproduce video files with the newest version of Smart Player.
- Use hosted Smart Player files (Recommended): Smart Player CSS and JavaScript files are hosted and kept up-to-date by TechSmith. This option ensures you always have the latest version of Smart Player without having to manually update files on your web server or reproduce video files.
- Local File (Mac): Select the Export to MP4 file format and enable the desired interactive options in the export dialog:
- For captions, select an option from the Caption Style dropdown.
- To include a quiz, enable the Include Quiz option and click Options to edit the settings.
- To report quiz results with SCORM, enable the Include SCORM option and click Options to edit the settings.
- To include a video TOC and search, enable the Create table of contents from markers option.
- Screencast
- Knowmia
- Legacy Local File (Camtasia Windows 2022 or earlier)
Tip: Archive your finished project in a folder that contains all the media in your video.
- Windows: Select File > Export > Zipped Project.
- Mac: Select File > Save As and select the Create standalone project option.