









Recording a live screen walkthrough sounds straightforward until you’re three minutes in, you’ve clicked the wrong menu, stumbled over your explanation, and now you’re starting over. For trainers, support teams, and technical writers who need to produce accurate, repeatable how-to content, that cycle gets old fast.
Learning how to create videos from screenshots solves that problem. Capture every step as a still image first, then record your narration separately once the sequence is in place. Focusing on one task at a time means fewer retakes, cleaner audio, and a finished video that’s easier to update when the software changes next quarter.
This workflow also works well with AI tools that can help you draft a narration script before you record and clean up your audio afterward, so you spend less time editing and more time creating useful content.
What follows is a practical, step-by-step process using Camtasia Snagit and Camtasia Editor, with guidance on where Camtasia Audiate fits into narration and accessibility.
Annotate and edit screenshots with Snagit
Professional mark-up tools and powerful features make it easy to create helpful images.
Try it Free
Key takeaways
- Separating screenshot capture from narration recording reduces cognitive load and produces cleaner, more accurate instructional videos.
- This process lets you reuse existing images you’ve already compiled for other training materials or documentation.
- It’s easier to maintain over time: Swapping out an image is simpler than re-recording, syncing visuals with edited audio is more straightforward, and AI-generated narration can be updated and regenerated.
- Camtasia Audiate can help draft a narration script before recording and remove filler words after, reducing the time spent on audio editing.
- Screenshot-based videos may serve training and support workflows better than live screen recordings when precision and repeatability matter most.
- Adding captions to every screenshot video improves accessibility for all viewers, including those in noisy environments and non-native speakers.
Why screenshot videos work
Separating capture from narration reduces cognitive load. When you record a live screen, you’re managing navigation, pacing, and delivery simultaneously, and mistakes can quickly snowball. Capturing screenshots first lets you focus on each task separately, resulting in clearer narration and a more polished video.
Use screenshots when your process has clear, discrete steps and precision matters. Use live recording when timing, cursor movement, or real-time interaction is essential, such as in a product demo with live data.
An IT team onboarding new hires into a ticketing system can capture each UI state as a screenshot, so the video remains accurate even after minor interface updates. If something changes, they can replace a single image rather than re-recording the entire walkthrough.
This approach supports effective instructional videos and is one reason screen capture works so well for knowledge transfer.
The problem with live screen recording
Every live recording asks you to do three things at once: click through the right screens, narrate clearly, and avoid mistakes that force a restart.
The challenge grows with fast-changing content. If you’re recording software training for new hires and the interface updates next month, you’ll likely need to record those sections again.
Ask yourself these questions before you start:
- Does the process change frequently?
- Do you need precise narration timed to specific clicks?
- Will this video need updates within six months?
If you answered yes to any of these questions, a screenshot-based workflow can save time and make future updates much easier.
Prepare your screenshots first
Cleaning up your screenshots before assembly saves far more time than fixing confusing visuals mid-edit. In Camtasia Snagit, this preparation happens before any image enters the video editor.
Use Smart Redact to automatically detect and blur sensitive data. For an HR portal or help desk dashboard that displays employee emails or account details, a single missing field can create a compliance issue. Smart Redact finds those fields so you don’t have to hunt for them manually.
Move, resize, or reposition the cursor overlay on any screenshot to guide the viewer’s eye without relying on zooming or additional callouts later.
Before sequencing your screenshots, check each one for two things: exposed personal data and whether someone unfamiliar with the interface can easily follow the action.
For a full walkthrough, see this step-by-step guide to editing a screenshot in Snagit.
How to create a video from screenshots
Capture and sequence your screenshots in Camtasia Snagit, then send them directly to Camtasia Editor to add narration, callouts, and transitions. From there, export your finished video. Our Turn your Snagit images into clear how-to videos webinar walks through each step.
Step 1: Capture your screenshots in Camtasia Snagit
Before opening Camtasia Editor, capture all the screenshots you need in Camtasia Snagit. This keeps your editing session focused and helps prevent gaps later.
For a software onboarding workflow, take screenshots of each step in sequence, from account creation and settings configuration to first login. You’ll arrive in the editor with a complete visual outline that’s ready to arrange and narrate.
Step 2: Open your images in Camtasia Snagit
In Camtasia Snagit, open the Recent Captures tray at the bottom of the editor. Your latest screenshots appear there automatically. For a help-desk walkthrough, select each UI step in order and open the images in the editor. Reviewing every capture before sequencing helps ensure nothing is missing and gives you a clear picture of the complete visual sequence.
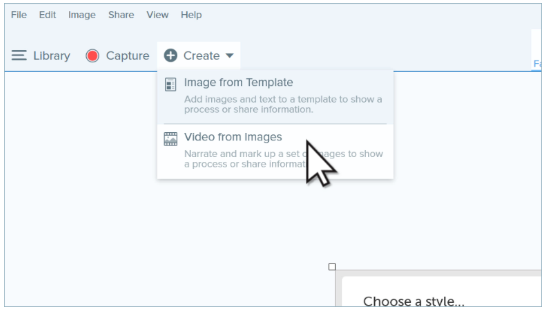
Step 3: Select and sequence your images
Arrange your screenshots in the exact order your audience will follow. For a password reset flow, that means starting with the login screen, not the confirmation email. The sequence becomes the foundation for your narration. If a screen state is missing or out of order, fix it now before you start recording.
Pro tip: Clearly name your captures in Camtasia Snagit so you can find them easily when sequencing in Camtasia Editor. Something like “Step 1 – Login” or “Step 2 – Settings” takes the guesswork out of the timeline.
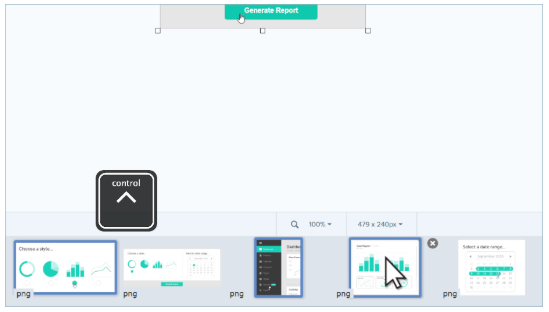
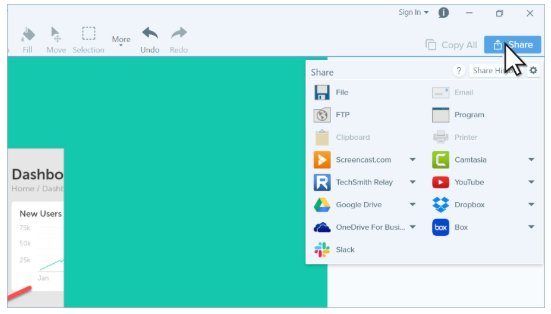
Step 4: Click “Camtasia Editor” from the Share drop-down
Open the Share drop-down and select Camtasia Editor. This sends your sequenced screenshots directly into Camtasia Editor, ready for video assembly.
For example, a training walkthrough arrives in Camtasia Editor as an ordered sequence, so you can immediately add narration without rebuilding the flow.

Step 5: Arrange your images on the Camtasia Editor timeline
Your screenshots appear on the timeline as individual clips in import order. Before recording narration, scan the sequence from left to right to confirm it matches the actual workflow.
If a login step appears after a dashboard screenshot, drag it into the correct position.
Step 6: Record your narration after the screenshots are in place
With your screenshots already arranged in Camtasia Editor, you can focus entirely on what you’re saying instead of managing a live demonstration at the same time.
For a software setup guide or policy walkthrough, read your entire narration script in one clean take. Reading the full script in one pass produces more natural pacing and consistent delivery. If you stumble or need to re-record a section, Camtasia Audiate makes it easy to cut, add, or replace audio segments without resplitting the whole narration.
Camtasia Audiate’s Edit Like Text feature can help you clean up mistakes quickly.
Step 7: Adjust image duration to match narration
With your narration recorded, each screenshot will initially appear for a default duration (typically 5 seconds). Listen to your audio and adjust how long each image stays on screen by dragging its edge on the timeline until the image disappears exactly when your narration moves to the next topic.
If you make any edits to your narration in Camtasia Audiate after this step, those changes will automatically resync with Camtasia Editor when you update, keeping all your image timings aligned without extra work.
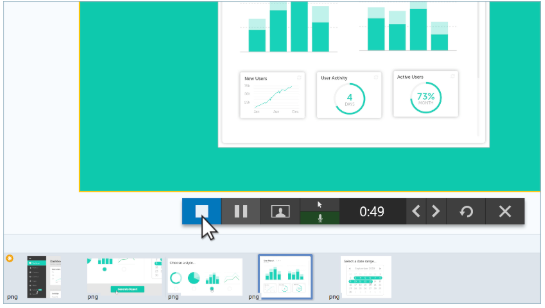
Step 8: Add annotations and effects
Annotations work best when they direct attention. Add a callout arrow pointing to a settings toggle or use a highlight box around a required form field so viewers know exactly where to look.
Keep effects purposeful: one callout for each key action and one highlight for each critical field. Check the Video Editing Quick Guide for a deeper walkthrough of annotation tools, or learn how to make a split-screen video for more complex layouts.
Step 9: Export the video and save it for future updates
Export your finished video, then save your Camtasia Editor project file. Keeping the project file lets you make future updates without starting over.
If your company changes its onboarding flow each quarter, you can open the original project, swap one screenshot, re-record a single narration clip, and re-export without rebuilding the entire video.
Save both the exported MP4 and the .tscproj project file in a clearly labeled folder.
If you want to see how it all looks together, check out this video.
Where AI fits into this workflow
AI can help streamline some of the more time-consuming parts of the workflow. In Camtasia Audiate, use Edit Like Text and Hesitation Removal to clean up narration, then apply Shorten Pauses to tighten pacing. Camtasia Audiate also offers background noise removal and AI voice generation. If you use an AI-generated voice, disclose it to your audience. Transparency matters even when AI is supporting your workflow rather than replacing your voice.
In Camtasia Editor, Automatic Captions help make your videos more accessible from the start. Smart Redact, covered earlier, masks sensitive data before you begin editing.
This workflow is built for instructional clarity. You stay in control of the content and messaging while AI helps speed up repetitive tasks.
Draft a script before you record
In Camtasia Audiate, use the AI script generator to turn a topic prompt into a working draft before you turn on the microphone. Review it, refine the language, then record it in your own voice.
If a product UI changes and your compliance walkthrough or support tutorial needs updated narration, revise the script, generate replacement audio with Audiate’s AI voice feature, and disclose that the narration is AI-generated. You’re still responsible for the script and message — AI is just executing it.
This approach eliminates the blank-page delay and makes it easier to keep recurring training content up to date.
Sharing and exporting your finished video
Export to MP4 for LMS delivery or knowledge-base publishing. Use Screencast when you need teammates or stakeholders to leave timestamped comments before the video goes live. Pick the method based on your goal: broad playback or structured review.
Export formats and how to choose between them
MP4 is the default for finished videos. It plays reliably in every LMS, email client, and YouTube upload workflow.
Use Screencast when your video needs team review. Reviewers can leave timestamped comments and view version history without downloading a file or needing a login or Screencast subscription to leave feedback.
If your team uses Google Drive or OneDrive, export the MP4 and upload it there. Reserve Screencast for active feedback rounds.
Sharing for team review via Screencast
Upload your draft to Screencast and share the review link directly with your stakeholders. Reviewers can leave timestamped comments tied to specific moments in the video, eliminating scattered email threads and mismatched attachments.
For example, a trainer sharing a compliance module can invite a subject matter expert and a support lead to comment at specific timestamps, keeping all feedback in one place and speeding up revisions.
Make your video accessible
Add captions before you export. In Audiate, captions are generated automatically from your recorded narration, making it the fastest path from script to subtitles.
This helps viewers watching in noisy environments or non-native speakers following technical steps. Both Audiate and Camtasia Editor reduce the manual work.
With captions in place, your workflow is complete. You’ve captured your screenshots, added narration, improved accessibility, and created a video that’s ready to publish and easier to update over time.
Start your free trial of Camtasia and build your first video today.
FAQs
What is the easiest way to make a video from screenshots without recording live?
Capture your screenshots first, then record your narration separately using a tool like Camtasia Editor. This approach lets you focus on one task at a time, reducing mistakes and producing cleaner audio. It also makes it easy to update the video later: if something changes, you can swap in a new screenshot or adjust the script instead of re-recording the whole thing.
Should I use screenshots or a full-screen recording for a how-to video?
Screenshots work best when your process has clear, discrete steps and precision matters more than showing live motion. Full-screen recordings may be more effective when real-time interactions, cursor movement, or timing are essential to understanding the workflow. For most software walkthroughs, training guides, and support documentation, screenshots give you more control over the final result.
How do I add narration to a video made from screenshots?
In Camtasia Snagit, you select and sequence your screenshots, then send them to Camtasia Editor to record your narration. If your delivery needs cleanup, Camtasia Audiate lets you edit the audio by editing the transcript, so removing filler words or fixing a mistake doesn’t require re-recording the whole take.
Can AI help when creating a video from screenshots?
AI can help at two points in the workflow: drafting a narration script before you record and cleaning up audio after you record. Camtasia Audiate’s AI script generator can produce talking points from a topic or outline, and its filler word removal tool can tighten delivery in one click.
When should I use an AI voice in my how-to videos?
AI-generated narration works best when you anticipate updates or revisions to your content. The biggest advantage of AI voices is that you can make changes in Camtasia Audiate by simply editing the transcript, then regenerating the audio. You can add, remove, or change narration without worrying about audio quality matching.
Even with the same recording equipment and location, re-recorded audio often sounds different. Camtasia Audiate’s AI voices ensure every update sounds consistent, which is especially valuable for training content that needs quarterly updates, compliance videos that change with policy, or how-to guides that evolve as your software does.
What tool should I use to create a video from screenshots for training or support?
Use Camtasia Snagit to capture screens, then edit in Camtasia Editor. Add narration faster with Camtasia Audiate.
When screenshots and narration are handled this way, the whole workflow stops depending on getting everything right in one pass. A UI label changes, a step gets added, a sentence needs tightening, and none of it threatens the rest of the project.
The next time you need to document a software process, capture your screenshots first in Camtasia Snagit before you write a single word of narration. That sequence — visuals first, words second — is what keeps your workflow maintainable and your explanations accurate.
AI-assisted transcript cleanup and automatic captions make it easier to build an accessible, polished instructional video without a full production team behind you.
Share