


So, you’ve decided to create a YouTube channel to connect with your audience. But maybe you’re thinking, “I don’t know the first thing about making YouTube videos.” Or perhaps you already have a channel but aren’t getting the kind of engagement you want.
Recording and optimizing YouTube videos can feel overwhelming — and the pressure may seem worse if you have expectations about how your videos should perform. The good news is that it doesn’t have to be overwhelming.
Here, we explore how to record and edit YouTube videos. We also look at how screen recording tools — like Camtasia and Snagit — can streamline the process, helping you create professional-quality YouTube content without needing prior video creation and editing experience.
Make a YouTube video with Camtasia
You do not need to be a video expert to get results. Use pre-built templates and drag-and-drop effects to make it simple.
Free Download
Why recording for YouTube requires a unique approach
With 2.5 billion monthly active users, YouTube is one of the most popular social media platforms among content creators, educators, and even subject matter experts (SMEs) looking to share their expertise. So, it’s no wonder you want to get your foot in the door.
You may be wondering, “Can I post casual screen recording videos or mobile footage on the platform?” You could, but they may not perform well. YouTube has specific requirements that call for a unique approach on your part. These include:
- Resolution: While you could upload a 480p-quality video, it may not receive a lot of engagement. YouTube (and its audience) prefers video clarity, so you need a 1080p or even 4K resolution.
- Formatting: YouTube prefers MPEG-2 and MPEG-4 video formats with a 16:9 aspect ratio. This means you can’t simply upload your casual webinar recording to the platform.
- File compression: YouTube automatically compresses uploaded videos to optimize them for streaming and storage. If your recording is low quality, the compression will make it worse.
- Audio: YouTube allows a minimum audio bitrate of 64 kbps and an audio duration of 33 seconds. However, it recommends a bitrate of 128 kbps.
- Audience engagement: YouTube’s algorithm continually recommends videos that keep viewers watching. So you need to optimize your content to meet the unique needs of your YouTube audience. This can encourage completion, signaling content value to the algorithm.
The good news is that you don’t have to handle the platform’s technical requirements manually. Most modern tools will automatically take care of them for you.
How to record on desktop devices (Windows or Mac): Step-by-step
Want to record on your desktop? Here’s a step-by-step guide to streamline the process:
Step 1: Choose the right recording tool
Your choice of a recorder will determine what you can capture, whether you’ll need an additional tool for editing, and how fast you can edit your video.
If you use Windows 10 or 11, the built-in Xbox Game Bar can be a good choice for quick screen recordings or gameplay captures. To open the program, simply press the Windows key + G. Then enable System audio in the Capture widget if you want to record audio as well.
For macOS devices, you can use the built-in QuickTime Player. Open the program, go to File, New Screen Recording, and tap the Record button to get started.
While these tools have a “built-in” recording benefit, they may not always meet your needs, as they offer light editing capabilities. You may need to install additional screen recording software, which can be a hassle.
Fortunately, you have another option: third-party video creation and editing tools like Camtasia — you can work with Camtasia Online if you want a browser-based solution or Camtasia Editor if you need more features.
Both options give you more extensive editing capabilities than built-in apps. Moreover, Camtasia records video elements (like screen, mic, webcam, system audio, and cursor) on different tracks, which means you don’t have to redo entire YouTube recordings if you want to make specific changes.
Check out Camtasia Online’s screen recording features!
Need to show your screen?
Skip the downloads. Use Camtasia online to record your screen, camera, and microphone right in your browser for free.
Start Recording
Step 2: Set up your recording area
Once you have your tool, decide whether to configure full-screen or custom region mode, depending on your needs.
Full-screen mode lets you record everything on your screen. It can be ideal for tutorials that involve using multiple apps — like those showing how to create a video on one app, edit it on another, and upload it elsewhere.
Custom region recording lets you focus on a specific area of your screen. This could be a good option if you want to draw viewers’ attention to a particular section.
YouTube doesn’t have a preference, so you’re free to choose whatever you prefer. The only requirement is to ensure video quality and clarity.
After choosing your preferred mode:
- Close unnecessary tabs to minimize clutter
- Hide notifications to prevent distractions
- Increase your app font size for optimal visibility
- Prepare any visuals — websites, slides, files, or screenshots
Snagit can help you capture screenshots and screen recordings to streamline the video creation process. The beauty of using this tool is that you can import your visuals directly into Camtasia to build your video.
Record your screen with Snagit
Snagit makes it easy to share quick updates and how-to’s by capturing exactly what’s happening on your screen.
Get Snagit
Step 3: Check audio settings
Next, set up your audio. If you want to use your desktop’s built-in mic, make sure it’s turned on. If you opt for a USB mic (which may produce better sound clarity), select it in your recorder. Then:
- Soundproof your room and reduce echo by turning off any noisy appliances and adding soft furnishings like rugs.
- Disable app notifications on your desktop and mute unnecessary sounds to minimize distractions.
- Do a mic test to confirm sound clarity and volume levels, and adjust your mic placement or room tone as needed. You can also use Audiate’s noise reduction and volume leveler features to improve voiceover quality and consistency.
If you don’t want to use your own voice, take advantage of Camtasia’s AI voice generation feature.
Step 4: Adjust recording quality
As mentioned earlier, YouTube prefers high-quality videos. Target a 1080p resolution and 30–60 fps frame rate. Many built-in tools capture at 1080p, so you won’t need to adjust your resolution manually.
If you use a 4k monitor or want to customize your recording frame rate, you’ll need to install a third-party tool like Camtasia.
To adjust your recording quality with Camtasia:
- Select the Magnification dropdown, then tap Project Settings.
- Tap Canvas Dimensions (Windows) or Dimensions (Mac) and choose a preset.
- Click Apply.
For your frame rate, you’ll first need to make your video (next step). When you’re done:
- Control+click (Mac) or Right-click (Windows) your recording in the Media Bin.
- Tap Details to see your actual frame rate.
- Go to the Magnification dropdown, Project Settings, and the Frame Rate dropdown to adjust your editing frame rate.
- Tap Apply.
Step 5: Hit record and present naturally
Now to the actual recording. You can start your desktop program manually or use hotkeys, like Win + Alt + R (Windows) or Shift-Command-5 (Mac).
Once your program is up and running, start recording your content. Here are some tips to keep in mind to create an engaging video:
- Open with a hook that engages viewers and lets them know what they’ll learn.
- Speak clearly.
- Maintain a conversational tone.
- Keep a consistent pace throughout your video.
- Use intentional pauses to give viewers time to absorb key concepts.
But don’t worry too much about making mistakes. With solutions like Camtasia, you can always edit them out later.
Step 6: Stop recording and save your file
When you’re satisfied with your recording, save your file in a recognizable location.
- If you’re using a Windows device, you’ll find your recording in Videos and Captures.
- For Mac devices, you’ll find the recording in ~/Library/ScreenRecordings. To change this, open your program’s recording settings and select a new “Save to” location.
After finding your video, check its playback to find issues like audio or pacing problems before you export it to your editing solution.
How to record on mobile devices (iPhone or Android): Step-by-step
Don’t have a desktop? Don’t let that stop you from creating YouTube videos. Your mobile device can be just as effective. In fact, it might be even more convenient if you’re a beginner content creator, as it can be easier to navigate than a desktop.
Here’s a step-by-step on how to make a YouTube video with your smartphone:
Step 1: Use the built-in recorder or download an app
First things first: choose your recorder. If you’re using an Android 11 or later device, you can use the phone’s built-in recorder by swiping down your screen. For iOS devices, swipe down and go to Control Center.
If you want extra features such as overlays, consider downloading third-party apps, like AZ Screen Recorder or DU Recorder. You can also use Camtasia to record your iOS device screen.
Step 2: Prepare your phone setup
To prepare your setup:
- Turn your phone sideways. Landscape orientation fills your entire screen, which is great for YouTube videos.
- Use a microfiber cloth to clean your lens for video clarity.
- Enable Do Not Disturb to prevent distractions mid-recording.
- Connect your phone to an external mic for clear audio.
- Prop your phone on a steady surface or use a tripod if you plan to record yourself.
Step 3: Check audio and storage
The last thing you want is to record your video only to realize that you’re inaudible or that your phone stopped recording mid-session.
Test your mic levels by recording a 10-second clip. Then play it back to confirm your voice is clear before you start recording.
Also, check your phone storage to make sure it’s sufficient. High-resolution videos take up quite a bit of space, so it would be good to have at least 1GB free.
Step 4: Record your video
If your audio and storage are good, start recording. For optimal results:
- Make sure your voice is clear.
- Record your script in small sections.
- Record as many takes as necessary until you get what you’re going for.
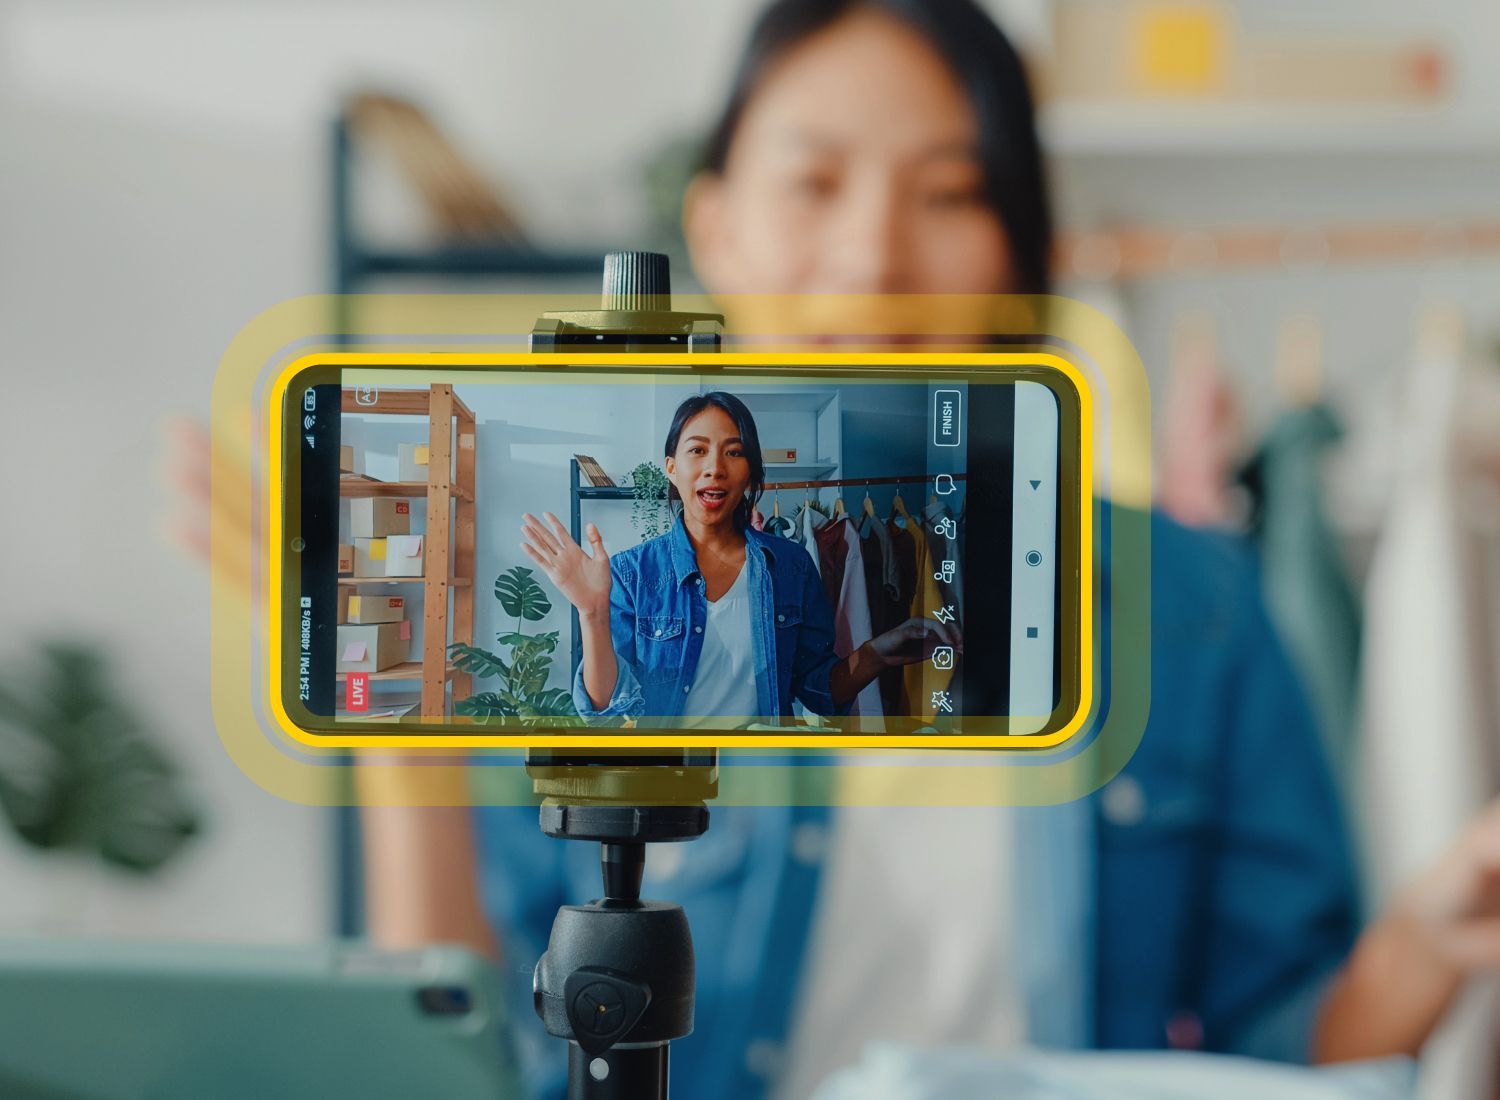
If you’re recording yourself:
- Center your head and shoulders.
- Ensure little to no camera movement.
- Look at the lens rather than at yourself so viewers feel like you’re talking to them.
Step 5: Save and review the file
When you’re done, save your recording. Both iOS and Android devices automatically save recordings in the Photos or Gallery apps, so your video should be relatively easy to find.
Now you’ll want to watch your video to confirm the audio and visual quality, and then transfer it to your video editor. If you have audio and visual quality issues, re-record before you start editing.
How to edit your YouTube video for a polished final cut
With tools like Camtasia, you don’t need advanced video editing skills or expensive add-ons to prepare your video for YouTube. Here’s how to edit your recording to optimize it for the platform:
Trim the video
While YouTube does allow lengthy content, posting too-long videos can negatively impact your engagement. The truth is that, with attention spans decreasing, people are not as patient as they were in the past, so some may drop off.
Trim your video by removing unnecessary pauses, pre-recording chatter, or dead space at the start or end of your recording. This is relatively easy with video editing software like Camtasia — you just need to drag the trim handles to unwanted parts.
Camtasia takes it a step further by allowing you to remove filler words (the “ums” and “ahs”) as well as cut out long pauses, via text-based editing.
If you can edit a doc, you can edit a video
Stop fearing the timeline. Camtasia Audiate transcribes your recording so you can edit your video just by editing the text.
Free Download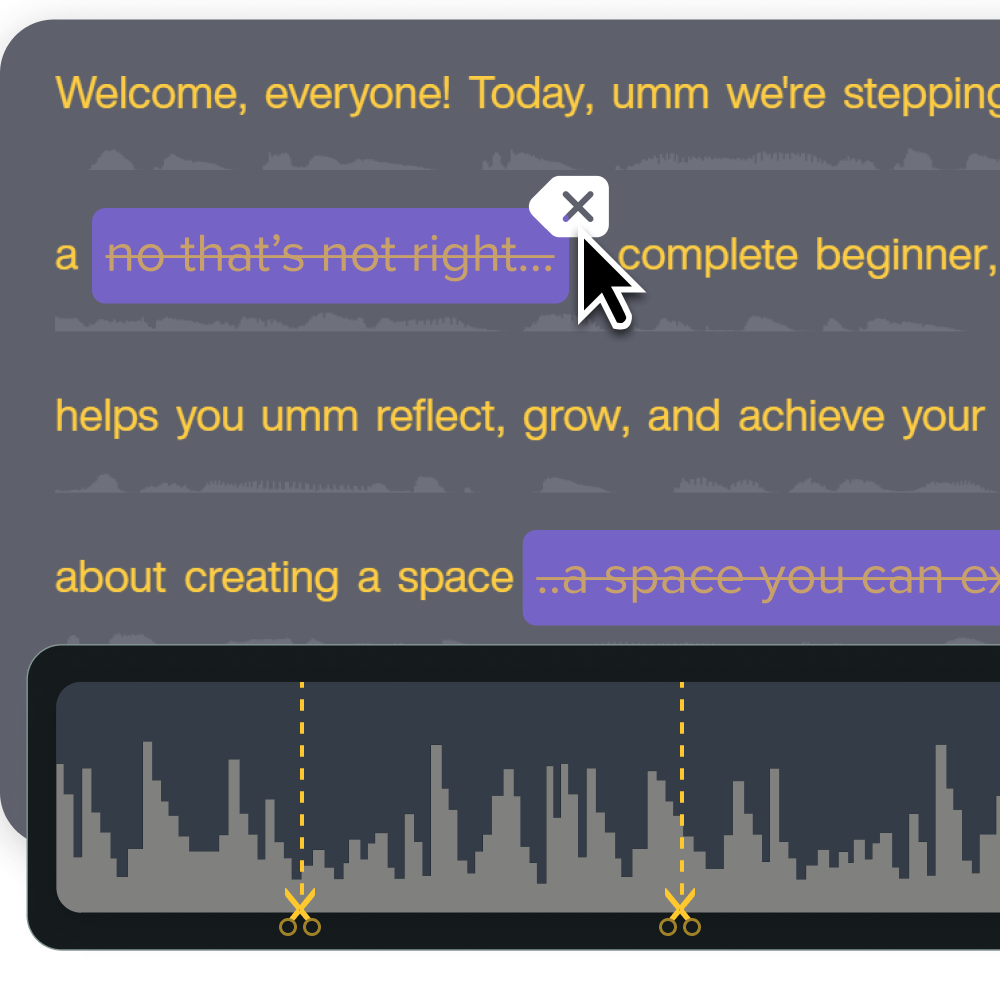
Improve audio clarity
Audio clarity can make or break YouTube videos. So be sure to remove background noise, enhance your voice clarity, and level out your volume before uploading your video.
With Camtasia’s one-click background noise reduction and waveform editing feature, you can do this relatively quickly. If you include background music in your video, you can also use Camtasia’s Emphasize feature to auto-adjust your music volume when narrating.
Add text, annotations, and cursor effects
Highlight key parts of your video by using overlay text, arrows, callouts, or cursor highlights — all possible with Camtasia. These elements guide viewers’ attention where you want it, minimizing the risk of missing vital instructions.
You can also use Camtasia’s gesture effects on mobile recordings. These effects simulate swipes, taps, and pinches, making it easier for viewers to follow instructions.
Go from screen recording to polished video
A screen recording is just the start. Camtasia’s editor helps you add the callouts, animations, and edits you need to create a truly professional video.
Free Download
Include transitions and zooms for flow
Make your video more dynamic and engaging by including transitions like slides, fades, or wipes. Also, add zoom effects to emphasize key parts of your screen or magnify aspects that viewers might miss.
But be careful not to overuse these effects, as they can be distracting.
Export using a YouTube-ready preset
Most modern editing tools offer preconfigured settings that match the specifications of different platforms. For example, Camtasia offers export presets for Screencast and YouTube.
Take advantage of the preset feature to prevent compression and video quality issues. When you use the YouTube-ready preset, your editing tool will automatically apply the platform’s preferred resolution and format.
Your YouTube recording workflow: What’s next?
While starting a YouTube channel can feel intimidating, you don’t need to be a technical expert or professional videographer to create videos that make waves. Just optimize your setup for great visuals and audio, practice your delivery to sound natural, and use the right YouTube video creation and editing software.
With TechSmith’s suite of tools, you can create and edit professional-looking YouTube videos on your desktop and on Android and iOS devices, regardless of whether you’re a seasoned YouTuber or new to the platform. We offer built-in screen recording capabilities and features like text-based editing and a YouTube-ready preset, which streamline the video creation, editing, and export process.
Leverage TechSmith products today to create high-quality YouTube recordings!
Share