


You’ve captured all the magical moments from your team’s stellar performance at the company event. The footage is brilliant, and snapping it all on your phone was a blast.

But now, the dread creeps in. How are you going to take all those great video clips and turn them into a single, polished video? And with less than an hour before the pitch session—gulp.
Whether you’re combining videos for a work presentation or creating an Instagram-worthy reel, editing always seems more daunting than shooting. Why is it so frustrating?
Maybe it’s the image of editors wading through reels of film on a cutting room floor. Or perhaps it’s the unreliable free apps that crash your computer. It could even be those complicated Hollywood-style editing tools that take forever to master. Or maybe you just haven’t found the right tool for the job.
Let’s skip the hassle and dive into some quick, easy tips for merging your videos.
Step-by-step guide to combine two videos
Step 1: Choose the right video editor
First, you need the right tool for the job. Camtasia offers the perfect mix of power and simplicity. Its drag-and-drop interface makes it easy to arrange video clips however you like.
Unlike many online editors, you don’t have to worry about file formats. Camtasia supports multiple formats, like MP4, MOV, JPG, and PNG. Just drag and drop your videos and images onto the timeline to merge them seamlessly.
Step 2: Import your video files
Importing videos and images into Camtasia is a breeze. Simply double-click in the Media Bin or hit the green import button, then browse your hard drive to find the two videos you want to merge.
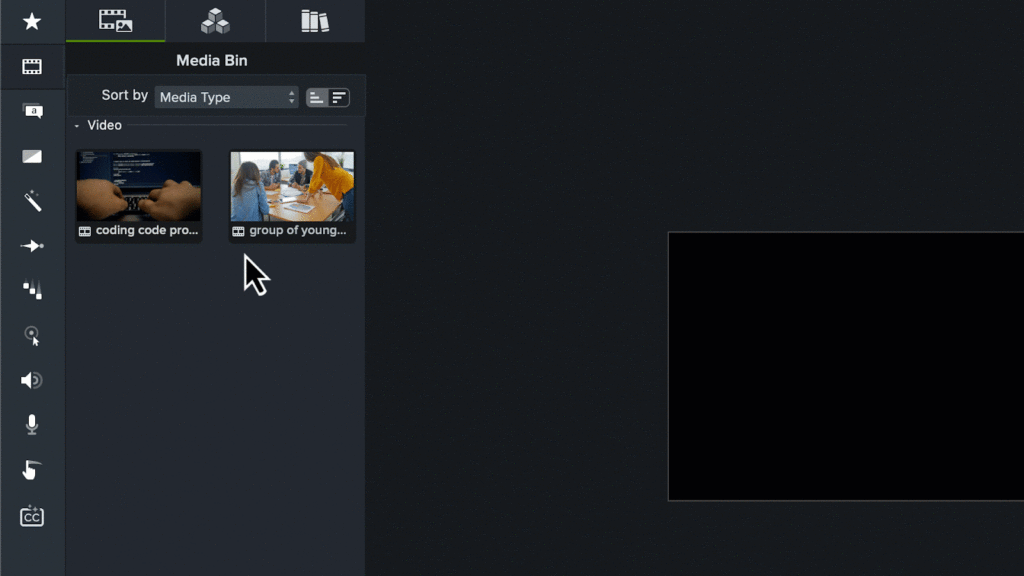
Once imported, your videos will sit in the Media Bin, ready for you to drag them onto the timeline. You can add as many videos as you want to the Media Bin, but only those you drag to the timeline will appear in the final product. No need to worry about file formats—Camtasia has you covered with a wide variety of supported types.
Step 3: Arrange and edit your video clips
Now for the fun part! Select both videos from the Media Bin and drag them onto the timeline. Congratulations! You’ve started the merge process (cue the dramatic space opera music).
Your clips are now lined up on the timeline, ready to go. If you want to adjust the order, simply drag the clip you want first to the left. Need to trim? Just hover over the edge of a clip and drag to shorten it.
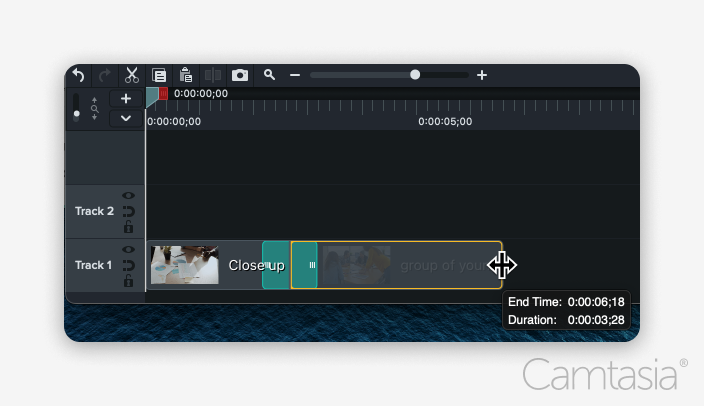
Once your clips are set, it’s time to spice things up. Explore Camtasia’s wide range of transitions. Find one you like and drag it between your clips to create smooth, professional transitions. You’re now editing like a Hollywood pro!
Step 4: Export your merged video
It’s time to wrap things up and export your masterpiece. Look to the top-right corner and find that big green Export button. Click it to start the process.

Camtasia lets you save your video as an MP4 or send it directly to platforms like YouTube. Choose your destination, name your video, and hit Export. In just a few moments, your video will be ready.
Now sit back, relax, and enjoy your newly merged video masterpiece!
Other tools for merging videos
Using Snagit for basic video merging
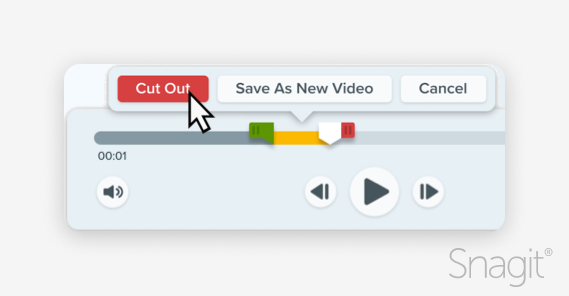
Still worried about the big video merge? Or maybe you’re looking for a lightweight solution that handles basic video recording and image capture? Well, let me introduce you to Snagit.

Snagit is fast, simple, and efficient. It captures images, records video, and yes—it merges videos too. There’s no timeline or complex video editor to deal with—just a no-nonsense tool that gets the job done. Perfect for quick and easy video tasks. And when you need more advanced features, Camtasia has your back with its editing tools, trimming options, and video effects.
Mobile apps from the App Store
Need to merge videos on the go? There are several great apps available on your phone. Here are three of our top picks:
- Canva (iOS/Android): Known for creating professional designs, Canva also helps merge videos. Available on Google Play and the iOS App Store.
- iMovie (iOS): If you have an iPhone, you likely already have iMovie. Just select the movie option and choose your clips to merge.
- InShot (iOS/Android): Quickly merge videos from your iPhone, iPad, or Android device with InShot.
These mobile tools are convenient on the go, but if you’re working from your laptop, a desktop solution like Camtasia gives you greater control. With a larger screen, accurate trimming, smooth transitions, and support for a wide range of file formats, Camtasia makes video merging effortless.

Conclusion
A great video merger helps you quickly combine MP4 files, insert branding clips, or add an extra section to your videos. With so many tools on the market, it’s tough to sift through them all. That’s why choosing an affordable, reliable, and professional tool like Camtasia makes sense.
Camtasia delivers everything you need—powerful merging and editing features, all in one easy-to-use package.
Do yourself a favor and download a free trial of Camtasia. Your future self will thank you!
Go from screen recording to polished video
A screen recording is just the start. Camtasia’s editor helps you add the callouts, animations, and edits you need to create a truly professional video.
Free Download
Frequently asked questions
Absolutely! Merge multiple video clips together by dragging them to the timeline, and Camtasia will take care of the rest.
Camtasia supports a rich array of video files on top of the industry standard MP4 files. Apple ProRes, AVI, GIT, Lottie, M4A, MOV, TREC, and WMV all work well in Camtasia. Visit Camtasia’s file format support page for more details.
Share