Training videos are one of the most popular ways to help your employees or customers learn new information.
In fact, we found that the top two instructional videos that people watch are informal and formal training videos. But for many corporate trainers, customer education, and HR professionals, it’s a challenge to know how to make a great training video in the first place.
So today, we’re going to go over these training video fundamentals:
- What is a training video?
- Why make a training video?
- What makes a great training video?
- What are the different types of training videos?
- How to make a training video?
What is a training video?
A training video is a type of video content that is used to teach individuals or groups a new skill or expand their understanding of a particular topic. These can be used in the corporate world to facilitate employee training, in the customer service world to educate customers about how to use a specific product, and in countless other scenarios as well.
Make amazing training videos with Camtasia!
Need to make a training video? Download a free trial of Camtasia and learn to quickly and easily make your own videos.
Download for free!
Why make a training video?
Training videos are a great way to teach and share information with employees and customers because they help you in the following ways:
1. Make it easier to retain information
Human beings retain content accompanied by imagery better than they retain audio content alone. This is likely because our brains process imagery 60,000 times faster than they do words.
And while in-person training can a great experience, it doesn’t allow a viewer to rewind or rewatch a section that they don’t instantly understand.
Training videos give any viewer the opportunity to slow down or speed up their learning process.
2. Get higher engagement
When asked how they would choose to learn something new, 73% indicated video as their model of choice. If your viewers enjoy the content you share with them, they’ll engage more often and more fully.
3. Keep the training costs down
Training videos are far less expensive than traditional models of training. Looking at the corporate world specifically, in 2023, US companies spent an estimated $101.8 billion on training alone.
Replacing parts of your in-person or outsourced training with high-quality videos can save you time and money without reducing the training quality.
4. Create on-demand training
Live training often requires coordinating schedules with individuals across your organization. This can be a nightmare to manage due to everyone’s busy schedules.
By creating training videos for your employees you can make the most of each individual’s time throughout the process – your subject matter expert can be recorded at a time that is convenient for them, and narrators or other characters can be filmed based on their own schedules.
And the learners, whether new or seasoned employees, can take the training at a time that works well within their schedules.
No more coordinating people across roles, locations, and time zones to all be at the same place at the same time means much more effective time use and buy-in to the training process.
5. Make your training more visual
Slide decks are an excellent tool for presenting content-heavy training sessions and when used properly can significantly impact the retention of information.
But what often happens is that the trainer leans hard into the bullet points and gives little thought to how to use visual media to enhance their decks.
Creating a training video can help elevate the content that you would typically include in a slide deck. By using images, video clips, and screenshots instead of long bulleted lists you can make your entire training more engaging. With easy-to-use tools like Camtasia, you can record your presentation and transform it into a reusable training video.
What makes a great training video?
All training videos are not created equal! So, how do you create a great training video?
You make sure it is easy to understand, that it follows a logical structure, and that it is memorable. And don’t shy away from making updates as needed to maintain its relevancy.
1. Learning outcomes are identified
When creating a training video, one of the first steps should be to identify the learning outcome you are striving for. What point do you really need to get across? What is the main message?
Once you’ve identified that be sure to maintain focus on that outcome. Be sure that every piece of information presented is supporting the chosen outcome. Adding in too much information or irrelevant contextualization can confuse the message and likely reduce engagement.
A great training video maintains focus and attention on specific learning outcomes and ensures that the entirety of its content supports the goal at hand.
2. They’re tailored to your audience
Understanding the needs of your audience and accommodating them is a key factor in creating a great training video.
The first step here is, of course, becoming familiar with your audience. Don’t guess what their needs are – do some investigating and find out for sure. If, for instance, you need to create training videos related to a payroll process you may choose to provide basic details about how the payroll system works so that the learners understand the full context.
That will likely be effective for learners who are not familiar with finance and HR but it could also create an instance where those in the finance and HR departments disengage with the training video as it won’t feel like it is “for” them. In this particular example, it may be beneficial to distribute a training video with those “basic details” removed to the departments that don’t need them.
It can be a good idea to consult with your team about how you can best meet the needs of the audience for which your video training is being created. They may have a helpful perspective on the audience and they can also help you tighten up the presentation!
3. The format and style fit the goals
When you are creating training videos, it’s not just about what you say but how you say it. The format selected is a crucial factor in making an effective training video. Consider what the content in your training video will include and what the best way to present it is.
Complex systems can often be presented well with 3D animation, while training on a topic that may require vulnerability may be better served with a “talking head” style video.
4. They’re not too short (or too long)
Don’t buy into the “less is more” theory that says humanity’s short attention span dictates a need for short videos only. The most important variable in determining the length of your video is the content. Your content should always dictate the length of your training video. Cutting it off just to meet a shorter timeframe will feel disruptive and disengage your learners. Longer videos are very effective as long as they are segmented, and the subject matter is complex enough to warrant the length.
The range in video length starts around 30 seconds and can increase exponentially but about 15 minutes is a fairly common length for a “long” video. 30 seconds to 1 minute can suffice for a trailer or a recipe tutorial while the training videos running 15 minutes and longer are usually pretty deep dives into some complex subject matter.
Make amazing training videos with Camtasia!
Need to make a training video? Download a free trial of Camtasia and learn to quickly and easily make your own videos.
Download for free!
Types of training videos (and examples)
Training videos do not come in only one shape and size. There are many ways to create training videos and we’ve described them below. But we didn’t stop there! You’ll also find helpful tips about which types work best for what use cases.
1. Presenter-style training videos
Presenter-style training videos typically feature a speaker on screen and incorporate a variety of other information-sharing techniques, like animation, graphics, etc. Sometimes the focus of the presenter-style video training is a demonstration, like in the case of orienting new staff around the use of a specific piece of equipment. This style of training video humanizes the content, making it more relatable and engaging, by using a person to convey the information. These are also referred to as “live-action” videos.
Scenarios where it’s relevant:
- When your training video needs to facilitate an emotional connection
- For interview-style training
- When you are creating training videos that show a product demonstration
Screencast Training Videos
Screencast training videos are screen recordings with audio narration added in overtop. These training videos can be recorded with a very low budget compared to other types of videos.r types of videos.
Softwares like Camtasia and Snagit can make creating training videos in screencast style easy and seamless. You can get a free trial of Camtasia here and Snagit here – download them now and try your hand at this type of training video!
Scenarios where it’s relevant:
- Getting an employee introduced to a specific software
- When there is minimal budget available
- When you want to provide efficient answers to frequently asked process questions
Tutorials
A tutorial video is often filmed with specific instructions and holds teaching something step-by-step as their top priority. These typically follow the main character through the actions they are describing but may also be filmed from the first-person point of view. Tutorials may also incorporate interactive elements like quizzes.
Scenarios where it’s relevant:
- When step-by-step instructions are needed
- For hands-on video training
- When the combination of a presenter style and screencast style training videos will best serve your learners
Corporate training videos
This type of training video is typically used to explain very specific aspects of a workplace, like customer service, shifts and schedules, sexual harassment policies, and other similarly repeatable concepts.
Scenarios where it’s relevant:
- When you need to familiarize new employees with a policy
- For situations where an aspect of workplace norms has changed and employees need to be retrained en masse
- When you want to train employees on office norms, policies and safety
Make amazing training videos with Camtasia!
Need to make a training video? Download a free trial of Camtasia and learn to quickly and easily make your own videos.
Download for free!
On-site training videos
Very similar to the presenter-style video, this type of training video is used when there is a benefit to having a certain location shown. It incorporates a presenter, a narrator, and recordings from the location in question.
Scenarios where it’s relevant:
- For virtual visits to factories, warehouses, or plants
- When you want to show front-of-house staff the inner workings of a kitchen
- For showing behind-the-scenes work
Motion Graphics Training Video
Motion Graphics Training videos use computer simulations or animations rather than human actors or presenters. These often come in handy to present scenarios that are too dangerous for real-life demonstration or require too high a budget to replicate realistically.
Scenarios where it’s relevant:
- When you need to bring a light mood to heavy material
- For showing hazardous situations in safety training
- When the budget does not allow for real-life replication of a scenario
Stock Footage Montage & Text-Based Training Videos
This type of training video is made primarily from purchased materials like stock footage, music, and custom graphics.
Scenarios where it’s relevant:
- When your budget doesn’t allow for a film crew
- For situations where anonymity is important
- When the content for your training video is relatively generic
Interactive Training Videos
Interactive video trainings are the cutting edge of training videos. They offer unique opportunities to create training courses for employees where they get to direct the path of the training video, and the educator can gain information about student progress through the learning exercise.
This is a highly engaging type of video training where the learner becomes fully immersed and multiple different outcomes can be reached. The interactive components can include yes/no scenarios, or calculations among other things.
Scenarios where it’s relevant:
- When you want to incorporate virtual or augmented reality in your training program
- When you want to be able to track a learner’s progress
- For situations wherein active learning is favorable to passive learning
How to make a great training video?
1. Plan your video
Before anything else, plan your video ahead of time. Planning your video’s content can be the most important step in the process of making your training video.
Before you start recording, you want to know exactly what you want to say and show to your viewers. You’ll save time and energy and avoid a lot of potential headaches.
You may want to write a script or even create a storyboard. If you want to generate a script quickly and avoid staring at a blank screen, use Audiate’s Generate Script feature to write a full script in minutes. And while you may not need to script every word, it’s best to at least have an outline to help ensure you stay on topic and don’t forget anything important.
Keep your videos simple and focus on only one customer pain point so you don’t overwhelm your viewers.
If you have more than one subject you need to cover, you can always make more videos.
2. Download a tutorial video editor
If you already have video editing software that you love, perfect. Use that. For this post, we’ll be using Camtasia for our training video.
Make amazing training videos with Camtasia!
Need to make a training video? Download a free trial of Camtasia and learn to quickly and easily make your own videos.
Download for free!
3. Capture your footage
If you plan to include video captured directly from your computer screen like software applications, websites, or presentations, Camtasia’s screen recorder makes it easy.
Just open Camtasia, click record, select the window and microphone you would like to record, and toggle the webcam option on or off depending on whether you wish to be in the video as well.
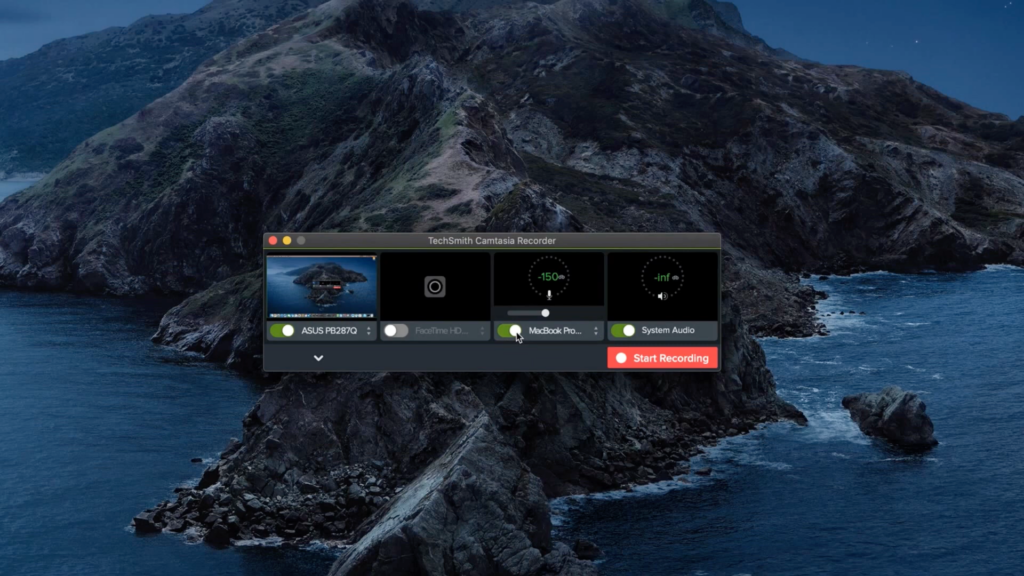
Now you should be ready to start recording.
4. Choose a template
You really can make a training video without much stress. Here’s why. Depending on the topic and content you’d like to present, Camtasia templates have lots of options available.
Camtasia comes with free video editing templates, but you can find more options under the Templates icon in the TechSmith Assets Store.
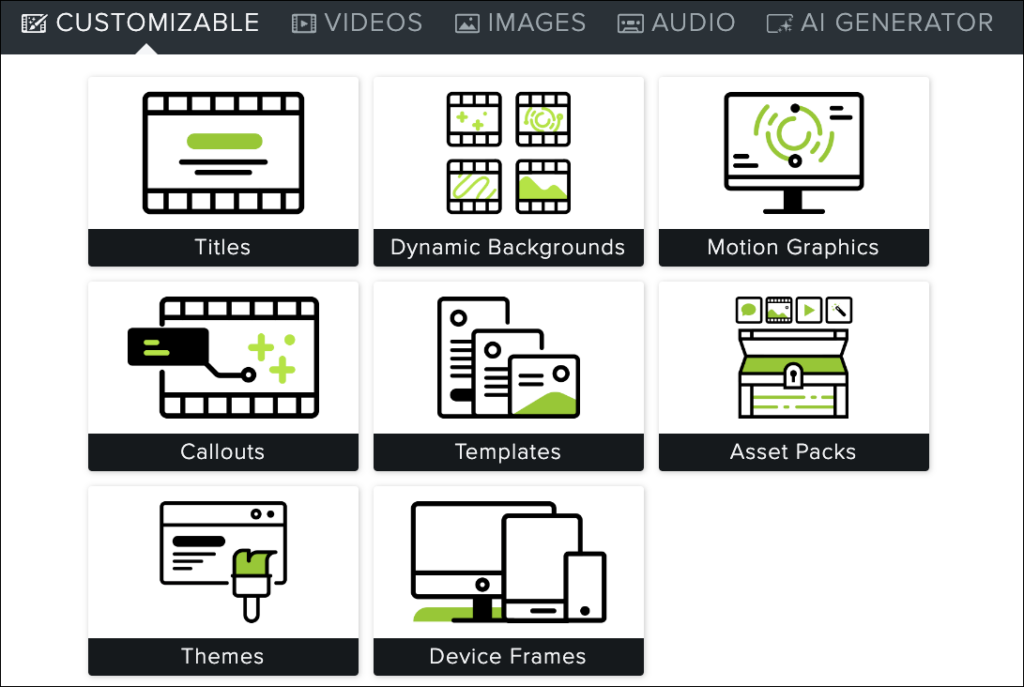
Simply go to the Template Manager in the menu and select ‘Download More Templates’ to take a look. Once you finish your recording and have selected a template, it’s time to import your video and audio, as well as any other visual assets you need, into Camtasia.
5. Import your media
Open the Media tab, and select ‘Import Media.’ Then, select the video, image, and audio files you need, and import them into Camtasia’s Media Bin for easy access while editing.
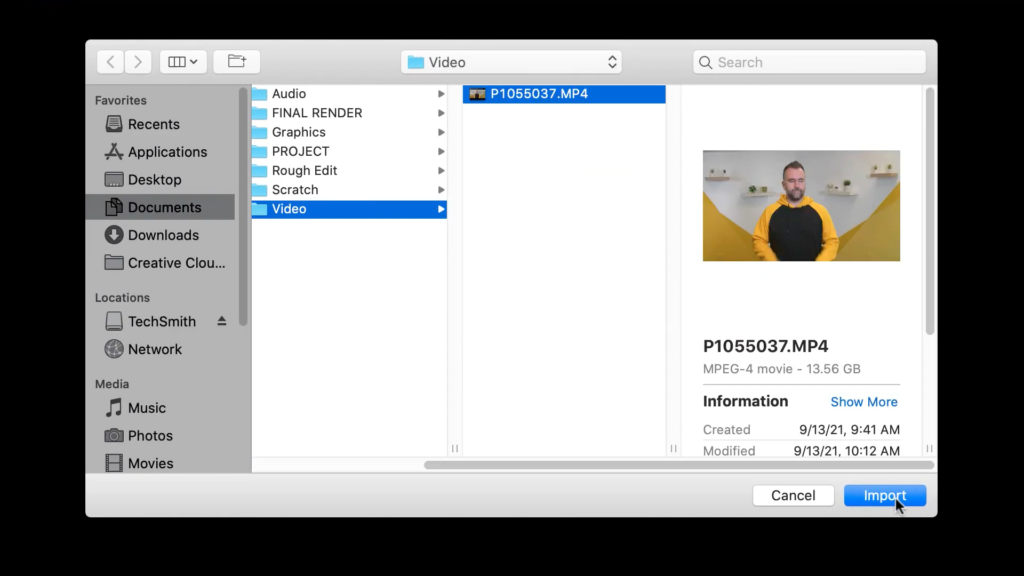
In addition to your own recordings, Camtasia offers tons of free downloadable assets to add to your videos, such as titles, lower-third graphics, stock footage, and even background music.
Some options do come with each template, but you can also open the library tab in Camtasia, click on ‘Download More Assets’ and find more on your own.
Make amazing training videos with Camtasia!
Need to make a training video? Download a free trial of Camtasia and learn to quickly and easily make your own videos.
Download for free!
6: Edit and export
With your template ready to go and your footage and other assets imported, you should be ready to edit your video.
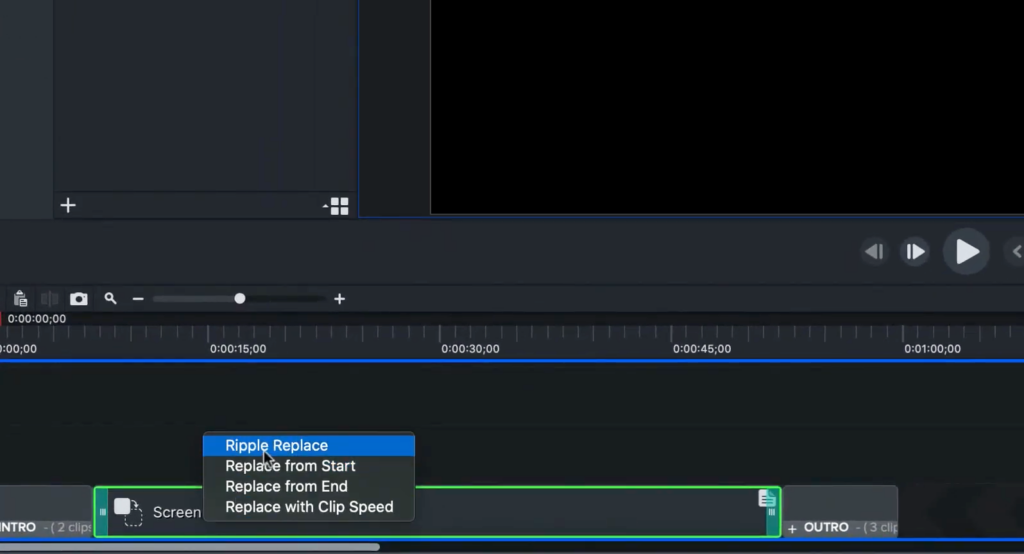
Click and drag your files down into the template placeholder and select ‘Ripple Replace.’
To trim the beginning or end of your video clips, just mouse over the edge you would like to trim and drag it to the appropriate length.
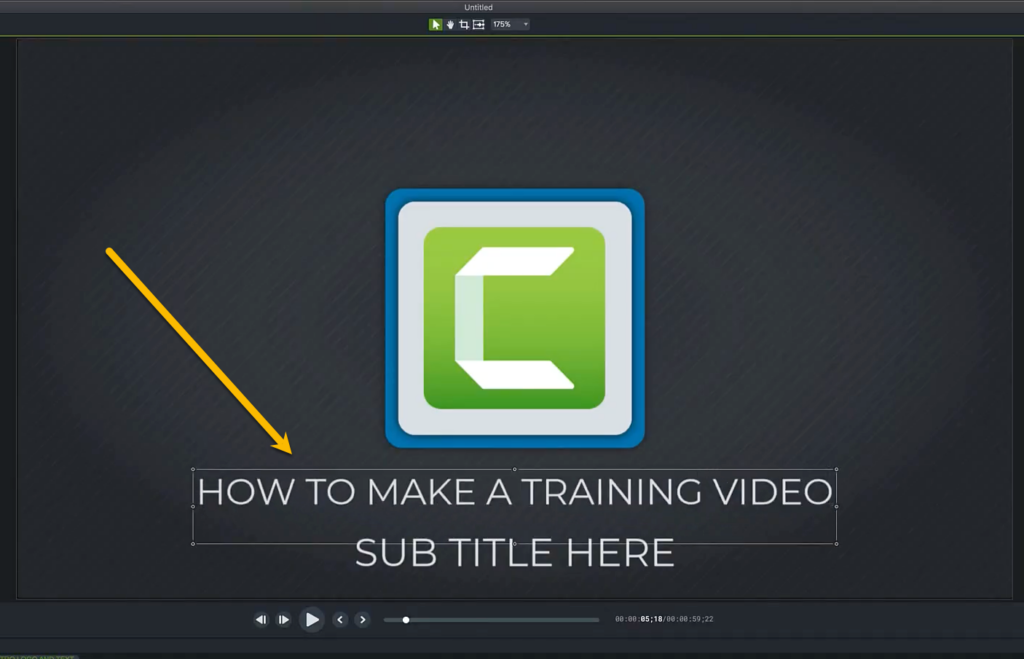
To customize the text of your intros, titles, and graphics, double-click on the words on the canvas and add your updated text in the box. If there are any extra text boxes present that you don’t need for your video, you can select and delete them.
Once you have all of your files and assets arranged and edited, make sure to watch it from start to finish to look for any errors or anything else you might have missed. If everything looks good, go ahead and export your video.
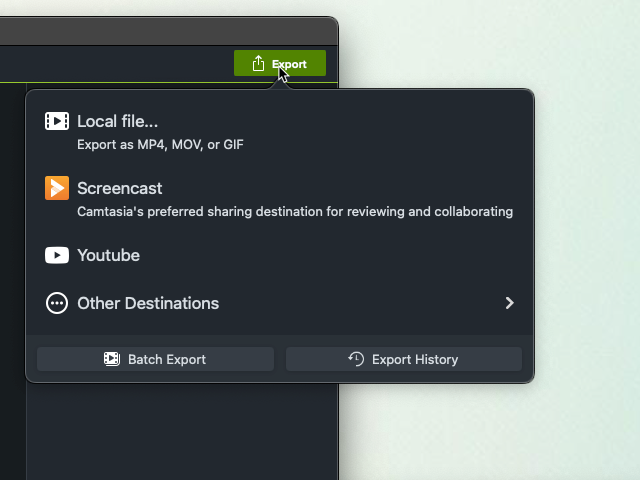
Click the Export button in the top right corner and select the ‘Local file…’ option in the drop-down menu to export the video file to your computer. Or, use one of the other preset options to upload your finished video directly to the internet and share it with others.
7. Host and distribute your training video
Now it’s time to get this training video made public. Or at least available to the people who need to access it.
The first step here will simply be producing the video – rendering the files in your editing software into a usable file format like .mp4. This should be your default file type for your training videos unless there is a specific reason to use a different one – for example, if your hosting platform requires a particular file type.
Once you have the file, you will need to upload it to whichever hosting platform you have selected. For free hosting, consider Youtube or Vimeo. Both of these options are easily accessible and offer private or public videos. If there’s information contained in the training videos that is sensitive or confidential to your company, your best option is to use an internal network, LMS, an existing company knowledgebase, or a password-protected page on your website.
Create a training video FAQ
An online training video, whether for employee training or customer training, is a video dedicated to educating viewers on a specific topic with the goal of teaching a skill or knowledge.
The number one thing to do to create a high-quality training video is to make sure the content is relevant and relatable. Of course, things like visual effects, music, and other enhancements help, but if the video isn’t interesting and informative, your video will fail.
Hosting is how a video is made available to viewers. YouTube and Vimeo are examples of hosting sites, but there are a number of other ways to host your video content. It’s important to choose the one that works best for you.
If you want to make your video public, I would suggest making a YouTube video. YouTube is great for learning content. However, if you want it to be available only to people at your company you can host it on your company’s help desk, knowledge base, or website.
You don’t need a lot of experience or video skills to easily create a training video. You just need a camera or screen recorder, a good microphone, and some video editing software.
Editor’s Note: This post was originally published in February 2018 and has been updated for accuracy and comprehensiveness.


Share