


Recording meetings with Zoom is easy. Turning that video into something people want to watch takes a little more work. Most raw recordings include pauses, side conversations, dropped audio, or unclear visuals.
But with the right editing process, you can turn any raw meeting recording into one or more clear, usable pieces of content. It doesn’t even need to be complicated — you can record in Zoom, edit using a dedicated video editing tool, and then export for sharing.
In this guide, we’ll walk you through each step of the process, from a quick trim to a full editing workflow, for consistent, professional videos your team can reuse.
Key takeaways
- Zoom recordings are a starting point — editing is what makes them clear, concise, and ready to share.
- Zoom’s built-in tools are useful for quick start/end trims, but they don’t support full editing or polish.
- For deeper edits — like removing sections from the middle, improving visuals, or enhancing audio — you’ll need a dedicated editor.
- A simple workflow (record in Zoom → edit in Camtasia → share) helps teams produce better content faster.
- Camtasia’s integration with Zoom streamlines this process, making it easier to move from recording to a polished, shareable video.
- Small edits — cutting dead air, adding captions, and highlighting key moments — can significantly improve clarity and engagement.
- Tools such as those in the Camtasia Suite help speed up the editing process, creating cleaner, more professional video content.
Understand your editing options before you start
Not all Zoom recordings require the same level of editing. If you just need to share the recording of an internal meeting to bring some colleagues up to speed, a quick trim is likely fine. For this, you can use Zoom’s own browser-based trimming tools, which don’t require any special software.
But if you plan to use the recording as the basis for a webinar or training session, you’ll need more sophisticated editing tools that allow you to cut sections, clean up audio, or add captions. Producing polished content at this level of quality requires dedicated desktop video editing software.
Camtasia’s Zoom integration offers a seamless way to produce professional edits of Zoom recordings, allowing you to move directly from the Zoom app into a full editing environment — without the manual download-and-import step.
Go from screen recording to polished video
A screen recording is just the start. Camtasia’s editor helps you add the callouts, animations, and edits you need to create a truly professional video.
Free Download
Trimming a Zoom cloud recording in the browser
If you only want to remove the awkward start or drawn-out closing chat from your meeting video recording, and don’t need to remove content from the middle, then Zoom’s web portal trimming tool is the quickest and easiest option. It works on your cloud recordings, doesn’t require you to download any special software or tools, and you can have your finished video ready in a few minutes.
But this method has a few limitations. Only the host who scheduled the meeting can access trimming features, so it’s not possible to hand this task off. Also, once you’ve trimmed a meeting, it only applies to the cloud version. It doesn’t affect copies that have already been downloaded.
Here’s how to use it.
Step 1: Open the recording in the Zoom web portal
- Sign in to Zoom.
- Navigate to Recordings in the left-hand menu.
- Select the cloud recording you want to edit.
Zoom needs to finish processing the recording before the trimming controls become available, which can take a few minutes or longer, depending on the file size. If you don’t see the trim option yet, check back shortly.
Also note that this workflow only applies to cloud recordings saved directly to Zoom’s servers during the call. If you recorded the session locally on your device, the file is already an MP4 on your hard drive. So you’ll need to edit in desktop software.
Step 2: Drag the sliders to set new start and end points
Once the recording is open, you’ll see a timeline with drag handles at each end:
- Pull the left handle inward to set a new start point. This is useful for removing pre-meeting small talk, the wait while everyone joins, or any setup that happened before the real content started.
- Pull the right handle inward to trim the end, cutting off the post-meeting wrap-up or any dead time after the main content finishes.
When you’re happy with the trim points, click Save and let Zoom process the edit. This usually takes a few minutes, depending on the length.
Note: If your recording’s share settings allow viewers to download the file, they may be able to access the original untrimmed version. If you need the trimmed version to be the only one available, go to the recording’s share settings and disable the download option before sharing the link.
Download and edit a Zoom recording on desktop
When you need a more substantial edit to your Zoom meeting than a simple cut at the beginning and end, desktop editing is the way to go. With dedicated software, you can access a lot more video editing features, including cutting out mid-sections, adding captions, or cleaning up audio.
Desktop editing provides full control over pacing, visuals, and enhancements, too, so you can turn meeting recordings into intentional training content.
Step 1: Export the MP4 from Zoom
- Access your recording by signing in to Zoom and navigating to Recordings in the left-hand menu.
- Find the meeting you want to edit and click Download.
- Zoom will save the MP4 to your computer.
If you recorded locally during the meeting rather than to the cloud, the file is already on your computer. Zoom saves local recordings to Documents > Zoom by default, organized into folders by meeting name and date.
Before you open anything in an editor, create a dedicated folder for in-progress recordings. Keeping raw files and edited exports separate prevents confusion, especially if you’re working across multiple recordings or returning to a project after a few days.
Step 2: Import the file into an easy video editor
Zoom recordings are typically screen shares, talking-head videos, or a combination of both, so you’ll need an editor with a straightforward timeline and intuitive cut-and-crop tools.
But if you aren’t looking for cinematic production quality, then complex editing software can just create friction and slow your workflow.
Camtasia Editor is a natural fit for this task. It’s built specifically for screen recordings and training content versus general-purpose video editing. To get started:
- Download Camtasia Editor for free
- Create a new project
- Import your MP4 by dragging and dropping the file directly onto the timeline, or use File → Import.
Step 3: Cut or crop unwanted sections with ripple delete
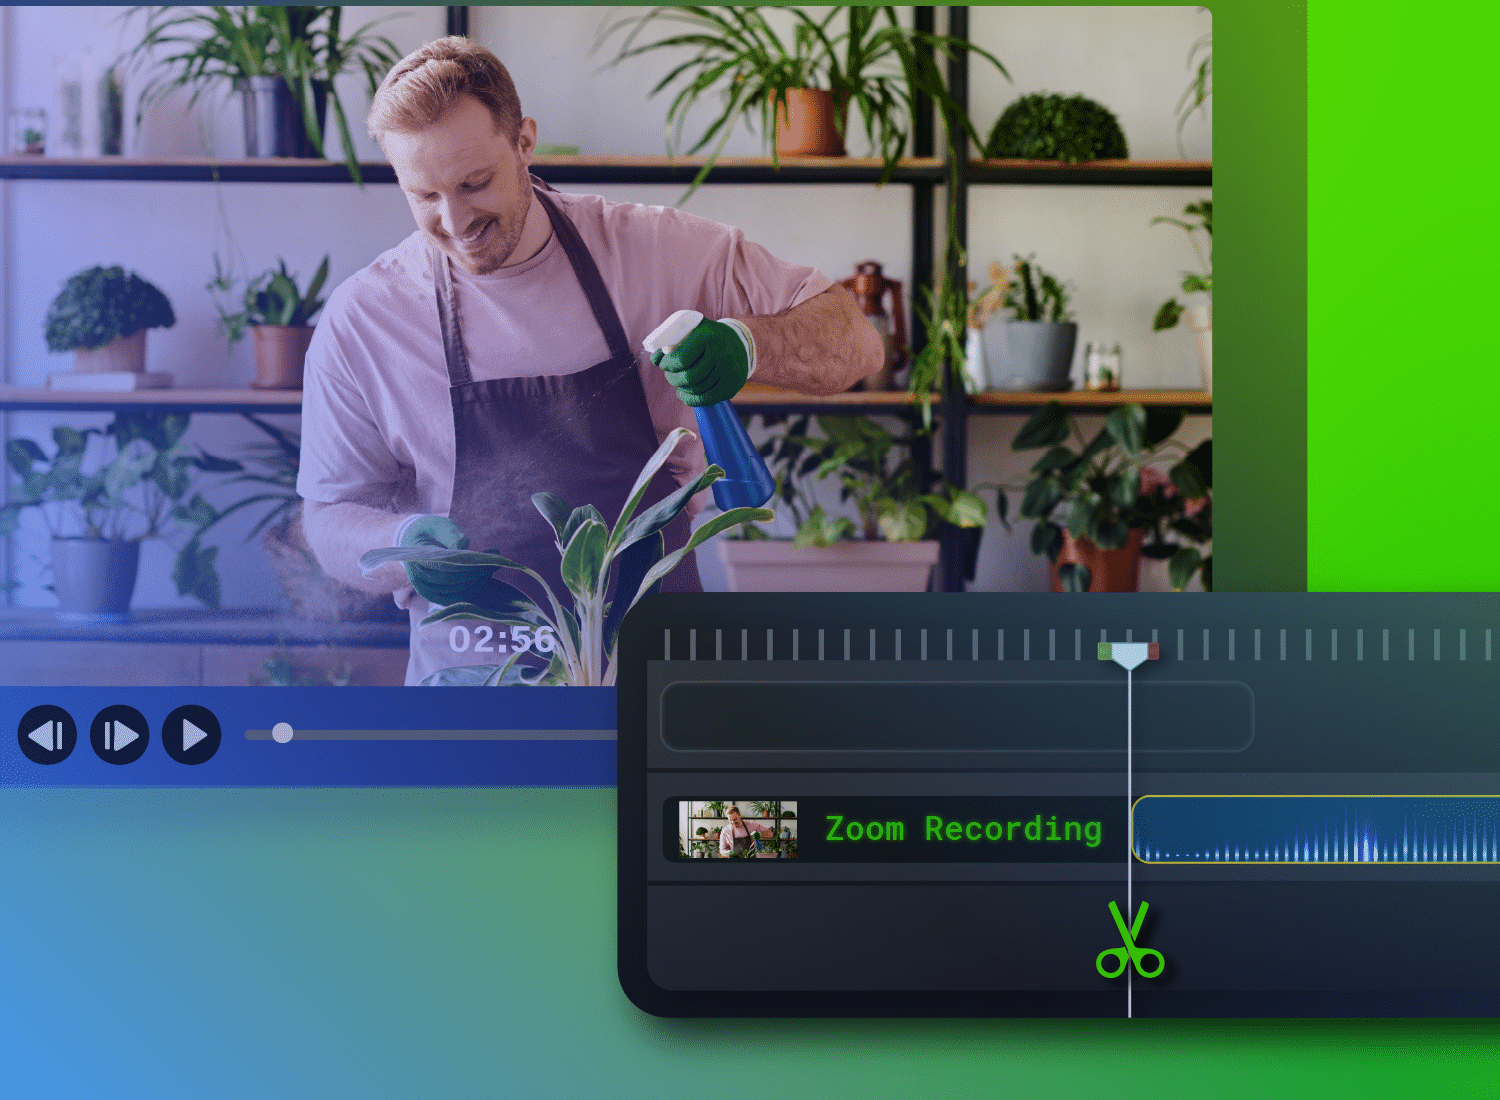
The core editing move for Zoom videos is the split-and-delete.
- Position the playhead at the start of a section you want to remove.
- Split the clip.
- Move to the end time of the unwanted section and split again.
- Select the isolated segment and then apply ripple delete.
This removes the section and automatically closes the gap on the timeline, so you don’t need to manually shuffle the remaining clips to fill the space.
You can use this functionality to quickly edit out anything that interrupts the flow, such as a long pause while someone was setting up a screen share, a tangent that went off-topic, a temporary mic dropout, or a mistake the speaker made before correcting themselves.
Cropping is a separate but related tool. Where cutting removes time, cropping adjusts what’s visible in the frame. This feature is useful for zooming into a specific app window or slide when the full-screen recording contains more than the viewer needs to see.
Some editors, including Camtasia Editor, also offer on-screen annotations and zoom-and-pan animation. Use these features to draw attention to key interactions without manually cropping every section.
Step 4: Export the polished MP4 for re-upload
Once you’re done editing, export as MP4 for the broadest compatibility across platforms, devices, and LMS environments. For training content, 1080p is generally the right balance between visual quality and file size. It’s sharp enough to read on-screen text clearly, but you won’t end up with heavy files that are unwieldy to upload or stream.
Before you export, rename the file to clearly distinguish it from the original recording — something like “Onboarding-Module-3-Edited.mp4” works well. It’s a small step that will help prevent confusion if you need to revisit the project.
From there, your edited MP4 is ready to publish to an LMS, share via a direct link, or upload to your team’s internal platform.
A better way to edit Zoom recordings with Camtasia
The process above works in most video editors. But keep in mind that each tool is built to support a different type of video producer, from filmmakers to YouTubers to motion designers.
If you’re looking to edit screen-based content for training, customer service, or marketing purposes, Camtasia is designed for you.
Camtasia lets you produce professional-quality video content from a raw Zoom recording and create repeatable workflows for consistent content quality across teams.
Import your Zoom recording and start editing immediately
With Camtasia’s Zoom integration, you can import cloud recording files into Camtasia Editor without downloading and importing them manually.
Most desktop video editors require you to go to the Zoom web portal, download the MP4, locate the file, and import it into your editor. Camtasia’s integration lets you access your recordings right from the editing interface. For local recordings or when you’re working from a file you already have, you can just drag and drop it into the timeline.
Either way, there’s no complex configuration or project setup required, so you can focus on editing, not managing files. For teams that edit Zoom recordings regularly, this is the foundation for a workflow that gets faster and more consistent every time you use it.
Clean up your recording with fast, precise edits
The first editing pass on most Zoom recordings follows a straightforward flow. You’ll typically need to remove dead air at the start when everyone joins, cut the odd section where the presenter lost their train of thought, and tighten the pacing in the middle when discussions go off on an unrelated tangent.
These are quick, mechanical edits, and Camtasia Editor’s ripple delete feature is designed to make them fast. Just split, select, and delete. Your timeline closes up automatically, leaving no gap behind.
Beyond the basic cuts, Camtasia Editor also lets you adjust the visual presentation of your recording before you get into any heavier edits. Use the Rev workflow to apply professional layouts, add backgrounds, and adjust how the camera and screen content are composed.
If your raw recording has a plain background or awkward camera framing, you can fix that quickly before the detailed editing begins. It’s an easy way to add a layer of visual polish with minimal lift.
This is where Camtasia starts to pull away from Zoom’s built-in tools. Zoom only allows you to trim the edges, whereas Camtasia lets you reshape the entire recording.
Enhance clarity with visuals, captions, and audio improvements
Editing for clarity can be one of the most time-consuming parts of a traditional editing workflow, but text-based editing with Camtasia Audiate makes it quick and easy.
Audiate automatically transcribes your recording and lets you edit the audio by editing the text. Just delete a word or phrase in the audio transcript, and the corresponding audio is removed from the video.
When you’re done, syncing back with Camtasia Editor applies all the changes to your timeline, letting you clean up filler words, repeated phrases, and other “verbal clutter” in seconds. Audiate can also improve audio quality by removing background noise and ensuring your audio and video stay in sync.
On the visual side, Camtasia Editor’s zoom-and-pan animations let you direct the viewer’s attention to the most relevant part of the screen at any moment. This is extremely useful when a recording captures the entire desktop, but the important content is in a single application.
Callouts and annotations add context directly in the video. While captions (which Audiate can generate automatically) make content accessible and improve comprehension, especially for viewers watching without sound or in a second language.
Together, these tools take your Zoom recording from a passively captured meeting recording to professional-looking video content intentionally tailored for training or instructional videos.
Turn one meeting into reusable content
Beyond just editing Zoom recordings, you can repurpose them into new content, without all the extra time and effort of producing from scratch:
- Break a 90-minute onboarding call into short, topic-specific clips that any new team members can reference.
- Turn a product walkthrough with a customer into a streamable training module.
- Cut a recorded internal presentation down to an asynchronous briefing for team members who couldn’t attend.
Camtasia Editor’s timeline makes it easy to take any raw, long recording, identify the segments worth reusing, and export them as standalone videos.
This is where the Zoom-to-Camtasia workflow delivers its clearest productivity return. Instead of your recordings sitting idly in the cloud, Camtasia turns them into assets.
Export and share polished videos with your team
When editing is complete, you can export your video as an MP4 for broad compatibility across platforms and devices. 1080p is the standard for training and professional content, balancing quality with practical upload and streaming considerations, but Camtasia Editor’s export settings let you control resolution and file size.
Once you’ve exported, your video is ready to go. You can publish to an LMS for a training program, upload to an internal knowledge base, share to YouTube for a wider audience, or distribute via your internal communication platform.
Crystal-clear screen recording
Why settle for blurry screen content? Camtasia Editor’s screen recorder captures everything at up to 4K!
Free Download
From raw recording to ready-to-share video with Camtasia
Zoom made capturing meetings as easy as clicking a button. But the next stage is where teams end up losing time to manual file downloads, complex video-editing software, and clunky workflows.
Camtasia’s clear editing workflow eliminates that friction. Record in Zoom, bring the recording into Camtasia Editor, enhance the visuals and audio, and export a video that’s ready to share.
But for teams that run this process regularly, like L&D teams building training libraries, managers producing onboarding content, or communication teams creating internal videos, Camtasia provides something else: consistency.
Everyone uses the same workflow, same tools, and same standards — which means clearer content, faster turnaround, and more professional output.
Ready to turn your next Zoom recording into a video worth sharing? Start editing with Camtasia.
FAQs
What happens to downloaded files after I trim them in the cloud?
Downloaded files contain the original, untrimmed recording because Zoom’s browser trims only affect the cloud version. If you want viewers to only access the trimmed version, disable downloads in the recording’s sharing settings.
How long does Zoom take to process an edited recording?
Zoom often processes trimmed recordings within a few minutes, but longer recordings can take up to an hour. Zoom may also send an email notification when the edited version is ready. Zoom offers a troubleshooting guide if you’re experiencing issues.
Can you cut out parts of a Zoom recording?
Yes, Zoom can trim from the beginning and end of a cloud recording in the web portal. To remove sections from the middle, you’ll need to download the MP4 and edit it in desktop software such as Camtasia.
Share