


You know that moment when you’re explaining something for the third time and half your students still look confused? Yup… we’ve all been there.
Screencasting lets you give your best explanation once, and then students can replay the recording when they need it. You just record your computer screen while you talk through whatever you’re doing.
Whether you’re managing a packed classroom or a group of distance learners, screencasting can become your teaching superpower. We’ll show you how to pick the right screencasting software and make videos that keep students watching — and we promise you don’t need a whole new degree to get started.
What is screencasting? (+ why it matters for teachers)
Screencasting is like having a conversation with your students, except they get to pause you mid-sentence when they need a minute to catch up. You record what’s happening on your screen while you explain everything out loud.
It works well for today’s classroom because you can cover all your bases. If you need to walk through a tricky algebra problem, screen record it. Want to show students how to navigate a new learning platform? Record a walk-through.
Once you make educational videos, you’re done. Use them again next semester or share them with colleagues. Or if parents ask what you’re covering in class, you have something to easily reference.
With screen recording, students get both visual and audio help, so you can hit different learning styles at the same time. Some kids need to see it, others need to hear it, and screencasting gives you both formats. If they need to rewatch the confusing parts of a slideshow later because they zoned out, they can catch up without feeling embarrassed.
Plus, every student gets your best explanation. You don’t have to worry about whether students in the back corner of the classroom can hear you, or if you rushed through a tough concept toward the end of class.
There’s also the time you save not repeating yourself. You can make the video once, and then spend class time on more engaging discussions and hands-on activities. And no matter what devices your students use — Chromebooks, old laptops, phones — your videos will play on all of them.
How to choose the best screen recording software for teaching
You don’t need advanced video editing software — just something that won’t make you want to throw your laptop out the window. Like the other teaching resources you use, your screencasting tool should feel more like a teaching assistant than a tech overlord. Here’s how to make sure you have what you need:
Look for easy-to-use screen recording tools
We’re going to focus on tools that were designed with teachers in mind: Camtasia and Snagit.
Camtasia is your go-to if you want polished instructional videos, but don’t want to spend hours learning complicated software. Add things like text overlays, zoom effects, and even quiz questions right inside your videos.
Snagit is a fit when you need something quick and simple. Record your screen and webcam together, trim out the awkward parts, and add some arrows or text to make things clearer. This tool is nice if you’re just dipping your toes into screencasting or making short tutorial videos.
Looking for professional screen recording software?
From simple screen captures to polished video editing, TechSmith has everything you need to create professional-quality content.
Learn More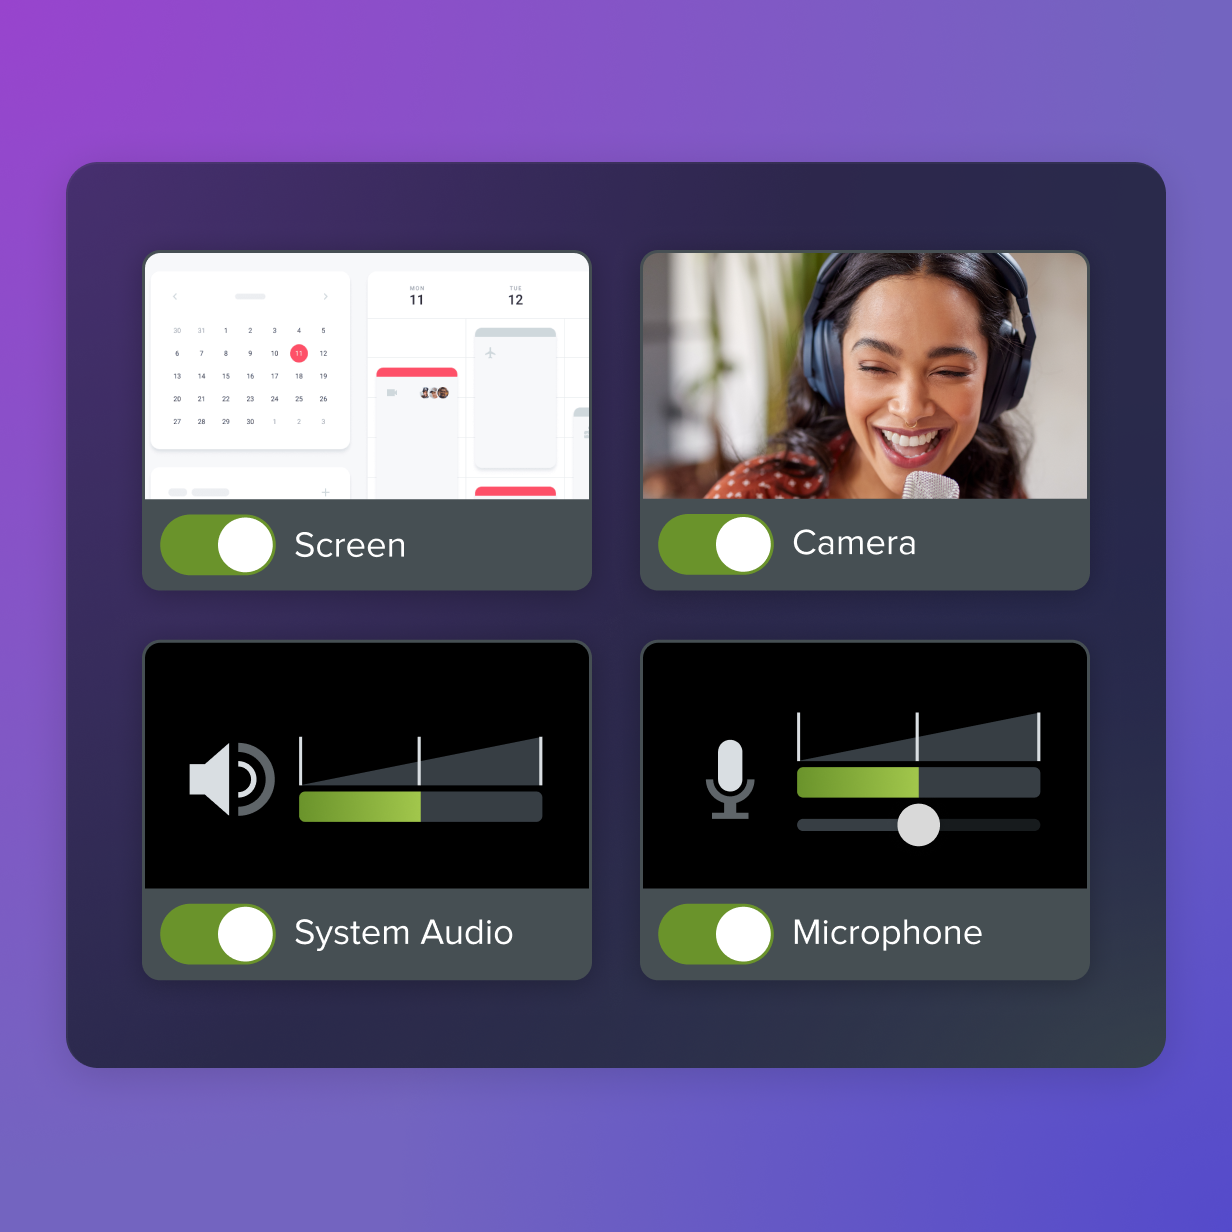
Can’t decide between them? We’ve got a detailed breakdown of Snagit vs. Camtasia that’ll help you figure out which one best fits your style.
Determine your must-have editing features
It’s easy to get distracted by the bells and whistles. But you want the main perks that will help your teaching, so you don’t end up spending your prep time watching how-to videos on YouTube.
With basic editing tools like trimming, it’s easy to remove awkward pauses. Text overlays are great for highlighting key points, and you can use zoom effects so students can see what you’re pointing at. As they’re watching your video recordings, students know where to direct their attention with cursor effects.
If you’re still torn between Camtasia and Snagit, here’s a tip: Camtasia is better for the videos you’ll use again and again. Since it records your screen, microphone, system audio, and cursor movements on separate tracks, you can update the parts that changed without redoing the whole thing. When the curriculum gets updated, just swap out the impacted slides.
For lighter projects, Camtasia Online offers a streamlined experience, giving teachers a free, straightforward, browser-based solution for recording and editing educational videos. If you decide you want to incorporate more advanced features, it’s easy to upgrade to the full Camtasia desktop editor later on.
Need to show your screen?
Skip the downloads. Use Camtasia online to record your screen, camera, and microphone right in your browser for free.
Start Recording
Prioritize screen recorders that integrate with your LMS
Your screencasting tool should work well with whatever platform you’re already using. Canvas, Google Classroom, and Moodle all work fine with properly formatted videos. The fewer hoops you have to jump through to get screen-recorded videos to your students, the better.
Look for time-saving features that will make your life easier:
- With direct upload capabilities, you can publish videos straight to your LMS without downloading files to your computer first, then re-uploading them somewhere else. That’s two fewer steps between finishing your video and getting it to students.
- Gradebook sync features can automatically create assignments or discussion posts when you upload videos, which saves you from switching between platforms to set up the actual coursework. Some tools even track which students watched your videos and for how long, giving you insight into engagement.
- Shared Google Drive folders work great if your school runs on Google Workspace. Students can access videos through the same drive structure they use for everything else, and you can organize content by unit, subject, or whatever system makes sense for your class. Plus, you won’t take up storage space on your LMS.
Creative ways to use screencasts in the classroom
Screencasting isn’t just for when you’re teaching remotely or trying to be the edtech hero. It also fits nicely into your everyday classroom, making the learning experience more fun. Here’s how:
Flipped instruction
When students watch your explanation at home, you have more class time for the good stuff, like working through problems together, having discussions, or doing hands-on activities. Instead of lecturing while students frantically try to take notes, they can pause your video whenever they need to process what you said.
This flipped classroom approach is great for step-by-step processes or concepts that students struggle with. They can rewatch the tricky parts until it clicks, and then come to class ready to talk about them.
Student video presentations
Get your students making their own screencast videos. It’s a great way to build communication skills while letting them show what they know. Start simple, like with a book report using visual elements, or a walkthrough of their science project methodology.
Snagit’s step-by-step capture feature works really well for this, especially in STEM classes where students need to show their process as much as their results.
Annotate and edit screenshots with Snagit
Professional mark-up tools and powerful features make it easy to create helpful images.
Try it Free
Video feedback on assignments
Instead of typing out the same comments over and over, record yourself talking through student work. You can point directly at specific parts of their assignment while explaining your feedback, which is way clearer than generic written comments.
Students love this because they can hear your tone of voice and see exactly what you’re talking about. Not every student will know what you mean when you say their work is unclear or needs improvement.
Want to learn more about this approach? Check out our guide on assignment feedback videos.
Step-by-step guide to creating engaging screencast lessons
Your educational videos don’t have to be perfect right out of the gate. You just want to get them from an idea to a finished video without overthinking every detail (easier said than done, we know).
Here are some steps to help:
1. Start with clear learning goals for each video
You already do this with regular lesson planning. Now apply that same thinking to your videos. Figure out what students should be able to do after watching, and focus on one main thing rather than covering it all.
Try a planning format that looks something like this:
- Video title: Make it something students can search for later.
- Learning objective: Come up with one specific goal.
- Key concepts: Stick to 3-5 main points max.
- Check for understanding: How will you know if they got it?
2. Write simple scripts and prep your visuals
If you write out every single word, you’ll sound like a robot reading from a teleprompter. Jot down your main talking points and note where you want to pause for emphasis or to transition to something new.
Grab your screenshots ahead of time if you’re using Snagit, so you’re not scrambling around during recording. Having your visuals ready makes the whole process smoother.
3. Record and edit for clarity
Students would rather hear you stumble over a word or two than listen to a fake-sounding presentation. Focus on speaking clearly and at a reasonable pace — that’s really all you need.
Camtasia makes the editing part pretty straightforward. You can trim out pauses and filler words, add some basic titles if you want, and export it in a format that works on your students’ devices.
If you can edit a doc, you can edit a video
Stop fearing the timeline. Camtasia Audiate transcribes your recording so you can edit your video just by editing the text.
Free Download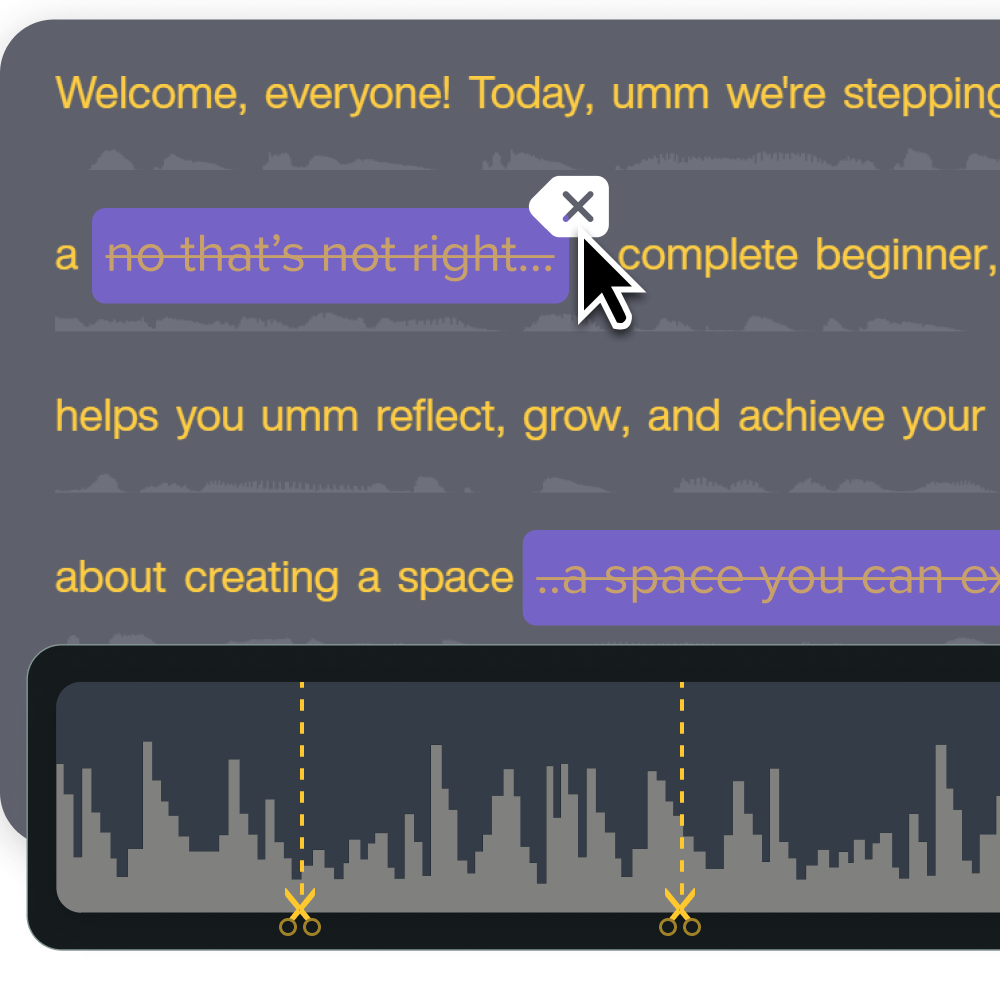
If you’re new to recording educational content, our guide on recording lectures has some helpful tips for getting started.
4. Share videos with students
Think about how your students access content, and go from there. Upload it to your LMS to keep everything in one place. Use consistent naming so students can find materials easily, and consider including a few guiding questions to keep them thinking while they watch.
And this one’s important: Don’t forget about accessibility. That means:
- Adding captions for students with hearing loss, or who speak English as a second language
- Including transcripts for students who prefer reading along
- Making sure videos work on mobile devices since lots of students watch on their phones
- Testing that videos load properly on your school’s network
Screencast makes the sharing part super easy. It connects directly with Snagit and Camtasia, allowing you to upload videos and share links without going between platforms.
How to make screen recorded videos more interactive
Students pay attention better when they’re doing something active. But that doesn’t mean you have to get fancy. Simple interactive elements can make a big difference:
- Try adding quiz questions at key points to help students check their understanding.
- Use clickable annotations so they can explore content at their own pace.
- Break longer videos into chapters so students can jump to the sections they need to review.
- Include discussion prompts that connect your video to what you’ll do in class.
Camtasia has built-in features for this kind of stuff. These things keep students engaged and give them ways to show they’re learning.
Go from screen recording to polished video
A screen recording is just the start. Camtasia’s editor helps you add the callouts, animations, and edits you need to create a truly professional video.
Free Download
Start screencasting today to improve student engagement
You don’t need expensive gear or video production experience to start screencasting. Begin with basic recordings and build your skills over time. The technology is a lot simpler than it looks!
Camtasia, Snagit, and Screencast all offer free trials, so you can test them out without spending anything up front. But once you see how screencasting improves your teaching, you’ll want to upgrade from the free version to the paid features to create professional-looking content.
Explore all the TechSmith tools and find what works for your classroom!
Share