


Video decks have quickly become a go-to alternative to live presentations and webinars, especially for remote and hybrid teams.
But turning your slides into an engaging, effective video presentation isn’t always as easy as it sounds. If you’ve ever felt awkward on camera, stumbled through a script, or struggled to make your message land without a live audience, you’re not alone.
There’s good news: Modern screen recording and video editing tools are making it much easier to create polished presentation videos — even if you’re not a natural in front of the camera or microphone.
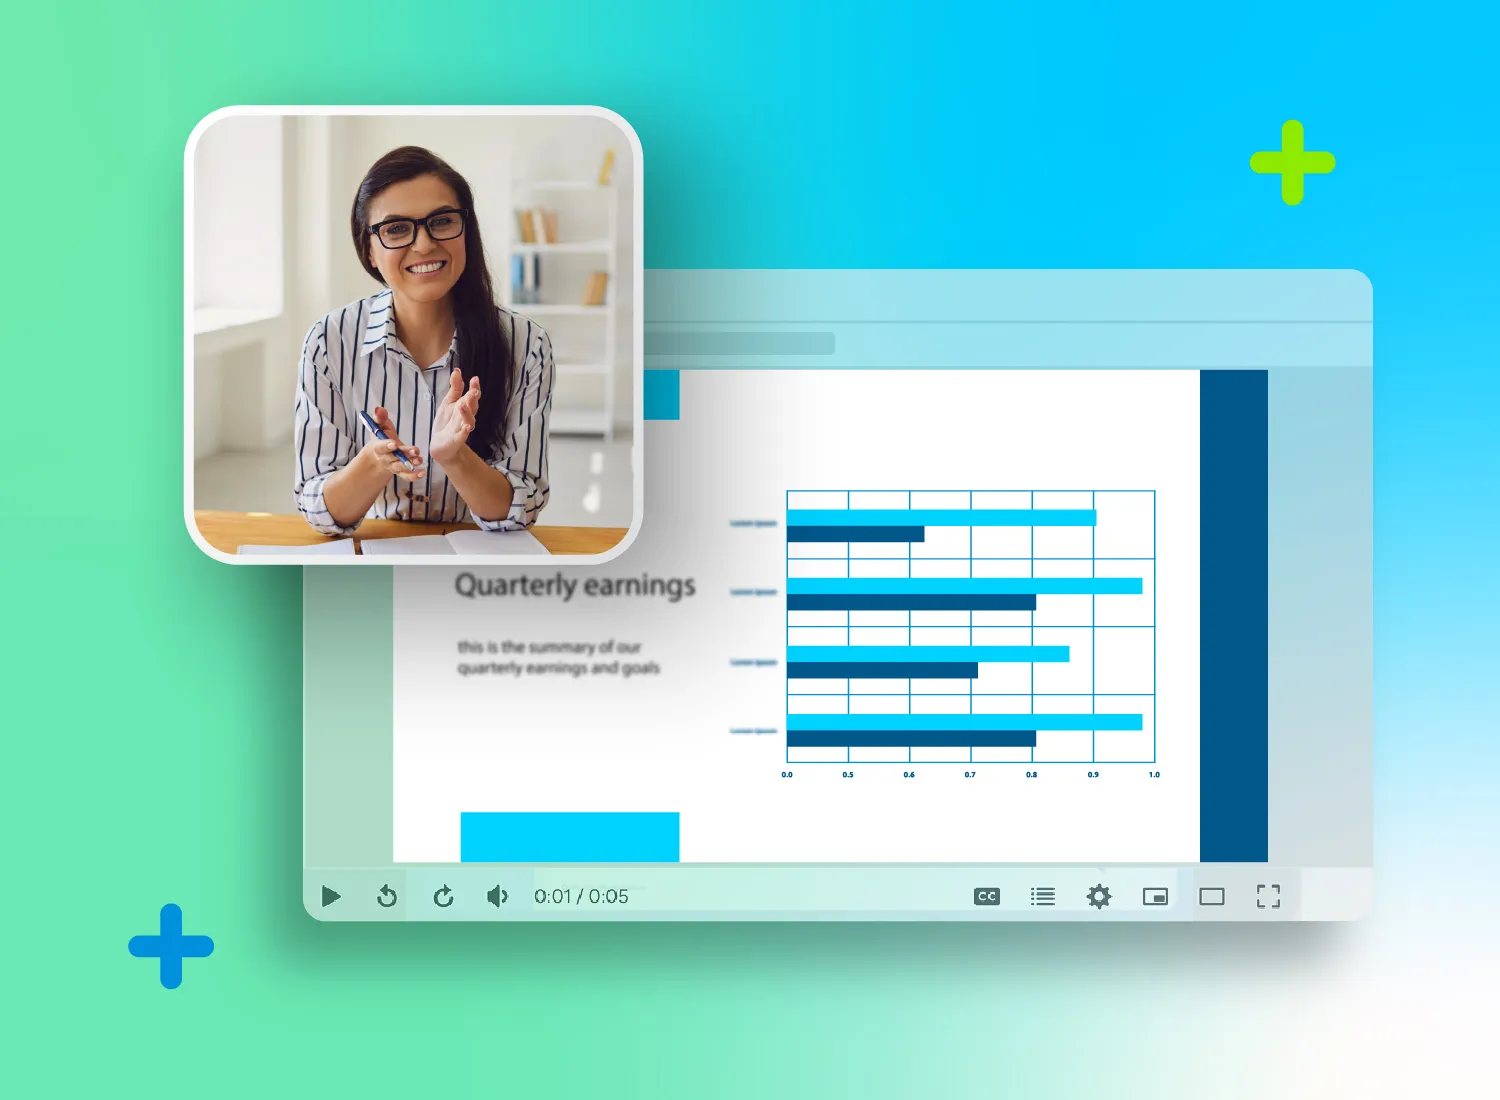
To record yourself presenting a deck, start with a clear slide deck, use a tool that can capture your screen and webcam, record your narration in short sections, edit out mistakes, and share the finished video where viewers can watch it on their own time.
From simple screen recording setups to AI-generated avatars that can present on your behalf, there are more options than ever to create a professional result that fits your comfort level and goals.
This guide will walk you through how to record yourself presenting a deck — whether you want to appear on screen or let technology do the talking.
Key Takeaways
- Start with a clear slide deck, a recording tool, and a simple plan for what you want viewers to learn.
- Choose the format that fits your goal: on-camera, voiceover-only, or an AI avatar.
- Record in short sections so it is easier to fix mistakes and keep your delivery natural.
- After recording, edit for clarity, then share the video somewhere your audience can easily access and review.
Why record yourself presenting a deck?
Why go through the hassle of recording yourself presenting a deck when you can share your Google slides or PowerPoint slides directly with audiences? Well, the benefits are too many and too great to ignore. For you, deck recordings:
- Expand your reach: You can share them with a broader audience, unlike live presentations, where you only present to those in front of you.
- Are convenient: They allow you to share content around the clock, across different time zones and schedules without affecting your work schedule.
- Help build human connections: Recordings featuring your face or voice can help you connect more deeply with your audience, something plain slides or docs can’t really accomplish.
Recordings can make a world of difference for your audience as well. They:
- Promote flexibility: Viewers can playback your content whenever and wherever — no more scheduling conflicts or travel inconveniences for live meetings.
- Allow for better learning: Audiences can watch and rewatch videos as many times as needed to understand key concepts.
- Enhance retention: Recordings engage both of the brain’s processing systems (visual and verbal) which improves understanding and retention.
- Are engaging: Recording yourself transforms static slides into dynamic experiences that are more likely to capture and maintain viewers’ attention.
What you need to get started
Ready to hit the record button? Great! But before you jump in, you need to make sure you have everything you need. The most essential items are a slide deck, recording software, a webcam, and a mic.
Before you get frustrated, you don’t need multiple tools for this. A solution like Camtasia can help you do it all. You can capture and edit recordings in Camtasia Editor, as well as Audiate, a tool that unlocks script generation and AI avatar features.
Let Audiate write your script!
No more blank pages! Instantly generate amazing, customizable scripts in any length, tone, and style!
Get Audiate
Let Audiate write your script!
No more blank pages! Instantly generate amazing, customizable scripts in any length, tone, and style! Get Audiate
A clear slide deck
Before you can start recording, you’ll need to create a well-organized slide deck that effectively conveys the information you want to share. However, be careful not to overwhelm your audience — stick to one concept per slide presentation.
Remember that your slides will be on screen longer than any other element in your video. So, keep them clean, use readable fonts, and include some visual elements, like supporting images or animations, all the while maintaining consistency and ensuring flow.
A good way to assess your slide deck is to ask: “Would I be able to keep my eyes on the screen and follow this presentation without having someone else explain the details?” If the answer is yes, you have the foundation for your recording.
With Camtasia, you can improve your slides even further to enhance audience understanding. The tool lets you zoom in on different parts of your current slides as well as add callouts after recording, which can help improve clarity.
Recording software
Next, you need a tool to help you capture your presentation. Ideally, it should help you:
- Record your screen (to capture your slides) or webcam.
- Record narration and add it to your presentation.
- Edit the recording to your satisfaction.
Camtasia is great for both experienced and inexperienced teams. It has a webcam and screen recording functionality, facilitates drag-and-drop editing, and offers built-in AI features like background removal. With a Camtasia Pro plan, you also have access to Audiate for additional features, like automated script generation and AI avatars.
A webcam and mic (or AI avatar)
If you want to appear on camera (might be great for building emotional connections), you’ll need a decent webcam and mic. This doesn’t mean getting “Hollywood-level” gear; a simple camera and mic that captures your face and records audio will do.
Prefer to stay off-camera? AI avatars offer an alternative way to deliver your message while maintaining a professional, human feel. They’re especially useful when you want a consistent presenter across videos, need multilingual voiceover options, or simply feel more comfortable behind the scenes.
Camtasia supports both live video recordings and voiceover-driven presentations. You can record your screen, webcam, and audio in one tool. And with Audiate, background noise can be cleaned up quickly, so you don’t need a perfectly soundproof space to record audio.
Go from screen recording to polished video
A screen recording is just the start. Camtasia’s editor helps you add the callouts, animations, and edits you need to create a truly professional video.
Free Download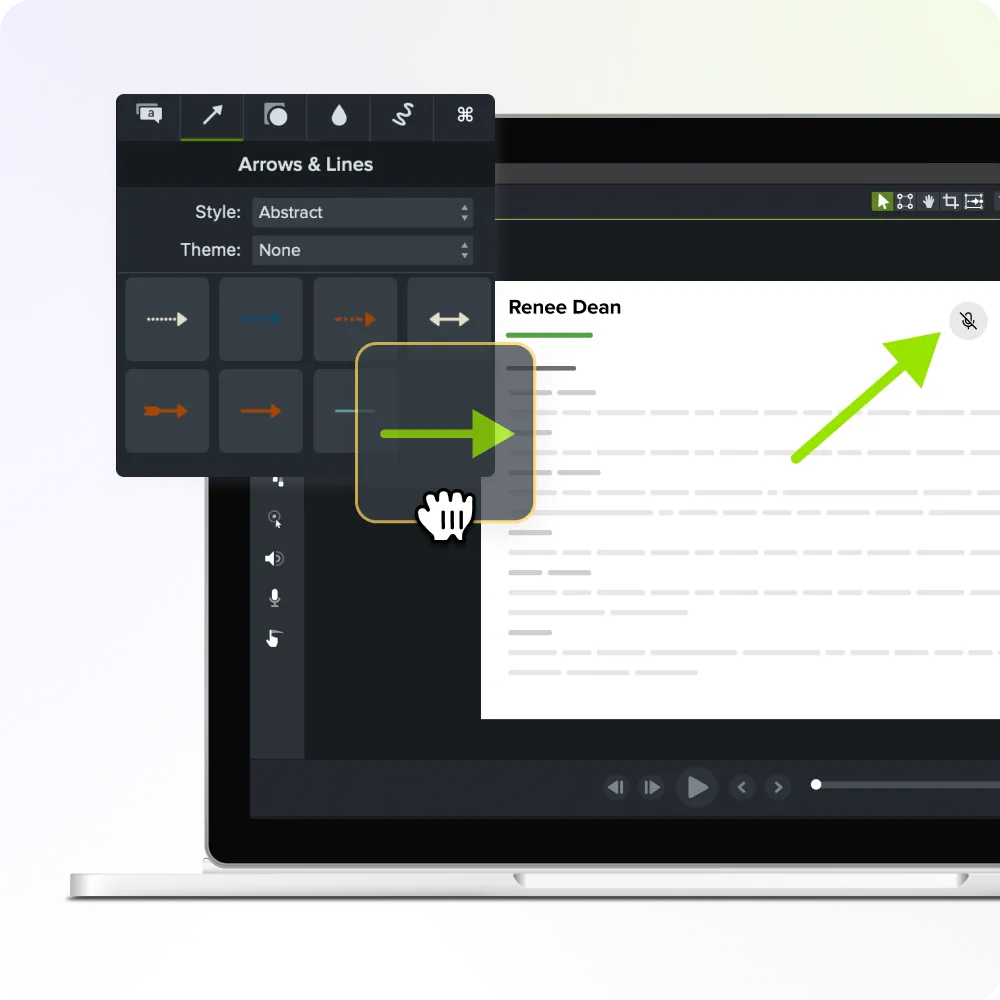
Should you use a human or AI avatar?
To appear on camera or use an avatar? It depends. Both have their strengths, and the right choice comes down to your audience, content type, and presentation goals.
Some Camtasia users opt for AI avatars when they need fast, repeatable delivery, but many still prefer the authenticity and emotional connection of a human face.
When should you record yourself vs. use an AI avatar?
Start by deciding on your audience, content, and goals. Record yourself when you want to build trust and connection with viewers. A human-led video is especially great when:
- Handling executive communications
- Pitching to clients or investors
- Onboarding new hires
- Presenting thought leadership content
- Sharing personal insights or stories
On the other hand, an AI avatar is a great tool if your priorities are speed, scalability, and consistency. This could be the perfect route for:
- Providing product walkthroughs or tutorials
- Creating repeatable explainer videos
- Replicating the same content for different audiences; for example, when creating videos in multiple languages
Of course, none of this is set in stone. If you’re unsure which format will resonate most with your audience, consider A/B testing both and monitoring engagement data.
How to get the best results when recording a deck
No matter which format you choose — appearing on camera or using an avatar — the outcome depends on how you approach the recording process. Here are some pro tips to keep in mind for optimal results:
Keep it concise and structured
With human attention spans shrinking, you have a higher chance of success with short videos than lengthy ones.
This isn’t to say that you should use shortcuts. Make your recordings short enough to maintain attention, but also as long as necessary to convey your message.
Make sure they’re easy to digest by:
- Focusing on a single concept per video
- Starting with simple concepts and building up to complex ones
- Using bullet points
- Adding brief pauses between ideas
Camtasia offers a timeline view of your videos, making it easy for you to edit out unnecessary parts as well as break up and rearrange sections as needed.
Speak to the slides, don’t read them
It may be tempting to read directly from slides when making a video of yourself. But should you? Probably not.
Voiceovers should add meaning to your presentation, not just mirror what’s on your slides. To hold viewers’ attention, provide additional value and use a natural, conversational tone.
Use Camtasia’s voice recording tool to record and review your delivery in segments. This way, you can easily re-record sections you’re unhappy with rather than having to scrap the full-length recording.and review your delivery in segments. This way, you can easily re-record sections you’re unhappy with rather than having to scrap the full-length recording.
If you can edit a doc, you can edit a video
Stop fearing the timeline. Camtasia Audiate transcribes your recording so you can edit your video just by editing the text.
Free Download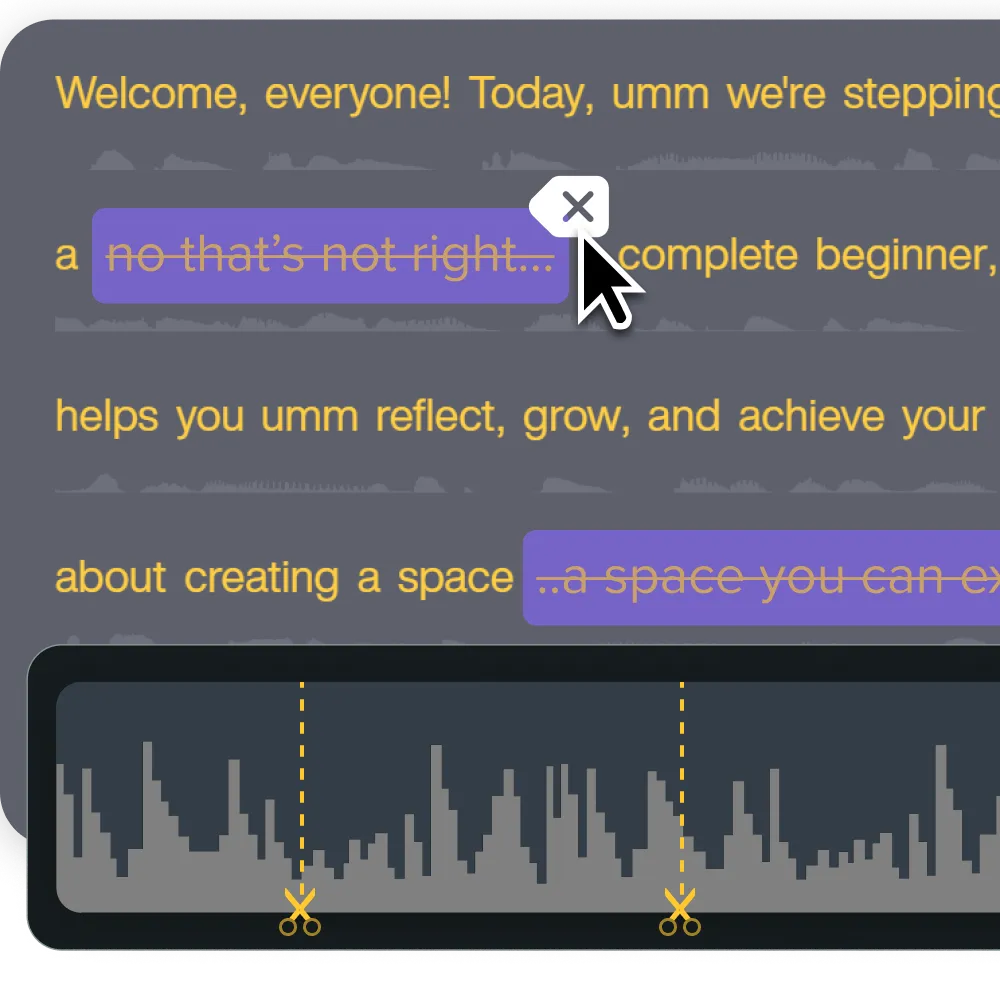
Rehearse or edit as needed
Even the best presenters need practice. So, rehearse and retake your presentation as many times as needed until you get the vibe you’re going for.
Take advantage of editing tools like Audiate to polish your content. Audiate can help cut pauses and remove filler words (yes, the “ums” and “uhs”!), empowering you to deliver high-quality recordings.
Choose the right delivery style
The best way to choose a delivery style is to consider your audience’s expectations and the type of content you’re presenting. When making internal presentations (like onboarding or update videos) or client and investor-facing decks, go the human route. For repeat or high-volume recordings, take advantage of AI avatars to make your work easier.
What to do after recording a presentation deck
What you do after you stop recording your video presentation is just as important as what you do during the production process. One of the most common mistakes presenters make is hitting “stop” and thinking they’re done without a clear plan for what happens next.
Developing a smart distribution and feedback strategy ensures your presentation actually reaches the right people and drives engagement. Here’s how to maximize your presentation’s impact.
Share and host the recording
The hosting platform you choose is a big decision, as it determines your videos’ discoverability and the viewer experience. Before settling on one, consider:
- Use case: Different platforms will be suitable for varying needs. For example, YouTube can be a good choice for thought leadership content, your company’s learning management system (LMS) for internal training, and your sales portal for sales-driven presentations. You can also share direct links with clients for sales pitches or product tutorials.
- Access control: Choose a solution that lets you manage who views your content, especially if you plan to record sensitive information. Screencast has an optional feature that can require users to enter passphrases to view the content behind a shared link.
- Mobile compatibility: Improve viewer experiences by selecting a tool that works well on mobile devices (both iOS and Android).
- View and engagement analytics: Pick a solution that provides analytics, like the number of video views and completions, to help you understand viewer behavior.
- Integration capabilities: Go for a platform that can integrate with existing tools, like your CRM or video editing solution, to streamline distribution.
- Bandwidth limitations: Consider your typical video file sizes and choose a solution that can support them.
Screencast can help you share presentation recordings with viewers.
Invite feedback and collaborate
Turn one-way presentations into two-way conversations by inviting feedback from viewers. Ask what they liked, what they didn’t, and what they wish you could improve on. You can embed your video in surveys or forms to collect input, clarify points of confusion, and surface frequently asked questions — all of which can inform future updates or spin-off content.
If you’re using Screencast, viewers can leave comments and emoji reactions right alongside your video. This makes it easy to collect real-time, in-context feedback without needing to send out separate forms or emails. It’s a simple way to spot patterns, improve clarity, and stay connected to your audience’s needs.
Present and record updates as needed
As things change — whether it’s your audience, your message, or the tools you’re showcasing — your presentations should evolve too. Regularly reviewing and updating your videos keeps them relevant and valuable long term.
Periodically revisit your video content to make sure it:
- Aligns with your current audience’s expectations
- Reflects industry changes
- Addresses viewers’ questions or concerns from past videos
When it’s time to make edits, you don’t need to start from scratch. Update key sections, re-record just the new sections with Camtasia, and redistribute the updated version.
Faster video creation with Rev
Make videos as easy as click, click, done! Camtasia Rev is so fast it’s like magic!
Learn More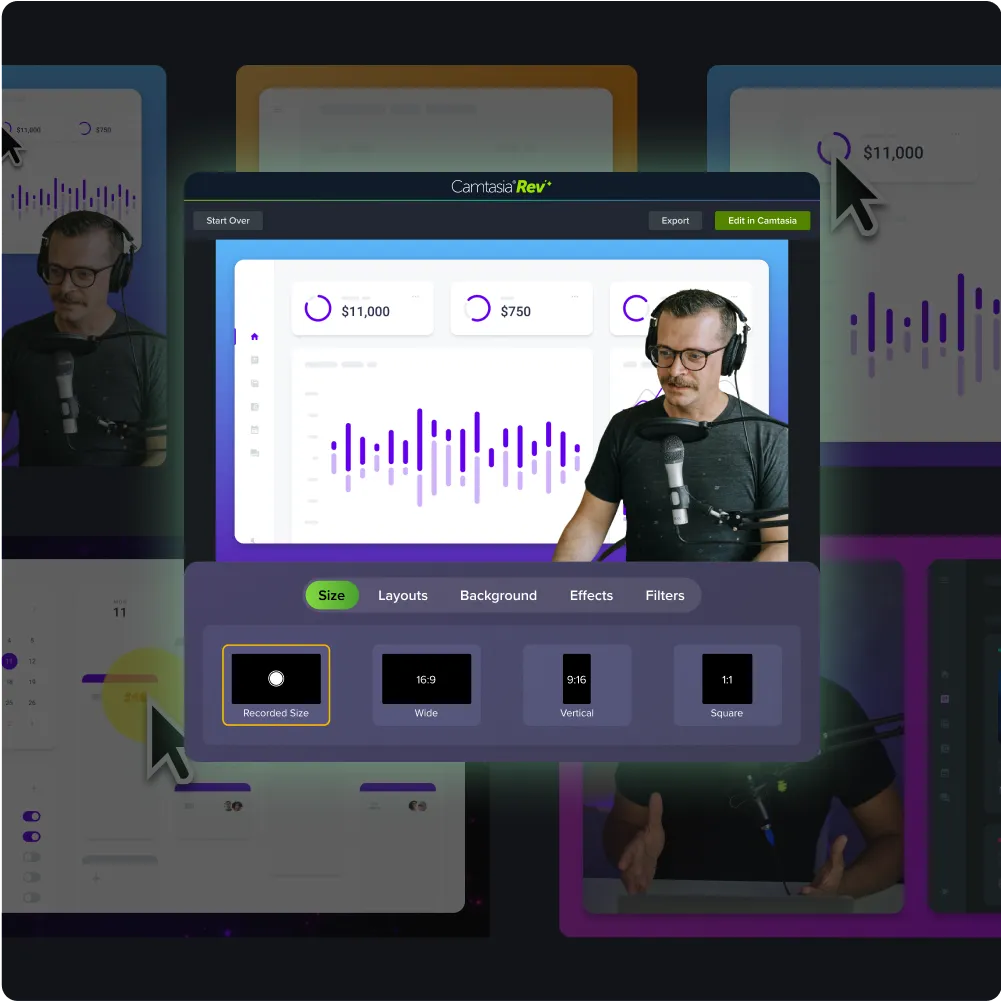
Create professional recordings for deck presentations with Camtasia
Turning a slide deck into a compelling video doesn’t require a full production setup — or even stepping in front of the camera. Present live with your voice and webcam, or use AI avatars and voiceovers when a more flexible or behind-the-scenes approach fits better. No matter your style, the key is creating something clear, engaging, and easy to watch.
The right tools make all the difference.
Camtasia gives you a simple way to capture your presentation, webcam, and audio in one place. Easily trim out mistakes, rearrange sections, and add polish without needing a background in video production. Want to tighten your narration or clean up your audio? Camtasia Audiate lets you edit your voice track as if you were editing a document. You can even create AI-generated voiceovers or use avatars when staying off camera makes more sense for your content.
Make Camtasia your one-stop partner for decks that engage and deliver!
FAQs
How do you record yourself presenting a deck?
Start with a clear slide deck and a recording tool that can capture your slides, narration, and webcam if you want to appear on screen. Record in short sections so it is easy to fix mistakes without starting over. Then edit the recording for clarity, add any needed callouts or zooms, and share it on a platform your audience can access.
Should you appear on camera or use an AI avatar?
Use your own face and voice when trust, connection, or personal context matter most. An AI avatar can be a better fit when you need speed, consistency, or repeatable delivery across multiple videos. The best choice depends on your audience, the kind of content you are presenting, and what you want viewers to take away.
What do you need to get started?
At minimum, you need a well-organized slide deck, recording software, and a way to capture audio. If you want to be on camera, add a webcam and microphone that clearly capture your face and voice. If you prefer to stay off camera, you can use voiceover or an AI avatar instead.
What should you do after recording a presentation deck?
Choose a hosting option that fits your use case, access needs, and viewer experience. Invite feedback so you can spot confusing sections and improve future versions. As your message changes, update the video by re-recording only the sections that need to be refreshed.
Share