


Boom mics. B-rolls. Background removal. These are some of the terms you may overhear when collaborating on a video production project. This jargon can leave you feeling lost if you’re not familiar with it. Technical terms, industry slang, acronyms — they all get tossed around casually during pre- and post-production and on set.
Learning the language ahead of time gives you a great way to build confidence and collaborate more effectively with others. When you’re setting up gear and adjusting audio or diving into software like Camtasia, knowing (and using) the right terms makes the entire process go more smoothly.
Think of the following glossary as your field guide. We’ll break down video production terms, explaining what they mean and how to apply them, while also showing how they can help you create better videos.
Pre-production terms that shape every project
There’s a lot that goes on before turning on any cameras. Pre-production is the stage where you and your team shape ideas and organize your plans. It’s also a good time to tackle potential problems before they happen on camera.
Doing this kind of careful planning upfront helps you get set up for success, saving you time and reducing the need for reshoots. You get smoother recordings and a production that stays on track — a big plus for repeatable training content or teams with tight schedules.
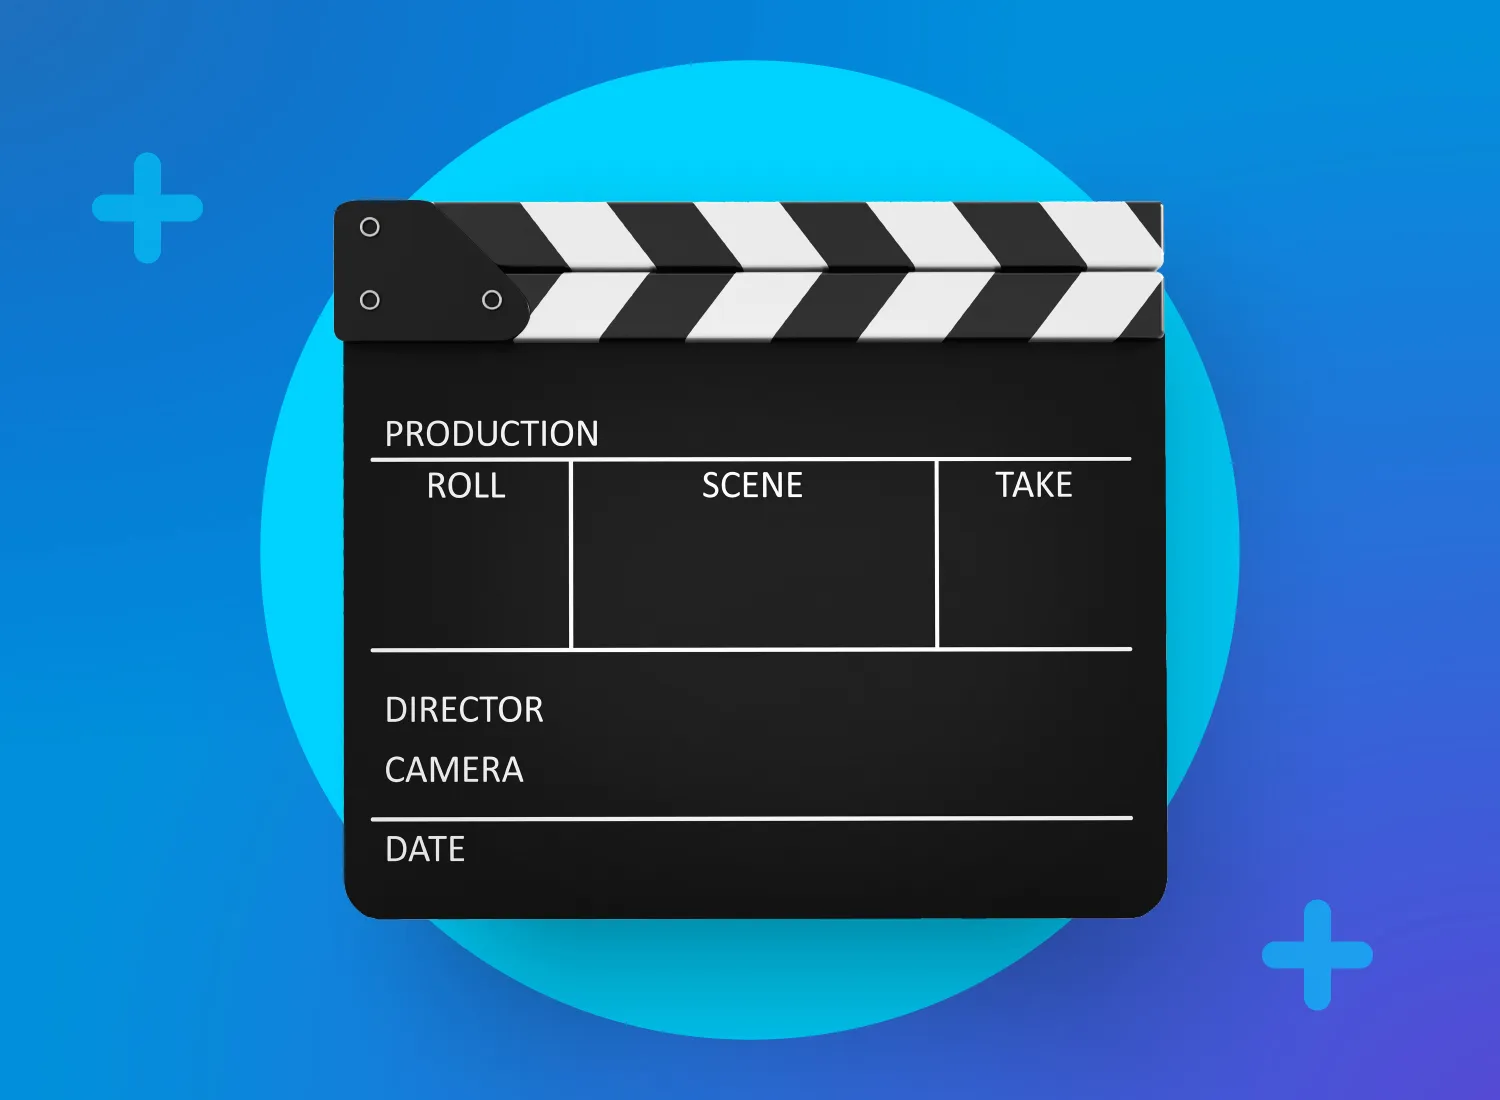
Script, screenplay, and storyboard
It’s easy to think of these terms as interchangeable. But they actually serve different roles in the video creation process.
- Script: A video’s written text that covers what’s going to be said and when (and sometimes how)
- Screenplay: A more detailed type of script for complex or team-based video projects and filmmaking, with elements like camera cues and actions
- Storyboard: A visual roadmap showing each scene of a video panel by panel for planning purposes
Think of it this way:
- You might script an onboarding module to make sure every key point is covered.
- Your team could design a short screenplay for a customer de-escalation scenario.
- You could sketch frames for an animated explainer storyboard.
While you can create in-depth storyboards, even basic ones can make a huge difference, helping you stay on track and reduce stress while you create. With tools like Camtasia, you can even use scene-based editing as a lightweight, built-in storyboard to guide your project.
Go from screen recording to polished video
A screen recording is just the start. Camtasia’s editor helps you add the callouts, animations, and edits you need to create a truly professional video.
Free Download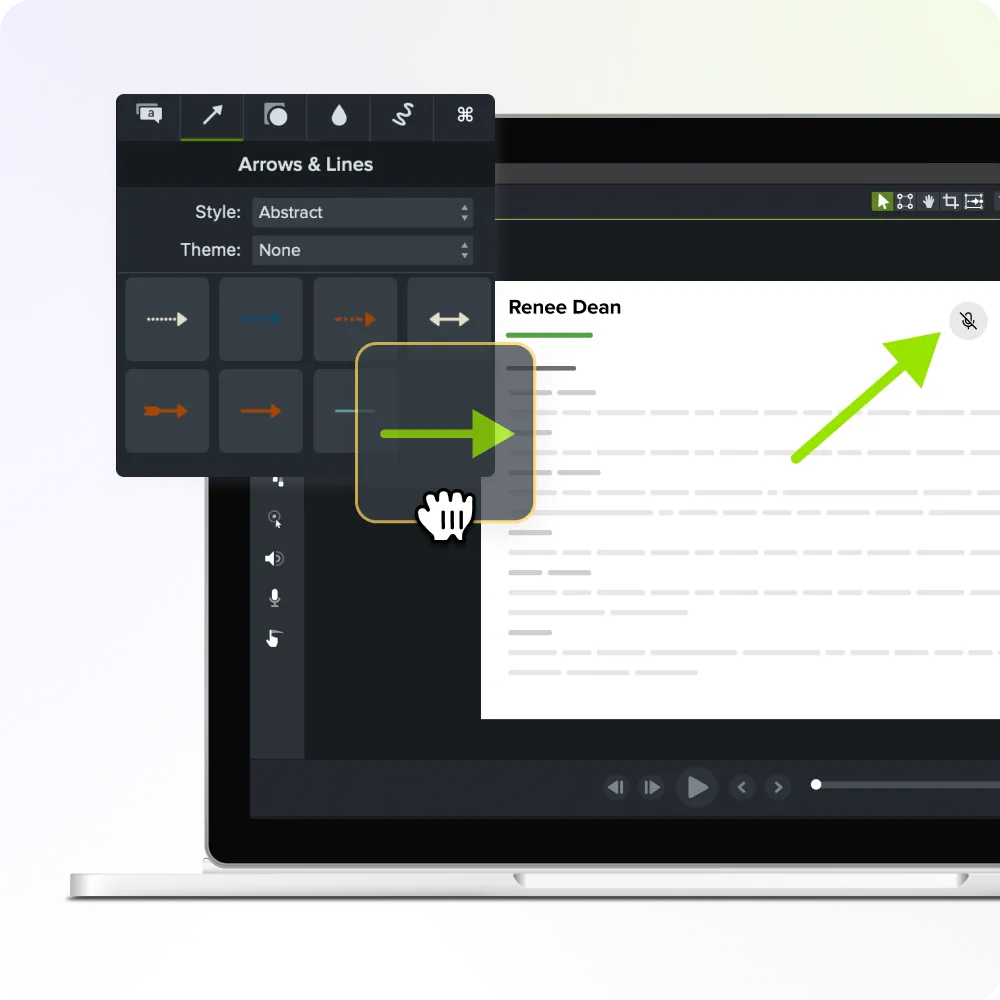
Shot list and shot list template
A shot list maps out every detail of your video before you hit record, keeping your project organized and efficient. It’s a smart way to avoid confusion and missed footage.
Most shot lists include fields like:
- Scene number: Where the shot falls in the sequence
- Camera shot: The type of angle or framing to capture
- Location: Where the shot takes place
- Notes: Relevant reminders or special instructions
- Estimated duration: How long the shot should be
Even small projects benefit from this simple structure. Using a shot list template makes it even easier, especially for TechSmith workflows, like recording software tutorials in clear, logical segments.
Shooting schedule and shoot day
A shooting schedule is your master plan for filming day, outlining when you’ll shoot each scene and how the day is structured.
A typical shoot day starts with a call time when everyone’s expected to arrive on set. It also includes setup time for equipment checks and adjustments and finishes with a wrap — the official end of filming.
Professionals build shooting schedules with care to keep everything running smoothly. Lighting’s a top factor. Outdoor scenes are timed for the best natural light, while indoor shoots allow for setup and adjustments.
Planning also factors in time constraints, like grouping scenes based on location or setup to cut down on delays. And there’s also crew coordination, with each team — camera, sound, set — getting the time needed to prepare.
Even if you’re working solo, the same principles apply, especially if you want to batch-record multiple videos in one session. It’s a much more efficient way to stay productive. This kind of preparation really pays off when using Camtasia to record voiceover and screen simultaneously. A clear schedule means you’ll capture polished, consistent results without added stress.
On-set terminology every creator should know
You’re done planning, and now it’s time for the on-set action to begin. You’ll hear a lot of terms on set and during recording that may be new to your ears. They’re a big part of streamlining production and minimizing mistakes to create more professional-looking content. We’ll explain these key terms below.
Crew members and their roles
Each crew member has a specific job in larger productions. But in smaller setups, one person usually wears many hats — or even all of them. Understanding these roles is helpful, whether you’re collaborating on professional shoots or organizing your own solo projects.
- Director: Guides creative vision and the overall flow of the video
- Producer: Manages resources, scheduling, and logistics
- Cinematographer: Handles the camera work and visual style
- Gaffer: Sets up and manages the lighting
- Boom operator: Captures clear audio with a boom mic
Tools like Camtasia allow you to combine many of these tasks — editing, audio, camera movement — in one streamlined platform.
Faster video creation with Rev
Make videos as easy as click, click, done! Camtasia Rev is so fast it’s like magic!
Learn More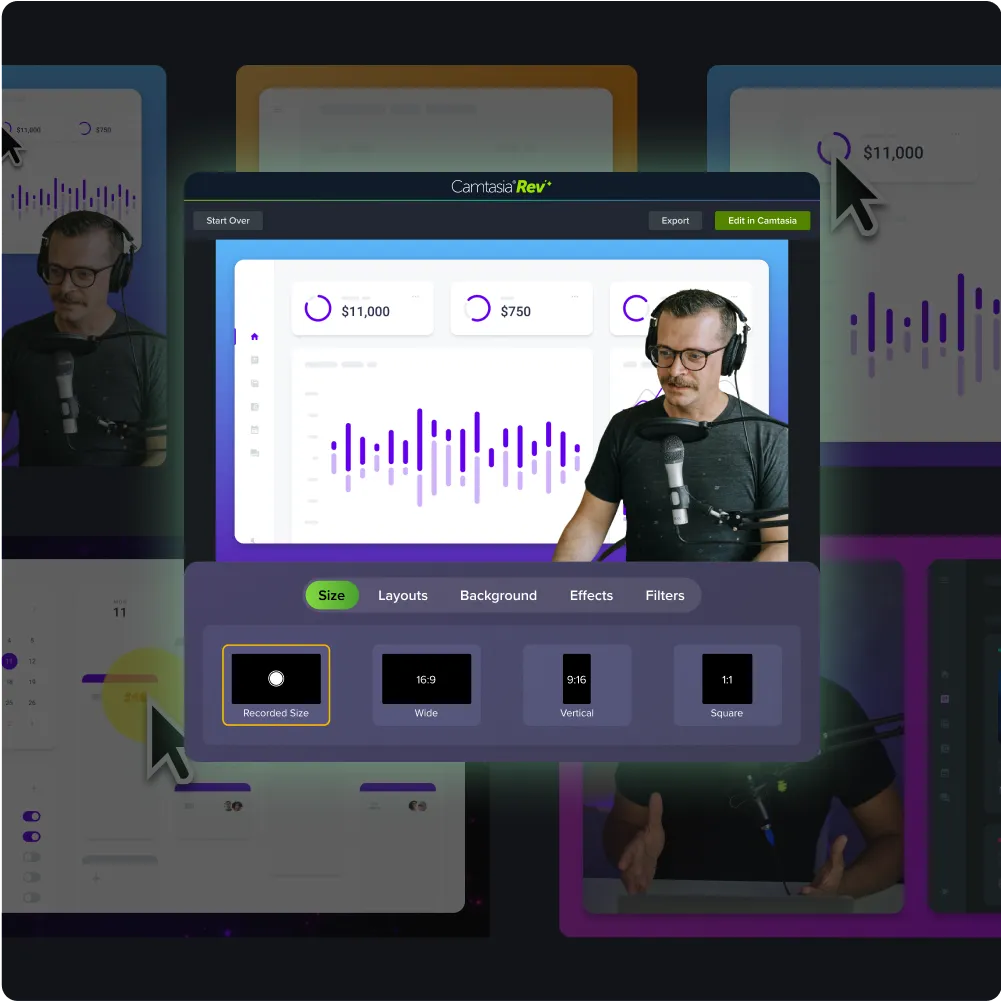
Camera shots and shot size (wide, medium, close-up, extreme close-up)
A camera shot is how much space your viewers see overall within each frame, while shot size means how much of your subject or setting shows in each shot. Picking the right type helps guide your viewers’ attention and keeps them engaged.
Some common shot sizes you may want to use in explainer or training videos include:
- Wide shot: Capture the whole scene or environment; great for an establishing shot or intro
- Medium shot: Frame your subject from the waist up; ideal for explanations or demos
- Close-up: Focus on a face or object; perfect for highlighting details or reactions
- Extreme close-up: Zoom in on very small details, like button clicks or other user interface (UI) elements
With Camtasia, you can simulate zooms or shot changes in the editing process — no extra cameras required.
Camera moves (pan, tilt, zoom, dolly)
Camera moves are a great way to add emotional impact and focus to your videos. A few commonly used camera moves include:
- Pan: Rotates the camera horizontally; great for scanning across a slide deck or showing a wider scene
- Tilt: Moves the camera vertically; useful for revealing tall objects or emphasizing top-to-bottom changes
- Zoom: Adjusts the lens to make your subject appear closer or farther away; perfect for highlighting an error message or a detail in a UI
- Dolly: Moves the camera physically toward or away from your subject; ideal for adding point of view (POV) immersion or depth of field
Even if you’re editing rather than filming, you can apply these moves in post-production. Software like Camtasia lets you simulate pans and other moves after recording, adding professional polish without needing extra filming equipment.
Lighting and sound basics (key light, fill light, lavalier, boom mic)
Sound and lighting play a big role in creating effective training videos. Good lighting can build trust, while poor audio can drive viewers away.
Some terms related to these include:
- Key light: The main light on your subject that sets the mood and positions your focus
- Fill light: Softens key light shadows for a more balanced look
- Ring light: A circular light for softer, balanced lighting
- Lavalier mic: Small clip-on mic that’s ideal for clear, hands-free audio
- Boom mic: Suspended mic that captures dialogue or ambient sound
Affordable setups, like a ring light and a lavalier mic, can drastically improve quality without breaking the bank. And Camtasia’s Audiate tools make voice editing simple, offering background noise removal and sound clarity enhancements for crisp, professional narration.
If you can edit a doc, you can edit a video
Stop fearing the timeline. Camtasia Audiate transcribes your recording so you can edit your video just by editing the text.
Free Download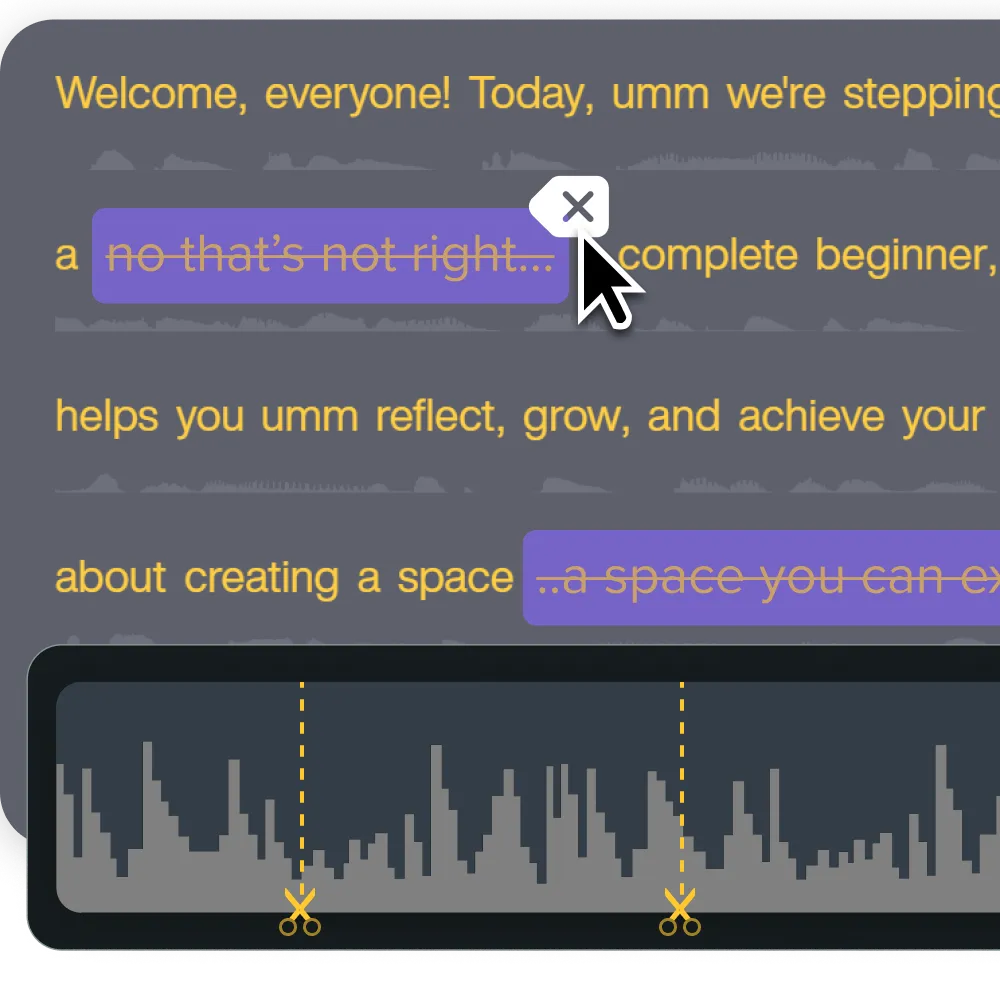
Key post-production terms (and where TechSmith tools fit in)
Filming’s done, and it’s time to polish everything up and shape the final product. Below, we’ll go over some key terms used during the post-production stage and explain how platforms like Camtasia help you handle these tasks.
B-roll and cutaways
B-roll and cutaways make videos feel more dynamic and professional.
- B-roll is the extra video footage that adds visual interest to your A-roll main content.
- Cutaways are shots that you can add to cover edits or make smooth transitions.
For educators, a few practical B-roll options include extra on-screen recordings, short UI walkthroughs, or relevant stock footage that supports key points.
With Camtasia, you can easily layer video clips and adjust the timing to create seamless primary footage.
Timeline, track, and layering
In any video editor, you’ll see a standard layout:
A timeline represents your project’s flow from start to finish, laid out horizontally so you can see the order of clips and edits.
Tracks are stacked vertically, letting you place different elements, like video, audio, or text, on separate lines.
Layering is how these tracks work together, determining which elements appear on top or play at the same time.
Camtasia makes this entire layout intuitive, even if you’re new to video editing. You can drag and drop clips onto tracks, allowing you to easily arrange and layer them and preview how everything fits.
Transitions, effects, and motion graphics
These elements can add a ton of visual appeal and professionalism to your videos.
Transitions are visual effects or elements that bridge the gap between clips for a better flow and fewer jump cuts.
Special effects enhance visuals or audio, while motion graphics add animation, like icons or text.
For best practices when making training videos, consider using a fade to signal a topic shift or a cursor highlight to draw attention to certain clicks. Or you might use lower thirds to introduce a speaker. The key is moderation — too many visual or sound effects can overwhelm your viewers.
Camtasia simplifies this process, giving you built-in motion graphics templates and easy-to-apply transitions to keep videos clear and engaging.
Voiceover, ADR, and AI voice tools
Now let’s turn to audio terms.
A voiceover is narration that’s recorded separately from visuals, usually to explain something or add clarity in post-production.
Automated dialogue replacement (ADR is when you rerecord original audio to fix unclear lines or improve sound quality.
With Camtasia Pro, you have access to powerful AI voice tools that make editing narration easier. Features like text-based editing let you make quick changes to spoken words. And voice cloning helps you maintain a consistent tone without needing repeated retakes.
Instant lifelike AI voice over
No voice over? No problem. Audiate generates incredibly life-like voice over right from your script!
Get Audiate
Advanced concepts for team collaboration and training efficiency
Whether you’re creating multiple videos as an individual or as part of a team, knowing advanced production terms can make a world of difference. It helps improve collaboration and communication, while speeding up workflows and ensuring consistent quality. This knowledge is even more helpful when you use tools like Camtasia and Snagit across departments. We’ll walk you through some of these more advanced concepts.
Frame rate, resolution, and aspect ratio
Understanding certain guidelines can help you create engaging videos.
Frame rate refers to the number of images shown per second. A rate of 30fps is standard for smooth playback, while higher rates are better for action-heavy content.
Resolution refers to video clarity, with 1080p being the go-to for sharp, professional results.
Aspect ratio refers to the shape of the frame: 16:9 works best for making YouTube videos or creating content on most training platforms.
A few tips for consistency: record all lessons with the same settings, use branded templates for intros and outros, and avoid mixing resolutions. Camtasia gives you a convenient way to do this with export settings and aspect ratio presets that keep videos uniform across modules and lessons.
Green screen, chroma key, and background removal
A green screen is a solid-colored background (usually green) placed behind your subject during filming.
Chroma keying is an editing technique that removes a color, commonly green or blue (a green screen is a common use of the chroma key technique), allowing you to remove a background.
Background removal replaces the background with a still image, clean backdrop, or video.
These techniques are especially useful for adding a clean, distraction-free background behind a speaker, placing them in a branded virtual environment, or overlaying them on slides.
For internal training, consistent backgrounds can build trust and reduce visual clutter, making videos easier to follow. That also supports accessibility, keeping the focus on the presenter and content, not distractions.
Camtasia’s drag-and-drop green screen feature allows you to quickly apply these techniques in your own videos.
File formats and codecs (MP4, MOV, AVI)
Video file formats like MP4, MOV, and AVI determine how video data is stored and shared. Codecs handle how that data is compressed and played back. Be careful with compression: while it reduces file size, it can also affect sharpness and audio clarity.
Here’s when you might use different file formats for training videos:
- MP4 (the most common format) to balance quality with smaller file sizes and share videos on nearly all kinds of devices and platforms
- MOV for storing and sharing videos mainly in Apple environments (but also compatible with Windows in many cases)
- AVI to create larger files that support high quality and minimal compression
With Camtasia, you get an easy way to export files, with format options tailored to YouTube, LMS platforms, internal servers, and other platforms.
Feedback loops, review cycles, and versioning
Producing professional-quality videos is a learning process that gives you opportunities to keep improving your content and skills.
Feedback loops are an ongoing process that involves receiving and implementing input on videos.
Review cycles are periods when team members evaluate drafts
Versioning tracks every iteration, keeping changes organized and accessible.
In practice, reviewers comment on draft edits and suggest improvements, highlighting inconsistencies or other issues. Creators update the video based on this feedback and track revisions.
Tools like Snagit and Screencast streamline this process, allowing easy sharing, annotations, and version control to help teams collaborate more efficiently.
Annotate and edit screenshots with Snagit
Professional mark-up tools and powerful features make it easy to create helpful images.
Try it Free
How to use this glossary to improve every project
The video production process has a lot of moving parts and different elements to keep track of. Bookmarking this glossary and referring back to it throughout your projects can save you time and prevent mistakes.
We recommend organizing your learning or review around the three key phases: pre-production, on-set, and post-production. This approach helps you apply the right techniques at the right stage while keeping your workflow in good order.
Understanding these concepts also helps you make the most of TechSmith tools, whether you’re planning a smoother Camtasia recording session or collaborating with colleagues on training content.
Put these video production terms to work
Familiarizing yourself with these video production terms is a great start. Now it’s time to put them into practice.
TechSmith’s tools, like Camtasia and Snagit, make video production accessible to creators at all skill levels, from beginners to professional videographers and production companies.
Combining powerful editing software, screen recording, intuitive workflows, and other features removes a lot of the complexity from production. Whether you’re batch-recording training content or working on a team project, these tools help you apply best practices, streamlining every stage of production and delivering professional, polished videos for your viewers. Ready for a seamless video production process? Start using TechSmith’s tools today!
Share