


You wrapped up a live webinar. Before that recording goes out to attendees or gets posted online, though, it could use a little love. Raw recordings almost never publish well as-is. Awkward pauses, background noise, screen hiccups, and the occasional stumble come with the territory.
Edited recordings reach people who missed it, work as training or onboarding content, and stay useful well past the live date. Editing a recorded webinar means trimming the rough edges, improving your audio and visuals, and turning that footage into something people will actually want to rewatch.
But you don’t need a video production background to pull it off.
Camtasia makes the whole process approachable with editing tools built for real people, not just professional video editors. We’ll walk through every step below, from importing your recording to exporting something you’re proud to share.
Key takeaways
- Importing webinar recordings into Camtasia Editor takes seconds with direct Zoom integration or manual file import, and separating audio, screen, and camera tracks gives you full control over each element.
- Trimming dead space and removing filler words with text-based editing can cut your webinar length significantly while improving viewer engagement and retention.
- AI noise removal helps transform amateur-looking recordings into polished, professional videos without manual audio scrubbing or complex effects.
- Adding branded intros, outros, and captions makes your webinar accessible to more viewers while reinforcing your organization’s visual identity.
- Exporting in the right format and resolution ensures your edited webinar plays smoothly across platforms, from internal LMS systems to social media channels.
Why edit your recorded webinar?
Most webinar recordings aren’t ready to publish the moment the live sessions ends. A presentation that worked well in real time can feel slow or distracting on replay, especially when viewers have to sit through long pauses, technical glitches, off-topic tangents, or uneven audio.
Editing webinars turns that raw recording into content people actually want to watch.
Tightening the pacing keeps viewers engaged, while cleaner audio and clearer visuals make your message easier to follow. Small upgrades can also make the final video look far more polished and professional.
Well-edited webinars have benefits like:
- Removing distractions, like false starts, awkward pauses, and unnecessary tangents that cause viewers to lose focus
- Improving audio quality by reducing background noise and balancing volume levels for easier listening
- Adding visual polish with captions, branding, annotations, and zoom effects that guide viewers through important points
- Extending the lifespan of your content by repurposing the webinar into training videos, short social video clips, or onboarding materials
Quick checklist before opening Camtasia Editor
A little prep upfront saves time later and helps you avoid the most common frustration: realizing mid-edit that you’re working with the wrong file, or having to scrub back and forth because you didn’t jot anything down.
Even simple habits make the editing process feel faster and far less overwhelming, especially if you’re new to video editing.
Let’s walk through a few quick prep steps that make the rest of your Camtasia workflow easier from the start.
Go from screen recording to polished video
A screen recording is just the start. Camtasia’s editor helps you add the callouts, animations, and edits you need to create a truly professional video.
Free Download
1. Confirm recording format and resolution
Take a minute to check your webinar file details before importing anything. Most platforms, like Zoom and Microsoft Teams, export recordings as MP4 files. Since Camtasia handles these natively, you can usually drag the file straight into your project without converting it first.
Check your recording resolution, too. If your webinar was captured in 1080p, match your project settings to it so the final export stays sharp. Mismatched dimensions can lead to blurry playback or distracting black bars around the video.
While you’re at it, confirm where the recording was saved. Webinar platforms often store files in cloud folders, downloads, or local directories that are easy to overlook.
2. Back up the raw file
Before cutting clips or adjusting audio, save a copy of your original recording somewhere safe (an external hard drive or cloud storage works well). It only takes a minute, but it can save you from a real headache if a file gets corrupted or accidentally deleted during editing.
A simple folder structure makes projects much easier to manage as files start to pile up. Separate folders for raw recordings, project files, and final exports keep everything organized from start to finish.
Camtasia Editor performs non-destructive editing, so your original recording isn’t touched while you work. Still, having an untouched backup is good peace of mind, and it makes repurposing the webinar later a lot easier.
3. Note key timestamps to keep or cut
For longer webinars, a quick preview pass pays off. Watch at 1.5x speed and note where the energy drops, where key points land, and where sections can be trimmed.
Jot down timestamps as you go instead of trying to remember later. Something as simple as “cut 12:30-14:15” or “zoom on slide at 22:00” gives you a clear roadmap once you’re in the timeline. It turns editing into a guided process rather than guesswork, which is especially useful with hour-long recordings or multiple speakers.
Camtasia’s Audiate integration makes it simple to edit audio using text. Just pull up the automatic transcription, delete a word or phrase, and the corresponding audio gets eliminated from the video.
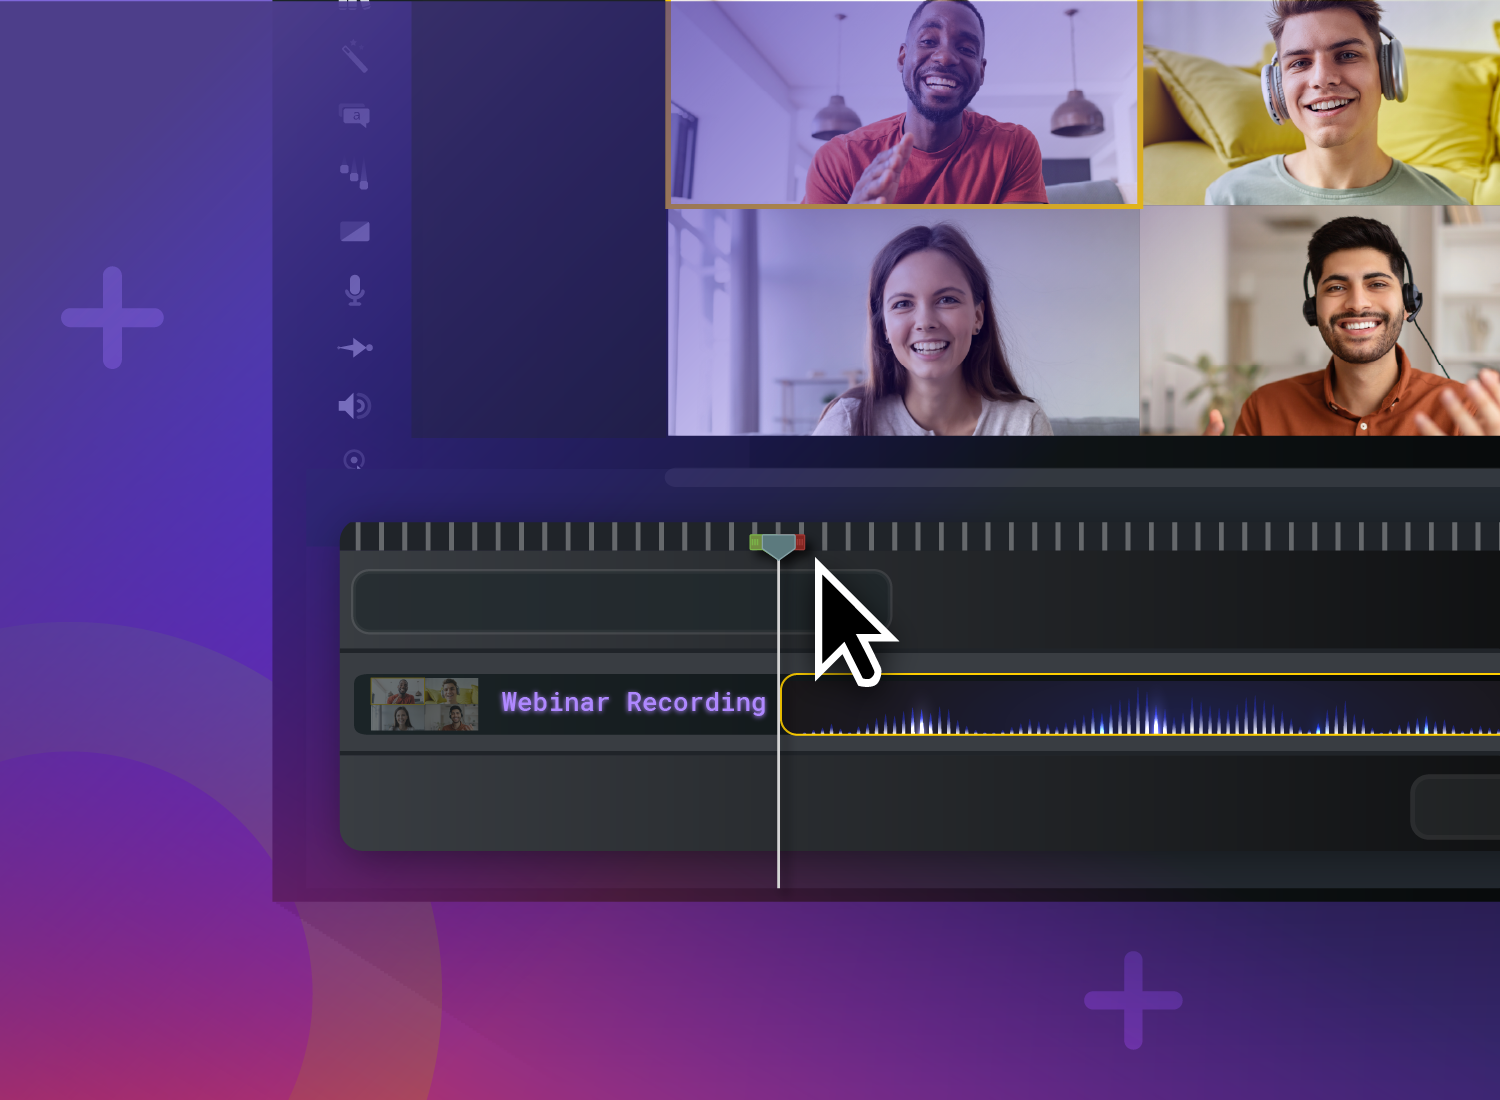
Importing your webinar recording into Camtasia Editor
Getting your webinar into Camtasia Editor is quick and straightforward, usually just taking a few clicks to bring your recording into the editor. Most of the technical setup happens automatically, so you can focus on shaping the content rather than worrying about file compatibility or settings.
From here, you’ll typically take one of two paths, depending on how your webinar was recorded: importing directly from a platform like Zoom or manually bringing in a saved file from your computer.
Use direct Zoom integration or manual import
If your webinar was recorded on Zoom, you can pull the recording into Camtasia Editor using its integrations, with no downloading or re-uploading required. That’s a nice timesaver when you want to move quickly from recording to editing.
Working with a saved file? Manual import is just as easy. Drag and drop the video into Camtasia Editor’s media bin, or use File > Import > Media if you prefer a more structured approach. Either way, your footage ends up on the timeline.
Camtasia Editor supports most common webinar formats, including MP4, MOV, and AVI, so you typically won’t need to convert anything before you start.
Separate audio, screen, and camera tracks
When you import a Zoom webinar into Camtasia Editor, it splits into separate tracks (screen recording, camera feed, audio), so you’re working with individual layers rather than a locked, flat video file.
That separation gives you a lot more control. Here’s what you can do with each track:
- Audio track: lower, clean up, or apply noise reduction without touching the visuals
- Camera track: crop, reposition, or reframe the speaker independently
- Screen track: trim or zoom into specific sections without disturbing everything else
This layered structure makes webinar editing feel much more manageable. You can refine each element on its own, which reduces accidental changes and produces a cleaner, more intentional final video.
If you can edit a doc, you can edit a video
Stop fearing the timeline. Camtasia Audiate transcribes your recording so you can edit your video just by editing the text.
Free Download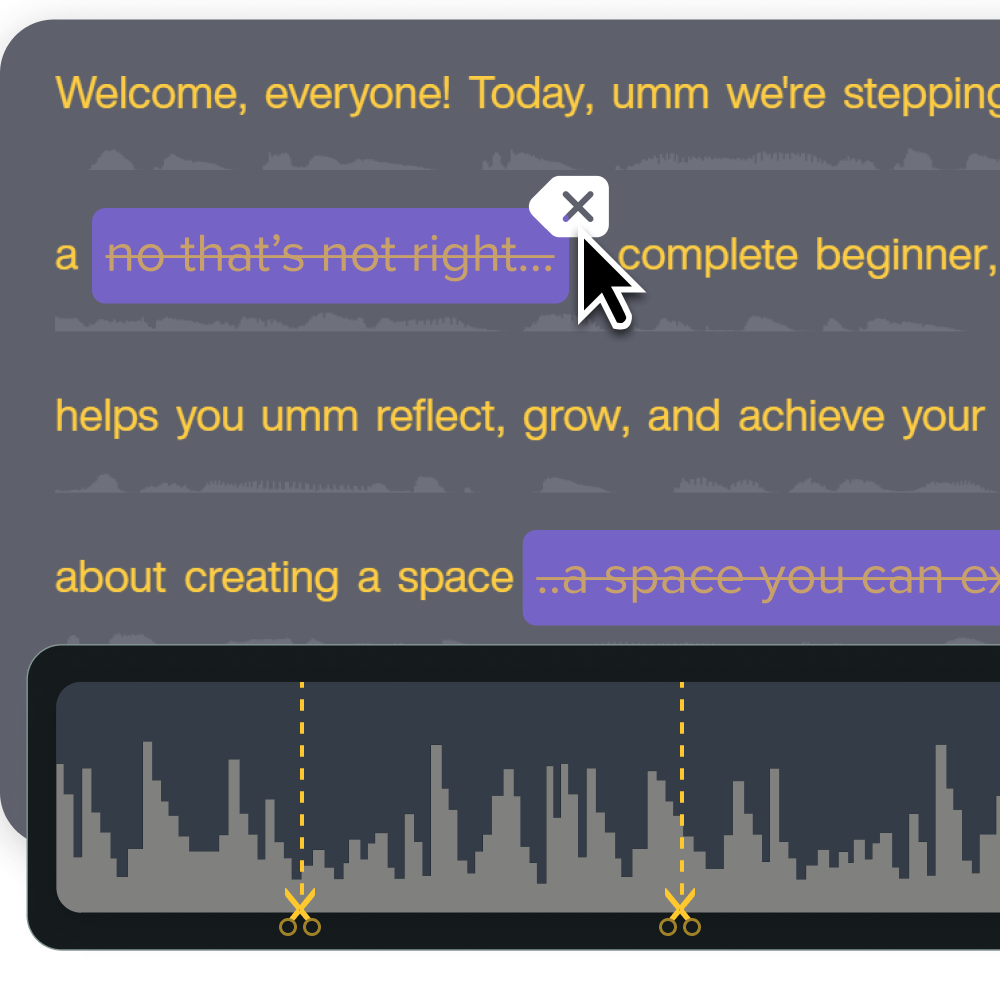
Step-by-step editing workflow in Camtasia
Here’s where your raw footage turns into something polished and ready to share. Work through these stages in order to stay organized and avoid rework. Each one builds on the last, so the process stays manageable even with longer recordings.
1. Trim dead space and false starts
Trimming is the most impactful edit you can make. It tightens pacing and cuts run time without removing any real content, and the result feels noticeably more polished.
In Camtasia Editor, the process involves moving the playhead to the section you want to remove, splitting the video clip at the start and end points, selecting the unwanted segments, and deleting it from the timeline. You can also use Clip Speed for slower moments like page loads to maintain flow without affecting voice clarity.
Good things to trim:
- Pre-webinar chatter and “can you hear me?” checks
- Long pauses between speakers or during transitions
- Retakes, so only the cleanest version of a sentence makes it to the final video
- Anything after the webinar officially wraps
2. Clean up speech and background noise with text-based editing + AI audio tools
Audio cleanup in Camtasia Editor gets much faster with text-based editing in Camtasia Audiate, where you edit the transcript to refine the recording rather than scrubbing through the timeline. You can spot and remove filler words (like “um” or “uh”), cut repetitive phrases, and smooth out awkward pauses while keeping the delivery sounding natural.
AI noise reduction handles the background stuff: fans, air conditioning, keyboard clicks. It reduces those steady sounds while keeping the speaker’s voice clear and present. Compression and leveling finish the job, so quieter sections stay audible and louder moments don’t spike.
3. Add Pan-and-Zoom effects
Pan-and-zoom effects help guide viewers’ attention to the parts of the screen that matter most. That’s especially useful for webinars with small text, spreadsheets, charts, or detailed software demos that can be hard to follow at full scale.
Zooming in on key areas and panning as the focus shifts makes content easier to follow without interrupting the flow of the presentation. It’s a simple touch, but it noticeably improves the viewing experience.
4. Insert branded intro and outro
A short branded intro and outro can make a webinar feel structured and complete, even if the content itself is fairly simple. A clean title screen sets context right away; a closing slide gives the session a clear finish.
You don’t need advanced design skills for this — Camtasia Editor’s text, shapes, and basic animation tools are enough to build a professional-looking intro in minutes. Even minimal branding, like a logo and title, can go a long way.
Turn these elements into reusable templates to save time on future recordings. Every webinar gets a consistent look and feel without rebuilding the design each time.
5. Add captions for accessibility
Captions make your webinar accessible to more people than you might expect. Yes, they help viewers with hearing impairments, but they also help anyone watching on mute, in a noisy space, or on mobile.
You don’t have to start from scratch. Camtasia Editor can auto-generate captions from your audio, so you just review, fix any small errors, and confirm the timing.
Once they’re in, captions also keep viewers engaged during complex or fast-moving sections, since they can read along rather than try to catch every word.
6. Export and share on demand
Exporting is the final step. MP4 is the safest choice for most use cases: most platforms support it and quality stays consistent. Before you export, double-check that the resolution matches your project.
From there, distribution depends on your audience:
- Upload directly to a video platform or internal tool for easy sharing
- Save locally for use in a learning management system (LMS) or company training library
- Export shorter clips from the same project for social media or email campaigns
Before finishing, save your Camtasia project file so you can easily return to it later if you need to make updates, adjust sections, or create shorter clips without rebuilding the edit.
Bring your webinars to life with Camtasia
Turning a raw webinar into polished, on-demand content doesn’t require a production background. All you need is a simple, repeatable workflow: import recording or use Zoom integration, trim it, clean up audio, add visuals, create captions, export it.
What makes Camtasia especially useful for this is how approachable each step feels, even if you’ve never edited video before. The tools are designed to guide you through the process rather than overwhelming you with complexity, so you can focus on the content itself, not the technical side of editing.
Ready to turn more webinars into lasting, high-quality content? Explore the full suite of Camtasia products.
Build your next training video with Camtasia
Record your screen or camera. Then, use the video editor to add polish and clarity.
Learn More
FAQs
Can I edit a Zoom webinar recording in Camtasia without file conversion?
Yes. Camtasia Editor imports Zoom MP4 recordings directly, and its Zoom integration lets you pull recordings in without any manual file transfer.
Does Camtasia auto-generate captions for webinars?
Yes. Camtasia Editor transcribes your audio and generates captions automatically. You can review and edit them before exporting.
How do I keep file size manageable after export?
Export at a resolution that matches your source footage and use compression settings to balance video quality with a reasonable file size for where it will be hosted.
Share