How to Record Your Webcam (Step-by-Step Guide)

Using a webcam recorder to add webcam footage to a video is a simple way to increase engagement and help viewers connect with your content.

Using a webcam recorder to add webcam footage to a video is an easy and effective way to increase engagement and help viewers better connect with your content.

Whether you’re trying to record webcam footage and add it to the corner of a training video or you want to start a video with a live introduction, this post will walk you through the steps to create a video from your webcam.

What is the best webcam recording software?

A webcam is a valuable and versatile tool in your video creation toolbox. You can use it to make YouTube videos, create instructional videos, and add personality to any other type of video.

When choosing software, you have two options: a dedicated webcam recorder, or a screen recorder. Now, we may be biased but we’d argue that a screen recorder is the better choice.

If all you need to do is make webcam videos, a simple webcam recorder might be enough, but if you are capturing a lecture, recording a live stream, or filming a webinar there’s a good chance that you’ll want to record your entire desktop, as well as your webcam.

That’s why we suggest using high-quality screen capture software, like TechSmith’s Camtasia, which comes with a full suite of editing tools, making it perfect for creating all types of video content. 

Because Camtasia is both a webcam recorder and a screen recorder, we’ll be using it throughout this step-by-step guide. If you haven’t already installed Camtasia, you can download a free trial here.

Easily Record your Webcam with Camtasia

Capture every move with our online webcam and screen recorder. From your browser – record yourself and your screen.

Try Camtasia for free
Camtasia icon

Here’s how to start recording your webcam

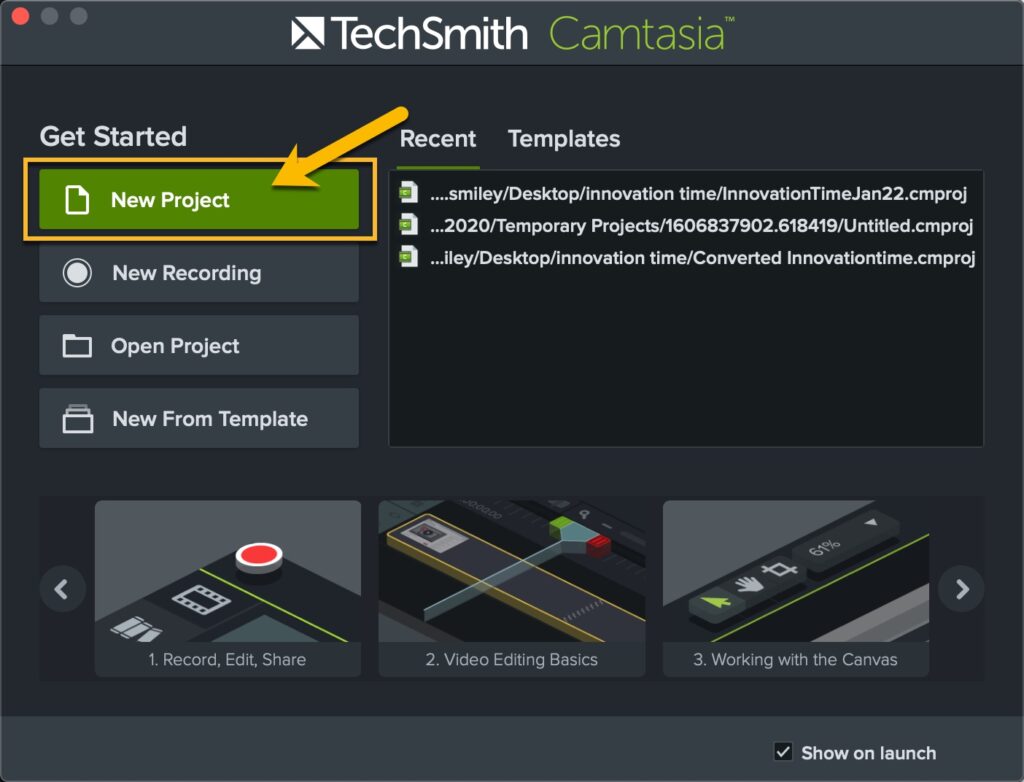
Step 1: Start a new project

Open Camtasia and choose New Project.

Step 2: Bring on the video

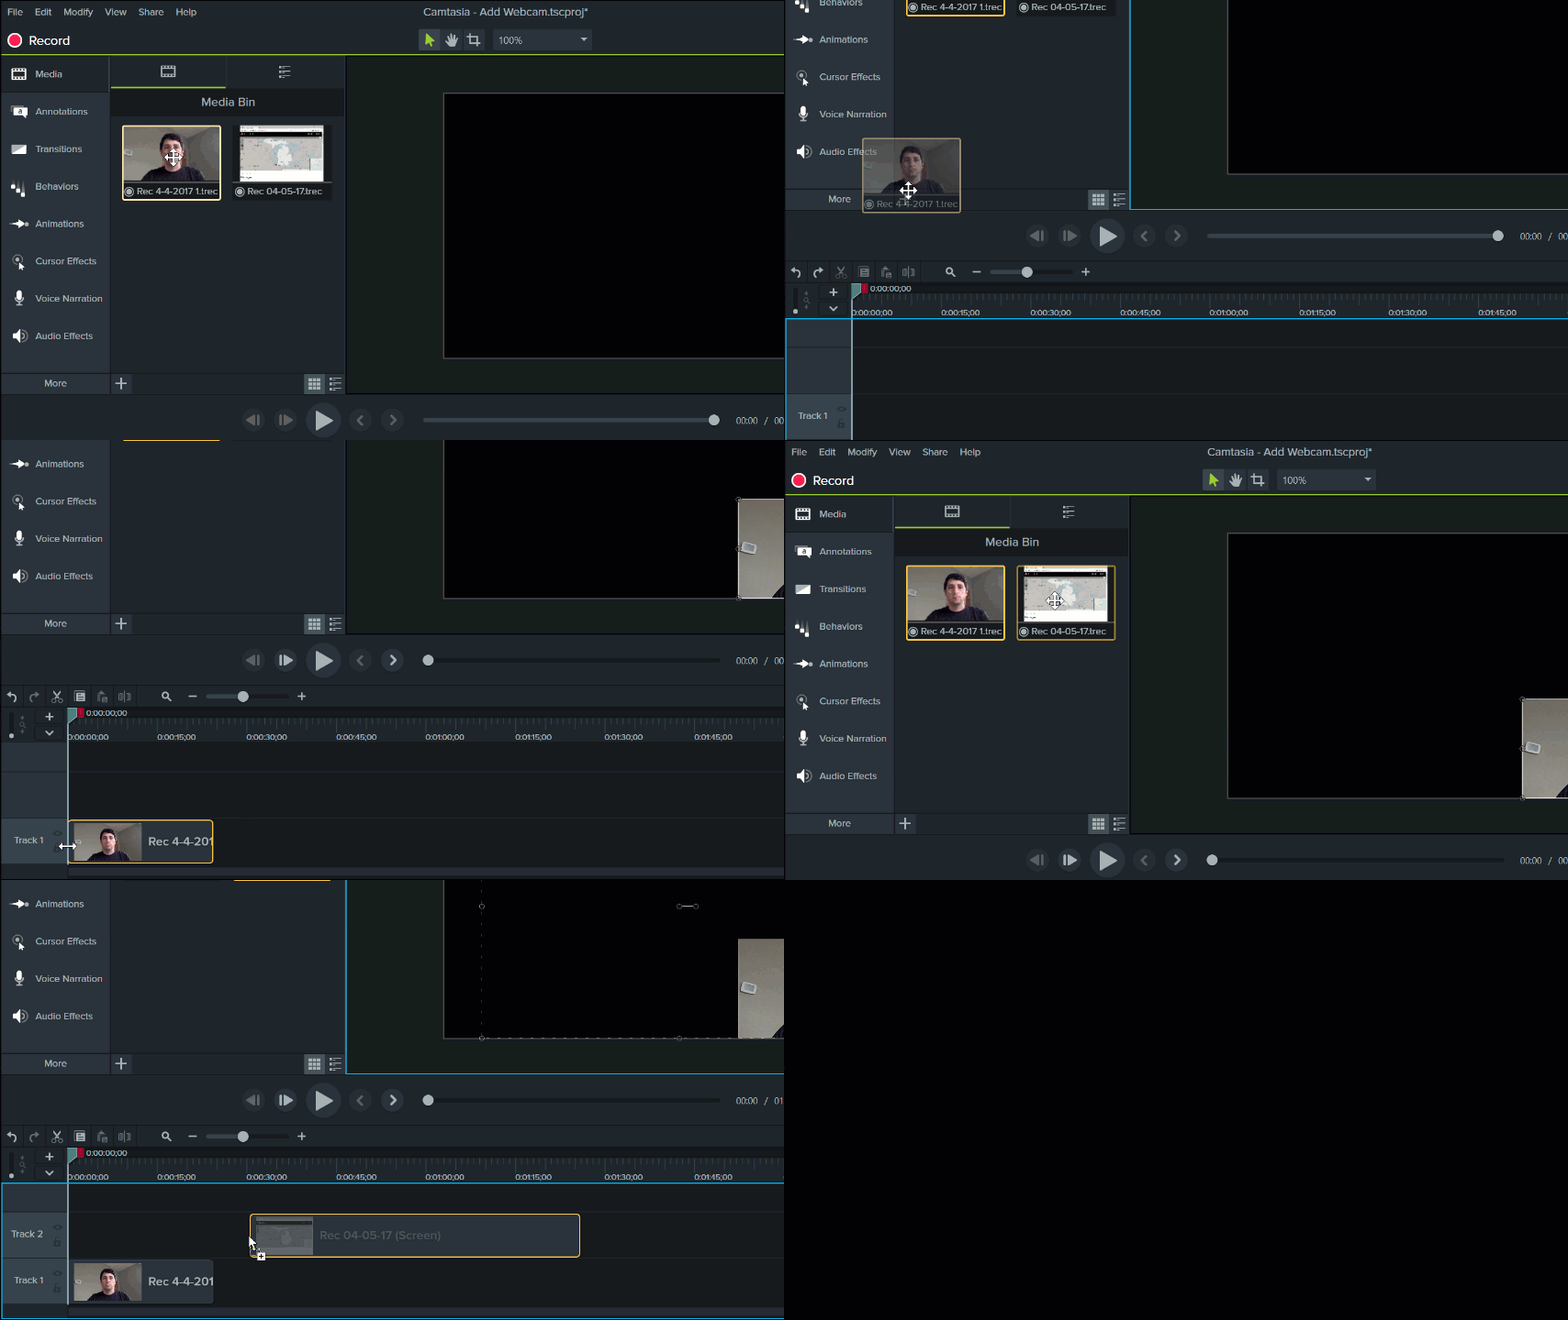
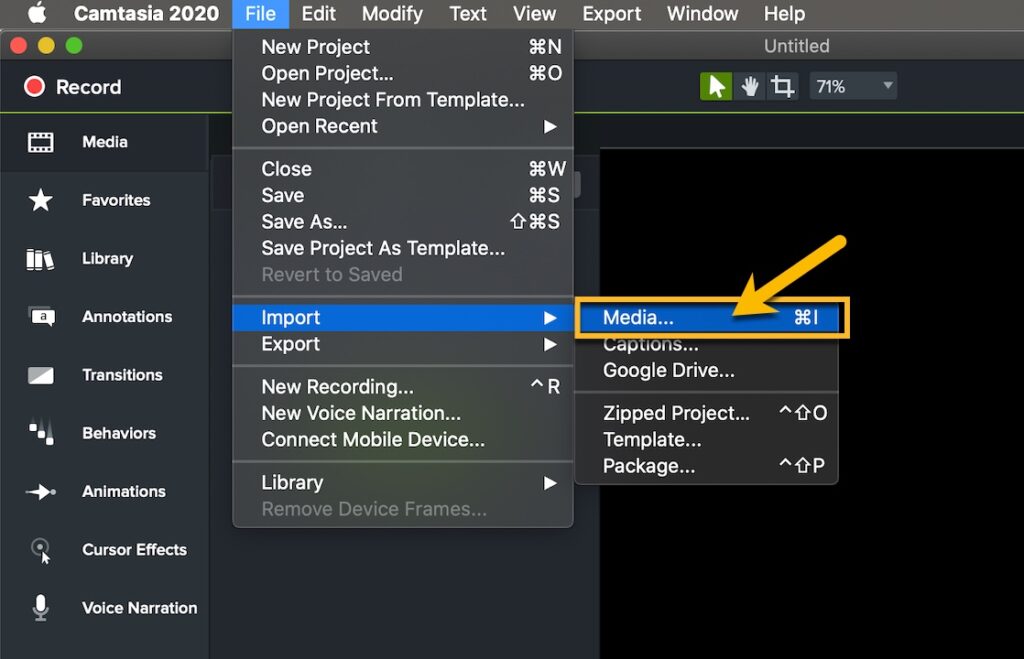
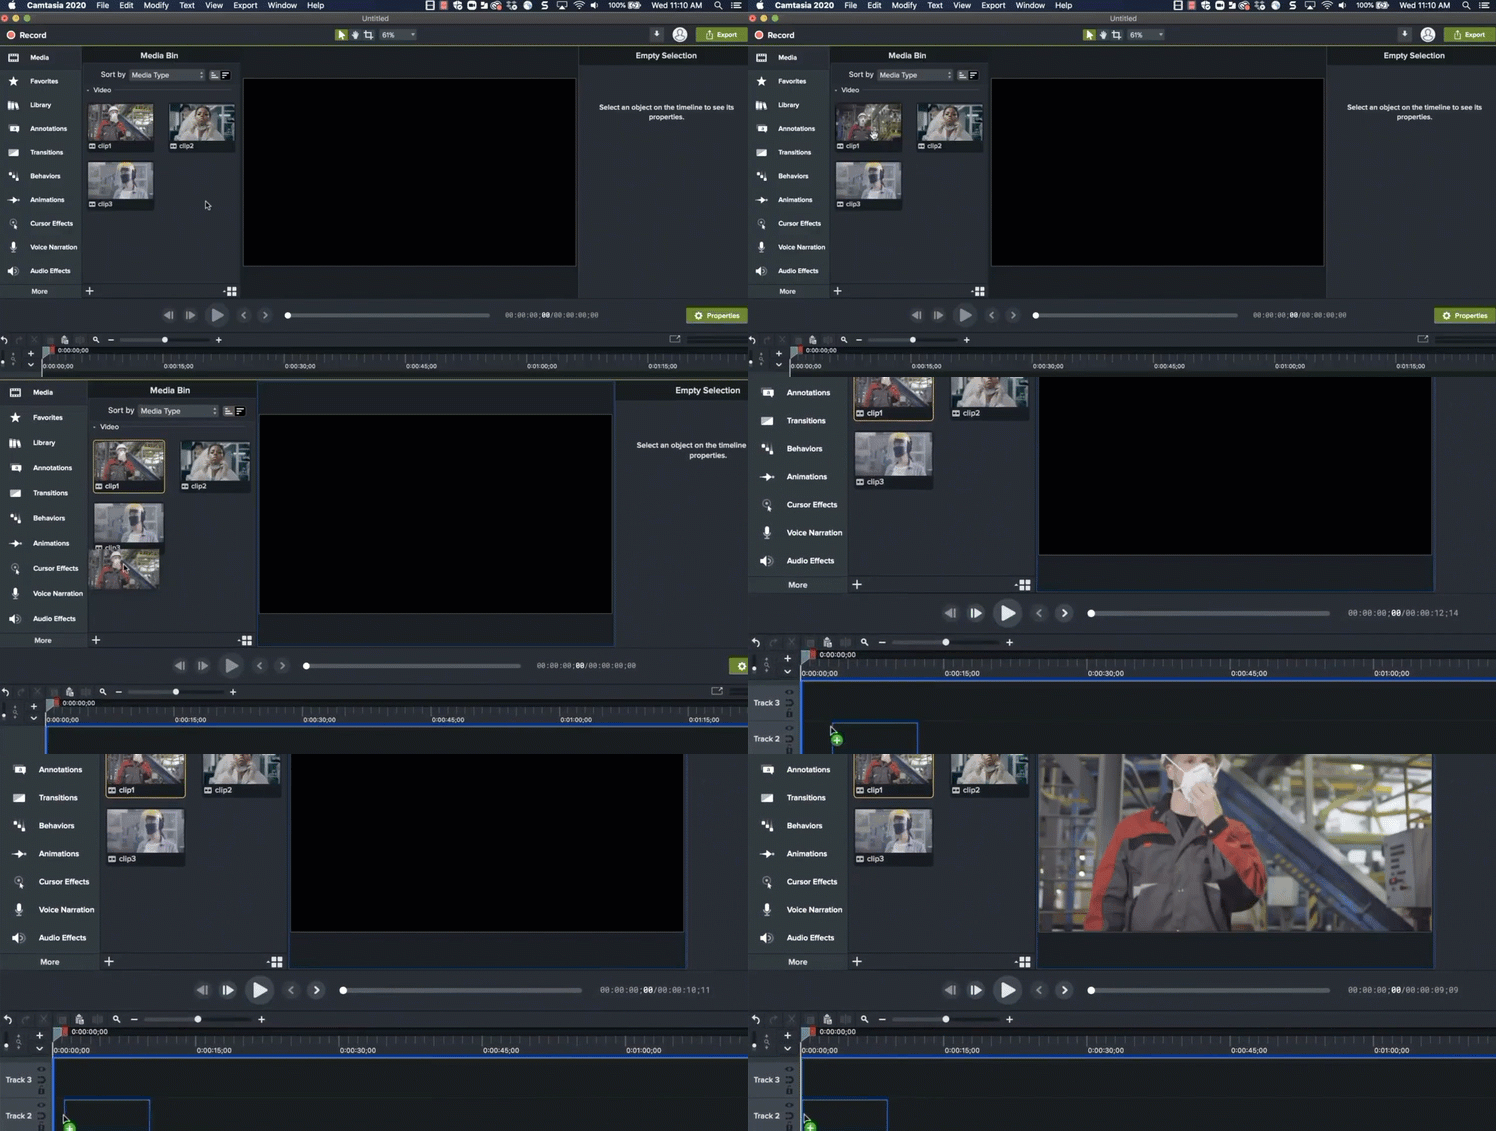
To start working with video and webcam footage, import it into Camtasia by choosing File > Import > Media.

Then, select the video and webcam footage you want to import and click Open. Camtasia will add your chosen videos to the Media Bin, where they’re ready to be used in your Project. If you haven’t already recorded your webcam footage, you can do that using the Camtasia Recorder.

Record webcam videos

Step 3: Position your media

Now you need to make a decision. Do you want your webcam footage to appear at the beginning of your video, or do you want it to appear on top of your video, using the Picture-in-Picture feature?

Don’t worry, we’re not going to force you to make that decision right now, but we are going to show you how to do both!

Webcam first, video second

Start by dragging your webcam footage from the Media Bin to the Timeline. Then, drag your other video files to the Timeline and make sure they’re positioned directly after the webcam footage.

When Camtasia produces the video, the videos will appear in the order shown on the Timeline. Remember, Camtasia will only produce videos that are on the Timeline, so be sure not to leave any footage behind.

Add webcam videos

Picture-in-Picture

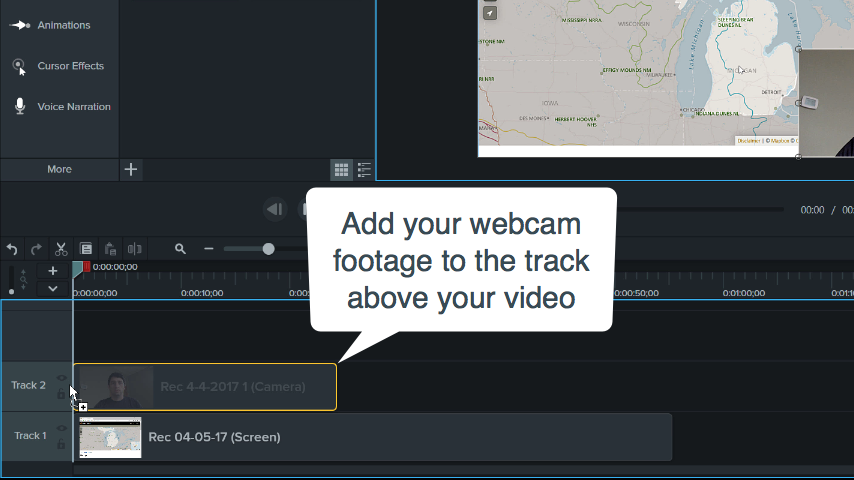
To create that cool Picture-in-Picture effect, start by dragging the video to the Timeline.  Then, drag the webcam footage to the track above the video. 

It might help to think of these tracks as pictures in a stack. The topmost track is at the top of the pile, meaning that anything underneath can be covered by what’s on top.

Adding Webcam Videos

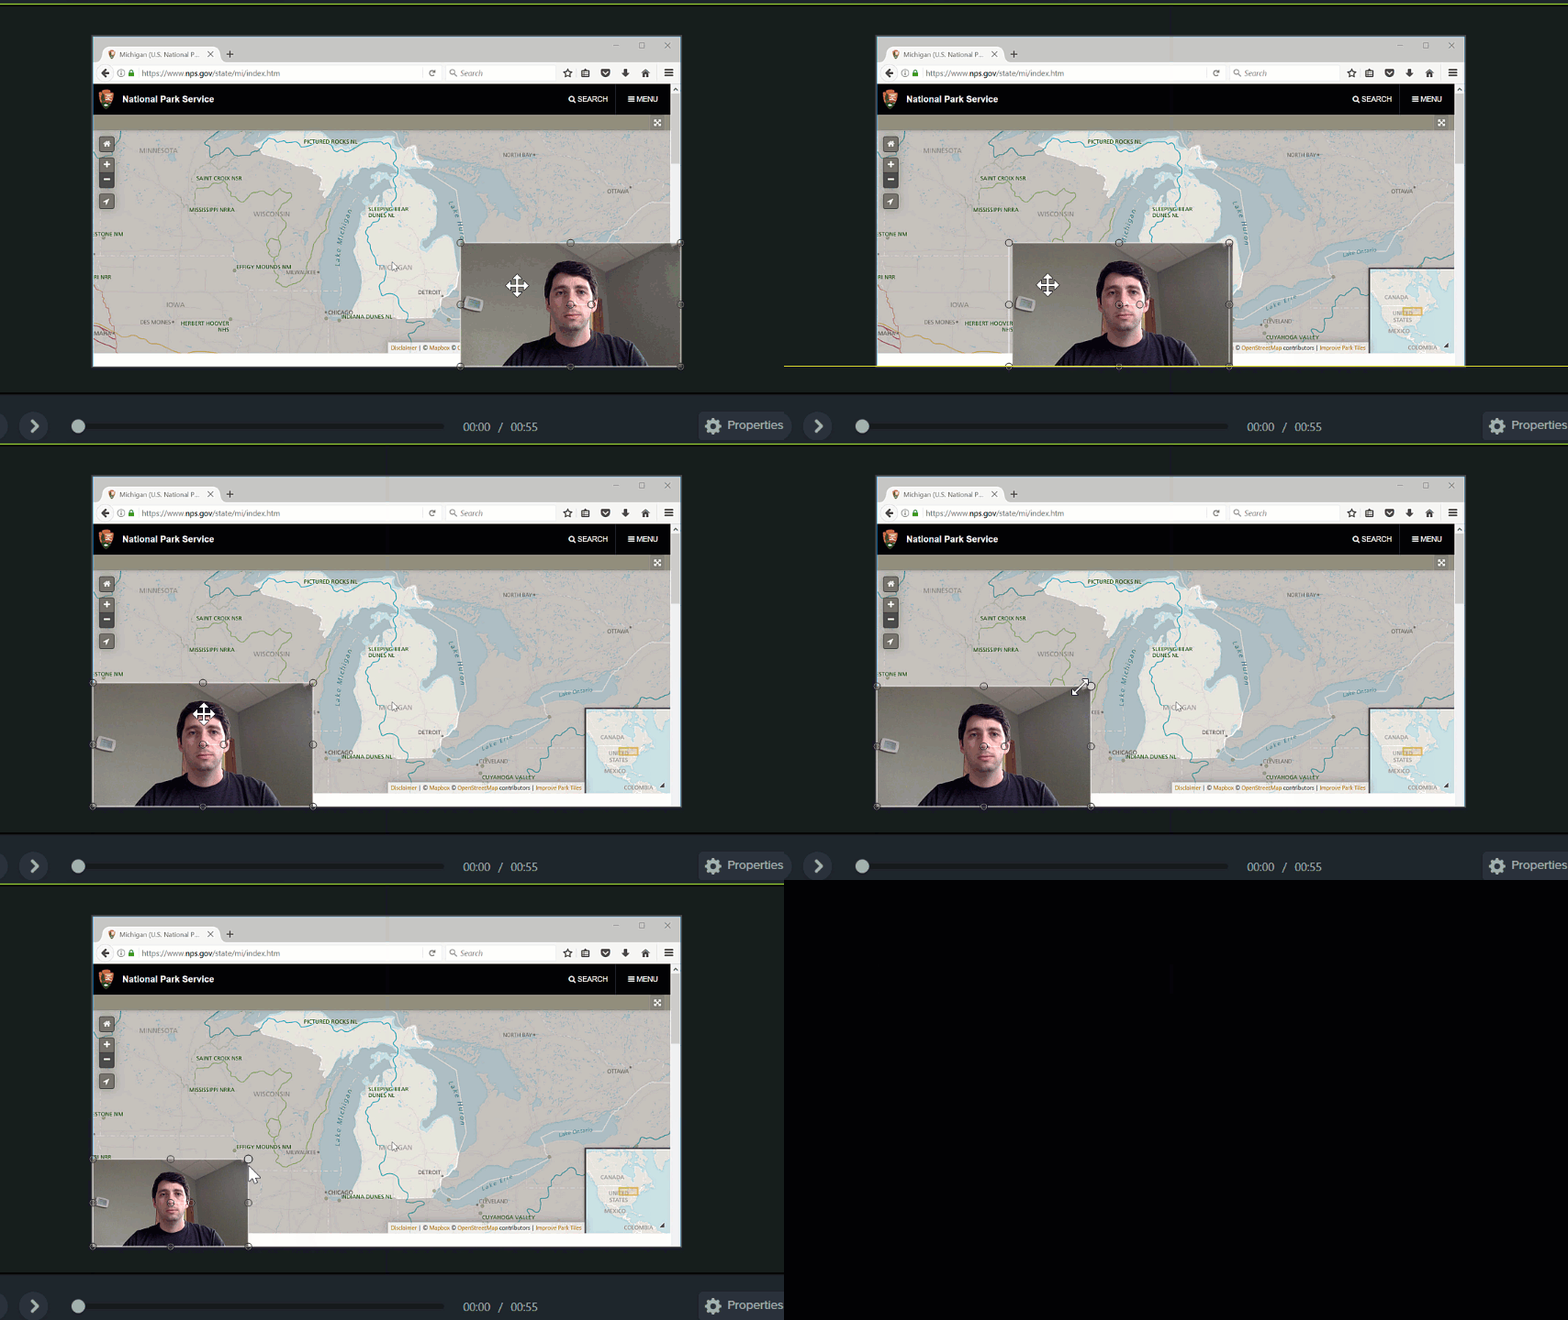
Once you’ve added the webcam footage, you can resize and position the Preview Window on the canvas to make it look just how you want it.

As cool as this is, we’re not evening scratching the surface of things you can do in Camtasia. If you want to learn more about Camtasia’s editing tools, as well as tips and tricks on how to use them, be sure to check out our video tutorials.

Easily Record your Webcam with Camtasia

Capture every move with our online webcam and screen recorder. From your browser – record yourself and your screen.

Try Camtasia for free
Camtasia icon

Step 4: Save your video

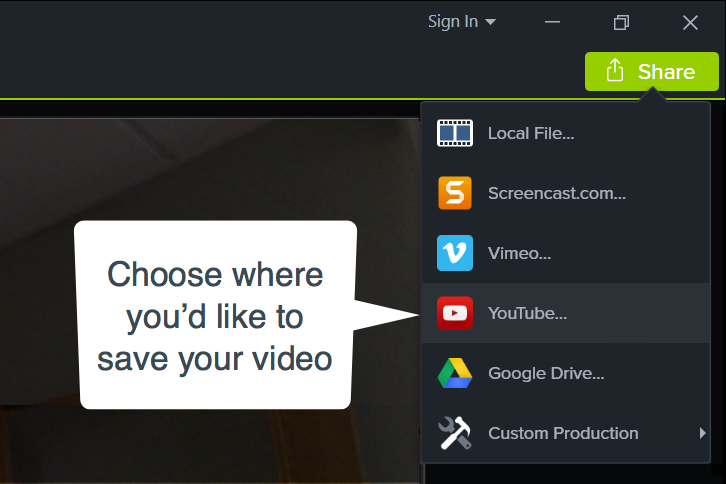
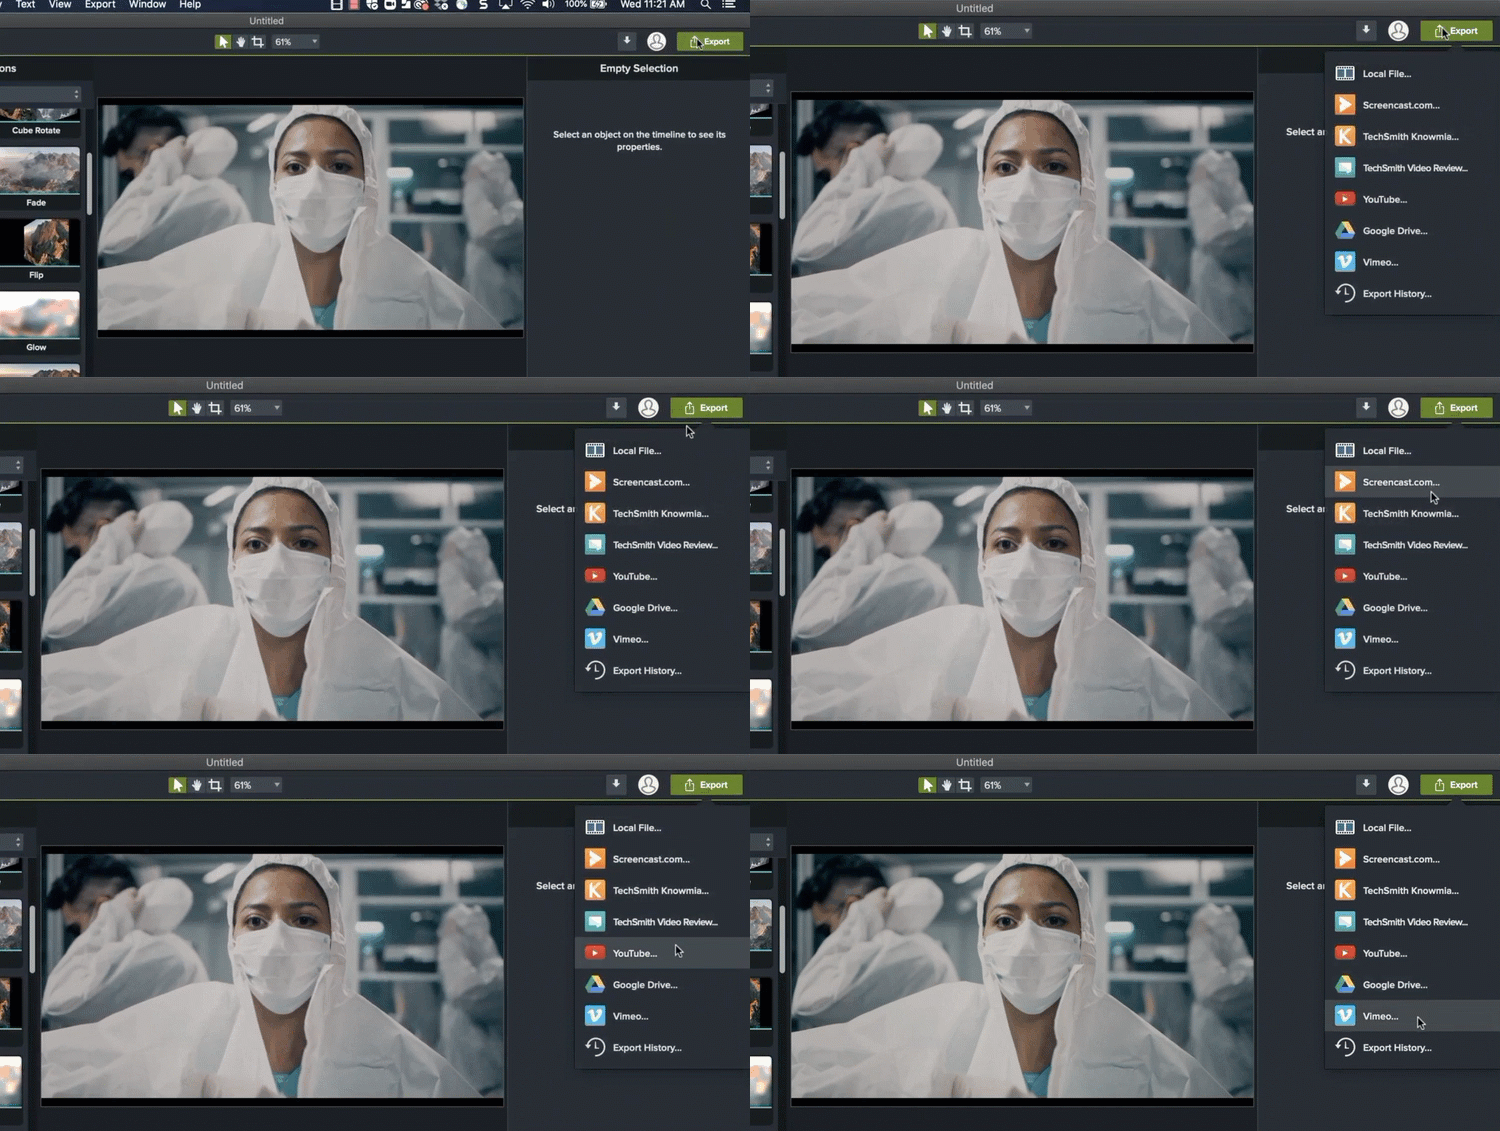
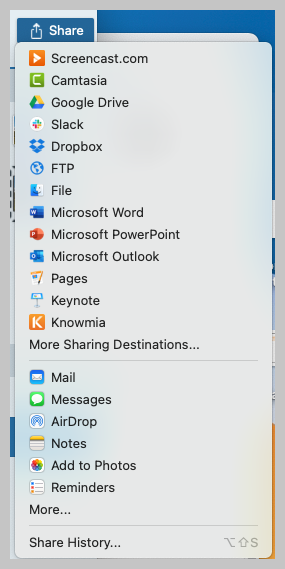
Once your webcam footage is set, export your video by clicking the green Share button. This produces your video and allows you to choose the format and where you’d like to save it.

Save your project or share it to social media

Tips to make your webcam recording awesome

Now that you know how to record webcam video, here are a few things to consider when creating your content:

Set-up

Tilt your webcam so that it’s at eye level, this way your viewers won’t feel like they’re looking up at you. You should also position yourself in front of a solid-colored wall or hang a sheet behind you. Busy backgrounds can be distracting, so this is a great way to help your viewers stay focused on what’s important: You! 

Stick to the Rule of Thirds (which you can learn more about here) or position yourself in the center of the frame. If you need to check your position you can do so by hovering your mouse over the webcam view in the recording toolbar. 

As a final tip, try to avoid making any quick movements while recording to ensure you don’t draw the eyes of your viewers away from your content.

Lighting

Lighting can make or break a webcam recording, so be sure to pay close attention to your video lighting

If you record near a window, try to avoid recording directly in front of it. Instead, position yourself either next to, or facing it. This will ensure you’re not washed out and will stop you from turning into a silhouette.

Ready to Embrace Asynchronous Communication?

Text: How do we have fewer, better meetings? We decided it was time to reboot our meeting culture and communication norms at TechSmith.

Download now!
cover of report about asynchronous communication

Built-in webcams

If you’re using the webcam built into your computer, there’s a good chance it will default to the computer’s microphone, which may not be the best quality. For the clearest audio, you might want to consider setting up a DIY recording studio

However, if time and resources make that impossible, using an external microphone will make a huge difference in the quality of your audio. It doesn’t have to be expensive, even the mic built-in to your headphones will likely be better than the one on your laptop.

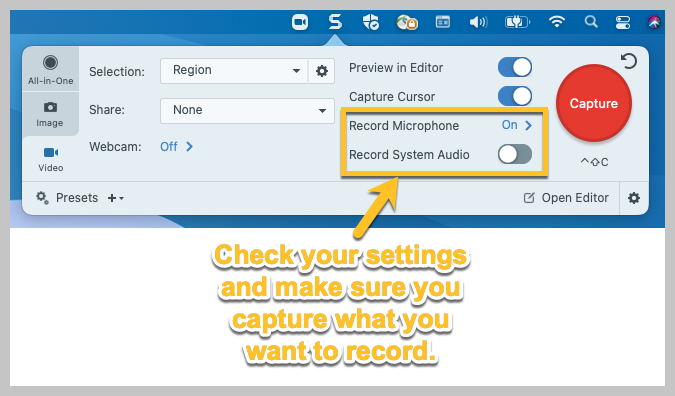
Just remember to check that Camtasia is recording your audio from the right source and always make sure you test your external microphone before recording your voice over

Click here for more tips on how to record great audio.

External webcams

Most external webcams have a microphone built-in; however, it’s always worth testing the quality of the microphone before recording. 

While using a webcam recorder might not be the best choice for everyone’s content, it could help you communicate better with your viewers.

Here are a few questions to ask yourself:

  • Will this help me get my message across better?
  • Is it necessary to accompany your content?

Think about how you want to present not only your video content to your viewers but yourself as well.

Doug Brunner

Doug Brunner is an Instructional Designer at TechSmith. Fun Facts: • He's run a 52.4 mile race • Traveled to 11 different countries • Played drums in a Celtic band • Sings in his local community choir

How to Take a Screenshot on Mac: The Complete Guide

The image features a simplified representation of an Apple iMac computer with a blue screen, on a gradient blue background that transitions from light at the top to dark at the bottom. On the computer's screen, there's a dashed white outline of a square with a smaller image icon inside, symbolizing the action of taking a screenshot.

There comes a time when you will need to take a screenshot on Mac for one reason or another.

You can use screenshots to demonstrate a process at work and share feedback with your team members. And who doesn’t like to send funny memes and gossip about the latest celebrity feuds?

Screenshots have become an essential part of our daily lives. 

Computers have built-in screenshotting functions that make it super easy to take a basic capture of your screen. However, third-party applications take more advanced captures that you can edit and share quickly. 

There’s something out there for everyone’s screenshot needs. Now, let’s dive into how to screenshot on Mac.

What is a screenshot?

A screenshot, also called a screen capture or screengrab, is a still image that displays the exact contents of a computer display. They can be edited and are usually shared with others or stored away for future reference. 

With a screenshot, you can capture exactly what you see on your screen. That makes it super convenient to share an error message with IT, showcase a mockup of your latest project, or even send funny memes to your coworkers.

They are helpful in many situations, which makes them an essential part of people’s workdays. Above all, screenshots are an easy way to show something that would be incredibly difficult to put into words.

Different methods to screenshot on Mac:

Basic screen capture tools are usually built into mobile and desktop operating systems. However, there are downloadable software that are designed for advanced screen capture.

With a third-party tool like Snagit, you’ll quickly forget your basic, bland screenshots and create visual masterpieces instead. In three easy steps, you can create a capture, edit it to fit your needs, and share it with anyone.

Take better screenshots on your Mac with Snagit

Don’t let clumsy built-in tools hold you back. Snagit’s comprehensive feature set makes it the top screen capture software for professionals.

Download Free Trial
Example of taking a screenshot on mac with Snagit

Whether you’re planning on using your built-in tool or downloading a third-party app, we’re here to help you take a perfect screenshot on Mac.

Screenshot on Mac with keyboard shortcuts

Shift Command 3 is the most straightforward option. This keyboard shortcut captures a screenshot of your entire screen and automatically saves it. This is a go-to choice for anyone wondering how to take a screenshot on a Mac without much effort.

Shift Command 4 turns your cursor into a crosshair. From there, you can either:

  1. Press and release the spacebar. This will turn your mouse from a crosshair to a camera icon. Release the mouse button or trackpad on the window you’d like to capture. This option also lets you capture specific windows.
  1. Click and drag the crosshairs to the desired dimensions. Once you release your mouse button or trackpad, your Mac will instantly capture the selected area.
Screenshot of built-in mac tool when taking a screen shot with the command shift 4 keyboard shortcut.

Once captured, your screenshot will be saved to your desktop, and multiple screenshots will be stored in a folder. 

How to take a screenshot on mac with the Screenshot app

Macs have a built-in screenshot app that allows you to take more precise and curated captures than the keyboard shortcuts above.

Shift Command 5 will pop up a small screen-capture window. This is the screenshot app. After that, three screenshot buttons will let you carry out these options:

  • Capture the entire screen. 
  • Capture a portion of the screen.
  • Capture a single window.
Screenshot of the options available when you use the command-shift-5 keyboard shortcut to screenshot on mac.

Pick whichever fits your needs best and get to screenshotting! Again, your captures will be saved to your desktop for easy retrieval. It’s important to note that they will not be copied to your clipboard at that time.

Expert tip: By pressing the Control (Ctrl) button at the same time as your keyboard shortcuts (for example: Shift Command 3 Control), your screenshot will be copied to your clipboard. However, it will not be saved to your desktop.

Using third-party applications

Do you use screenshots more than just a few times per year? If so, you would benefit from trying out an advanced screen capture and screen recording tool. 

Although built-in screenshotting functions can be useful, they are restricting.

That is why third-party applications have become a much-needed tool for many professionals. An application like Snagit provides countless editing and sharing options. That makes it an essential tool for anyone who relies on screenshots to share information because the functionality can save you so much time.

Take scrolling screenshots on Mac

Stop stitching together multiple screenshots on your Mac and try scrolling capture in Snagit.

Download Free Trial
Image with Snagit Scrolling capture UI

Snagit provides users with advanced features that are easy to use, like scrolling capture. For example, it allows users to take a screenshot of a full, scrolling web page without the hassle of stitching together multiple screenshots.


You can also create videos from images to explain processes quickly and easily. Record your screen, camera, and microphone audio to create quick, informative videos.

These, and countless other features, make Snagit an indispensable tool for visual communication

Snagit brings more flexibility and creativity to your screenshots compared to built-in snipping tools.

How to edit and save screenshots on Mac

Add context and clarity to your screenshot by editing it. Incorporating text, marking up your screen, and cropping out what you don’t need all make your screenshots easier to understand.

Once you take a screenshot on your Mac, a preview will pop up in the bottom right corner of your screen. Click on the icon to open Apple Preview with your screenshot inside. This is where you will be able to edit your capture. 

The expandable toolbar allows you to edit the screenshot. In the editor, you can add shapes, change color composition, incorporate text, draw on the screen, and more. When you’re done, save your screenshot by clicking “Save as” and filing it in the appropriate folder. 

Image of a screenshot in Mac's preview editor with annotation tools exposed

Or, you can edit your screenshots in Apple’s presentation tool Keynote. This app has different features, like adding shadows and effects.

However, for the best results, you may need to edit screenshots with a third-party app.

Choose a third-party tool for more editing functionality

If you regularly need to edit screenshots, a tool like Snagit will save you time and get you more professional results. 

For instance, it’s full of helpful features like the Simplify tool that lets you block out unwanted text to keep information secure and your screenshots less cluttered.


You can even move elements of your screenshots around with the Smart Move tool. It makes rearranging information, showing potential edits, and altering workflows easy. 

Image of Snagit Editor, showing annotations on a screenshot of a webpage offering design feedback.

Organizing and managing screenshots on Mac

The first step in keeping your captures organized is to name them appropriately. Your Mac screenshots are saved with the name “ScreenShot” with the date and time attached by default. To make retrieval quicker, use file names you can easily remember!

All desktops have a file library. File your screenshots in a designated folder and rename it. Additionally, you can tag your screenshots by color. This will remind you what files belong together and where to find them.

Your Mac device includes all of these management tools. But third-party apps are your best bet if you don’t want to do all that work.

Keep your screenshots magically organized with Snagit

Snagit’s library organizes screenshots like your Mac but also uses an advanced filing system. Your captures will automatically be managed by application, website, and month. 

This neat feature lets you find your screenshots in multiple places. Without any work on your part, your screenshots are organized and ready for you to refer to easily. 

Screenshot of Snagit's library that organizes your screenshots for you.

And there you have it! Using Mac keyboard shortcuts and the Screenshot app, it’s easy to create basic screenshots and screen recordings. 

We advise you to look into third-party applications for more advanced screen capture. They can take your screenshots to the next level. 

Take your Mac screenshots to the next level

Download a free trial of Snagit to easily take screenshots of your Mac, edit, and share with anyone.

Download Free Trial Today
Illustration of a how-to guide made with snagit

Snagit is a great tool and a leading screen capture and screen recording software. For example, it allows you to look good, feel good, and communicate with clear intent. Its revolutionary capture powers, advanced editing features, and easy sharing options make it our go-to screenshotting software.

There you have it! Now you know how to take a screenshot on Mac using different built-in shortcuts and the best third-party app for your needs. 

So, get on to screenshotting and have fun looking better and working smarter!

Explore our blog and subscribe to our bi-weekly newsletter to learn more about screenshot tips and tricks. 

FAQ

What is the default keyboard shortcut for taking a screenshot on a Mac?

The default keyboard shortcut on Mac is Shift Command 3, which captures the entire screen.

How can I screenshot a specific area or region on my Mac?

To screenshot a specific area or region, use the keyboard shortcut Shift Command 4 and create a selection area with your crosshair cursor.

What is the difference between capturing the entire screen, a selected area, and a specific window?

Capturing the entire screen screenshots everything you see on your display, while capturing a selected area lets you choose a portion of the screen. Capturing a specific window captures just the content of the currently active window. Snagit allows you to specify your capture window down to the pixel, so you get the exact screenshot you need every time.

Can I change the default location where my Mac saves screenshots?

Yes, you can change the default save location for your screenshots. Snagit’s library offers different options for an organized filing system, such as application type, website, and tags.

Are there any third-party apps for taking screenshots that you recommend?

Snagit is a screen capture and screen recording software that is full of advanced but easy-to-use features for anyone looking to improve their screen capture tools.

How can I annotate or edit a screenshot on my Mac?

You can use the built-in Preview app to annotate and edit your screenshots. Snagit also includes original stamps, a blurring tool, a step tool, and much more for a finer editing process.

What should I do if I’m encountering issues with taking screenshots on my Mac?

If you’re facing issues, you can troubleshoot by checking your keyboard shortcuts, available storage space, and any third-party software that may interfere with screenshot functions.

Can I capture a screenshot of a dropdown menu or context menu on my Mac?

Yes, you can capture a screenshot of a dropdown or context menu by using keyboard shortcuts or the Screenshot app. Ensure the menu is open before taking the screenshot.

How can I share my screenshots with others or post them online?

You can share your screenshots by copying and pasting them into documents, emails, or image editing software. In addition, you can use Screencast by TechSmith to share your screenshots with a link to anyone.

Clémence Daniere

Content Marketing Specialist Contractor at TechSmith where I write, edit, and create content that informs and entertains. I also read too many books.

Frame Rate: A Beginner’s Guide

A beginner's guide for frame rate

Getting started with video can be a little intimidating, especially when you hear so many technical-sounding terms, like frame rate or fps. 

Even if you’ve heard of frame rate, it can be hard to know what would be best for your videos. There are, after all, many factors to take into account when choosing a frame rate.

Lucky for you, in this beginner’s guide, we’ll break down the definition of what a frame rate is and why it matters. So, to sum up, here’s what we’ll be discussing: 

  • What is a frame rate?
  • Why does frame rate matter?
  • How do I choose the best frame rate for my video?
  • What are the different types of frame rates?

Edit your own videos like a Pro

Camtasia is the best screen recorder and video editor on the market. Create content your viewers actually watch.

Download now!
Camtasia user interface

What is frame rate?

Remember those cool little flipbooks where a pad of paper had an image on every page, and when you flipped through the pages quickly, the image would appear to move? 

This is how video works. Whether it’s digital or film, a video is essentially a series of still images that, when viewed in order at a certain speed, give the illusion of motion. Each of those images is called a “frame”. 


Frame rate, then, is the speed at which those images are shown, or how fast you “flip” through the book. It’s usually expressed as “frames per second,” or FPS. In the most simple terms, frame per second means how many frames are squeezed into one second of video. So, if a video is captured and played back at 24fps, that means each second of the video shows 24 distinct still images.

The speed at which they’re shown tricks your brain into perceiving smooth motion. Magical isn’t it? 

Why does the frame rate matter?

Frame rates can greatly impact the style and viewing experience of a video. Different frame rates yield different viewing experiences, and choosing a frame rate often means thinking about multiple factors, such as how realistic you want your video to look and whether you plan to use slow-motion or motion-blur effects.

For example, Hollywood-style movies are usually displayed at 24fps, since this frame rate is similar to how we see the world and creates a very cinematic look. Live videos or videos with a lot of motion, such as sporting events and video game recordings, often have higher frame rates because there’s a lot happening at once — this keeps the motion smooth and the details crisp.

Meanwhile, people who create animated GIFs will often sacrifice detail for a smaller file size and choose a low frame rate.

Frame rate is different than video speed, but they are related. You can change the speed of your video when you’re editing it, it’s always best to capture footage at your preferred frame rate. 

The most common video frame rates

Every art form has its standards, and in the world of video, frame rates have been central to the viewing experience. Historically, these standards have evolved not just from artistic decisions but also from technological and practical considerations.

The cinematic world settled on its standards early on. Movies, with their desire to emulate real-life motion, chose to capture film at 24fps and display it at 48fps or 72fps as this mimics the way our eyes naturally process movement. This standard has stood the test of time and is deeply rooted in the film industry’s legacy.

In contrast, TV broadcasters had to contend with technical constraints related to power standards, which influenced the frame rates used. This led to regional variations based on the electricity specifications of different countries.

Fast forward to today, and technology has broadened the horizon. Modern filming equipment allows filmmakers and videographers the flexibility to explore beyond traditional frame rates, especially when pursuing specific visual effects or storytelling techniques.

In essence, while there are common frame rates that the industry leans on, the ultimate choice often rests on the blend of an artist’s intent and the technical demands of the project.

What is the best video frame rate?

There’s no such thing as the “best” frame rate. As mentioned, different frame rates yield different results, so selecting the best one means going with the option that best fits what you’re trying to create.

Even though frame rate is a relatively straightforward concept, there’s a fair amount of controversy around which rates provide the best viewing experience, and there’s research that builds the case for just about any frame rate. Controversy aside, here are four things you need to keep in mind when choosing a frame rate.

The Marketer’s Ultimate Guide to Video

In our FREE ebook, we’ve put together practical strategies to get out of the woods and create engaging, powerful video content on your own that reaches your audience.

Download now!
techsmith logo

Style/Realism

The frame rate of a video greatly impacts the way it looks and feels, which in turn determines how realistic the video appears. This concept ties directly to how we see the world.

When we see motion, such as a person throwing a ball or a car driving by, we naturally see a certain amount of motion blur. Ideally, the frame rate you choose will mimic this motion blur, keeping the experience as realistic as possible. 

If you choose a frame rate that’s too high, things will start to look unnatural and the video will suffer from what’s called the “soap opera effect” — which is when a video shows so much detail that it looks odd. On the other hand, if you choose a frame rate that’s too low, the video will start to look choppy and will provide a poor viewing experience. 

To help figure out which frame rate is best for you, let’s look at a few common options and how they’re used.

24fps

This is the standard for movies and TV shows, and it was determined to be the minimum speed needed to capture video while still maintaining realistic motion. Even if a film is shot at a higher frame rate, it’s often produced and displayed at 24fps. 

30fps

As mentioned, this has been the standard for television since the early days, and is still widely used despite producers moving toward a more cinematic 24fps. Videos with a lot of motion, such as sports, will often benefit from the extra frames per second.

The reasons for using 30fps are complicated and, as mentioned are mostly to do with television and electricity standards set in the days of yore.

60+fps

Anything higher than 30fps is mainly used to create slow-motion video or to record video game footage. Additionally, as technology continues to evolve, many smartphones are now capable of recording at 60 fps as well.

Motion

The next key variable to take into consideration when choosing a frame rate is the amount of motion in your video. This one’s pretty straightforward. If you have a lot of movement, you’ll probably want to capture at a higher frame rate.

However, this doesn’t necessarily mean you’ll want to produce at a higher frame rate, but capturing at a higher frame rate ensures a higher level of detail for the amount of motion captured. The higher frame rate also allows for more flexibility when editing your video

To help you decide what’s best for you, here are a few common options.

24fps 

As stated above, this is the minimum speed needed to capture video while still maintaining realistic motion. If you capture a really busy scene at 24fps, you’ll see a lot of motion blur.

30fps 

With six more frames a second than 24fps, you’ll see more detail during scenes with high motion; however, the motion might start to look unnatural and suffer from the “soap opera effect.”

60+fps 

Anything higher than 30fps is usually reserved for recording busy scenes with lots of motion, such as video games, athletics, or anything you want to show in slow motion.

Gamers record at this rate because there’s a lot happening on their screen at once, and more frames equals more detail. Sports are often recorded at a high frame rate too so they can be slowed down to show replays while still maintaining crisp, clear video.

Frame Rate Delivery

The way a video is delivered, such as via YouTube or broadcast television, and the device a person uses to view your video can greatly impact the options you have for frame rate.

Not all devices and delivery methods support all frame rates, so it’s best to look into this before you start filming.

To help tackle delivery, let’s look at a few of the most common places people watch videos and how the video is delivered.

Streaming video on the Internet

This is quickly becoming the most common way to deliver video, and many streaming services support a wide array of frame rates. 

If, for example, you’re making a YouTube video, you can relax a little with the knowledge that viewers aren’t as bothered by frame rates when watching online. However, keep in mind that older TVs and computer monitors might not have a screen refresh rate that can handle high frame rates.

Television

When you produce a video for television, it’s best to stick between 24 and 30fps. This ensures that your videos look realistic and fit what people expect from broadcast television. Live broadcasts, such as news and sports, are almost always shot at 30fps, whereas TV shows and movies are usually shot at 24fps.

Film Projectors

Movie theaters, and projectors in general, are still an incredibly popular way to consume video. Much like TV broadcasts, the frame rate should be kept to 24fps as this will give your video that “cinematic” look and feel. You’ll also be able to rest easy knowing that your video will be displayed properly on most projectors.

Edit your own videos like a Pro

Camtasia is the best screen recorder and video editor on the market. Create content your viewers actually watch.

Download now!
Camtasia user interface

Frame Rate File Size & Export Times

The final factors to consider when choosing a frame rate are file size and export times. These two are pretty straightforward — the higher the frame rate, the more still images are packed into each second of video.

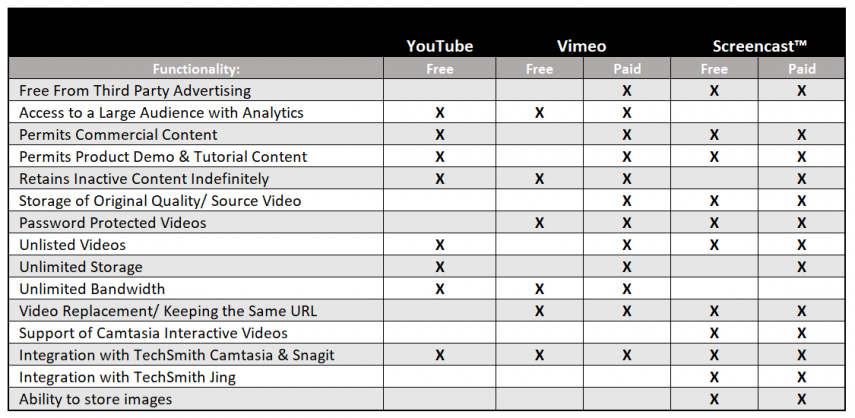
More images mean more information, and more information means bigger files and longer export times. This is especially important to consider when uploading videos to online streaming sites such as YouTube, Vimeo, and TechSmith’s Screencast.

Higher-quality video is always the most desirable, but larger file sizes require better internet connections and computer hardware to stream at its highest quality. This means that people who aren’t using the most modern equipment or the fastest services might suffer from a poor experience.

Final Thoughts on Frame Rates

Choosing a frame rate requires some thought, but if you consider the four key points outlined in this guide, it should be pretty easy to find the best frame rate for you. Of course, the best way to really get to grips with frame rates and understand how they work is to play around with them. Try recording similar footage at different frame rates, and then using software like TechSmith’s Camtasia to edit your videos. 

Camtasia comes with a professional editing suite that’s intuitive and easy to use for beginners and experts alike. With it, you can add music to your videos, create closed captions, and even synchronize different audio and video sources

But Camtasia isn’t just an editing suite, it’s a screen and webcam recorder too. This means you can use it to film your own videos, record live streams, and make training videos

If you don’t have Camtasia already, you can download a free trial here. So what are you waiting for? Get out there and make some great videos! Check out the video below for a great walkthrough on making your first video with Camtasia.


FAQs about Frame Rates

Is one frame rate better than another?

That depends on what type of project you’re working on! See the above sections to learn about different frame rates and what they’re typically used for.

How many frames per second can the human eye see?

Most people can see about 30-60 fps.

What are the most common frame rates?

The most common frame rates are 24fps for cinema, whereas 30fps and 60fps are used for television and online content. Different projects and mediums may have their own unique standards, but these are the most typical benchmarks.

How do you change a camera’s frame rate?

To change a camera’s frame rate, access the camera settings or menu, locate the video or frame rate option, and select your desired fps setting. For more specific instructions, take a look at the user manual for your camera.

What’s the difference between shutter speed and frame rate?

The shutter speed determines how long each frame is exposed to light, while the frame rate indicates how many frames are captured in a second. A fast shutter speed freezes motion, whereas a slower one can introduce motion blur. Frame rate, on the other hand, affects how smooth the video is when you’re watching it back.

Doug Brunner

Doug Brunner is an Instructional Designer at TechSmith. Fun Facts: • He's run a 52.4 mile race • Traveled to 11 different countries • Played drums in a Celtic band • Sings in his local community choir

How To Rotate a Video

How to rotate a video

Whether you’re bringing in vertical footage from your phone, looking to create a unique perspective, or just want to fix a crooked clip, it’s always good to know how to rotate videos.

Fortunately, it’s super easy to rotate a video. In fact, with the right tools, you can do it in under a minute and in this post, we’re going to show you how. 

How to rotate a video with Camtasia

As frustrating as it can be, recording a video with the wrong orientation isn’t the end of the world. So, rather than start recording all over again, you can use the rotation properties to rotate your video and save time in the long run.

1. Open a video editing program

You’ll be glad to know that even if you’ve never edited a video before, knowing how to change the orientation of a video is as easy to learn as it is valuable. The first step to rotate a video is to open up a video editing program on your computer. We recommend choosing software that’s easy to use, like TechSmith’s Camtasia, especially if you’re new to editing. 

Camtasia has been designed with both beginners and professionals in mind. While it comes packed with a wide range of advanced editing tools, its user interface is sleek and intuitive without being overwhelming. So whether you’re a pro and you know exactly what you want to do with your footage or an amateur who wants to learn along the way, Camtasia has you covered. 

We’ve also got loads of online resources, from the TechSmith Academy, to our blog where you can learn how to do things like add music to your video, change the speed of your footage, and add captions to your video. Best of all, you can start using Camtasia to edit your videos for free! Download the free trial today

Edit your own videos like a Pro

Camtasia is the best screen recorder and video editor on the market. Create content your viewers actually watch.

Download now!
Camtasia icon

2. Find the video you want to rotate

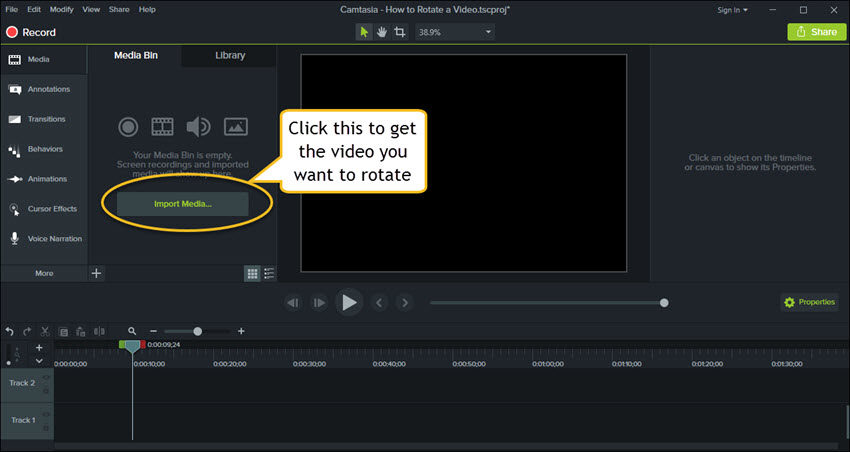
With Camtasia open, click on Import Media and browse to find the video you want use. You can grab a clip from your computer, camera, or network. Next, click Open to add it to your Media Bin.

find the video you want to rotate

3. Get it ready to edit

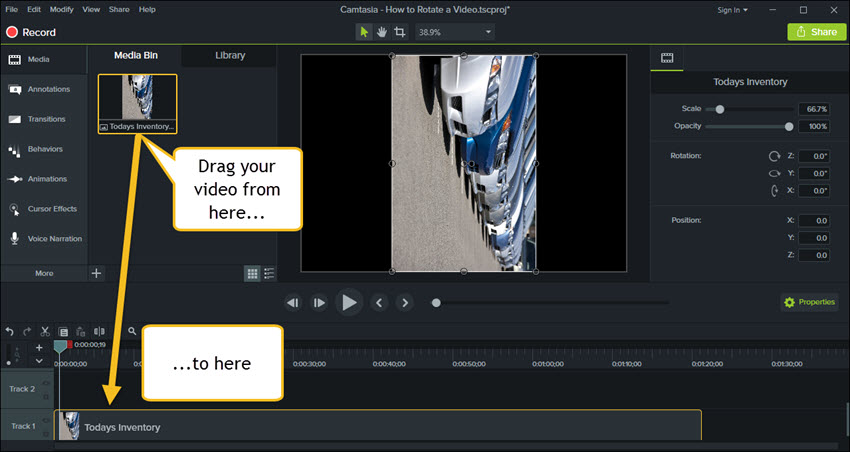
Now that you’ve imported your footage, you can drag your video from the Media Bin to your Timeline.

Drag the video you want to rotate

4. Rotate your video

Lastly, click on the video in the large Preview pane. In the center of the video, you’ll see two hollow circles. Hover over the circle on the right until your cursor turns into a rotation symbol. Click and move your mouse to tilt your video.

That’s all there is to turning a video around! Pretty quick, right? 

There’s more than one way to rotate a video though, and depending on what your video is for, you might want to try out these other techniques:

  • For more precise rotation, you can click and hold the rotation symbol while moving your mouse near the outer edge of your video. This wider radius will provide you with more accuracy in your rotation movements.
    This is especially helpful when you are rotating videos from a smartphone or iPad/tablet that was taken just slightly askew.
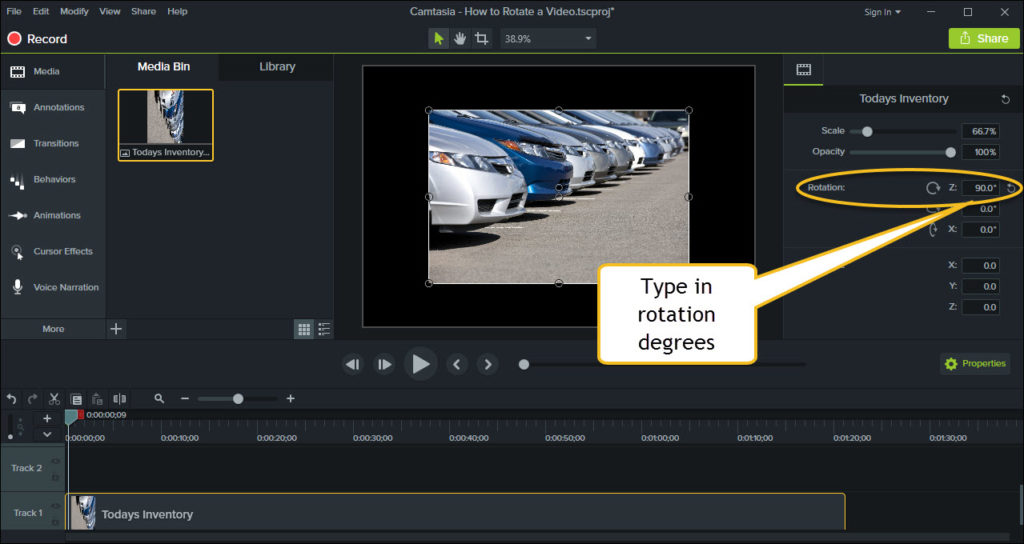
  • Have a specific angle in mind? You can type in the exact degrees. Just select the video in the Preview pane and click the Properties button on the right. Then, under the Rotation heading, the Z axis is where you enter the number of degrees.
    Hint: Enter 90º or 270º if you want to rotate vertical footage to be horizontal, or 180º if you want to turn it upside down.
Rotate by typing in degrees

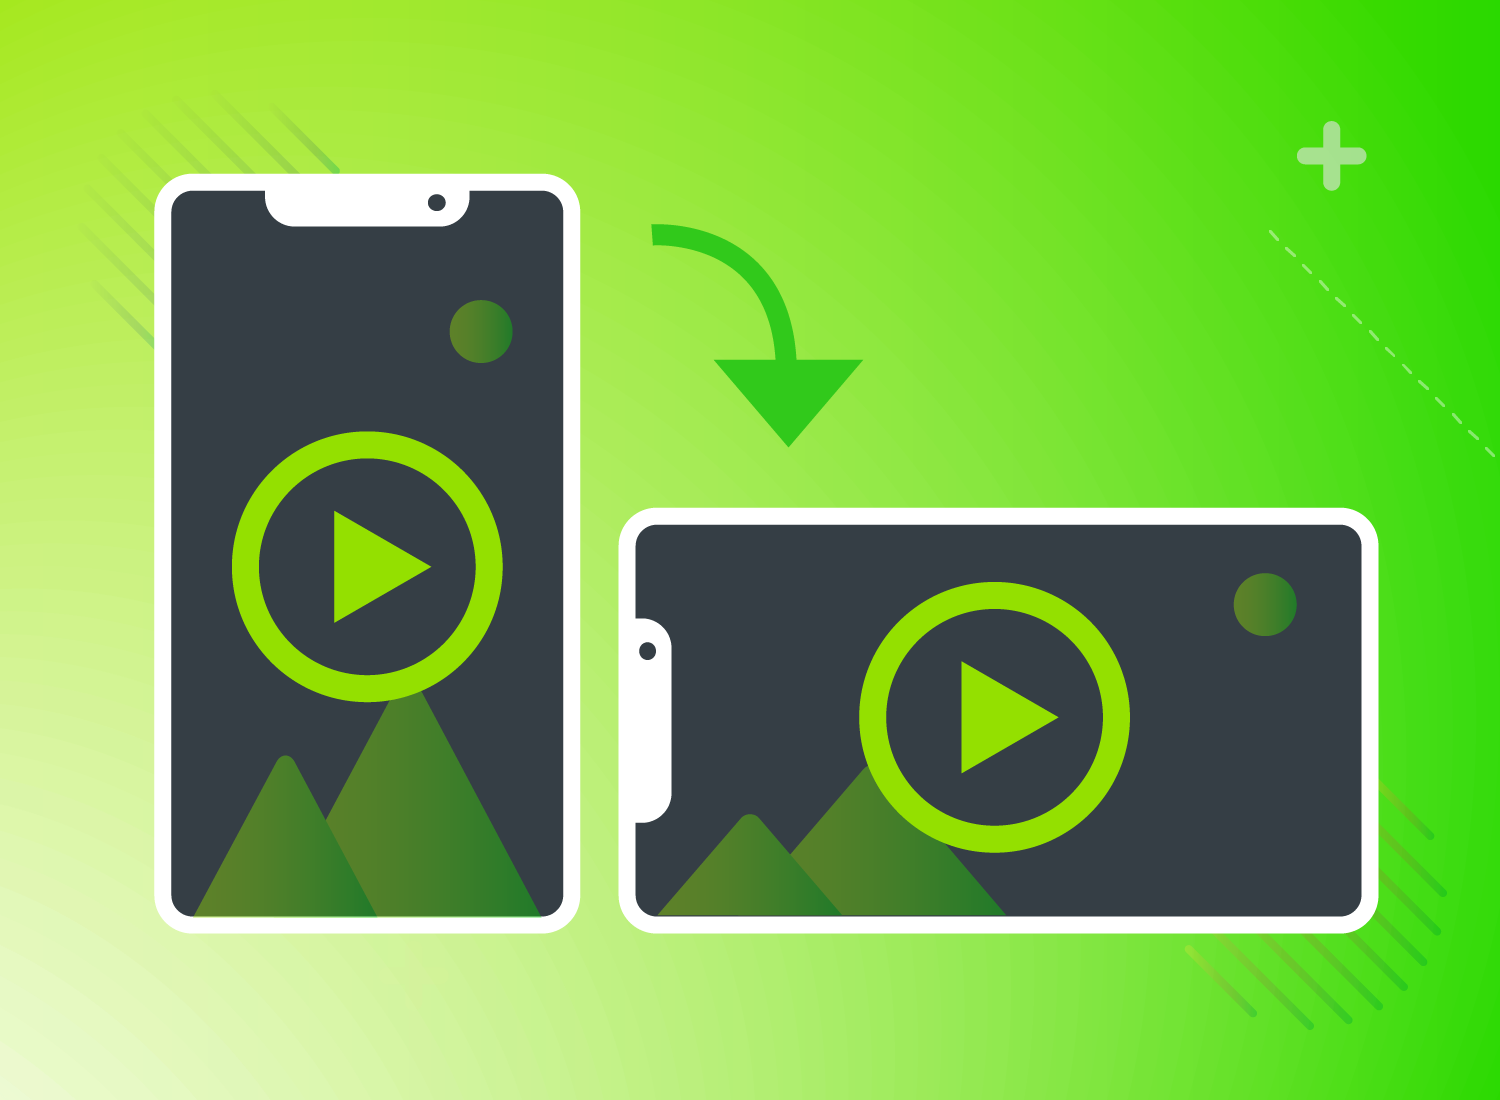
Remember, if you’re turning a horizontal video into a vertical one, you might want to crop your clip after rotating it.

Bonus tip: Fill the space

Of course, there may come a time when you don’t want to rotate your video, but you do want to play a vertical recording in a horizontal space — without leaving big blank spaces on either side of your content. 

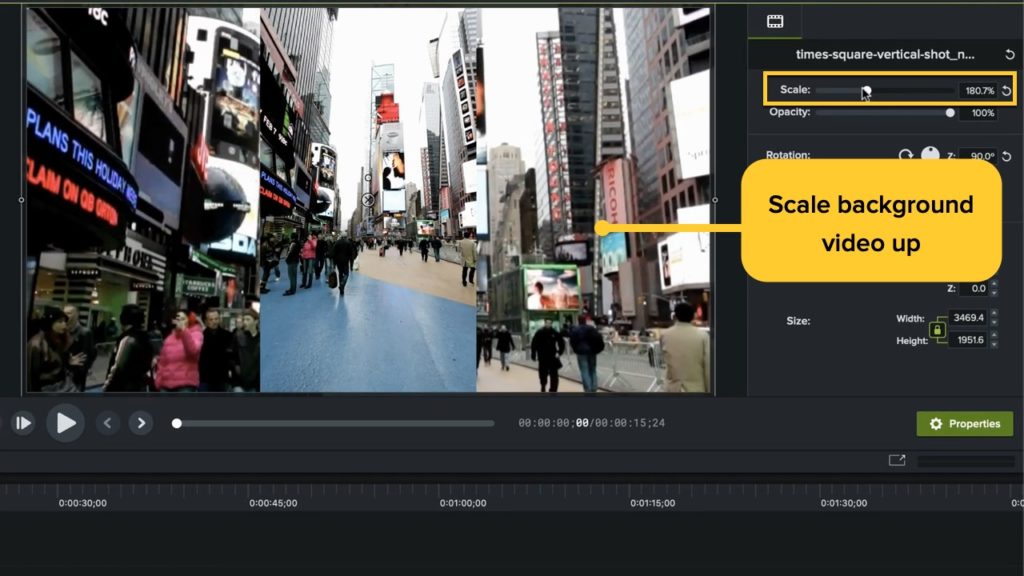
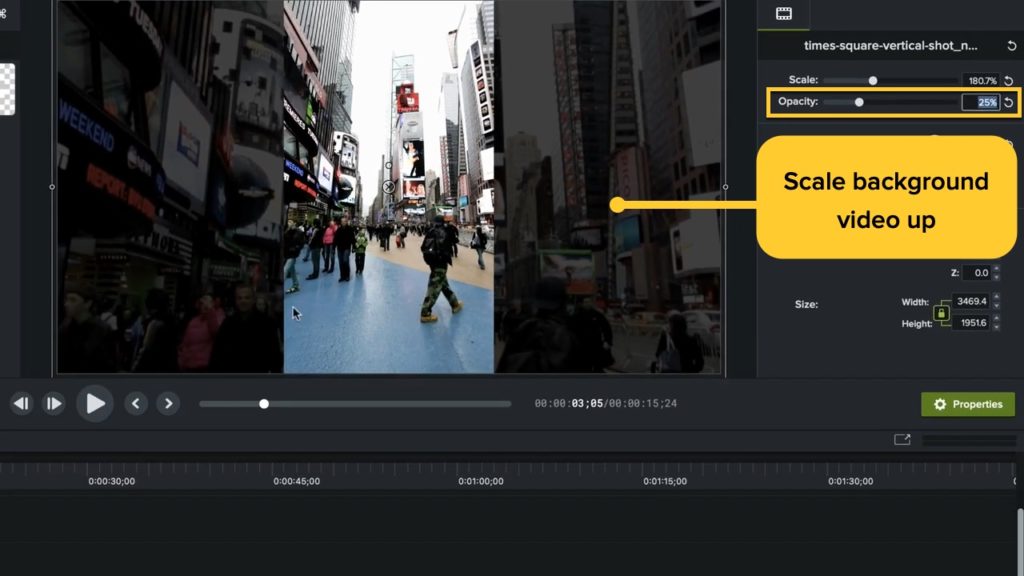
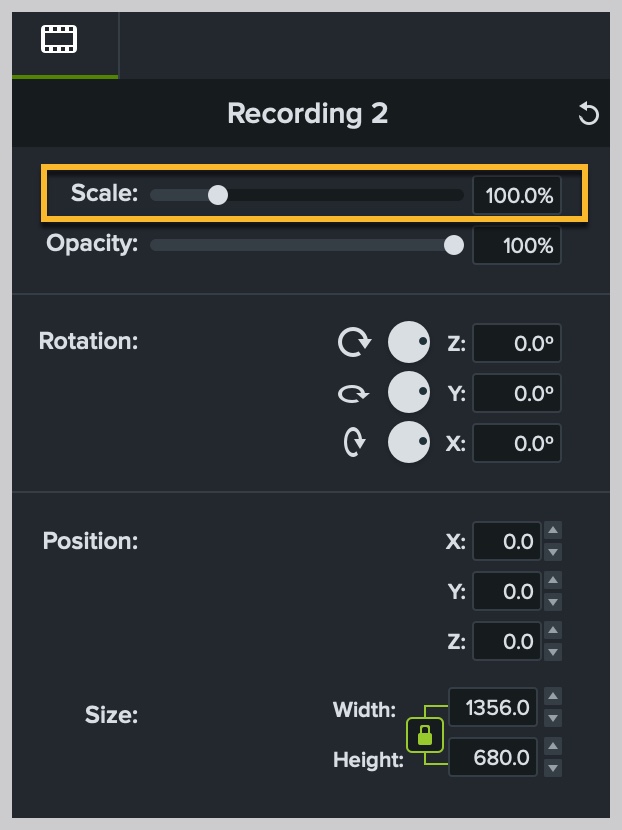
One great way to do this is to duplicate the layer and scale the background video up until it completely fills the space.

screenshot of Camtasia scale feature

Then, either add a simple blur effect from inside the annotations tab – or adjust the opacity down to 25% to really make that top layer stand out.

screenshot of Camtasia opacity feature

This works in reverse too! So if you wanted to make a video for Instagram where vertical video is the norm, or even on YouTube where many people watch vertically on their phones — you can! 

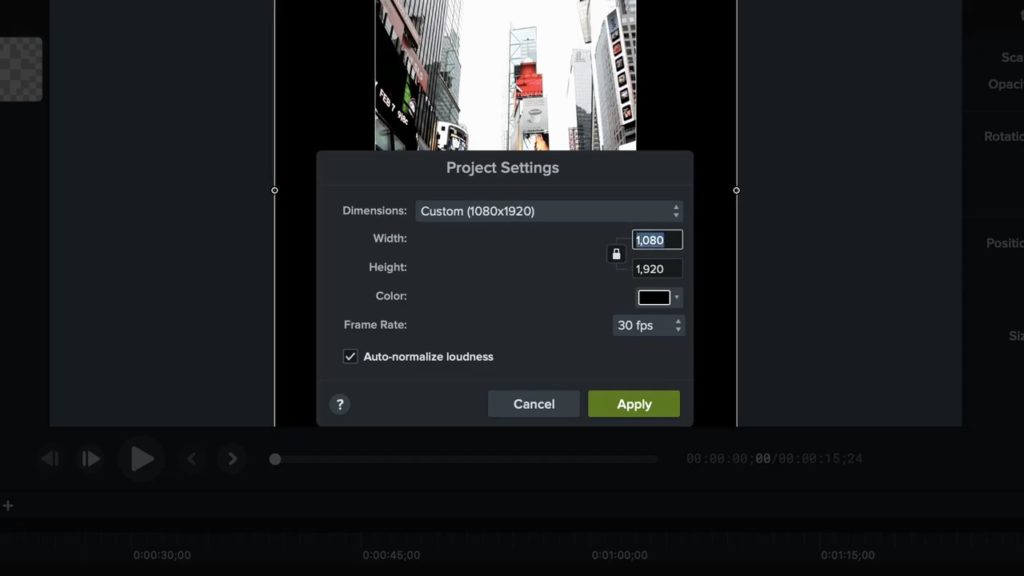
Simply go into your Project Settings, reverse the 1920×1080 aspect ratio to make it 1080×1920, and rotate your video to fit!

Ready to start rotating video?

Now you really do know all there is to know about using Camtasia to rotate videos horizontally, vertically, and everything in between, as well as ‘flip’ them upside down and backward. But remember, there is still a whole lot more you can do with Camtasia. From making split screen videos to synchronizing video and audio sources — the world (of editing) is your oyster!

The Marketer’s Ultimate Guide to Video

In our FREE ebook, we’ve put together practical strategies to get out of the woods and create engaging, powerful video content on your own that reaches your audience.

Download now!
techsmith logo

How to Make a Great Quick-Reference Guide

A quick-reference guide is any documentation that provides a one- or two-page set of condensed instructions on how to use a product.

New products often spark excitement, but that enthusiasm can quickly be lost when reading the user documentation, which consists of hundreds of pages of dense text and technical jargon. There’s no denying that such documentation can be dull, but an overwhelming introduction to your product can also overshadow your customers’ thrill of using it. 

While detailed documentation is important, especially for in-depth explanations of complex processes, not every user wants or needs to navigate an ocean of information on their first use. This is where the quick-reference guide comes in. 

A quick reference guide can be your users’ best friend when it comes to understanding your product without getting into the nittiest and grittiest details. 

In this comprehensive how-to guide, we’ll be looking at: 

But before we get ahead of ourselves, let’s take a closer look at what exactly a quick-reference guide is…

What is a reference guide?

In a nutshell, a quick-reference guide is any documentation that provides a condensed set of instructions on how to use a product. Such documents are typically no longer than two pages and can either be very detailed or super simple, depending on what’s needed. 

While user manuals and lengthy documentation dive deep into the intricacies of a product, quick-reference guides are all about brevity and accessibility. They act as a bridge for users, spanning the gap between having no prior knowledge and gaining basic proficiency. 

Whether it’s a list of keyboard shortcuts, a flowchart for a process, or a collection of frequently asked questions, these guides are designed with one goal in mind: to get the user up and running as quickly as possible. 

With the rapid pace of today’s world, such guides resonate with users who need answers fast, without sifting through pages of information.

Why is it important to have a quick reference guide?

Quick-reference guides are especially useful when a product or service has several different or advanced functions but can also be used to perform more simple tasks. 

Imagine you’re buying a fancy new stove to replace your trusty old one. The old stove had a straightforward oven — turn it on, set the temperature, and you’re good to go. But this new one? It’s cutting-edge. Beyond the basic Bake setting, it dazzles with options like Convection Bake, Roast, Bread Proof, and more. Instead of the old-fashioned turn-knob, it has buttons and a sleek digital display.

Now, even if you’ve baked the occasional loaf of bread, let’s admit it: most days, you’re just warming up pizza rolls or crisping up garlic bread. That’s where the beauty of the quick-start guide (a common type of quick-reference guide) comes in. Provided by the manufacturer, this handy documentation gets you up and running with basic baking in no time.

Then, when the day comes that you’re ready to dive into those advanced features, the fully comprehensive manual is ready and waiting. Quick-reference guides are like a cheat sheet, helping users to quickly locate the essentials. They don’t replace the user manual but act as a trusty sidekick, making information delivery swift and user-friendly.

Turning our attention away from baking bread, TechSmith’s Snagit makes it super easy to create a quick-reference guide. So, without further ado, here’s everything you need to know about making a high-quality quick-reference guide faster than you can say sourdough! 

Create a quick-reference guide!

Download a free trial of Snagit to quickly and easily make your own quick-reference guide.

Download for free now
Snagit icon

Is a quick-start guide the same as a quick-reference guide?

The quick answer: Yes!

As mentioned above, a quick-start guide is one of the most common types of quick-reference guides. So, while not all quick-reference guides are quick-start guides, all quick-start guides are quick-reference guides.

Make sense?

How to make a quick-reference guide in six easy steps

It’s important to note that creating a quick-reference guide can be tricky without the right tools. For example, using Microsoft Word to create such a document will likely be frustrating and time-consuming. 

Of course, if you have a professional designer — who can ensure your quick-reference guide looks good and conveys all the necessary information in the best possible way — on the payroll, then you’re sorted. 

But what if you don’t have the tools or expertise on hand? We’ve got two words for you: Templates

When it comes to designing great content, Snagit 2020's templates are my superpower.

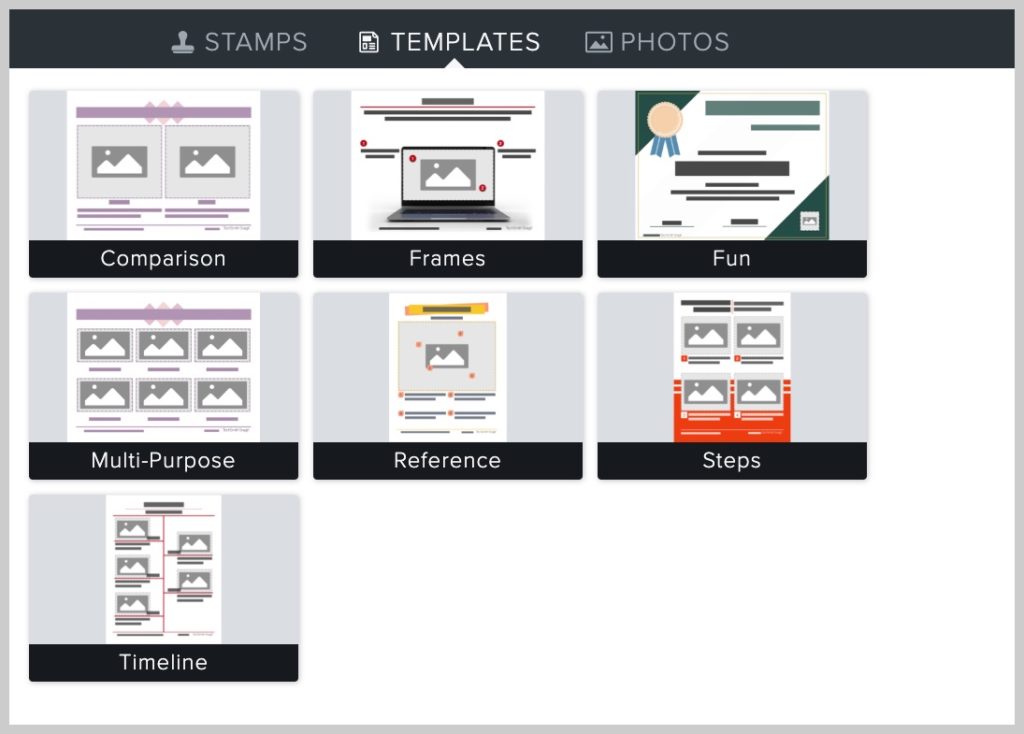
Snagit comes with several templates that provide professional-looking designs you can use to create quick how-to guides just by dragging and dropping different elements. Snagit will even let you add and customize different color palettes to help ensure brand consistency, which will build better customer relationships. 

If none of the preloaded quick reference guide templates take your fancy, you can download dozens more with TechSmith Assets for Snagit.

quick reference templates for Snagit 2020

Snagit templates allow you to create an array of different kinds of how-to guides, process documents, tutorials, and more. 

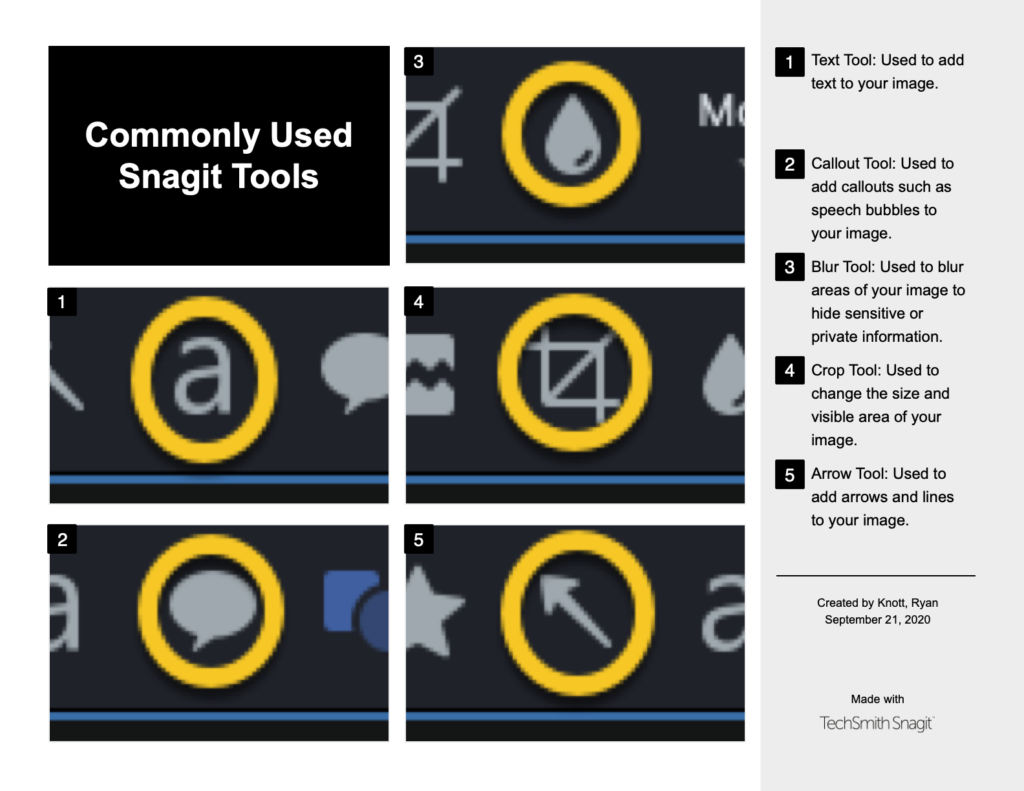
Now, for this example, we will create a quick reference guide that outlines how to use the five most popular tools in Snagit.

Step 1. Take your screenshots

First, take all the screenshots you need and make any annotations (arrows, text, etc.) you want to include in the graphic.

Step 2. Create your template

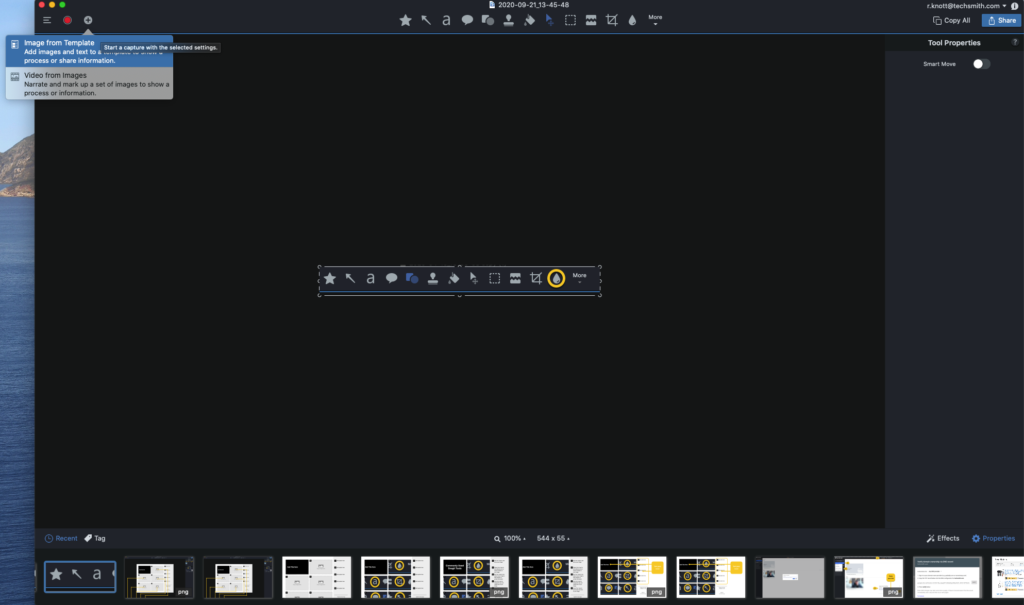
Then, in the Snagit Editor, click Create > Create Image from Template. 

Step 3. Choose a template

The Basic 5 Steps Landscape Snagit template.

Next, select the template you want to use. There are plenty of quick-reference guide templates to choose from.

For this example, we chose the Basic 5 Steps Landscape. While this particular template is intended as a step-by-step guide, it’s perfect for our use case as well.

Step 4. Add images

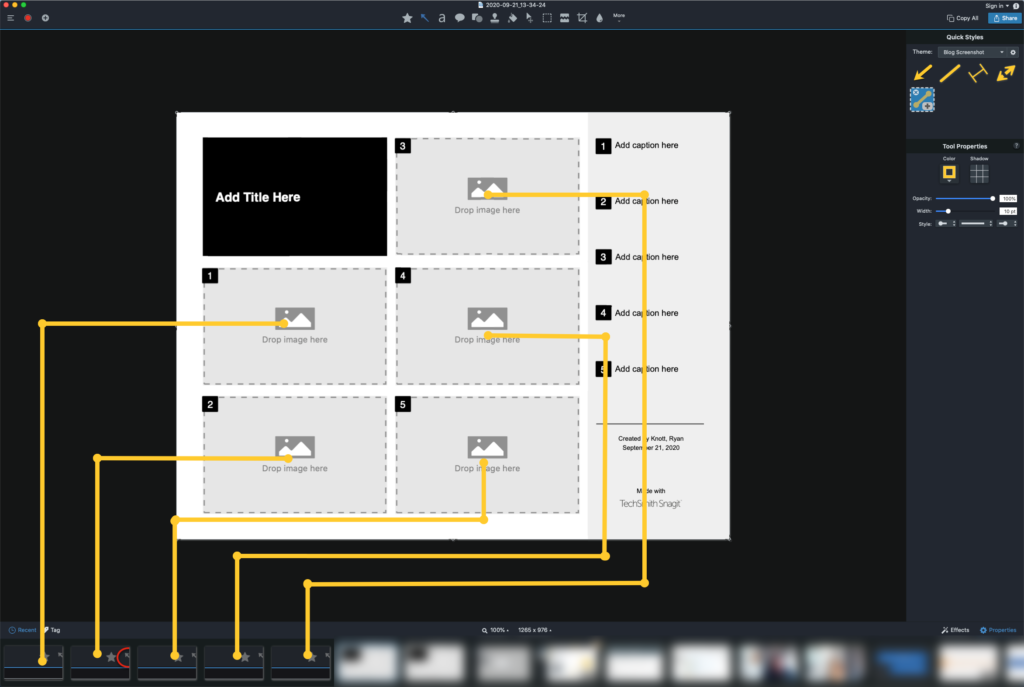
Then you can drag your screenshots from the Recent Images tray at the bottom of the Snagit Editor into the placeholders in the template. 

Step 5. Resize images

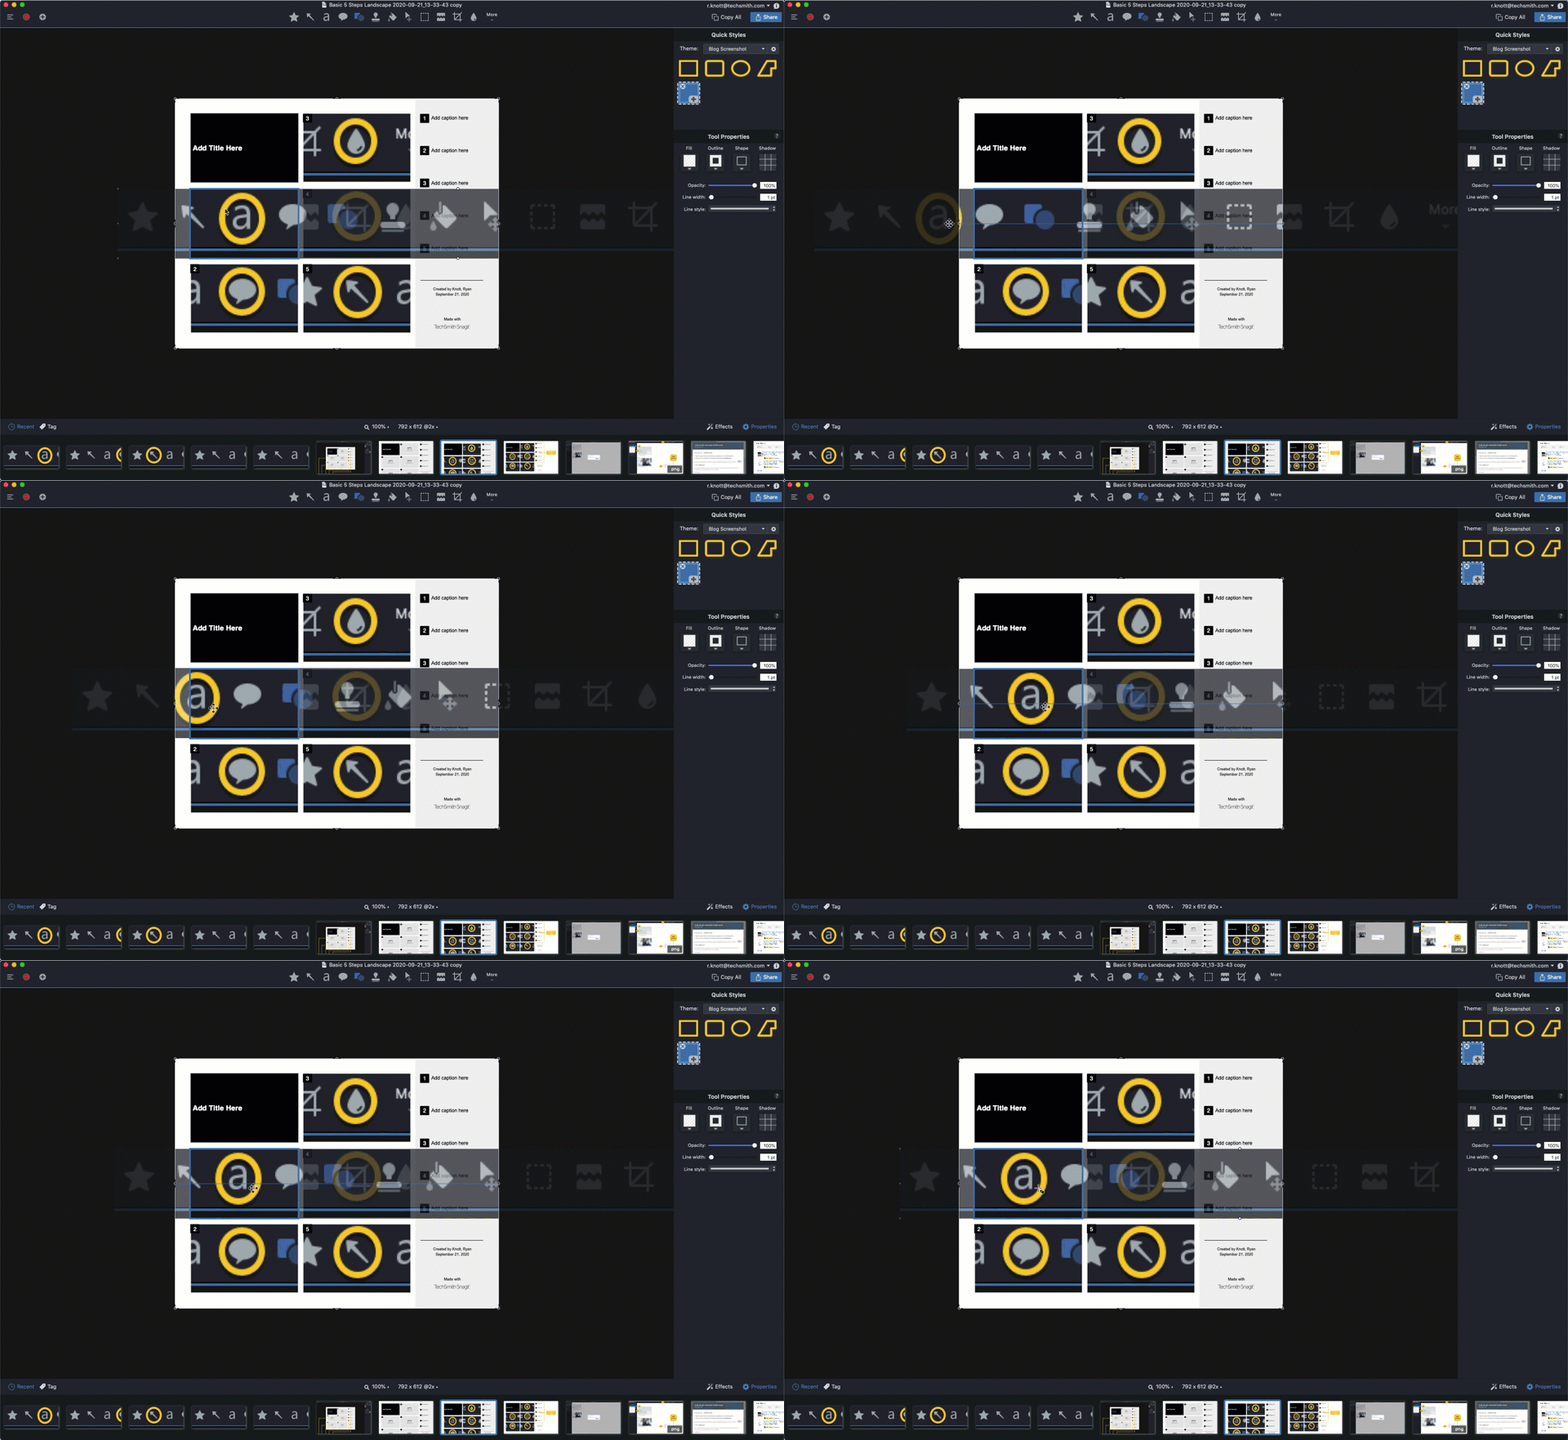
Showing how to resize and reposition the images added to the template.

Next, resize and adjust your screenshots as needed.

Step 6. Add written content

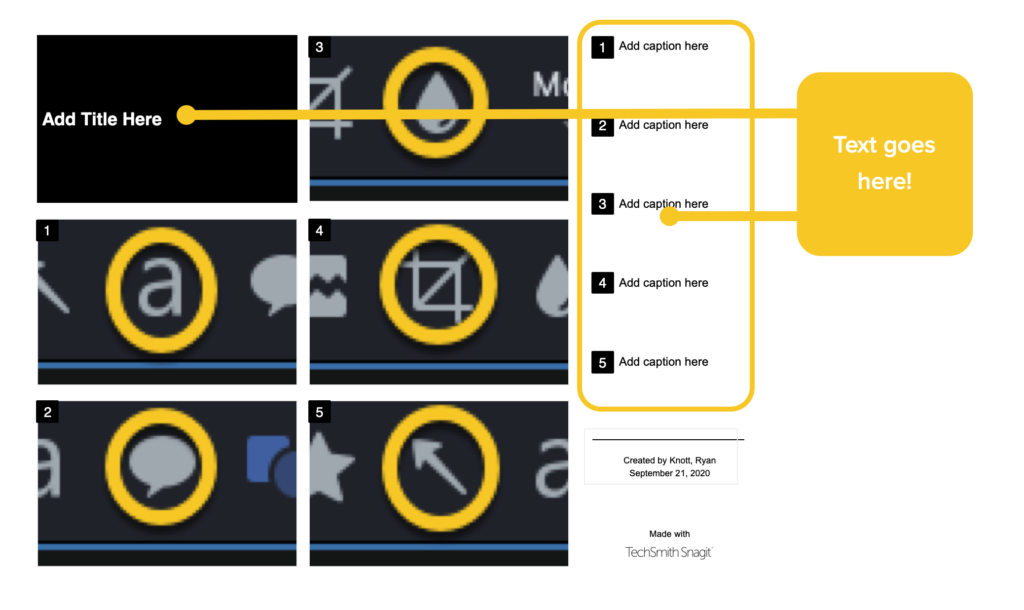
Finally, add descriptions and instructions in the corresponding sections in the spaces provided to the right of the template, and add a title in the title box.

That’s it, you’re done! Now, you can share, save, and print your quick-reference guide. 

Believe it or not, it took us longer to write out the six steps than it did to create this quick-reference guide!

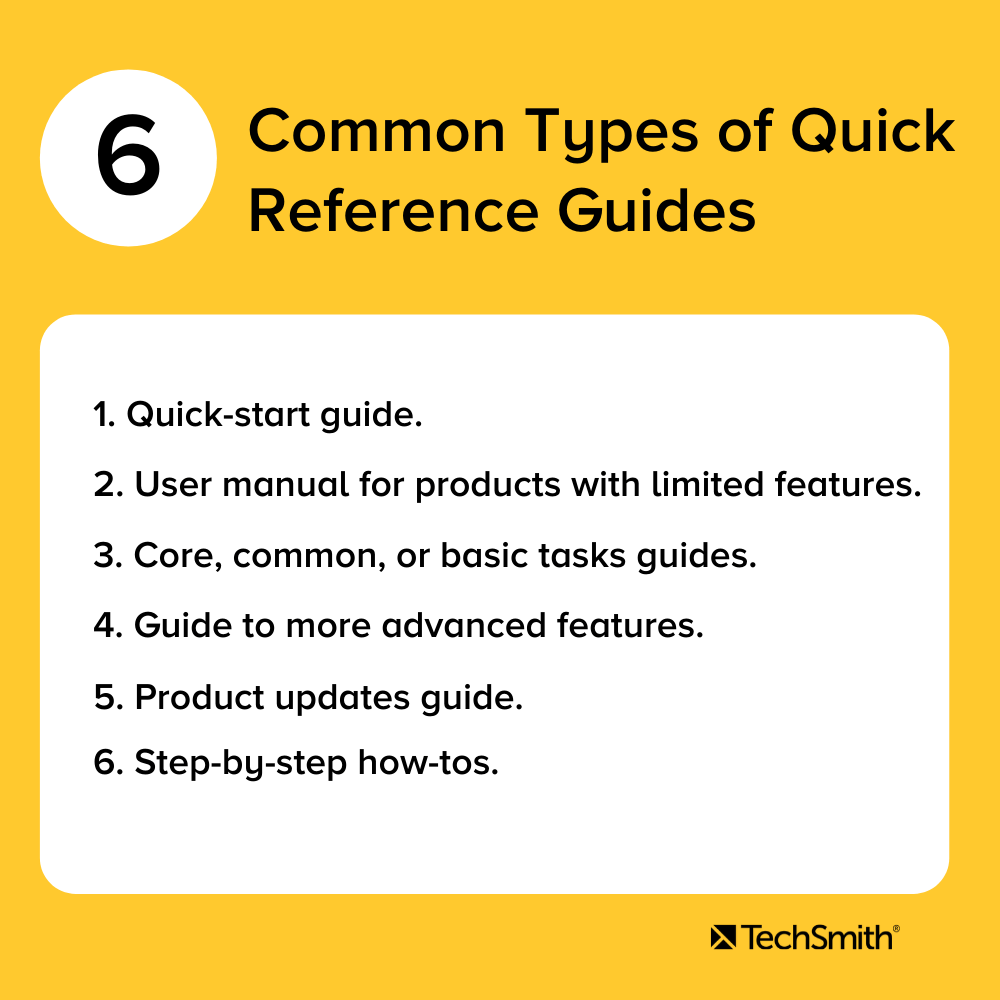
Common types of quick-reference guides

Six common types of quick-reference guides. Content is repeated in the text below.

There’s more than one type of quick-reference guide, so understanding your audience’s needs is paramount when it comes to creating the right type of documentation for their needs.

Learn your audience's needs and expectations and then create the content they need to succeed.

For example, does your audience need a fast and easy way to get started using your product’s most basic features? If so, you need to create a quick-start guide. Or, maybe they need a one-stop reference for understanding your software’s UX? How about a glossary of common terms? Or an overview of your product’s core features?

What if the user is moving from a different software to yours? What information might they need to make the transition easier? By thinking about the differences in menu trees, icons, and feature names, you can accelerate product adoption and improve customer retention

While all these applications may be different, the point is that the information you need to convey can transferred with the right quick-reference guide. The key is understanding your audience and creating the content they need to succeed.

With that in mind, here are some quick-reference guide examples with a breakdown of how they’re most commonly used to help users:

  • Quick-start guide
    Help your users get up and running quickly with your product.
  • Core or basic task guides
    This is similar to a quick-start guide, but offers an overview of how to use your product or service’s most basic or core features.
  • Guide to more advanced features
    Once your users are ready to take things to a new level, use a quick-reference guide to introduce them to other functions and features.
  • Guide to product changes
    Has your software had a major update? Use a quick-reference guide to walk your users through the changes. If the update is really major, you might even consider simplifying the user interface in your guide.
  • Step-by-step how-to
    Got a process you need to explain? Outline the process one step at a time.
  • User manual for products with limited features or functionality
    If your product doesn’t require a huge manual, a quick-reference guide may be all the documentation you need.

Create a quick-reference guide!

Download a free trial of Snagit to quickly and easily make your own quick-reference guide.

Download for free now
Snagit icon

Essential elements to creating a great quick-reference or quick-start guide

Know your audience and their needs

It’s important to keep in mind that any user documentation you make needs to include the information and content your audience wants. It’s important to remember that this isn’t always the same as what you want to tell them.

As noted in our Beginner’s Guide to Customer Content, there are a number of ways to figure out exactly what your users need to know. Looking at online forums, using customer surveys, and even speaking to your technical support staff are all great ways to find out what your customers believe is missing. 

Regardless of how you get this information, delivering the content your customers want and need will go a long way to ensuring the success of your quick-reference materials.

Simplicity is key

The whole point of a quick-reference guide is that it’s quick. This means making information easily and readily accessible, so it’s important to ensure it’s easy to understand. Here’s how you can do that…

Use visuals

Visual communication matters, so avoid big blocks of text as much as possible. Instead, use visual elements such as screenshots with markups, icons, and product photos — and just enough text to ensure your points are clear.

Include only essential information

Be sure to keep your guide between one and two pages long. Don’t try to include everything from your entire user manual — a quick-reference guide that needs a table of contents isn’t going to be that quick to reference. 

Make sure you only include the most vital information that the user will need to accomplish a particular task. This means boiling down complex concepts to their most basic form. 

Remember, you can always create more quick-reference guides to cover other important topics when needed. 

Use a simple and easy-to-follow layout

You don’t have to create a work of art to make a good quick reference guide, but if your quick-reference guide isn’t visually appealing and easy to follow, your users won’t find it useful. 

Creating instructions using visuals is easy. Sometimes, something as simple as a screenshot annotated with arrows, text, etc. can be enough to give someone the information they need. 

Visual Content

We can’t emphasize this enough: Your quick-reference guide just won’t be as effective, engaging, and useful as it can be without good images, icons, screenshots, or other visuals. 

Images draw the eye and help provide anchor points to your content, helping your users quickly and easily identify important points of information. In fact, our Value of Visuals research found that people learn better with images and text compared to just text alone. 

Infographic showing that 58% of people believe they remember information better when it's visual, that 67% of people complete tasks better when instructions are provided with visuals or video, and that employees absorb information 7% faster when communications are visual.

As the infographic above demonstrates, there’s some truth behind the saying “A picture is worth a thousand words”. A good image can convey a ton of information and help to reduce the text density of your content, thus making it more user-friendly. 

So, it turns out the best way to show something, is to literally show it. Who knew?! 

Quick-reference guide dos and don’ts

Not all quick-reference guides will be as simple as the one we created above. Some will need more text or more images, while others will need more complex layouts. 

There is a wide range of types and uses for quick-reference guides, and it would be impossible to cover them all here in this guide. That said, there are some common dos and don’ts that are pretty universal:

Quick-reference guide dos and don'ts. Text is repeated below the image.

Do

  • Keep it as short as possible — one to two pages is best.
  • Use visuals like annotated screenshots, icons, and product & UX images. 
  • Use a sensible, easy-to-follow layout, with clear headings and subheadings.
  • Know your audience and what they need.
  • Make it stand on its own. Users shouldn’t have to look in your manual to understand your quick-reference guide.

Don’t

  • Cram in too much information. You’re not trying to fit your whole user manual into one guide.
  • Make your font sizes so small that no one can read them without a microscope.
    Repeat information unnecessarily. 

Improving Your Internal Communications

A guide to how visual content can help create a more collaborative and productive work environment.

Download now!
techsmith logo

Quick Reference Guide, the FAQs

What is a quick-reference guide?

A quick-reference guide is any documentation that provides a one- or two-page set of condensed instructions on how to use a product. 

Is a quick-start guide a type of quick-reference guide?

Yes! A quick-start guide helps a customer or user quickly get started with your product or service without having to know the more intricate or advanced features.

What are some common types of quick-reference guides?

– Quick-start guide
– Core or basic tasks guide
– Guide to more advanced features
– Guide to product changes
– Step-by-step how-to
– User manual for products with limited features or functionality

What are the essential elements for creating a good quick-reference guide?

– Know your audience and their needs.
– Keep it simple.
– Good, clean, easy-to-follow layout/design.
– Use visual content such as images and illustrations.

Ryan Knott

Ryan Knott is a Marketing Content Strategist at TechSmith, where he creates content about easy, effective, and efficient video creation, editing, and tips and tricks, as well as audio editing for creators of all kinds. He/him.

How To Merge Videos?

Whether you’re creating training videos for your staff or a YouTube video for your vlog, sooner or later you’ll probably find yourself needing to merge videos. 

What does merging videos mean? Well, it’s pretty simple, whether it’s two clips or more, you can combine videos together to make a single cohesive video. Learning how to merge videos is easy, but will save you a ton of time and effort in the future. 

While editing beyond basic techniques such as cropping and rotating can be daunting, there’s no need to panic. In this post, we’ll show you how to combine videos together using TechSmith’s Camtasia

Never used Camtasia before? Then download the free trial today and find out just how easy it is. 

Camtasia comes with a sophisticated, but incredibly intuitive editing suite that makes it easy to create professional-quality videos. Whether you want to add music to a video, change the speed of your footage, or add closed captions, with Camtasia it only takes a few clicks. You can even synchronize separate audio and visual sources

But back to how to combine videos! Here’s what this post will cover: 

It’s worth noting that merging two or more videos together is not the same as creating a split-screen video. However, if that’s what you’re looking to learn then this is your lucky day as we have another post on how to make a split-screen video

What to consider when merging video clips

No matter how experienced you are with video editing, it can still be hard to seamlessly merge videos in a way that keeps your videos looking professional. With that in mind, here are some of the obstacles you might need to work around: 

Quality

Be aware of the video quality when merging two separate videos. If one clip has a lower resolution, you may want to lower the resolution in your project settings to match that of the lowest-quality clip, before moving forward. 

Trimming and cutting

There’s a good chance that not every clip you want to use will be perfect from start to finish. This is where the trimming and cutting tools come in handy. You can use these tools to clean up your clips so that the transitions between them are seamless.


Color correction

Most video clips won’t look exactly the same. If you’re filming in different locations or at different times of day, the overall lighting might be different. 

While getting the perfect lighting before you film can help maintain consistency, you can also adjust the color temperature of your clips to ensure they share the same aesthetic before you merge them. You can do this by using any of the color effects options, or by adding a color filter (which you can learn more about here) to all of your clips to give them a cohesive look.

Edit videos like a pro

Camtasia is the best screen recorder and video editor on the market. Create content your viewers actually watch.

Download now!
Camtasia icon

Tips for adding a professional polish to your final merged video

Create a storyboard

Without going into too much detail, storyboards act as visual representations of a video. They’re often hand-sketched, but that doesn’t mean they have to be picture-perfect — even stick people can make a good storyboard.  

While not every video will need a storyboard, they can go a long way in helping you get organized, especially if you’re merging two or more videos into one.

If you’re only making a quick tutorial video to be shared internally, then you probably don’t need a storyboard. But if your video is reaching a wider audience, it would likely benefit from being visualised in advance.

Keep your clips organized

Always keep your video clips and images organized in folders when you’re working on a project — this will ensure that nothing gets lost during the editing process.

In Camtasia, you can import certain clips from your computer to the library. This way, you can have easy access to all the clips you plan on using in your project. What’s more, Camtasia’s Standalone Projects feature makes it easier than ever to make sure all your clips are included in your project file, which lowers the risk of losing them later on.

Include transitions and animations

Things don’t always go to plan when you’re trying to combine videos as they won’t always merge seamlessly. 

However, with the help of transitions and animations you can hide the moment when one clip ends and another begins. This will make your footage more cohesive and less choppy while adding more visual interest to the video. 

Make sure your animations provide clarity, draw appropriate attention, and are worth the extra effort. If you’re adding animations simply for the sake of having some cool effects, there’s a chance they’ll do more harm than good — trust us.

The Marketer’s Ultimate Guide to Video

In our FREE ebook, we’ve put together practical strategies to get out of the woods and create engaging, powerful video content on your own that reaches your audience.

Download now!
techsmith logo

Include images

Having images dispersed throughout your video can be a great way to break up the visual monotony and better keep your audience’s attention. 

With most video editing software, including Camtasia, you can import images the same way you import videos and adjust the amount of time they appear on screen to a duration that you think works best. 

If you feel an image is on screen for too long, you might try adding an animation to slowly zoom in or out on the picture, as this will add more visual interest. 

How to merge two videos together in Camtasia

Step 1. Start a New Project

First, open Camtasia and select New Project.

Step 2. Import Videos

Before you can merge videos, you need to add them to the Camtasia project you created. 

With your new Project open, choose File > Import > Media, then select the videos you want to merge. Camtasia will add the videos to the Media Bin and they will be ready to be added to your Project.

Step 3. Add videos to the timeline

To merge videos together, you must add them to the Timeline in the order you want them to appear. To add videos to the Timeline, click and drag them from the Media Bin to the Timeline. To reorder your videos on the Timeline, click and drag them to the desired location. 

Pretty easy, right?

Now you can click the Play button above the Timeline to preview your merged videos. If there are gaps between your clips, be sure to move them together until they’re touching. It’s important to note that Camtasia will only produce the videos that are on the Timeline.

Step 4. Save your video

Once you’ve added your videos to the timeline, and they’re arranged in the order you want them, you can export your video by clicking on the green Export button (who’d have guessed!). 

This will merge all your videos together and give you options for where you’d like to save your merged video, and in what format.

Learning how to stitch videos together to make one complete video can seem overwhelming if you don’t know how to do it — but now you do! Be sure to use all of the information we discussed to get started, and don’t be afraid to get creative!

Edit videos like a pro

Camtasia is the best screen recorder and video editor on the market. Create content your viewers actually watch.

Download now!
Camtasia icon

How to Write A Shot List That Will Transform Your Video

SLR camera next to laptop

When you start creating videos, there’s often a lot of preparation before you can even think about hitting the record button. If you will recording using a camera, you need to find a set, adjust lighting, and have the proper camera angles.

The best way to organize this preparation is with a shot list.

Even if your video will only use screen recordings without any camera footage, it’s helpful to have a shot list to help you identify and plan for everything you want to record.

What is a shot list?

A shot list is a document that maps out exactly what will occur and what will be used in that particular shot, or scene, of the video.

And, while your video probably isn’t a big Hollywood production, a shot list helps organize your thoughts and begin with a solid plan.

Shot lists go hand-in-hand as part of writing the script, creating a storyboard, and the overall pre-production process.

Make your own videos today!

Make professional-quality videos quickly and easily with Camtasia. Record your screen or upload an existing video, then bring the “Wow!” with effects, music, and much more.

Download for free now
Camtasia user interface

Why are shot lists important?

If you’re asking yourself whether a shot list is really worth the effort, then allow us to answer that question for you: Yes it is!  

A shot list is like a blueprint that acts as a roadmap for your entire project, offering a structured plan that everyone can follow. It ensures that all team members are aligned, setting the stage (quite literally!) for a successful shoot.  

But why are they so important?  

Firstly, shot lists save time. Having a predetermined list of shots helps you utilize your shooting hours more efficiently. It provides quick answers to questions like, “What are we shooting next?” or “Who will be on camera for this part?” Having this information in hand eliminates guesswork, speeding up the shoot and maintaining focus throughout production.  

Secondly, a well-constructed shot list helps keep you prepared because it outlines what to expect at each step. This reduces the risk of misunderstandings and ensures the shoot runs as smoothly as possible.  

In essence, a shot list helps streamline the creative and logistical aspects of making a video. It’s a guide to staying organized, saving time, and most importantly, capturing the footage that will bring your story to life.

The essential elements of a shot list

Now that we know why a shot list is so important, let’s take a look at how to make a shot list, starting with a breakdown of each of the key elements you should include: 

  • Script / SB reference: Indicates which part of the script or storyboard the shot corresponds to, ensuring alignment between planning and execution.
  • Shot Number: The reference number assigned to each shot. This is essential for easy identification and organization.
  • Interior / Exterior: Specifies whether the shot takes place indoors or outdoors. This is crucial for lighting and equipment planning.
  • Shot: Identifies the type of shot — such as Wide Shot (WS), Medium Close-Up (MCU), or Very Wide Shot (VWS) — to establish the shot’s visual style.
  • Camera Angle: Specifies the perspective from which the camera will capture the shot — like eye level, high angle, or even birds-eye view — adding layers of meaning to the scene.
  • Camera Move: States whether the camera will remain static or employ a specific movement like panning, which affects the energy and pacing of the scene.
  • Audio: Indicates if the shot includes specific audio elements like a voice-over (VO), an important note for post-production.
  • Subject: Listing any people needed in the shot is an important detail for scheduling and ensures all team members know what should be captured.
  • Description of Shot: This is a detailed summary of the shot in question, including the visual elements and type of shot to help guide the director, cinematographer, and crew. 

While there is fundamental information that should be included on every shot list, there’s no right or wrong way for you to put yours together. This is a tool for your production and the most important thing for you is to make sure you have all the information you and your crew will need. 

With that in mind, you may wish to add, or even swap out, some columns to list other bits of information, such as: 

  • The Scene Number: This is a number to identify each scene, which will help with the organization and workflow of the shoot. 
  • Location: Specifying the set or location for each shot will help when planning logistics.
  • Framing: This should indicate how you want a shot to be composed, which will help maintain artistic coherence and consistency.
  • Action/Dialogue: This is where you’ll describe what you want to happen in the shot, such as character actions and important lines, ensuring key parts of the story are captured.
  • Props Needed: It’s also worth detailing the props required for each shot.
  • Extra Notes: You can also add a section for miscellaneous (yet essential) information, like special camera instructions, lighting requirements, or anything else that needs to be conveyed to the crew.

Make your own videos today!

Make professional-quality videos quickly and easily with Camtasia. Record your screen or upload an existing video, then bring the “Wow!” with effects, music, and much more.

Download for free now
Camtasia icon

Shot list template

Now let’s take a closer look at what a shot list might actually look like.

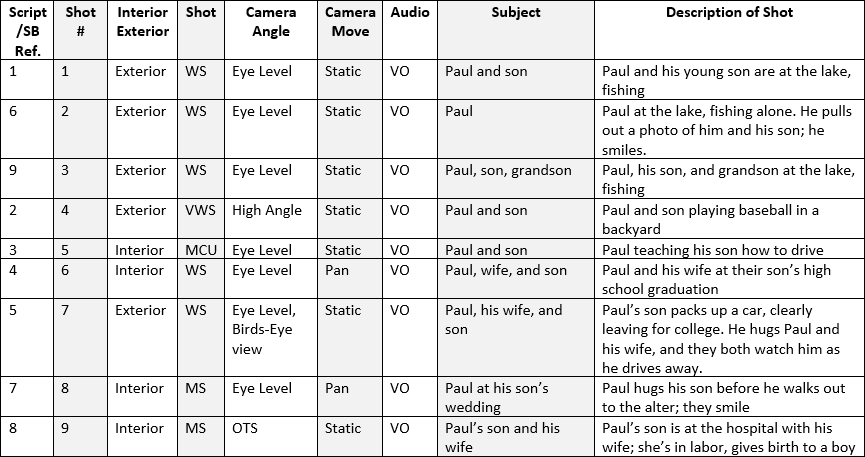
In the screenshot below, you can see a clear shot list example, complete with information about each shot to help convey to the crew who’s needed on set, details of the action, and where each shot will be filmed. 

Sample shot list template

We’d recommend organizing your shots based on location. Grouping shots this way will make it easier to film because you’ll be able to film everything you need at one given time. 

For example, if you’re going to shoot a scene at a lake for the beginning and end of the video, it would make sense to film these shots at the same time, rather than separately. While you won’t be filming in order of the storyboard, this makes filming much more convenient. 

The different types of shots

Perhaps one of the most important aspects to consider when creating your shot list is how you want each shot to be captured. This includes information about the types of shots you want to film, as well as camera angles and movements. 

For example, do you want a wide shot (WS) or a close-up (CU)? Will the camera be static or panning? 

Meanwhile, camera angles could include high and/or low-level shots, whereas a move may be on a handheld camera, a crane, or a dolly. Once you’ve decided on your camera work, it’s also important to think about how you’ll record the audio, whether it’s using a boom mic or a voice-over — and don’t forget about your B-roll, the secret sauce of all great videos

We’ve put together a quick and easy chart that you can refer to below for more shot types, camera angles, camera moves, and audio.

Chart of shot types, camera angles, camera moves, and audio options

There’s a lot to consider, but all of these details are vital to creating a shot list that ensures your shoot runs smoothly. 

How to create a shot list in 5 steps:

Now, we’ve already covered enough information to make any video creator’s head spin. But, don’t worry if you’re feeling overwhelmed by the idea of creating your own shot list because we’re going to make it easy for you. 

Whether you’re making a training video, a software demo video, an animated explainer video (yes, animations need shot lists too!), or any other type of video, we’re going to show you how to make a shot list in five easy steps. 

Now for the actual process of creating your shot list, we suggest opening a spreadsheet. The layout makes it easy to compartmentalize all the information while keeping everything organized and easy to rearrange if and when needed. 

1. Pick a scene

The first step in creating a shot list is choosing a scene from your script to focus on. Then, in your spreadsheet create column headings using the nine essential elements of a shot list that we’ve discussed above, such as the scene and shot numbers, location, framing, etc. 

Next, each individual shot you have planned for that scene should be given its own row. Pretty easy so far, right? 

2. Break down each capture

Now that you have your scene and spreadsheet ready, it’s time to dissect each shot. This means going through them one at a time and thinking about how you’d like to capture each one.

This is the time to use your understanding of shot type and camera movements to fill in each column in your spreadsheet with the specifics that will guide your crew during production.

3. Number your shots

Clarity is key when organizing your shot list, which is why it’s so important to number your shots. Start with the number 1 for your first shot, and for each subsequent shot, create a new row in your spreadsheet and give it a unique number.

This simple system makes it much easier to reference specific shots during a busy shoot and also helps in the editing process later on.

The ultimate guide to making amazing videos

Watch our video and get great advice on how to start making videos, promotion, and more.

Watch more
techsmith logo

4. Assign a shot for every part of the scene

There’s nothing worse than wrapping up production, only to realize later on that you forgot to take an important shot — but it’s a mistake that’s as common as it is avoidable. 

While it can be really tempting to skip a “minor” shot when creating your shot list, with an “it-will-all-work-itself-out” mentality, the whole point of your shot list is to list all your shots. So, make sure that each part of your scene, no matter how small, has its own spot on your spreadsheet. By being meticulous in this way, you’ll eliminate ambiguities and ensure that every element in your scene gets the attention it deserves during filming.

5. Draw rough sketches

Even if you’re not an artist, drawing rough sketches or storyboards for your shot list can be incredibly useful. This visual aid will help you and your crew better understand how a scene will unfold. It’s also a good way to try and spot any potential issues before you’re on set. If something doesn’t look quite right in the sketch, you can adjust your shot list accordingly. 

You might want to think of these drawings as a second layer of planning, offering another opportunity to fine-tune your vision before the cameras start rolling.

And that’s all there is to it! Your shot list can be as simple or as detailed as you see fit. The most important thing is making sure you have a shot list in the first place—while it might seem like a lot of work upfront, it will make both shooting and editing your video much easier in the long run. 

Speaking of editing, once you’ve got all your footage together, consider using TechSmith’s Camtasia — which comes with a 30-day free trial! If you’re new to editing, you might also want to check out our guide on how to edit a video.

How to write a shot list, the FAQ

Do I really need a shot list for a small project?

Even for small projects, a shot list can be incredibly useful as it keeps you organized and ensures you don’t miss any shots crucial to your production.

How detailed should a shot list be?

The level of detail your shot list requires will depend on the needs of your project. That said, it’s generally better to be over-prepared than under-prepared.

Can I make changes to my shot list during the shoot?

Yes! Flexibility is key in filmmaking. While a shot list serves as a guide, there may be moments when you need to adapt due to unforeseen circumstances or new creative insights.

Is a shot list the same as a storyboard?

While they serve similar purposes, shot lists and storyboards are not the same. A storyboard is a visual representation of your script, while a shot list is more like a detailed checklist that includes logistical and technical information.

How to Crop a Video Quickly and Easily

Do you need to change the focus of your video clip without having to re-shoot your footage all over again? This post is going to teach you all you need to know about how to crop a video.

While it’s often used for photo editing, cropping is just as useful when it comes to editing video. With cropping, you can remove unnecessary or distracting portions of a video clip or change its dimensions to fit within a certain area. 

Camera footage is often cropped to change the emphasis of a shot or remove unwanted and distracting portions. So, whether you’re working with footage from a camera or a screen recording, there will likely be plenty of times that you need to crop these clips. 

Edit your own videos like a Pro

Camtasia is the best screen recorder and video editor on the market. Create content your viewers actually watch.

Download now!
Camtasia icon

What is video cropping?

In a nutshell, video cropping refers to the process of removing unwanted portions from the outer edges of a video to focus on a specific subject or area. For example, if you have a photograph, and you cut out the parts you don’t need so you can zoom in on what’s most important — that’s essentially what you’re doing when you crop a video.

While you might think that cropping sounds similar to trimming or cutting, it’s not. Trimming and cutting generally refers to shortening the length of a video by removing bits of footage. Cropping, on the other hand, doesn’t alter the duration of the video; it simply changes the dimensions and the framing to center the viewer’s attention where you want it.

So, why do people crop videos? Well, there are a few reasons, such as removing distractions from the edge of a frame or changing the aspect ratio of your video so that it’s better suited to platforms like Instagram and YouTube. 

Whatever the reason, knowing how to crop a video is an essential skill for any budding video editor! 

How to crop a video with Camtasia

One of the fastest, simplest (and best) ways to crop a video is with TechSmith’s Camtasia. Our user-friendly editing suite comes with a wide range of advanced tools that are super easy to use — making it perfect for professional and novice editors alike! 

With Camtasia, you can change the speed of your videos, add music to your footage, and even create closed captions and subtitles. But, before we talk about all the wonderful ways you can use Camtasia, let’s get back to the matter at hand. 

Here are step-by-step instructions to crop a video using Camtasia:

Step 1:

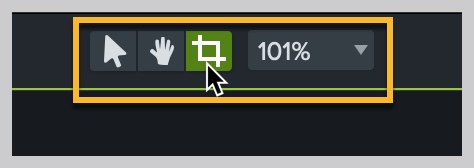
With a video clip, or image, selected on the canvas, you can select the Crop tool.

Step 2: 

With the Crop button selected, select the video clip or image that you want to crop. 

Step 3:

A thin blue line (and handles) will appear on your clip, which shows that Crop mode has been enabled. Click and hold the handles to drag the edges of the clip or image until your frame looks exactly how you want it. 

Step 4:

When you’re finished, toggle back to Edit mode by clicking the cursor icon above the canvas. 

Once a clip has been cropped, you can move it to wherever you need it on the canvas.

How to un-crop a video

Using Camtasia to crop a clip is particularly useful because it’s “non-destructive.” This means that when you crop your footage, the original clip remains intact. So, if you look back on your edits at a later stage and realize the shot looked better as it was, or want to crop it differently, you can! 

Simply follow the steps above to toggle Crop mode back on and make the necessary changes by adjusting the edges.

How is cropping different from zooming and trimming?

As we mentioned above, cropping is the process of moving or adjusting the edges of an image. Of course, there are other ways to edit your video that don’t involve cropping images or parts of your video, such as splitting and trimming. 

While these editing terms are sometimes used interchangeably with cropping, they do, in fact, mean completely different things. So, to avoid any confusion, let us talk you through the differences of each: 

What is zooming?

With Camtasia, you can zoom in or out on your videos by changing the size or scale of clips and images. Zooming is perfect for software tutorials and demonstrations when you need to display a detailed view of a user interface. 

What is trimming?

On the other hand, trimming refers to removing part of the beginning or end of a clip and is sometimes, this is referred to as trimming the top or tail. Trimming is critical to making sure that your video starts quickly and you don’t lose your audience’s attention. 

Best of all, with Camtasia’s video cutter, you can trim video and audio files separately.

Edit your own videos like a Pro

Camtasia is the best screen recorder and video editor on the market. Create content your viewers actually watch.

Download now!
Camtasia icon

What is video scaling?

While we’re here, let’s quickly cover scaling too! 

Scaling an image will change the overall size of that image. If you’re using Camtasia, it’s always best to display media at 100% scale, but camera footage can sometimes be scaled down without losing as much clarity, which could help reduce the file size of your video

The scale of a clip or image in Camtasia can be viewed and edited in the Properties panel.

However, please note that stretching a video or image larger than its natural size can cause pixelation — which is why it’s important to learn how to resize an image correctly.

That’s all there is to it, but don’t forget that as well as zooming, trimming, and scaling, Camtasia has all the editing tools you could ever ask for. Whether you want to blur your footage, rotate the final video, or merge two videos into one, Camtasia has got everything you need! 

When you should crop a video

Here are a few ways that cropping can be a helpful technique to have in your toolbox:

  • Fitting footage in a specific frame — like the screen on a smartphone or tablet.
  • Patching a mistake or irregularity in a screen recording.
  • Removing black bars from mobile videos.
  • Showing simultaneous actions happening in separate areas of your screen.
  • Displaying multiple clips on screen at the same time.
  • Isolating part of a user interface.

Now that you have learned how to crop a video in Camtasia, get out there and work some video magic!

The ultimate guide to making amazing videos

Watch our video and get great advice on how to start making videos, promotion, and more.

Watch more
techsmith logo

Croping a video, the FAQs

How to crop a video on iPhone?

To crop a video on an iPhone, open the Photos app and select the video you wish to crop. Tap Edit in the top right corner, then tap the crop icon at the bottom of the screen. Drag the corners to crop your video, and tap Done to save your changes.

How to crop a video in Premiere Pro?

To crop a video in Adobe Premiere Pro, first position the playhead over the clip you want to crop in the Timeline panel and make sure the clip is selected. Next, go to the Effects panel and navigate to Video Effects › Transform › Crop, then double-click to apply it to your clip. Finally, go to the Effect Controls panel, select the Crop effect, and either drag the handles in the Program Monitor or adjust the numeric controls to crop your video more precisely.

How to crop a video on Android?

To crop a video on Android with Google Photos, open the video you want to edit and tap on Edit, followed by Crop. If you’d like to change the aspect ratio, tap on Aspect ratio, or to adjust the video’s perspective, tap Transform and then drag the dots to crop the video. Once you’re satisfied with the crop, tap Save Copy at the bottom right to save your changes.

How to crop a video Windows 10?

To crop a video in Camtasia on Windows 10, first select the video clip or image on the canvas and then click on the crop tool. A thin blue line with handles will appear around your media, indicating that Crop mode is enabled. Drag these handles to crop your video to your desired frame. When you’re done, click the cursor icon above the canvas to toggle back to Edit mode.

How to crop a video in iMovie?

In iMovie, select the clip you want to crop in your timeline and then click on the Cropping icon, which looks like two overlapping squares. Click Crop to Fill and then adjust the frame by dragging the corners or sides. Once you’re satisfied, click the blue tick in the top-right corner to apply the crop and return to the main timeline.

How to crop a video on Mac?

To crop a video on a Mac you can use iMovie or Camtasia. In iMovie, import your clip to the timeline, then click the Cropping icon and adjust as needed. If you’re using Camtasia, select your clip on the canvas and click the crop tool; then drag the handles to crop your frame.

How to crop a video on Tiktok?

To crop a video on TikTok, start by uploading your video before proceeding to the editing screen. From there, click Crop and drag the handles on the sides and corners of your video, or select your desired aspect ratio, until your frame is the shape and size that you want.

Ryan Knott

Ryan Knott is a Marketing Content Strategist at TechSmith, where he creates content about easy, effective, and efficient video creation, editing, and tips and tricks, as well as audio editing for creators of all kinds. He/him.

How to Record a Streaming Video

These days, it seems that no matter where you look online, you’re bombarded with live content. Whether it’s a video on Facebook Live, a live webinar at work, or a Live Stream on YouTube. 

With so much content available in real-time, how is anyone supposed to process it all? Especially when there’s a chance it’ll disappear the second you scroll, without little hope of ever finding it again… Well, fortunately, there is a way to record streaming video before it’s lost to the void.

Screen recording software like TechSmith’s Snagit, and even the tools that come built-in with most computers, make it easy to capture streaming video while it’s being broadcast live. 

In this guide, we’ll discuss the different ways in which you can capture your screen so that you know how to record streaming content. 

Once you know how to record an online video, you can save it for later or share it with your friends, family, and coworkers. It’s easy, fast, and will bring order to a chaotic media landscape.


How to record a live video with built-in recorders

Computers and laptops are more versatile than ever. While we may use them predominantly for everyday tasks such as answering emails, browsing the web, creating Word docs, and playing the odd video game — there is so much more you can do. 

For example, you can make a decent YouTube video in less than a day. If you’ve got a good microphone for recording, then plug it into your laptop, and BOOM! — you’ve got a mini recording studio. The sky is the limit! 

But before we get distracted by all the awesome stuff you can do with your computer, let’s get back to the matter at hand: How to record a live-streaming video. 

There’s no need to dive into the deep end of the software pool here; both macOS and Windows have integrated tools that are great for recording streaming video. Let’s jump in! 

Video recording built-in tool on Mac

If you’re a Mac user, the built-in screen capture tool — aptly named Screenshot — is an easy and simple solution for recording a live stream. Provided you’re using macOS Mojave or later, here’s how you can record a live video on Mac in five simple steps:

  1. Open Screenshot: Press Shift+Command+5 at the same time. This will open the Screenshot toolbar.
  2. Choose your recording area: There’s no need to capture your whole screen if you don’t need to. Instead, select the specific part of your screen that you want to record.
  3. Don’t miss the sound: Want to capture audio as well? Head to Options and make sure to select Microphone. This way, both visuals and sounds from the stream will be recorded, provided they’re loud enough to be picked up by your microphone.

Note: The built-in Screenshot tool on a Mac doesn’t have an option to record the system audio. This means you’ll need to turn up the volume on your machine to ensure the microphone picks it up (so try not to sneeze!). 

  1. Record your screen: When you’re ready to start recording, hit Record. Then once you’re done, click the Stop symbol that will have appeared in your toolbar at the top of your screen.
  2. Review your recording: You’ll see a thumbnail pop up in the bottom-right corner of your screen. If you click on it, you can trim your video, share and save it.

Video recording built-in tool on PC

Windows users have access to a similar built-in feature: The Game Bar. 

Originally created for the gaming community, the Game Bar can be used for a wide range of tasks — even those that have nothing to do with gaming! This nifty little screen capture tool is perfect for recording live streams across browsers, applications, and other programs on Windows. 

Here’s a step-by-step guide to recording a live video on your PC:

  1. Activate the Game Bar: Press Windows+G together. This will open up the Game Bar on your screen.
  2. Personalize your preferences: Navigate to Settings, then to General. Here, you can turn specific features on or off depending on your needs.
  3. Ready. Set. Record: Once you’re all set up, hit Start Recording to begin capturing your live video.
  4. End and save: After recording, your video will be auto-saved as an MP4 file, making it universally accessible across devices and platforms.

How to record a live video with Snagit

Step 1: Find a desktop capture tool

First, find a great screen recorder and screen capture tool. There are many tools that will let you record your desktop screen, but some are better than others — and Snagit is one of them. It’s great for easily capturing screen recordings. You can even cut out the parts you don’t need. 

If, however, you need a tool with greater editing capabilities, check out TechSmith’s Camtasia. While Snagit is perfect for non-complex recordings and basic editing, Camtasia comes with the advanced functionality of a professional editing suite that’s still easy to use. 

With Camtasia, you can change the speed of a video, add captions and subtitles, and even sync audio and video sources in just a few simple steps. 

Make your own streaming videos today!

Make professional-quality streaming videos quickly and easily with Snagit.

Download for free now
Snagit icon

Step 2: Adjust your recording settings

Once you’ve downloaded Snagit, open it and check that everything is set up to record a video rather than capture an image.

After selecting the area of the screen you want to record, the screen recorder toolbar will appear. You can then select to record microphone audio or system audio (or both!) alongside the screen recording.

If you’re recording a video that’s streaming live, then there’s a good chance you’ll want to capture the audio as well. This includes any sound from your computer, such as application alerts and the audio playing from your speakers. So, if you want that included in your recording, make sure you’ve got the system audio selected.

Step 3: Select an area to record

Click the Capture button and then select your entire screen, a particular window, or a custom region. Here’s an example of a NASA live stream:

As you can see, we only captured the streaming video section of YouTube, rather than the entire browser window. 

Step 4: Hit record

Once you’ve made your selection, click the Record button to start.

With Snagit, you can pause and resume the recording at any time. You can also record your webcam at the same time as your screen, which is what we like to call a picture-in-picture recording.

When you’re done recording, click the Stop button.

If you plan to record a long video stream, it’s worth noting that if your computer goes to sleep, or a screensaver starts running, your screen recording may be interrupted. So, if you plan to start recording a live stream video and walk away from your device, you may want to turn off screensavers and sleep mode in your computer settings. 

Step 5: Save and upload

Once you have your video, you can save it to your computer as an MP4 or upload it to a platform, such as TechSmith Screencast, to share as needed. Snagit and Camtasia both have built-in export features for popular platforms such as YouTube, Slack, and plenty more.

Snagit even lets you turn a video into a GIF! But remember, GIF files don’t support audio.

Video captures can help you bring order to the chaos of live content and have many practical uses for saving and sharing both entertaining and useful footage. If, for example, you’re a remote worker, then you might find it useful to record Zoom meetings for future reference, or to share with colleagues that couldn’t attend.

It is, however, important to make sure you have permission to record and share content. If you were to ever pay to attend a webinar, record it, and share it with your coworkers, you and your organization could end up in trouble. 

Make your own streaming videos today!

Make professional-quality streaming videos quickly and easily with Snagit!

Download Now!
Snagit icon

Record a live streaming video, the FAQs

Can I record the video and audio on a live stream at the same time?

With Snagit and Camtasia, you can! Simply toggle the aspects you want to record, like your screen or system audio.

Can I record a live stream on my phone?

Yes, you can! To capture a live stream on your phone, download TechSmith Capture. Then, once you’re done recording, you can easily upload the video to Snagit or Camtasia for editing.

How do I record a live stream online?

To record a live stream online, you can use built-in tools on like Screenshot on macOS or the Game Bar on Windows. Alternatively, specialized live streaming software, such as Snagit and Camtasia from TechSmith, offer enhanced recording and editing capabilities.

How do I record a live stream on Windows 10?

On Windows 10, you can use the built-in Game Bar to record live streams. All you have to do is push Windows+G, adjust your preferences, and click select Start Recording. Alternatively, you can use Snagit for more advanced tools.

Kara Swanson

Marketing Content Specialist at TechSmith. I know way more about tea than any human being ever should.

YouTube vs. Vimeo: What’s the Difference?

youtube vs vimeo comparison

In today’s digital age, video content is king and platforms like YouTube and Vimeo reign supreme. Yet, while both are video hosting behemoths, they cater to different audiences and serve distinct purposes. 

If you’ve ever found yourself torn between the two, wondering which platform to invest your time and creativity in, you’re not alone! 

In this guide, we’ll dive deep into the intricacies of YouTube vs. Vimeo, comparing their features, monetization methods, core users, and more to help you decide which platform is best for you.

So, whether you’re a budding filmmaker, a business looking to market products, or simply curious, join us as we unravel the strengths and weaknesses of each platform.

Make your own videos today!

Make professional-quality videos quickly and easily with Camtasia. Record your screen or upload an existing video, then bring the “Wow!” with effects, music, and much more.

Download for free now
Camtasia icon

What are YouTube and Vimeo? 

Whether you’re catching up on the latest vlogs, tutorials, or indie films, YouTube and Vimeo have become the go-to platforms for millions of users looking to watch videos worldwide. But what exactly are these platforms, and how do they differ?

At their core, YouTube and Vimeo are both online video-sharing platforms, but that’s not to say they’re the same. In fact, each platform is unique. 

Without going into too much depth (yet!) about what makes each platform different, let’s look at what makes them what they are: 

YouTube:

  •  Launched in 2005, it’s a behemoth in the online video space.
  •  A place where users can upload, share, and comment on videos.
  •  Known for its wide variety of content, from amateur clips to professional series.

Vimeo:

  • Debuted in 2004, a few months before YouTube.
  • Prides itself on being a platform for high-quality, artistic, and creative videos.
  • A community-driven site, often chosen by filmmakers, artists, and professionals.

Both platforms have evolved over the years, catering to their respective audiences and enhancing the user experiences they offer. However, their underlying purposes, features, and communities have unique nuances that set them apart. 

Now let’s delve a little deeper into what it is that sets these two platforms apart, deciding, once and for all, the ultimate champion of Vimeo vs. YouTube. 

YouTube vs Vimeo, the main differences

Main differences between Youtube and Vimeo

Because YouTube and Vimeo are the giants of the video hosting world, we’ve integrated outputs for both platforms in TechSmith’s Snagit and TechSmith’s Camtasia. However, Vimeo outputs are currently only available through the Windows version of Camtasia. 

While there aren’t really any limits as to how you can use either tool, you could, for example, use Camtasia to create and edit a video, and use Snagit to create the video thumbnail. In doing so, you’ll be able to quickly and easily export your files specifically for YouTube and/or Vimeo.

TechSmith Screencast is another great place to host your video content if you only want to share it with a select group of people. But, before we start tooting our own horn, let’s get back on track and dive into the main differences between YouTube and Vimeo:

YouTube:

  • Audience: With such a vast user base, constructive feedback may be lost amid the sheer volume of comments.
  • Cost: Free version available. A premium, ad-free experience can be had for $10/month.
  • Video Management: You can’t replace videos while retaining analytics, but you can trim your video content.
  • Monetization: Ads are everywhere! This can be frustrating for viewers, but good for content creators looking to profit from their content.
  • Privacy: Options for scheduled releases, as well as unlisted and private video settings.

Vimeo:

  • Audience: A predominantly more mature community, often resulting in more constructive feedback.
  • Cost: Offers free and paid tiers (Plus, Pro, Business, and Premium) with varying storage capacities and perks.
  • Video Management: Ability to replace a video without affecting its statistics.
  • Monetization: A completely ad-free platform.
  • Privacy: Features include password protection, alongside unlisted and private video settings, among others.

Understanding the differences between YouTube and Vimeo and what makes them unique, is the first step in deciding which platform is best for you and your content.

YouTube vs Vimeo, the community size

The first question you should always ask yourself before pushing the record button on your camera is: “Who is my audience?” This question extends beyond making a video, as it’s also something you need to consider when deciding whether to host your content on YouTube or Vimeo — because both have very different communities.

YouTube’s community isn’t big, it’s massive! There are more than one billion users watching hundreds of millions of hours of content, every single day! 

While this is great for reaching lots of people with your content — with the potential to get millions of views on a single video — there are some cons with such a big audience. For example, you may run into questionable or even offensive users that aren’t afraid to tell you exactly how they feel about your content.

Vimeo, on the other hand, has a much smaller community. Of its 170 million active viewers, about 42 million are in the United States. However, Vimeo’s community is generally very supportive and has many users that offer more constructive feedback than what you might find on YouTube.

Despite this, when looking at the numbers alone, no video hosting platform can match the sheer volume of YouTube. If you are looking to engage with a creative and more caring community of filmmakers, Vimeo might be the place to go. But, if you want to tap into a gargantuan audience, YouTube is where it’s at. And hey, haters gon’ hate — but you don’t have to listen. 

Winner: Youtube

Make your own videos today!

Make professional-quality videos quickly and easily with Camtasia. Record your screen or upload an existing video, then bring the “Wow!” with effects, music, and much more.

Download for free now
Camtasia icon

YouTube vs Vimeo, the type of content

There’s this notion that YouTube is, first and foremost, a hub for entertainment and viral sensations. While that may have once been the case, YouTube has since blossomed into a diverse platform hosting a myriad of valuable content genres. 

You’ll find many creators offering deep dives into subjects ranging from productivity to videography — all of which offer genuine value for viewers looking for more than just mere entertainment. 

With YouTube’s immense global audience, there is a huge opportunity for creators to carve out a niche and cultivate a dedicated following. Beyond individual creators, businesses also harness YouTube’s reach to share product launches, product demonstrations, customer testimonials, and instructional content.

On the other hand, Vimeo presents a more curated atmosphere. It’s the chosen platform for many creators keen on immersing themselves within a tight-knit creative community. 

Vimeo’s content is meticulously segmented into categories, including ads and commercials, animation, branded content, documentary, and music. This fosters a space where creators can establish their standing in specific genres and better connect with their audience. 

So, while YouTube offers breadth and vastness, Vimeo delivers depth and specialization.

Winner: Vimeo

YouTube vs Vimeo, monetization

Monetizing your video content requires more than just getting lots of views. The strategy you opt for should resonate with your audience, content type, and long-term business goals. 

Here’s how YouTube and Vimeo stack up in terms of monetization:

YouTube

Through the YouTube Partner Programme (YPP), creators can earn from ads displayed before, during, and after their videos. However, being a YouTuber isn’t necessarily a quick and easy road to fame and fortune. Before even applying to be part of the YPP, creators must have:

  • 1,000 subscribers, minimum.
  • 4,000 hours of watch time on their channel over the last 12 months.
    • Or 10 million Shorts views in the last 90 days.

However, a content creator’s revenue stream isn’t limited to YouTube ads. In fact, many of the highest-paid YouTubers leverage their audience by: 

  • Earning money from affiliate marketing schemes.
  • Procuring sponsorship deals.
  • Seeking donations from their viewers. 

Vimeo

Unlike YouTube, Vimeo is completely ad-free and makes its money by offering premium memberships to its users. This means creators need to follow entirely different monetization methods to profit from their content.

So, if you’re planning to use Vimeo to host your content, here are the two best ways you can make money from the platform:

  • Vimeo on Demand: Pro members can sell or rent out their video content, retaining a whopping 90% of the revenue (after costs).
  • Vimeo OTT: This allows creators to start a subscription-based channel exclusively for their content. Vimeo OTT draws revenue from on-demand content, live streaming, and subscription fees and is great for anyone with an expansive video library, and a large audience. 

To sum up, YouTube leans into ad-based revenue while Vimeo’s monetization models gravitate towards direct sales and subscriptions. While the best platform for you will depend on your content strategy and where your audience is most engaged, we’d say YouTube is probably a better platform for new creators looking to make money from their content. 

Winner: Youtube

YouTube vs Vimeo, usability 

For creators seeking a new platform to share their content, knowing how straightforward it is to upload, manage, and analyze content is crucial. So, let’s take a quick look at how easy it is to upload and manage content on YouTube and Vimeo.

YouTube:

Known for its user-friendly interface, uploading a video on YouTube couldn’t be easier. You simply log on, hit the Upload button, choose a video file, and fill out details like title, tags, and descriptions while you wait for it to upload. 

YouTube also provides a comprehensive dashboard that can give insight into performance metrics like views, subscriber growth, and watch time, to help ensure creators are fully equipped with data to refine their content strategies.

Vimeo:

Uploading videos on Vimeo is also very easy. However, Vimeo places a distinct emphasis on video quality. Its upload guidelines, which are slightly stricter than YouTube’s, underline the platform’s commitment to prioritizing the richness of content. 

So, while quantity might thrive on YouTube, Vimeo is the haven for quality-driven creators, and for that reason, Youtube is the winner here. 

Winner: YouTube

YouTube vs Vimeo, the membership fee

Vimeo offers four membership options: Plus, PRO, Business, and Premium. Each one has its own level of storage, support, and unique features, as you can see in the chart below:

Vimeo: choose a membership plan

While Vimeo does offer free memberships, it limits users to a maximum storage capacity of 500MB per week. YouTube, on the other hand, allows users to upload videos for free with an unlimited amount of storage.

There is, however, YouTube Premium which allows people to watch videos without ads — but this is aimed more at viewers than creators. As well as being able to watch videos ad-free, Premium users can download videos for offline viewing and can access the YouTube Music app.

Winner: Youtube

YouTube vs Vimeo, updating your videos

Have you ever uploaded a video, and later realized you need to correct a mistake or update the information? Vimeo allows you to replace a video after it’s been uploaded without losing that video’s stats. 

While we think writing a script for all your videos is a great way to minimize the risk of making mistakes, this feature can be very useful if you need to make a change to your video after it’s been uploaded.

With YouTube, however, you can’t make changes to a video without completely deleting and re-uploading the file. If you use YouTube, you should always double — and triple-check — the content before uploading a video, because once you post it, you can’t fix it! 

Winner: Vimeo

YouTube vs Vimeo, copyrighted material

If you’ve added music to a video before uploading it, YouTube will detect copyrighted music (and images) almost immediately upon upload and automatically disable these elements if you don’t have permission to use them. This can help ensure you’re not unintentionally infringing on copyright.

Vimeo on the other hand, isn’t as strict and won’t disable your content. Remember, if you don’t own the rights to the media in your video, then technically, you’re stealing (even if you don’t realize it). 

This is something you have to be extra aware of if you use Vimeo, because it is your responsibility to ensure you’re not wrongly using material or content that belongs to someone else. 

Winner: Youtube

Make your own videos today!

Make professional-quality videos quickly and easily with Camtasia. Record your screen or upload an existing video, then bring the “Wow!” with effects, music, and much more.

Download for free now
Camtasia icon

YouTube vs Vimeo, advertising

You’ve probably noticed that YouTube has ads everywhere — across its website and within its video player. As a marketer, you have tons of options to reach specific audiences with highly targeted ads on YouTube, but as a viewer the sheer number of ads you’re forced to watch dampen the viewing experience.

Vimeo takes pride in keeping its site completely free from ads, which means neither you, nor your audience, will have to watch a commercial before, during, or after your watching content. 

While fewer ads are arguably better for viewers, it’s no good for advertisers or creators looking to capitalize on ad revenue. 

Winner: Youtube

YouTube vs Vimeo, analytics

Both Vimeo and YouTube offer a wide array of analytics that can be extremely helpful when determining who is watching your content, where they’re based, and how they’re viewing it.

However, if you’re a Vimeo user then you’ll need a premium account to access more advanced analytics — and the more you pay, the more advanced those analytics will be. 

While both platforms offer stats on views, comments, likes, shares, total plays, and geographical data, YouTube offers a little more (for a lot less). 

YouTube also offers insight into traffic sources, gender, what devices your viewers are using, and audience retention. Another feature of YouTube is the ability to add annotations or “clickable hotspots” on top of your video that allows viewers to interact.

Winner: YouTube

The Marketer’s Ultimate Guide to Video

In our FREE ebook, we’ve put together practical strategies to get out of the woods and create engaging, powerful video content on your own that reaches your audience.

Download now!
techsmith logo

YouTube vs Vimeo, search results

As well as being a platform to host videos, YouTube is the second-biggest search engine on the internet, with Google (YouTube’s parent company) being the first. This gives YouTube an unparalleled advantage in this criteria. 

YouTube’s dominance is doubly underscored when you take into account that Google is inclined to favor videos that are hosted on YouTube. For example, if your search for a video tutorial or product review, it’s not uncommon to see YouTube results crowning the top of Google’s results page. 

This prominence means that creators tailoring their content to cater to specific search queries can expect enhanced visibility on YouTube, as well as a surge in organic traffic from Google.

Vimeo, while a respectable platform, doesn’t quite match up in terms of search result presence. Although Vimeo videos can (and do) appear in Google searches, their frequency is noticeably less than YouTube’s. 

While creators can optimize their Vimeo content with descriptions and alt tags to bolster SEO, matching YouTube’s expansive reach is a challenge, to say the least.

Winner: YouTube

YouTube vs Vimeo, support

Looking now to customer support, Vimeo and YouTube both have different approaches to supporting their users. 

Depending on the kind of membership you have, Vimeo provides users with robust technical support. While basic users only get support via email (and the self-serve knowledge base), Advanced users can access chat support. However, Enterprise users can even get live support over the phone. 

YouTube, on the other hand, takes a more communal approach to support. It houses a vast knowledge library of troubleshooting, tips, and guides but doesn’t provide a channel to communicate with a helpdesk or support staff. While there is also an extensive help community, finding immediate answers to specific questions can be like looking for a needle in a haystack.

For those prioritizing direct, on-demand assistance, Vimeo may be the better choice. While it does come at a price, many find the bespoke help and guidance to be well worth it.

Winner: Vimeo

YouTube vs Vimeo, audio and video quality

Audio and video quality can be a determining factor for many when choosing a platform to host their video content. Both Vimeo and YouTube support 8K Ultra High Definition, which is currently the best picture quality any video can achieve. 

Both platforms also allow for high-resolution videos to be compressed to save storage space and will usually adjust the playback resolution to best suit the viewer’s internet speed and bandwidth.

While this might make it sound like a tie between each platform, people have run plenty of tests to see which one really offers the best playback resolution. Most results suggest that Vimeo often delivers a sharper, clearer video, while some YouTube videos can appear slightly less crisp in comparison.

As for audio, Vimeo’s commitment to quality is as clear as the sound it produces. It offers a remarkable 320 Kbps sound quality — which is the ultimate MP3 bitrate. However, it’s worth noting that you do need a paid plan to access this superior audio quality. Meanwhile, YouTube typically streams at 128 Kbps, with a boost to 256 Kbps for premium subscribers.

In essence, if you’re aiming to deliver the best possible audio and video experience, Vimeo might be the better choice, provided you’re open to investing in a premium account.

Winner: Vimeo

YouTube vs Vimeo, privacy options

Vimeo offers a variety of privacy options as well as password-protected content. This can be great if you’re reviewing content with clients and want to keep it hidden from the general public.

Meanwhile, YouTube allows three options; public, unlisted and private. Unlisted means only those with the link can view it, while private means only those you invite with an active YouTube account can view it.

Winner: Vimeo

Make your own videos today!

Make professional-quality videos quickly and easily with Camtasia. Record your screen or upload an existing video, then bring the “Wow!” with effects, music, and much more.

Download for free now
Camtasia icon

The bottom line 

At the end of the day, it really depends on the audience you are trying to reach because both platforms offer great resources for individuals and businesses who are expanding into the world of digital video. 

There are also a lot of other online video platforms to choose from — including Screencast — and finding the right one depends on the features and functionality you need for your videos. For reference, here’s a chart comparing the features and functionality of Vimeo, YouTube and Screencast:

Note: This is an update of a post originally published November 2015. It has been updated in August 2023 to reflect changes to the hosting platforms.

Youtube vs Vimeo, the FAQs

Is Vimeo better than YouTube?

Both Vimeo and YouTube have their distinct strengths. Vimeo is often praised for its superior video and audio quality, as well as its professional community and customer support. However, YouTube offers unparalleled reach, being the second-largest search engine, and provides more versatile ways of monetizing content.

What are the biggest differences between Vimeo and YouTube?

The key differences between Vimeo and YouTube start with their users: Vimeo is used mostly by professionals and creatives, while YouTube boasts a broader reach and a global audience. 
Where Vimeo offers better audio and video quality, YouTube provides better search engine visibility. Additionally, Vimeo’s monetization is subscription-based, while YouTube relies on ads and offers more versatile revenue streams for its creators.

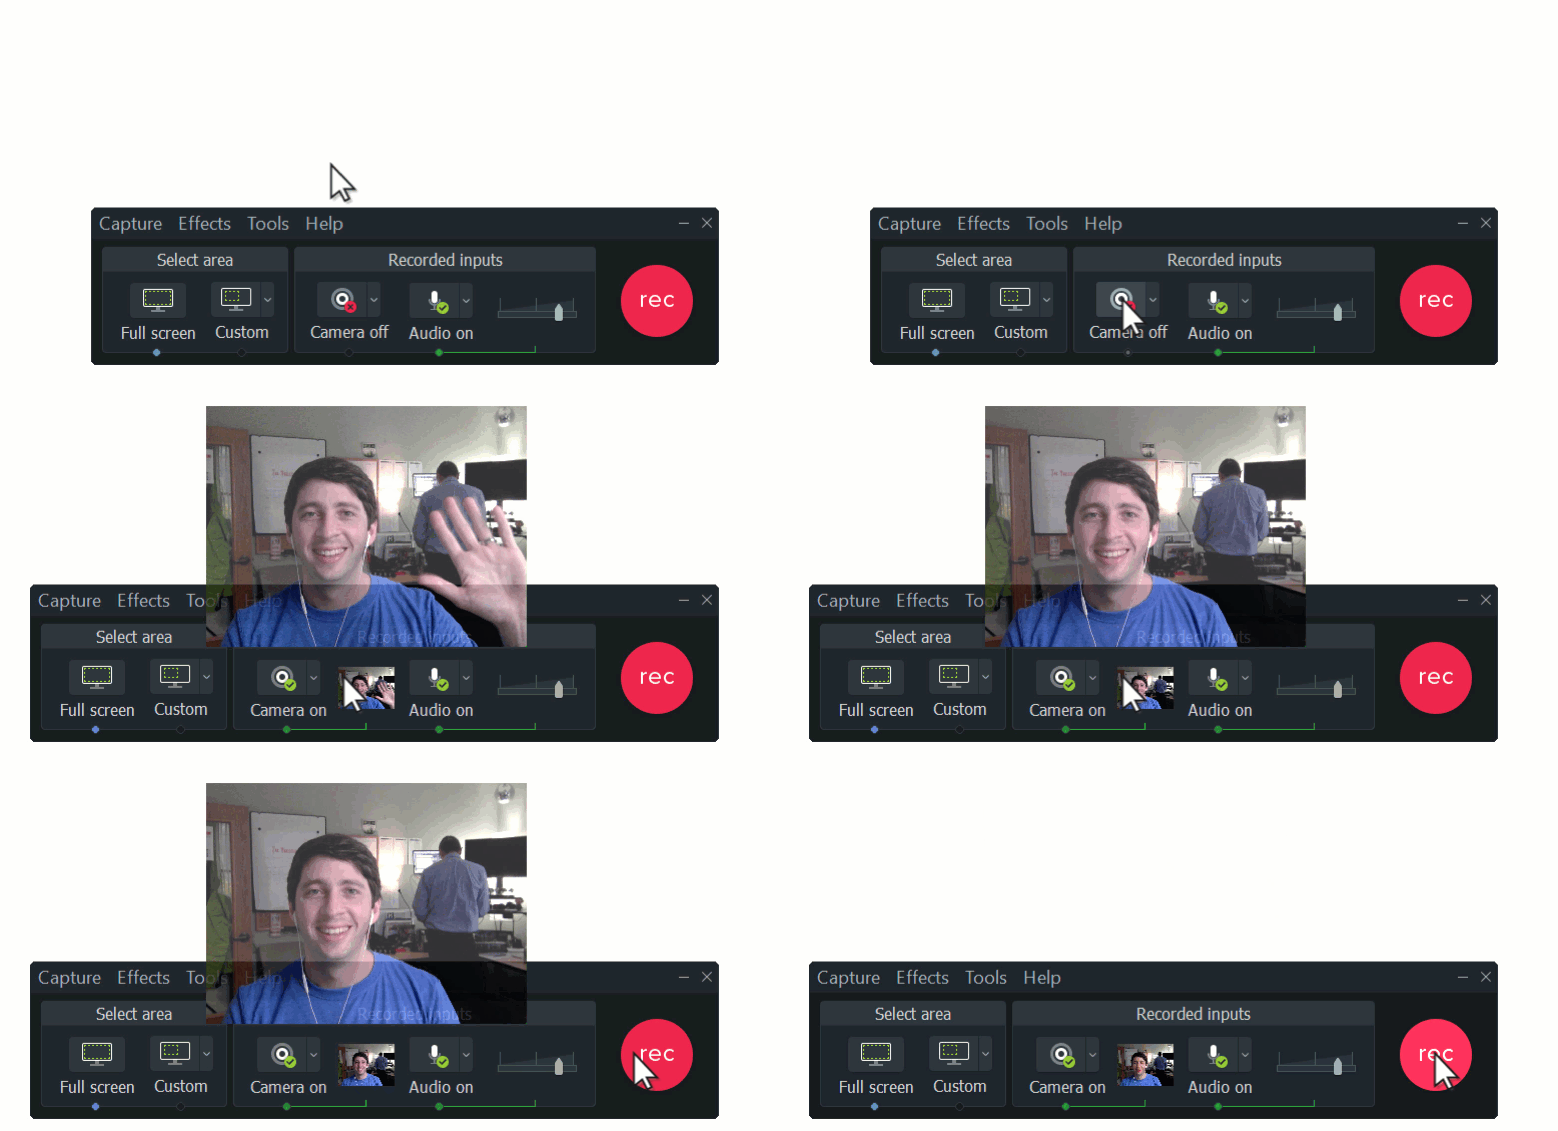
How to Easily Speed Up or Slow Down Your Videos

How to Easily Speed up or Slow Down a Video

Have you ever wondered how to add that extra flair to your video presentations or educational content? Whether you’re trying to glide through a lengthy instructional video or slow down a product demo, altering the speed of your video is a great way to keep your audience engaged. 

The best part? You don’t need to be a professional video editor to pull it off. With the right tools and a dash of creativity, you can learn how to speed up a video, or slow it down, to add that little extra panache that will make your videos stand out.


There are several video editors out there to help you adjust video speed, but we think that Techsmith’s Camtasia is the simplest and most user-friendly. As well as speed up and slow down videos, Camtasia let’s you trim videos to make them shorter, crop the frame for better composition, and even make a split screen video — and that’s just the beginning! 

But before we get too ahead of ourselves, it’s important to understand precisely what video speed is.

Make your own videos today!

Create dozens of engaging, trending and impactful clips from your long videos with Camtasia. Record your screen or upload an existing video, then bring the “Wow!” with effects, music, and much more.

Download for free now
Camtasia user interface

What is video speed?

Being able to control the speed of your videos can dramatically enhance your video content. But what exactly do we mean when we talk about “video speed”? 

Video speed refers to the pace at which the frames in your video are played back. Think of each video as a series of still images (or “frames”) that are displayed in rapid succession to create the illusion of motion. The number of these frames shown per second is known as the “frame rate”, often referred to as FPS (frames per second).

By adjusting the video speed, you’re essentially modifying the frame rate at which your video plays. Speeding a video up can give it more energy and or even add a comedic element. Meanwhile, slowing videos down can build suspense and add tension — it’s the difference between a Benny Hill sketch and The Matrix. 

So, whether you’re a vlogger trying to create an engaging narrative, a marketer aiming to highlight a product feature, or simply someone having fun with home videos, controlling the speed can make your content more compelling. And with tools like Camtasia, changing video speed couldn’t be easier.

Now, without further ado, let’s take a look at how to slow down a video (or speed one up!). 

How to speed up or slow down a video with Camtasia

With Camtasia, there’s more than one way to change the speed of your videos, but both of them are super easy and simple…

Method 1: Add clip speed

Clip speed allows you to play a video clip faster or slower than its original speed. To apply the clip speed effect, click and drag it from the tools panel to a clip on the timeline.

Open the effects tray and drag the clip speed handles to adjust the speed of a clip.


Method 2: Go to properties, then adjust clip speed

Another way to speed up or slow down a video is to select your chosen clip on the timeline with clip speed added, and simply adjust the speed in the properties panel.

screenshot of clip speed panel to speed up video

It’s that simple! Camtasia gives you the power to create clips and videos at whatever speed you want. So now you know how to make a video slow motion, or lightening fast! 

Do you want viewers to change the video speed themselves?

One thing to note is that adjusting the video speed in an editor is different from the playback speed. If you want to allow your viewers to adjust whether the video plays faster or slower, simply upload your video file to the platform of your choice. 

Most hosting platforms — including YouTube, Vimeo, Screencast, and Wistia — allow users to adjust the video playback speed. 

That’s right, you don’t even have to do anything and your audience will be able to watch your videos at the best speed for them! 

Why speed up a video?

Speeding up a video isn’t just a way to show off your editing skills, it serves a variety of purposes that can take your content to the next level. 

Whether you’re trying to make a lengthy process easier to digest, tell a captivating story, or add humor to your video, speeding up your footage can be a magic ingredient if you know how to use it, and understand how it can affect your audience. 

Showing a long process

We’ve all been eager to learn something new, only to be met with an endlessly long, step-by-step tutorial. When it comes to demonstrating inherently lengthy processes — be it a software installation or a cooking recipe — speeding up your video can be great for you, and your audience. 

By transforming what could be an hour-long ordeal into a captivating two-minute overview, you not only make your content more palatable but also show respect for your viewers’ time. This is done a lot with cooking videos where you can swiftly move from prepping the ingredients to pulling a delicious dish out of the oven, all in a matter of minutes!

While cutting an hour-long video down to 120 seconds might seem like a tall order (and might not apply to your content), we’ve seen plenty of unnecessarily long videos out there. Remember, most people want instructional videos to be less than 20 minutes, with a preference for 3-6 minutes long. Click here to find out more about video lengths

Increasing footage’s production value

Vloggers and filmmakers will often speed up parts of a video strategically to introduce a dynamic rhythm that can make their content go from ‘good’ to ‘awesome’ quicker than you can say “FPS”. 

But remember, contrast is key. When high-speed footage is juxtaposed with slower shots, they enhance each other. Imagine pairing a fast-paced montage of a cityscape with slower shots of an intimate conversation. The result isn’t just a video, but an experience that holds your viewer’s attention and leaves a lasting impression.

This blend of pacing can evoke different emotions and emphasize different aspects of your content, which will also enrich the production value of your entire video.

Telling a story

Storytelling isn’t reserved for movies and TV shows, it’s a powerful and important component for almost all types of videos. Whether you’re making a YouTube video or educational content, most videos have an element of storytelling — and speeding up your footage can help tell the story better. 

Imagine using a time-lapse to show a product being assembled, or being used over time to show off its durability. This essentially sets the stage for the problem your product solves, or its superior quality. Time-lapses and sped-up segments act as a narrative device that can fast-forward your story to its crucial points, allowing you to focus on key moments that resonate with viewers. 
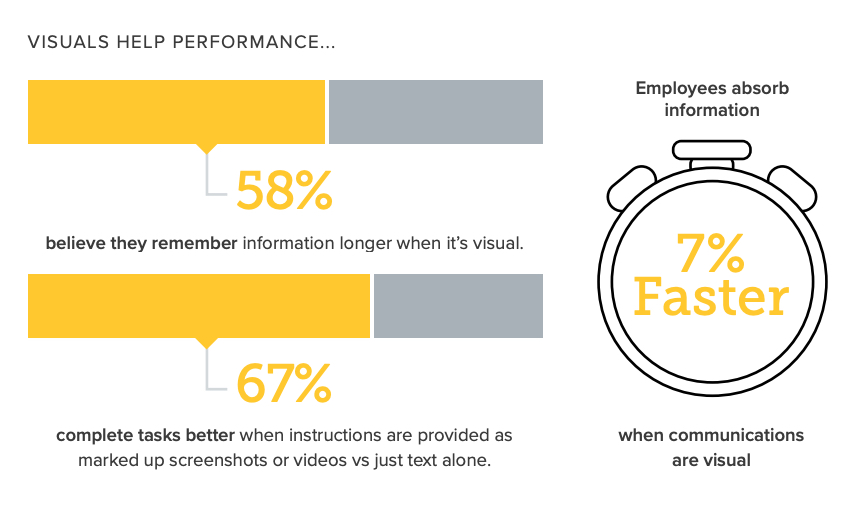
In essence, speeding up your video serves as a storytelling shortcut, offering a quicker route to the emotional or informational payoff that keeps audiences engaged. 

Make your own videos today!

Create dozens of engaging, trending and impactful clips from your long videos with Camtasia. Record your screen or upload an existing video, then bring the “Wow!” with effects, music, and much more.

Download for free now
Camtasia user interface

Creating a comedic effect

Have you ever watched a video that was sped up just enough to make an ordinary situation quirkily funny? Whether you’re creating a vlog, producing a skit, or even adding a sprinkle of humor to corporate content, this simple technique can be surprisingly effective. 

Consider a sped-up sequence where colleagues race against the clock to meet a deadline, their rapid movements turning a stressful scenario into a laugh-out-loud moment. Or how about a quick cooking segment that spirals into a whirlwind of culinary chaos? When you turn up the speed, you don’t just hasten the action — you amplify the comedy.

Why slow down a video?

While speeding up a video can inject some humor or make your content more digestible, turning the speed dial in the other direction has its own benefits. Whether you’re looking to emphasize intricate details or build suspense, slowing down your footage can offer a deeper, more nuanced viewer experience. 
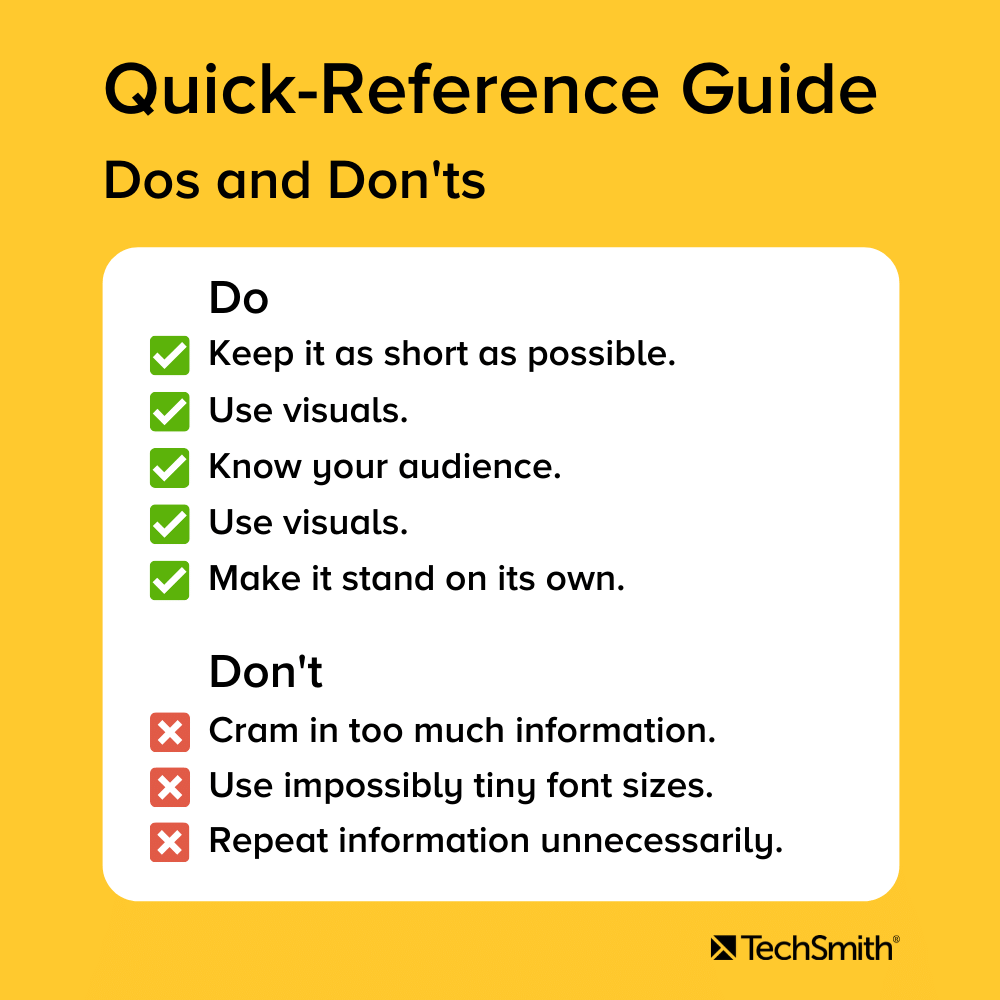
The power of slow motion, or reduced speed, isn’t just about aesthetics; it’s about creating moments that invite viewers to engage more thoughtfully with your content. So let’s explore some of the key reasons why you might want to dial down the speed in your next video.

Emphasizing details

With so much happening on screen at any one time, it’s all too easy for intricate details to go unnoticed. Slowing down your video footage offers the perfect opportunity to highlight these finer points, whether it’s the craftsmanship in a handmade product, or the expressions on people’s faces during an important moment. 

By reducing the speed, you give your audience the time to fully absorb these elements, turning what might have been a blink-and-you-miss-it moment into a scene that’s memorable and impactful.

Showing a specific skill

Sometimes, the beauty or complexity of a skill can only be fully appreciated when viewed in slow motion. Whether you’re capturing a musician’s intricate fingerwork, or the precise movements of an athlete, slowing down footage allows audiences to fully grasp the magic of what they’re watching. It’s the reason why sports channels show so many slow-motion replays!

Slowing down a video turns a fleeting moment into a detailed study of skill and precision. Whether you’re a coach, a musician, or simply a fan, slow motion reveals those details that are easy to miss but make all the difference.

Adding suspense

Going back to the power of good storytelling, slowing down your video can add a whole new layer of tension and drama. By drawing out key moments (and the build-up to them) with slow motion, you heighten the emotional stakes of the story you’re telling, and pull your audience to the edge of their seats.

The psychological impact of a slowed-down scene can be tremendous, keeping viewers glued to the screen in anticipation of what’s to come. Used strategically, slow motion can turn ordinary footage into a suspenseful narrative that deeply resonates with your audience.

The ultimate guide to making amazing videos

Watch our video and get great advice on how to start making videos, promotion, and more.

Watch more
techsmith logo

Focusing on an experiment

If you’re conducting a science experiment, the devil is often in the details. 

For example, you might want to film a chemical reaction — where elements combine and transform in a matter of seconds — to study exactly what’s happening one frame at a time, or simply for fun. 

Slow motion videos provide a unique way to focus on the intricacies of the reaction that might otherwise be missed (and it will probably look really cool). This focused viewing can be both educational and awe-inspiring, because in slow motion, even the ordinary can become extraordinary.

Make your own videos today!

Create dozens of engaging, trending and impactful clips from your long videos with Camtasia. Record your screen or upload an existing video, then bring the “Wow!” with effects, music, and much more.

Download for free now
Camtasia user interface

Tips and tricks to change video speed

So, now you know how and why to speed up and slow down your videos, as well as the effect it can have on your audience. While you might be raring to jump straight into the editing suite, we’ve got a few final tips to share that will help you create videos that both look and feel professional.

  • Choose Your Moments Wisely: The art of speed alteration lies in its strategic use. Don’t just speed up or slow down footage at random, instead use these effects where they’ll make the most impact, such as to highlight key moments or to maintain interest.
  • Be Subtle, Be Smart: Slow motion doesn’t mean snail-motion, and fast doesn’t mean frantic. When slowing down or speeding up your video, aim for a pace that enhances, rather than distracts from, your content.
  • Pair With the Right Audio: The right soundtrack can make or break your video’s mood, so if you’re going to add music to your video, make sure that it complements the change in speed. For slow-motion scenes, consider soft, atmospheric music; for fast-paced moments, something energetic may work better.
  • Narrate When Necessary: A well-placed voiceover can add depth to your video, especially if your sped-up or slowed-down scenes lack audio clarity. Narration can guide your viewers through the action in a way that provides context and enhances storytelling.

    If you do plan on narrating your video, you might want to check out our guide to the best microphones for recording videos.
  • Background Matters: The choice of background can drastically affect your video’s impact. We suggest keeping your background as uncluttered as possible to allow your viewers to focus on the action, especially when you’re manipulating speed.
  • Add Closed Captions: Adding captions and subtitles to your videos is a great way to increase engagement and make your content accessible to a wider audience.
  • Review Before Publishing: As with any video you ever make, be sure to always preview your edits before publishing online. This gives you a chance to double-check the video speed changes, as well as branding, captions, and other edits you’ve made.

Trust us, it’s much better to spot potential mistakes before your audience does!

Kara Swanson

Marketing Content Specialist at TechSmith. I know way more about tea than any human being ever should.

How to Extract Text From An Image?

How to extract text from an image

Imagine there was an easy way to copy or extract text from an image, scanned document, or PDF file and quickly paste it into another document or chat tool.

The good news is that you don’t have to waste time retyping or searching for the original document. Some programs use magic (aka. Optical Character Recognition (OCR)) to analyze the letters and words in an image and convert them to text.

Anyone who’s ever had to painstakingly copy the words on a screen manually will know just how useful this can be. But, if you’re lucky enough to have never been in such a position, here are some reasons why you might use OCR technology to copy text from an image or PDF:

  • Paste text from a picture or screenshot into Slack, Teams, Word, or any other tool
  • Copy text in an error message, pop-up window, or menu where the text can’t be selected
  • Capture the text in a file directory (filename, file size, date modified, etc.)

Regardless of your situation, this function can be super helpful, especially when you need to copy information about a file or from a screenshot that would otherwise mean you spending lots of time copying the text manually. 

Fortunately, TechSmith’s Snagit makes extracting text from images quick and easy! This means you can capture words or make a mere picture of text editable in just a few steps. 

Snagit is an all-in-one screen capture and recording software that helps you capture your screen and camera, edit screenshots, and share images, GIFs, and videos across a wide range of platforms.

With Snagit, you can even watermark photos, remove backgrounds from pictures and turn images into videos

Here’s everything you need to know about how to extract text from an image on your computer screen using Snagit.

Extract text from images today!

Download a free trial of Snagit to quickly and easily extract text from images.

Download free trial
Snagit icon

Use a screenshot to capture text on Windows or Mac

Step 1: Set up your capture settings

To capture text, open the Capture Window, select the Image tab, and set the selection to Grab Text.

how to capture text on Windows or Mac step 1

Step 2: Capture your screen

Start your capture, then use the crosshairs to select the region of your screen with the text you want to copy. Snagit will then analyze the text from your selection and displays the formatted text.

If the font identified isn’t available on your computer, Snagit will substitute it with a similar style.

how to capture text on Windows or Mac step 2

Step 3: Paste your text

Next, select the text you want to copy, or click Copy All, to add it to your clipboard. This will allow you to paste the text into a chat tool, document, presentation, or any other place you can think of.

how to capture text on Windows or Mac step 3

Extract text from an image with OCR

Step 1: Find your image

To capture text from a scanned image, first upload it to the Snagit Editor or take a screenshot on your desktop.

extract text from image step 1

Step 2: Open Grab Text in Snagit

With the image open in Snagit’s Editor, go to the Edit menu and select Grab Text. Alternatively, you can simply right-hand click on the image, and select Grab Text from there instead.

extract text from image step 2

Step 3: Copy your text

Then, copy the text (or click Copy All), and paste it into other programs and applications.

extract text from image

That’s all there is to it! It doesn’t take much effort at all to extract text from pictures, PDFs, or scanned documents when you’ve got Snagit.

Extract text from an image, the FAQs

How can I convert images to text with Snagit?

Upload your image into Snagit. Then right-click anywhere on the image and choose Grab Text. This scans your image and converts it to text.

How do I extract text from an image on Windows?

First, use Snagit to take a screenshot of your image or upload it into the Snagit Editor.
Snagit can use Optical Character Recognition (OCR) software to detect and extract text from an image on your Windows computers.

How can I extract text from a scanned PDF?

First, open the PDF file and take a screenshot of it using Snagit. Then, in the Snagit Editor, right-click on the image, and select Grab Text.
The text from your scanned PDF can then be copied and pasted into other programs and applications.

How can I copy text from an image?

To start, open Snagit’s image capture window. Then, in the selection dropdown, choose Grab Text. Once you’ve taken your screenshot, a box will pop up with all the text from your screenshot, ready to be copied and pasted elsewhere.

Editor’s Note: This post was originally published in 2017 and has been updated for accuracy and comprehensiveness.

Kara Swanson

Marketing Content Specialist at TechSmith. I know way more about tea than any human being ever should.

What Are Video Thumbnails and Why Do They Matter?

video thumbnails hero

You’ve probably heard the phrase, “You never get a second chance to make a first impression,” which is exactly why video thumbnails are so important. They give potential viewers the first impression of your video. 

A great video thumbnail can mean the difference between getting a few views, and a few thousand views. But how do you know what makes a good thumbnail, and how do you create one? Well, allow us to show you. 

In this article, we’ll answer questions like “What is a thumbnail?” and discuss the best practices for creating your own. So, in a nutshell, here’s what you’ll learn:

  • What are video thumbnails?
  • Why are video thumbnails important?
  • The essential elements of effective video thumbnails.
  • Technical requirements of a thumbnail
  • Four ways to make your thumbnails stand out.

However, if you want to learn how to create your own video thumbnails, we’d suggest downloading a free trial of TechSmith’s Snagit and checking out our other post on ‘YouTube Thumbnail Sizes and Best Practices’. 

Why? Because it includes a step-by-step guide on how to make your own YouTube thumbnail. 

Make your own YouTube video thumbnails today!

Download Snagit to quickly and easily make your own YouTube videos thumbnails.

Download now!
Snagit icon

What are video thumbnails?

A video thumbnail is a still image that acts as the preview image for your video. It’s kind of like a book cover. And, like a book cover, its job is to entice potential viewers to want to see more.

The actual term “thumbnail” originated with still images (rather than videos). It was simply a smaller version of a full digital image that could easily be viewed while browsing multiple images at once.

A MacOS window showing thumbnail previews of various images files.

Thumbnails are everywhere — even your computer’s operating system uses them! As you can see above, when viewing this folder, the computer shows several smaller representations of each file. 

Although a video thumbnail isn’t a smaller version of the video, it should give your audience an idea of what they will see when they decide to watch it.

You’ve probably been told not to judge a book by its cover, but if that were true, book publishers wouldn’t go to the trouble of making such lavish and exciting covers. The same is true of your video thumbnail.

Why are video thumbnails important?

In a world where video has become the most popular form of content — with video consumption accounting for 65% of all internet traffic — video thumbnails are more important than ever. 

By understanding the value thumbnails bring and using them effectively, you can captivate audiences, increase click-through rates, and ultimately drive more engagement and views to your videos. Sounds good, right?

Thumbnails help rank on YouTube

While video thumbnails themselves don’t directly influence how YouTube handles your video, they play a crucial role in driving viewer engagement once they click through. 

YouTube employs various mechanisms to present your video to users, such as search rankings, video page recommendations, and the YouTube homepage. The performance of your video in these areas is influenced by how viewers interact with it and how others respond to your content. This is where video thumbnails come into play.

An appealing and authentic video thumbnail has the power to entice viewers to click, watch your video, explore more of your content, and potentially subscribe to your channel. On the other hand, a misleading thumbnail that fails to deliver can lead to viewers feeling frustrated. 

This frustration could lead users to stop watching the video early, push the ‘dislike’ button or even leave YouTube altogether. In turn, YouTube’s algorithms take note of these interactions and adjust their recommendations accordingly, impacting the visibility of your videos across search results, video pages, and the YouTube homepage.

By creating captivating and truthful video thumbnails, you can maximize the chances of attracting engaged viewers, fostering positive interactions, and ultimately increasing your video’s reach and success on YouTube.

Make your own YouTube video thumbnails today!

Download Snagit to quickly and easily make your own YouTube videos thumbnails.

Download now!
Snagit icon

Thumbnails help rank on Google

See: https://wave.video/blog/video-thumbnails/ 

Believe it or not, your videos can make an impact beyond the platform they’re hosted on, whether that’s YouTube or Vimeo. As you’ve probably noticed, Google search results often include videos, as well as text and web pages. This means that your video — and your thumbnails — could appear at the top of the first page on Google. If that sounds like a big deal, that’s because it is. 

Imagine someone searching for “how to promote your YouTube video” and seeing a load of articles next to a select group of videos. Which do you think people are most likely to click on? Well, if you’ve got a good thumbnail, it could be yours!

Ultimately, if you haven’t got an enticing and authentic thumbnail, your video is unlikely to be featured in Google search results. That’s how important this is. 

By optimizing your video thumbnails for Google search rankings, you can increase your chances of standing out, enticing viewers to click on your videos, and driving traffic to your content — whether it be on YouTube or other platforms where your videos are embedded.

Thumbnails build brand awareness

See: https://wave.video/blog/video-thumbnails/ 

Even in a crowded digital landscape, thumbnails play a pivotal role in strengthening brand awareness. Imagine the power of having an audience that recognizes your videos from the thumbnail alone. 

Now, everyone has a general idea that brand awareness is important, but not everyone knows that it can directly impact sales and profit. Research suggests that consistent brand representation can increase revenue by more than 20%

When viewers consistently encounter visually cohesive and recognizable thumbnails, they associate them with your brand and its values. Over time, this recognition builds trust and loyalty, driving engagement, click-through rates, and ultimately, conversions. 

By incorporating elements such as consistent colors, styles, logos, overlays, and more, you can reinforce your brand identity and make a lasting impression on viewers. Investing in the consistency and visual representation of your video thumbnails can yield long-term benefits and contribute to the overall success of your brand.

Make your own YouTube video thumbnails today!

Download Snagit to quickly and easily make your own YouTube videos thumbnails.

Download now!
Snagit icon

Essential elements of a video thumbnail

If a thumbnail is your audience’s first impression of your content, you want to make sure it’s a good one. 

A custom thumbnail allows you to really sell yourself and your video, so give your audience a reason to watch your video — especially if your video is one of many on the same subject.

With this in mind, your thumbnail should always:

  • Clearly convey your video’s subject.
  • When possible, show the face of the person speaking in a fun and inviting way.
  • Include your brand.
  • Be optimized for any device.
Thumbnail for the video "How to Make a YouTube Video."

Looking at our example above, you can see that we’ve managed to tick all the boxes because:

  • The video’s title is large and easy to read.
  • The video’s speaker (our very own Andy Owen) is striking a humorous pose to convey an emotion.
  • The TechSmith logo is clearly visible.

We even earned ourselves a bonus point by letting potential viewers know that there’s a free template up for grabs, which lets them know there’s even more value to be had by watching our content.

When you think about it, that’s a lot of information being conveyed by a single image. And, it helps anyone looking at it decide if that video is right for them.

The Marketer’s Ultimate Guide to Video

In our FREE ebook, we’ve put together practical strategies to get out of the woods and create engaging, powerful video content on your own that reaches your audience.

Download now!
techsmith logo

Technical requirements of a video thumbnail

A key part of knowing how to create a thumbnail for a video means understanding the technical requirements that will ensure optimal compatibility across a range of devices and screen sizes.  

This isn’t something we need to overcomplicate, you simply need to follow these rules: 

  • Thumbnail Size: The recommended YouTube thumbnail size is 1280 by 720 pixels, with a 16:9 aspect ratio.
  • Minimum Width: It’s best to keep the width of your thumbnails at least 640 pixels.
  • File Size: The file size of your thumbnails should be no more than 2MB.
  • Supported Formats: The commonly supported formats for thumbnails are JPG, GIF, and PNG. These formats provide good image quality while keeping the file size manageable.

By following these video thumbnail guidelines, you can’t go wrong. 

Make your own YouTube video thumbnails today!

Download Snagit to quickly and easily make your own YouTube videos thumbnails.

Download now!
Snagit icon

Video thumbnail best practices

A quick search on YouTube for just about any subject will turn up hundreds, if not thousands, of videos. And, a good number of them will have custom video thumbnails.

So how do you make yours stand out from the crowd?

If you did a random search on YouTube for “How to make a video,” there’s a good chance these will be among the first few results. You can learn a lot about how to design a thumbnail, just by looking at these examples!

Five examples of video thumbnails. Each is unique, but all have several common features, including flattering images of the person or people speaking, the video's title, and pleasing design.

Let’s now take a look at some of the best practices to keep in mind when designing a video thumbnail, and think about which of the examples above tick the most boxes. 

1. Use color

Color can make all the difference. Even thumbnails with a black or grey background can benefit from a splash of color. You might notice that all of the examples above use color to help draw your eye.

2. Use closeups of faces

Every one of these examples show someone’s face — even the one that uses a cartoon — and all of them are conveying emotion. Remember, you don’t want the subject’s face to look bland or emotionless, this isn’t a passport photo! 

3. Use bold, clear text

You want to make sure that anyone who sees your thumbnail instantly knows what the video is about. Don’t make their eyes hunt around for the title.

4. Be consistent

This is especially true if you’re trying to grow your channel and build your Youtube audience. Be sure to use consistent colors and themes in your thumbnails so that your audience can tell your content apart from everyone else’s, no matter how many other videos appear in the search results.

Once you’ve gained credibility as a creator, people will come back for more of your content — so make it easy for them!

Video thumbnails, the FAQs

How to make a thumbnail for YouTube?

Creating a thumbnail for your YouTube video is easy! Start by finding an image that represents your video’s content. Then, use image editing tools, or YouTube’s built-in editor, to customize the thumbnail by adding text, graphics, and branding so that it’s visually appealing and instantly recognizable.

How big is a YouTube thumbnail?

Always aim for a thumbnail size of 1280 x 720 pixels with a 16:9 aspect ratio. This ensures your thumbnail will look great across various devices and screen sizes.

Why can’t I change the thumbnail on YouTube Shorts?

To edit a thumbnail for a YouTube Short, you need to upload your video using a mobile device (rather than on a desktop) via the YouTube app. However, you can’t change the thumbnail after the video has been published. Instead, you’ll need to delete and re-upload your YouTube Short with the new thumbnail.

What is a thumbnail sketch?

A thumbnail sketch is quite different from a video thumbnail. It’s a quick and simplified drawing that serves as an early visual representation or concept for a larger design or artwork. Artists, designers, and creatives often use thumbnail sketches to explore different ideas, compositions, and layouts before diving into detailed work.

How to download YouTube thumbnails?

Downloading YouTube thumbnails is easier than you might think as there are a range of online tools, such as Softr, designed to do exactly that. Simply copy the URL of the YouTube video with the thumbnail you want to download, paste it on the Softr website, and follow the instructions to save the thumbnail image to your device.

How to change the thumbnail on a Facebook video?

First, find the video post that includes the thumbnail you want to change. Next, click on the three dots in the top-right corner of the post and select Edit Video. Next, hover over the video and you’ll see a pencil pop up in the top-left corner, click it. Then click on Change Thumbnail and decide whether you want to Choose Suggested, Upload Image, or Choose From Video.

Ryan Knott

Ryan Knott is a Marketing Content Strategist at TechSmith, where he creates content about easy, effective, and efficient video creation, editing, and tips and tricks, as well as audio editing for creators of all kinds. He/him.

Here’s the Best Way to Quickly Take a Scrolling Screenshot

Here's the Best Way to Quickly Take a Scrolling Screenshot

The majority of basic screen capture tools allow you to capture all or part of your screen, but what if you need to capture more than what’s visible on your screen at any one time? If you’ve ever needed to screenshot an entire web page, you probably know how annoying it is to take multiple screenshots and stitch them together.

But it doesn’t have to be that way!

The scrolling capture tool on TechSmith’s Snagit allows you to take screenshots of content that doesn’t fit within the dimensions of your screen. They’re great for capturing:

  • Long website pages and documents
  • Spreadsheets with lots of rows or columns
  • Lengthy email, chat, and social media threads

In this post, we’ll show how to take a scrolling screenshot in the best and easiest way, using Snagit. 

Easily capture scrolling screenshots with Snagit

Quickly grab infinitely scrolling pages, long chat threads, and everything in between.

Try Snagit for free
Image with Snagit Scrolling capture UI

What is a scrolling capture?

Put simply, a scrolling capture (formerly panoramic capture) is a screenshot that allows you to scroll to capture content that may not be visible on your screen. You can scroll vertically to capture things like web pages or documents or horizontally for spreadsheets and large graphics.

How to take a scrolling capture (Windows or Mac)

There are many ways to take screenshots on Windows or Mac, but the built-in screen capture tools on both operating systems lack a scrolling screenshot feature. This means they can only capture the visible areas of your screen.

Unless you want to spend lots of time piecing multiple screen grabs together, you’ll need advanced screen capture software to take a scrolling screenshot. 

For the purpose of this post, we’ll use Snagit to show you how to take a scrolling screenshot on Mac and Windows. Unlike browser extensions, where your captures are limited to web pages, Snagit can capture anything on your screen. 

If you don’t already have Snagit, then don’t worry you can try it for free without needing a credit card.

Capture a scrolling area with a scrolling capture

With Snagit, there are two ways to take a scrolling capture: manually and automatically. 

While the automatic scrolling makes it super quick and easy to take a scrolling capture, doing it manually gives you greater control of the area you want to capture. For example, if you’ve got an Excel spreadsheet with lots of rows and columns, you might want to scroll both vertically and horizontally, which is easier to do manually. 

How to take an automatic scrolling capture

Here’s how to take a full-page screenshot automatically using Snagit’s Automative Scrolling capture tool: 

  1. Select the all-in-one tab within Snagit’s capture window and click Capture.
  2. When the orange crosshairs appear, click the window you want to capture, and Snagit will snap to that window.
  3. Next, click on one of the orange arrows to select the direction you want your screenshot to scroll.

    (Don’t worry if you can’t see all the arrows. If the web page or program you’re using can only scroll in one direction, then only one arrow will appear.)
  4. Once you’ve clicked an arrow, Snagit will take the scrolling capture and open it up in the Snagit Editor when it’s ready. 

How to manually take a scrolling capture

If you’re looking for more control over the area that your scrolling capture actually captures, then you’ll need to take your Scrolling Capture manually. Here’s how: 

  1. Select the all-in-one tab within Snagit’s capture window and click capture.
  2. When the orange crosshairs appear, you can either click on the window you wish to capture or drag a custom area across your screen.
  3. Next, click on the icon with the camera and arrows. This will start the scrolling capture process.
  4. Next, scroll through the content you want to capture, then click Done. We’d suggest you scroll slowly to get the best results. 

Once you’ve captured your screenshot, it will automatically open in the Snagit Editor, where you can preview, edit, add markup or callouts, and quickly share it. It’s that easy!

Three ways to make your full-page screenshots even better

Screenshots on their own are useful, but when you add a little context, they can be downright magical in helping explain ideas and convey information. Here are three different ways you can use the Snagit Editor to bring the magic out in your screenshots and Scrolling Captures:

1. Annotate your screenshot

Don’t let important information go unnoticed. Use arrows and callouts to highlight specific areas of your screenshot or add more context. Choose from different color themes, or create your own to keep your images on-brand.

2. Rearrange objects within your screenshot

Snagit automatically makes the objects in your screen capture movable, which means you can rearrange buttons, delete text, and edit other elements in your screenshots.

So, if your cursor blocking something, delete it! If you’d prefer that button was on the right and not the left, move it! With Snagit, it really is that easy. You can even magically mock up websites with screenshots.

3. Edit the text in your screenshot

Snagit recognizes the text in your screenshots for quick editing, which means you can change the text’s color, font, and size — as well the actual words —without redesigning the entire image. 

With Snagit, you can even extract text from an image, which is something that no built-in screenshot tool on the planet can do!

The best way to capture scrolling screenshots

Scrolling captures is a lifesaver when you need to screenshot an entire webpage, extensive spreadsheet, or long chat thread. And as you can’t take scrolling screenshots with native apps like Snip & Sketch, investing in a more powerful screenshotting tool is well worth it.

As well as being the best tool for taking full-page screenshots, Snagit lets you quickly capture your screen, add additional context, and share images, GIFS, and videos to your favorite apps in just a few clicks.

Easily capture scrolling screenshots with Snagit

Quickly grab infinitely scrolling pages, long chat threads, and everything in between.

Try Snagit for free
Image with Snagit Scrolling capture UI

Scrolling screenshots, the FAQs

How do I take a screenshot bigger than my screen?

Snagit’s scrolling capture tool is a great way to capture content that doesn’t fit within the dimensions of a typical screenshot.

Can you scroll while taking a screenshot?

The native Windows and Mac tools don’t have a scrolling screenshot feature, but it can be done with a third-party app like Snagit.

Is it possible to screenshot a parallax website?

Static screenshots aren’t the best way to capture interactive elements like parallax scrolling. However, with Snagit, you can record your screen and quickly turn the video into an animated GIF.

Can you take a scrolling screenshot on an iPhone?

Yes, but only when using native apps like Safari and Notes. Press the Lock button and Volume Up button simultaneously to take a screenshot. Then click on the preview and tap Full Page at the top.

How do I take a scrolling screenshot on Android?

On Android 11 or later, press the Power and Volume Down buttons at the same time. Then, tap the Capture More option at the bottom-left corner of the screen.

Danielle Ezell

Danielle Ezell is a Marketing Content Strategist at TechSmith, where she writes about effective workplace communication, offering tips and strategies for using images and videos to collaborate more effectively in hybrid and remote environments.

What are High-Resolution Images?

This image is a creative illustration designed to represent the concept of high-resolution images. It features a split background with two shades of blue. Overlapping this bicolor background is a photo gallery icon graphic consisting of two overlapping squares with rounded corners. The texture on the right half of the background is more pixelated, contrasting with the smoothness on the left, symbolizing the difference between high-resolution and low-resolution images.

Picture this: Your coworker asks for a photo, so you quickly email them one from the web. Moments later, they reply back: “Do you have that in hi-res?” and you think to yourself: “Does it really matter?”

Well, the answer is a resounding yes. Your colleague isn’t just being picky, there really is a difference between lo-res (low-resolution) and hi-res (high-resolution) images. It can mean the difference between a company logo that looks fuzzy, or one that is crystal clear.

But in order to understand when a hi-res image is a must (such as for printing and enlarging), we should first discuss what exactly hi-res means.

Convert images quickly and easily with Snagit

Snagit is your one-stop place for all your image conversion needs. Just drag and drop your image, and you’ll get it done within a few seconds!

Download now!
Snagit icon

What is the meaning of “high resolution”?

In short, hi-res stands for high resolution, or denser image quality.

Digital images are made of tiny pixels (picture elements), or squares of color. You usually don’t notice individual pixels because they all blend together to form the picture that you see. 

But, those pixels are still there! You can see them either when you zoom in too much, or you try to enlarge an image beyond what it can handle — which is why it’s important to know how to resize an image correctly.

pixels-hi-low-res

As you can see, the lo-res image on the left looks great at its normal size, but when we zoom in or enlarge the image, it looks choppy. 

In other words, it’s “pixelated” because you can distinguish each pixel, in a block pattern. Anyone that pre-dates smartphones might recall this distinctive, low-tech aesthetic from retro video games.

pixelated image

Early video games looked pixelated because they purposefully used minimal colors to preserve memory and processing power. Today, we usually only see pixelated images when they’re either:

  • Overly enlarged
  • Too zoomed-in
  • Printed from a low-resolution file.

You’ll be glad to know that we’ve got a whole post about how to prevent blurry pictures (and it’s easier than you might think).

Ready to Embrace Asynchronous Communication?

How do we have fewer, better meetings? We decided it was time to reboot our meeting culture and communication norms at TechSmith.

Download now!
cover of report about asynchronous communication

What are high-resolution images?

Lo-res images have around 72-pixels, or squares of color, per inch. This makes them great for the web because that’s usually as much as most computer screens can display. Lo-res images are also very lightweight (because they have fewer pixels), which helps websites load quickly.

Hi-res images, on the other hand, are at least 300 pixels per inch (PPI). This resolution makes for good print quality and is pretty much a minimum requirement for anything you want hard copies of, especially to represent your brand or other important print materials.

lo-res-photo-printed-regrets

Ink is expensive, so using hi-res photos to produce sharp prints without any blurry or jagged lines is the best way to avoid any printing regrets.

How to tell if an image is high or low resolution?

Just because a picture looks good on your computer screen doesn’t mean it’s hi-res, and you can’t tell by the aspect ratio, either. A hefty file size might suggest an image is high-res, but this isn’t always the case. 

The best way to check image resolution is to open it up in an image editing program, like Photoshop or TechSmith’s Snagit, and view the file properties. While this particular feature is currently only available on the Windows version of Snagit, you can also use it to extract text from images and remove the backgrounds from photos — on both Windows and Mac. 

While Snagit is great for quick photo editing, most computers come with a basic editing program that will help you see whether or not a picture is hi-res. 

Do you need high-res or low res-images?

So now that you know the difference between low and high-resolution imagery, and you understand how important it is, the next hurdle is knowing when you do and don’t need hi-res images. 

Ultimately, this all comes down to what an image will be used for. Whether you’re a budding photographer planning your first exhibition, or an entrepreneur working on a new website, understanding the format and context of where your image will be seen is the key to knowing the resolution you need. 

In this section, we’ll look at some typical examples of where low and high-resolution photos are required, to help you decide what best suits your needs.

Screen

Whether it’s a computer monitor, mobile device, or television, high-resolution images are often praised for their clarity and sharpness on screen, but there’s still a balance to be struck.

Digital screens have a finite number of pixels, and it’s this pixel count (often referred to as screen resolution) that limits the detail they can display. Using an image with a resolution higher than the screen’s probably won’t improve the picture quality, as the screen simply can’t render the extra detail.

What’s more, because high-res images make for heavy files, they can slow down websites and take up unnecessary storage space on your device. This means that low to medium-resolution images are usually best for screen-based applications.

Posters

When it comes to making posters — particularly life-sized ones — high-resolution images are generally the way to go. This is because large-scale prints need more detail to maintain the integrity of the image, ensuring that they don’t appear pixelated when printed.

There is, however, one essential caveat: The viewing distance. If your poster is going to be seen from far away, then there isn’t as much need for ultra-high image definition.

This is because, from a distance, our eyes can’t discern the same level of detail as up close — but you knew that already. This is where intermediate resolutions come into play, as they can provide a perfect balance between giving posters a clear and detailed appearance without needing extremely high resolution. 

Printing

Whether it’s a business card or a glossy magazine, you’ll need the level of detail that only high-resolution images can provide to ensure the printed image is crisp and clear.

For this reason, images intended for print should have a minimum resolution of 300 DPI (dots per inch). This isn’t just a random number — it’s the perfect resolution to provide a high-quality image at arm’s length. 

Convert images quickly and easily with Snagit

Snagit is your one-stop place for all your image conversion needs. Just drag and drop your image, and you’ll get it done within a few seconds!

Download now!
Snagit icon

Artwork and fine photography

When you’re dealing with artwork or fine photography, every detail matters. Here, the texture of a brush stroke, the delicate shading in a charcoal drawing, or the interplay of light and shadow in a photograph can be the difference between an image that looks good and one that truly captivates onlookers. 

As you might expect, high-resolution images are especially useful in such scenarios, as they capture subtle details with the kind of precision that lo-res simply can’t. 

That said, it’s still worth thinking about how your image is going to be used. Are you planning an exhibition where your work will be displayed in large formats? Or are you building a digital portfolio? While high-resolution images are a must for a physical exhibition, low-res photos might be better if you’re planning to display them online.

Nature photography

Nature photography is all about capturing the world around us. From the textured bark of an ancient tree, to the vibrant hues of a sunset, there are hundreds, if not thousands, of intricate details that make each photograph a unique testament to the beauty of nature.

As such, high-resolution photos are crucial for capturing and sharing such photos. Think about it, have you ever seen a blurry picture in National Geographic?… Exactly. 

Hi-resolution images, the FAQs

How to make a low-res image high-res?

If possible, it’s always best to try and recapture an image in high-resolution, rather than make a lo-res image, hi-res.
That said, software such as Adobe Photoshop or online services like Let’s Enhance use sophisticated algorithms to upscale images and improve their resolution while minimizing the appearance of pixelation. However, the end-result might not be as sharp as an image originally captured or created in high resolution.

How big is a high-res image?

While the file size of high-resolution images varies greatly, hi-res is typically defined by its pixel dimensions and the number of pixels per inch (PPI or DPI).
An image is generally considered high resolution if it has 300 PPI or more, with typical dimensions ranging from 2,000 x 2,000 pixels for smaller images to 5,000 x 5,000 pixels (or more) for larger ones. Keep in mind that the specific pixel requirements will likely depend on the intended use of the image.

How can you tell if an image is high-res?

You can determine if an image is high resolution by checking its DPI (dots per inch) and its pixel dimensions. This can be done by looking at the image’s properties on your computer, or in an image editing suite.
Generally speaking, if an image has 300 DPI or more and has large pixel dimensions (usually in the thousands), it is considered high resolution.

How to make a high-res image low-res?

To make a high-res image low-res, you can use software such as Snagit or Photoshop or free online tools like PIXLR. These tools allow you to decrease the image’s size in pixels or change its resolution (DPI).
By reducing these parameters, you can essentially lower an image’s resolution by creating a smaller, less detailed version of the original image.

Are JPG images high resolution?

The resolution of an image isn’t determined by its file format but by its pixel dimensions and DPI. So, any file — including a JPG — can be a hi-res image provided it has large pixel dimensions and a high DPI (usually 300 or more).
It’s important to note, however, that JPG is a lossy format. This means some image data and quality is lost each time the image is saved, which could affect the resolution over time. You can learn more about different file types here.