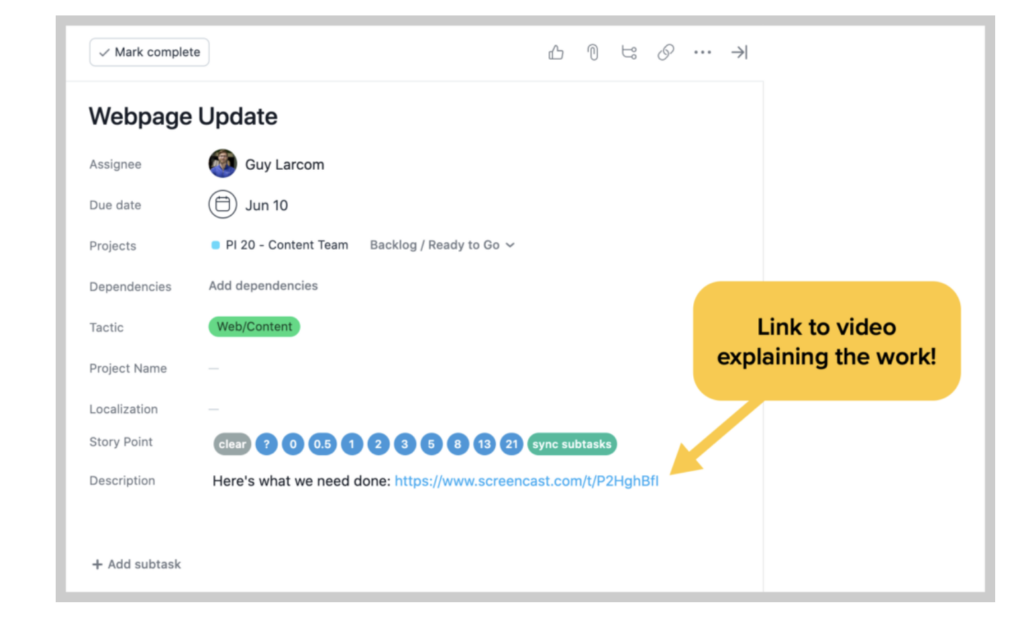
Not only does the ADA Section 504-refresh highlight the need for audio descriptions in higher education videos, but it’s also an accessibility best practice that has the potential to benefit all students.
Learn the different types of audio descriptions, how they work, and how to create them so your institution stays compliant.
Are audio descriptions like captions?
Sort of. Here’s the difference: captions use text to describe what’s being heard on-screen. Audio descriptions (AD) talk through what’s being seen. Put another way, captions help people who are hard of hearing, while audio descriptions help people who have difficulty seeing.
Audio descriptions are also sometimes called ‘video descriptions’ or ‘descriptive narration tracks.’ They all refer to the same thing – an option that gives you all the information from a video without ever opening your eyes.
You’ve probably watched movies that have embedded audio descriptions, even though you didn’t use them yourself (or even know they were there!). Ever see the AD symbol on a DVD? That means the movie has an audio description track that can be turned on as needed. Many movie theaters offer audio description support, too.
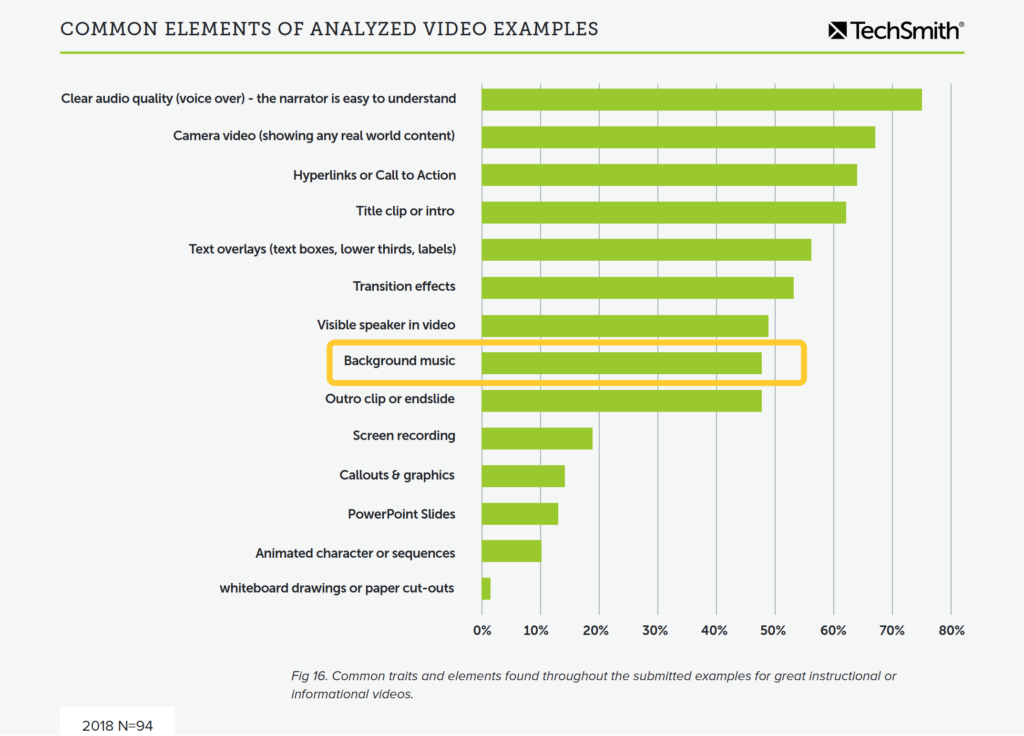
An example – what they sound like Although visuals are a core strength of video’s ability to convey information, it can be difficult for people with sight loss to understand what’s going on based on standard audio alone. Audio descriptions bridge the gap by narrating what occurs on screen so everyone can understand the meaning.
Here’s an example that demonstrates how audio descriptions can describe important on-screen action that makes the video easier to understand for sight-challenged viewers.
In higher education, audio descriptions are important and providing them is legally required. This is good news because it makes crucial on-screen visuals in online and blended courses available to every student.
They can help other students, too. Some people learn better with both audio and visual inputs or are primarily auditory learners. Non-native speakers may like hearing audio descriptions to better understand the language. Students on the autism spectrum can benefit from hearing social/facial cues read aloud.
Some students turn on audio descriptions simply because they prefer to hear the video lesson. Whether they’re jogging, reviewing a video lesson at night with headphones while their roommate sleeps, or watching videos on a jostling bus, there are many reasons why having the option to treat the lecture like a podcast makes sense.
How to add audio descriptions
There are two main ways to add audio descriptions:
Embedded voice descriptions – In this method, audio descriptions are their own separate digital “track,” behind the scenes. They can be turned on as needed. This is the most advanced and versatile method because all students have the same version of the video, and only listen to audio descriptions if they need them.
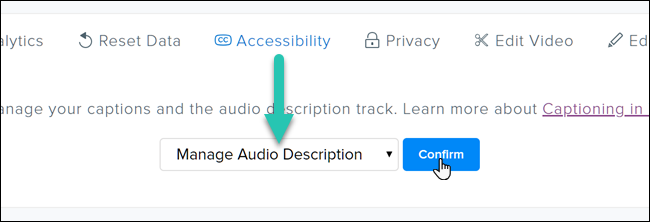
The best of today’s accessible video platforms now offer features that make it easy to add audio description tracks to videos. In TechSmith Knowmia, formerly TechSmith Relay, you simply log in, go to your video, click on the ‘Accessibility’ tab, and then ‘Manage Audio Description.’
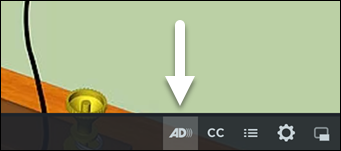
Then, upload your audio description track, which can be an Mp3 or M4A file type. Once your video has an audio description track, students can easily turn it on by clicking the AD Track button on the video player.
Separate video – Usually only used when embedded tracks are not available, this involves creating a duplicate video with audio descriptions permanently part of the audio, or “burned in.” There’s no option to turn on or off the audio description narration with this method. While this is great for students who always use the narration, having two copies of every video can be confusing and double bandwidth and storage costs.
Create audio descriptions yourself, or outsource
The easiest way to create audio descriptions is to outsource it to a company who does this as a service. Many of the same vendors who create captions can also create audio descriptions and usually charge about $15-$30 per minute.
Another option is to create audio descriptions in-house. It’s more affordable, and you retain complete control of the wording and phrasing.
Before you begin, learn from those who have done this before and can share best practices. There are a number of preferred ways to explain what’s happening on-screen. It’s helpful and will save you time when you understand common practices. One great resource is the Described and Captioned Media Program (DCMP), which has a handy description key and other resources with tips and techniques that will make your audio descriptions easier to create and understand.
When you record your audio descriptions, keep in mind that they don’t need to synch perfectly with the visuals. As long as they are approximately nearby the on-screen action, they will be effective.
Another tip is to time your narration so that it doesn’t interfere with on-screen dialogue or other audio in the original video. Record audio descriptions in the empty spaces in between the existing audio. You don’t need to verbally explain every single thing that happens on the screen, as long as you describe the gist of what’s happening.
Alternatives to audio descriptions
An annotated transcript is an alternative to audio descriptions. Instead of narrating what’s happening visually, you write it out and provide it separate from the video.
For example, if a complicated chart is shown in a health sciences video, an annotated transcript would include an extra section that describes what the chart looks like, in detail.
Create automatic transcripts with Audiate
Audiate automatically transcribes your audio into text.
One benefit of this method is that deaf and blind students can use assistive devices to ‘read’ these transcripts, whereas audio descriptions are only helpful to those who can hear. Extended transcripts may also help other types of students who want to review material through written words, or struggle to process visual information for other reasons. Cons include extra time creating the transcript and maintaining another resource.
A final alternative to audio descriptions is simply to verbally describe all visuals within your original video. This takes the concept of providing an AD track and makes it part of the video itself. This method works particularly well for educational videos and demonstrations where descriptions of on-screen action are a natural addition.
For example, if you’re making a video lesson with a chart, verbally explain the main points. If you’re hand-writing a calculus proof, talk through it as you go. Demonstrating a chemistry experiment? Describe what you’re doing along the way, so students have the audio and visuals.
There’s a lot to understand about audio descriptions. This topic will continue to grow as more video platforms offer this functionality, and more colleges and universities begin including audio descriptions alongside video captions as standard accessibility accommodations.
It can be difficult to onboard users to new and complex interfaces and workflows. Too much information can easily overwhelm the user and make it difficult to keep the focus on the essential feature or functionality.
Additionally, software updates tend to be frequent. These regular updates, coupled with localization processes, can make documentation work in the software industry quite demanding for technical content creators. How can we face these challenges without having to constantly update supporting content?
What if we designed our visual content in a way that is easy to follow, and is able to withstand future UI tweaks?
Let us introduce a design technique used by TechSmith’s User Assistance team and others – it’s called simplified user interface.
Simplified User Interface: What is it?
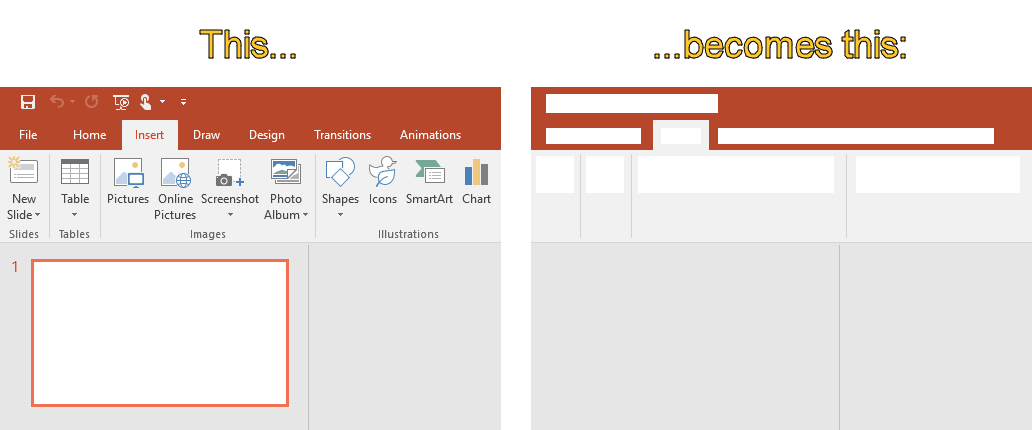
A simplified user interface (SUI) is a visual representation of a software interface that removes unimportant elements and reduces them to simpler shapes.
An example of SUI (pronounced “sue-ee” by the TechSmith User Assistance team).
The elements that are fundamental to the instructions or for the user to understand are purposefully kept visible and the SUI graphics serves as a visual aid to support the instructional content given, via the sub- or figure text.
SUI graphics allow for easy-to-follow instructions which enable the reader to get to the point quickly and avoid distractions.
Keep it simple, Stupid!
SUI graphics leverage the famous K.I.S.S. (Keep it simple, Stupid!) principle: systems perform better if they are kept simple and when unnecessary complexities are avoided. By reducing the graphics to a simpler state and by removing distractions, we can allow the user to focus on only the essential information, which creates a better experience.
Josh Cavalier,an eLearning expert, describes cognitive load as the “amount of information being processed by the brain”. When you reduce the amount of distractions for your audience, they are better able to focus their attention on what is important.
In this example, only a single menu item is shown so as direct user attention to something specific.
In a recent blog post from The Interaction Design Foundation, it’s explained that a user is focused solely on how useful something will be for them. This is true for both the product design itself but also for the how-to documentation and instructions. If it’s hard to understand how to use a product, the value that it has to offer, or how a product can solve a particular problem, then users will struggle.
SUI graphics build upon these principles: using a simplified user interface in help documentation can aid in user success by giving them only the information they must have in order to be successful, increasing their success and satisfaction with a product.
Keeping content up to date
Keep your content current, longer. A quick survey with attendees at STC Technical Communication Summit revealed that keeping content up to date is one of the biggest challenges faced by technical communicators today. And that makes sense, if we look to software as an example: release cycles are shortening and new features and functionality are being added frequently. And with each feature addition and related tweaks to the user interface, the instructions that the technical documentation team laboriously put together are at risk of becoming quickly out of date, even if only slightly. So what is a technical communicator to do?
Again, simplified user interface graphics can play a strategic role in one’s content strategy. The removal of a button or addition of a feature will easily confuse the user if this change is not reflected in a precise screenshot. However, a simplified user interface graphic can often sustain multiple software versions and updates before needing further updates. The simplified design is more forgiving to minor interface changes and additions as it is already an abstract representation of the interface. Technical content creators can use this technique to extend the shelf-life of their visual content or even for repurposing content in similar scenarios.
Faster content localization
Any content creator who has been through the localization process knows that it can be time-consuming and expensive to create screenshots and graphics for each locale. Yet, the localization of onboarding materials and other graphics can be trivial for any organization that wants to be successful internationally. As Day Translations points out, we should all “scrap the idea that English is the language of business”. It’s important to cater to different customer bases by providing them with content that speaks to them…in their native language.
Most technical communicators know the effort it takes to create and manage unique screenshots for each language. In order to simplify this task, one can design the content to use SUI images instead of language-specific screenshots. The same graphic can often be repurposed across multiple languages with little to no adjustment. Additional information or instructions can be conveyed through the sub- or figure text.
In this example, the same SUI graphic is used in the software preference dialog for all languages.
Again, this is another area that helps to reduce creation and maintenance efforts while still providing the user with clear instructions.
How to create a Simplified User Interface Graphic
Creating a simplified user interface (SUI) graphic is easier than you think. The best way to get started is to begin with a screenshot and then transform it. To do this, you need screen capture and image editing software. At TechSmith, our tool of choice for creating SUI images is Snagit because it provides both of these functions, though there are other capable image editors.
Step 1: Capture the screenshot
Using Snagit, capture a screenshot of the user interface you want to turn into a SUI graphic and open it in the Snagit Editor. Crop the screenshot to the dimensions of your desired output.
Step 2: Simplify the screenshot
Simplifying an image is a process that involves covering up and removing visual noise like unrelated text, menus, buttons, or tool tips to reduce an image’s complexity and focus attention on the important parts. Snagit provides two ways to help make this an easy process with the Simplify tool available in Snagit.
The first option is to simplify a screenshot manually by selecting the Simplify tool, and using the graphic elements to hide unimportant details in your image and direct attention to the ones that matter. After choosing the Simplify tool, Snagit automatically detects the colors in your screenshot, creates a color palette, and provides a set of tools that match and are ideal for simplifying images.
The second way option is to automate the process. Snagit’s Auto Simplify feature recognizes shapes and text and then automatically covers them with the themed elements. Remove, add, and change the color of any of the elements Snagit adds to achieve the look you want.
Watch the tutorial below to see the Simplify tool in action!
Step 3: Save it
When you are done, save your file as a .png or .jpg file to be used in your documentation. We highly recommend also saving your final image as a .snag file. This is the Snagit project file type and it allows you to reopen the project to edit and adjust the image later on. This makes updating your image easy so you won’t need to recreate your SUI graphic every time.
Bonus Tip: Use a tag to easily access this file any time in the Snagit library.
Key takeaways
The benefits of using Simplified User Interface graphics in your technical documentation are twofold: First, these graphics visually enhance your instructions and improve the onboarding experience for your users. Second, the graphics make technical communicators’ jobs easier, as they reduce the need for screenshot updates and help with localization.
Integrating SUI graphics into part of one’s content strategy is therefore a smart business decision that all content creators should consider, regardless if your favorite aspect is the improved user experience, having evergreen content, or faster localization. Even just a few simplified user interface graphics can make a big difference!
Allison Boatman is a member of the Marketing Team at TechSmith.
Follow her on Twitter @allisonboats
She can often be found aimlessly wandering around local craft stores.
Personal motto: "Work hard, stay humble."
Favorites: Alaskan Malamutes, Iceland, and 90's pop culture.
Have you ever felt you needed to record a webinar to share with your coworkers? Or do you have your own webinar to record?
Whether you want to learn how to record a webinar for your reference later or share your own webinar with others, this tutorial will show you how it’s done. We’ll go through how to use Snagit and Camtasia so you can record any webinar you want.
This process allows you to record a webinar on a Mac or Windows machine.
So join us, and let’s record!
Record your webinar with Snagit
Snagit is a fantastic screen recording tool with easy-to-use features for every skill level. The low learning curve for this tool makes it a winner for every screen recording journey!
Step 1. Download Snagit
Snagit is our favorite screen recorder because of its versatility as an image and video capture software. Plus, basic editing like making cuts, combining videos, and adding effects can come in handy.
Record a Webinar with Snagit
It’s easy to record a webinar with Snagit’s screen recording options.
However, if you’re looking for more video editing power, you can also use Camtasia. Then you can make more substantial edits after you’re done recording your webinar.
This guide will help you no matter which tool you choose to use. The recording process is super easy, so let’s dive in!
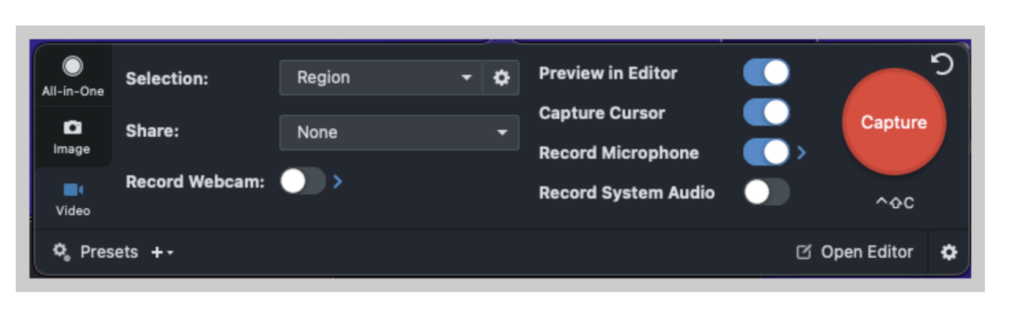
Step 2. Set up your recording
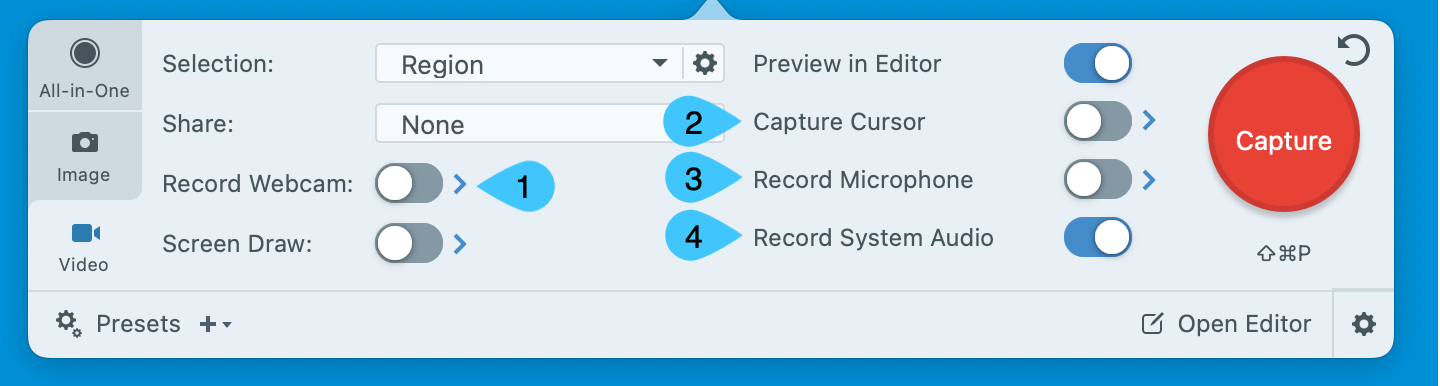
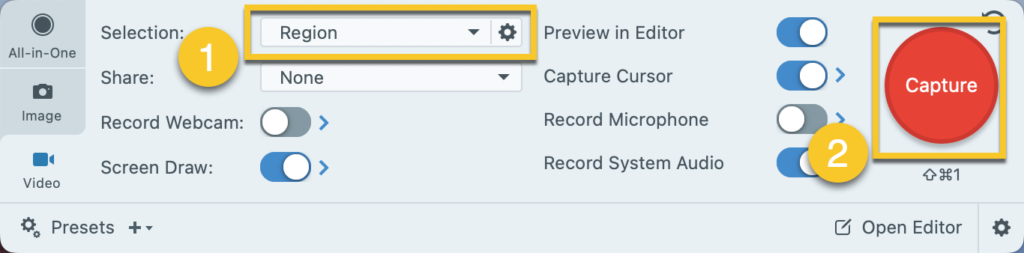
When you’re ready to start recording, open a browser and navigate to the webinar you’d like to record. Then, in Snagit, select the Video tab.
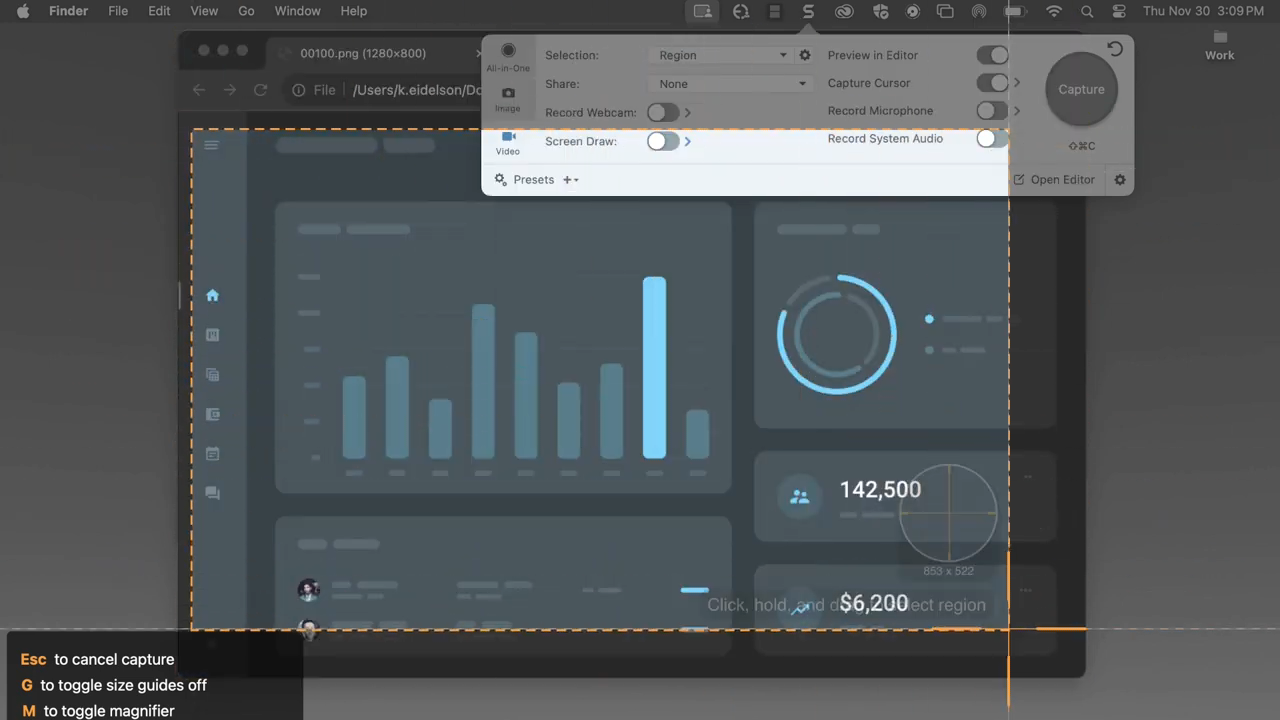
Next, press the red Capture button and use the crosshairs to select the area of your screen you want to record. You can adjust the capture area after drawing your selection using the handles on the edge of the selected area.
Make sure you select everything you want your audience to see. Anything outside the crosshairs will not be visible once you start recording.
To launch the webinar full screen, select your entire screen!
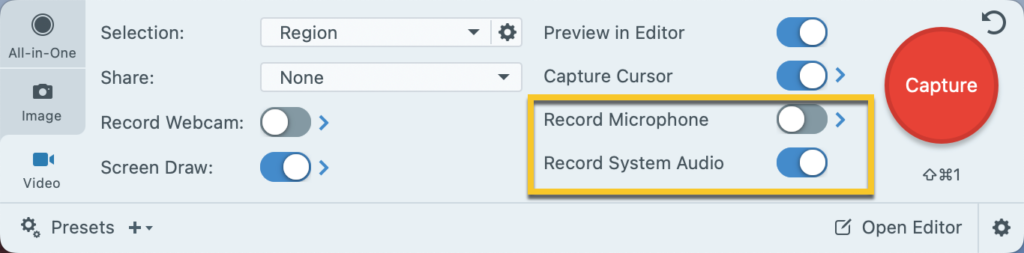
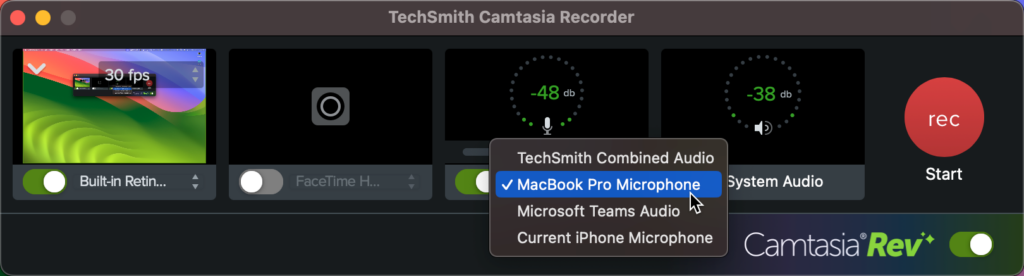
In the video toolbar, make sure that the system audio icon is green, as this means the video will capture the sound from your computer. If it is not green, click the icon to turn the system audio on. (You can also hover your cursor over the button and the tooltip will tell you if system audio is on or off.)
In case you also want to record your voice, make sure the microphone icon is green (enabled) as well. Once both buttons are green, you’re good to go!
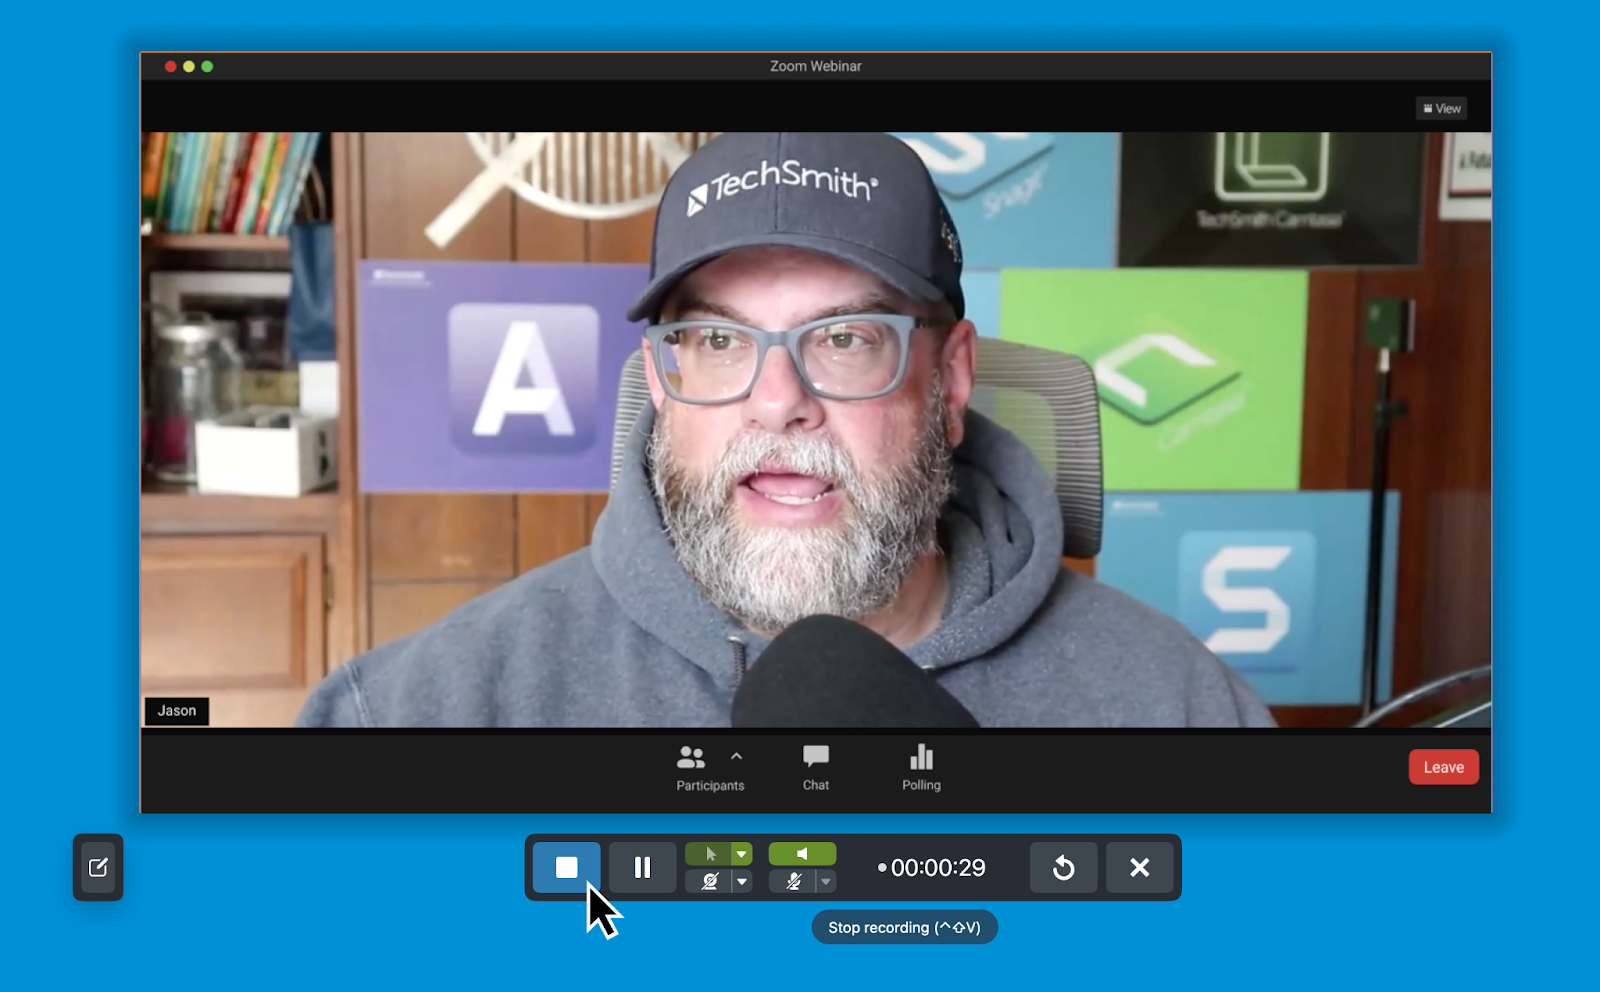
Step 3. Record your webinar
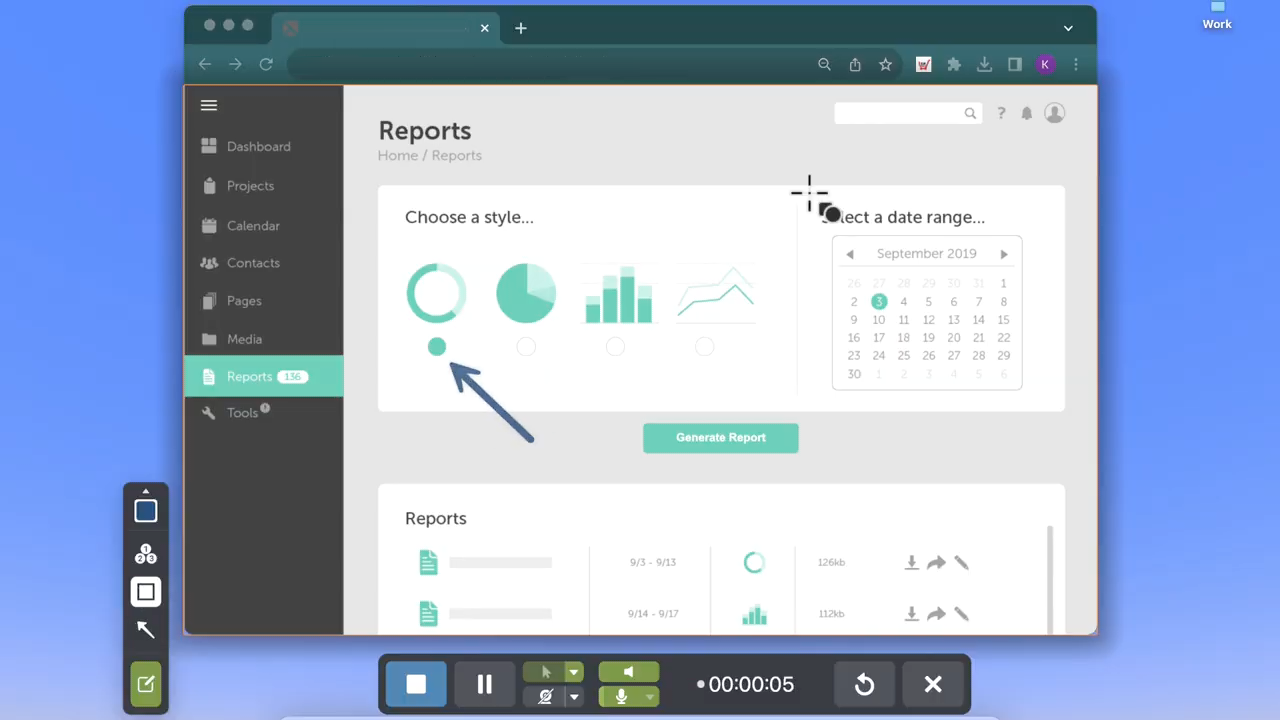
When the webinar starts, click the Record button and Snagit will start recording after a three second countdown. While the webinar is running, be careful not to move your browser window or tab between applications. Snagit is recording everything that happens inside the selected area, no matter what is on your screen.
To finish recording when the webinar ends, hit Stop. You can also use hotkeys to control the recorder.
If you’re a Windows user, press Shift + F10 to stop the recording, and Shift + F9 to pause/resume.
If you’re a Mac user, press Control-Shift-V to stop the recording and Control-Shift-space to pause/resume.
When you end your recording, it will open in Snagit Editor.
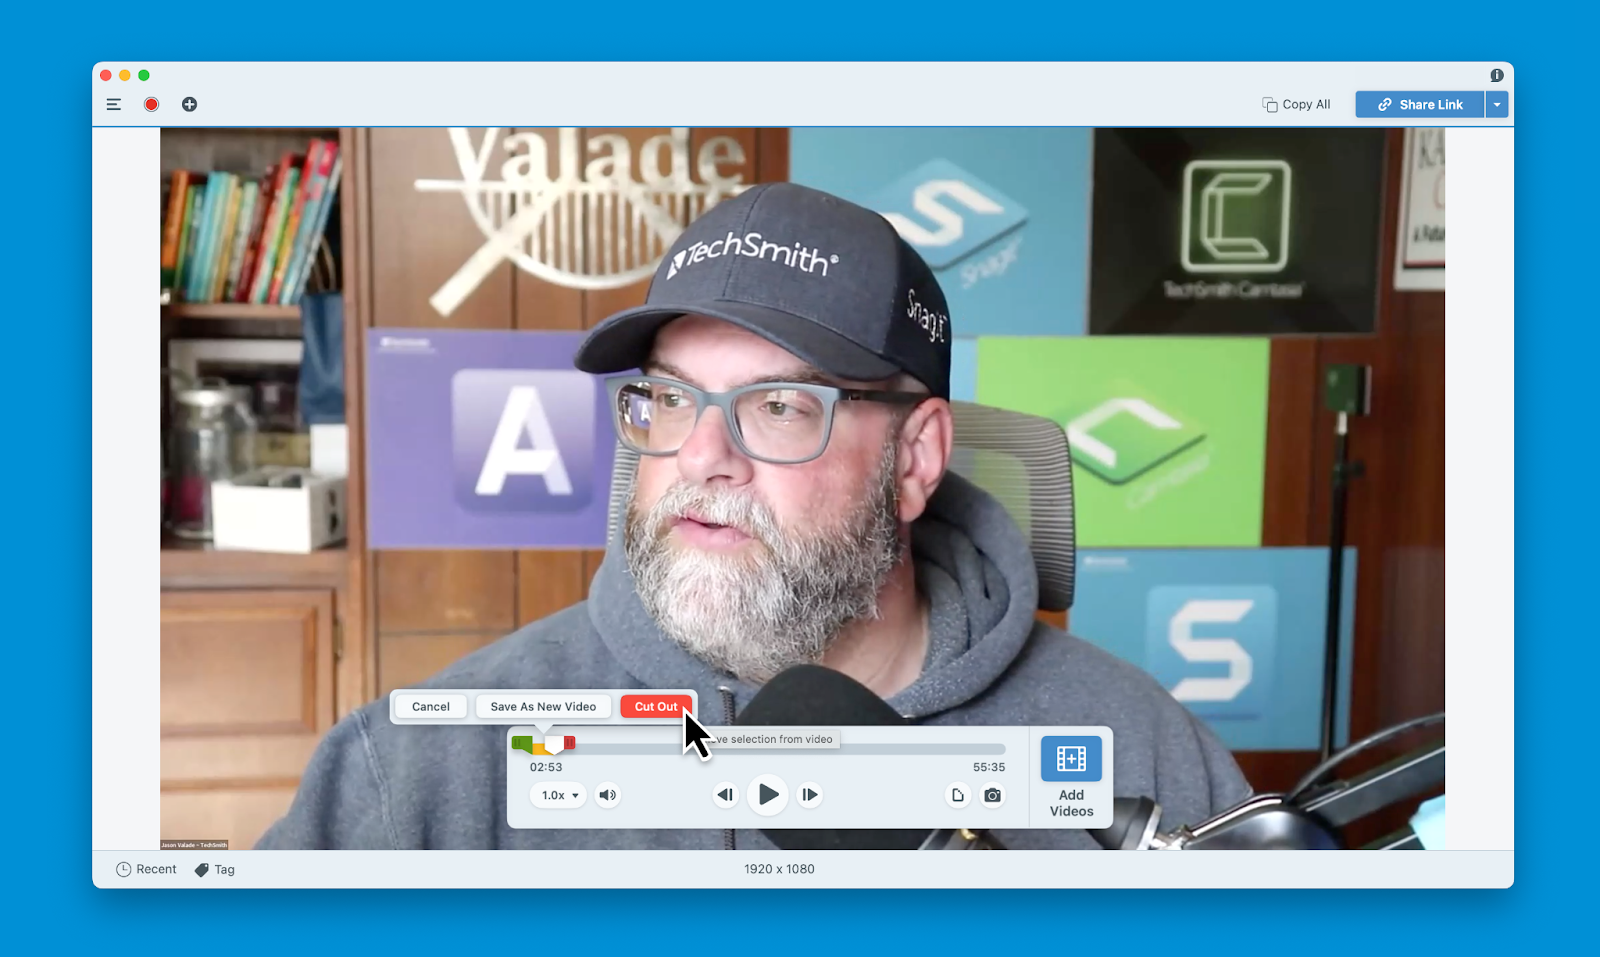
Step 4. Edit and Save
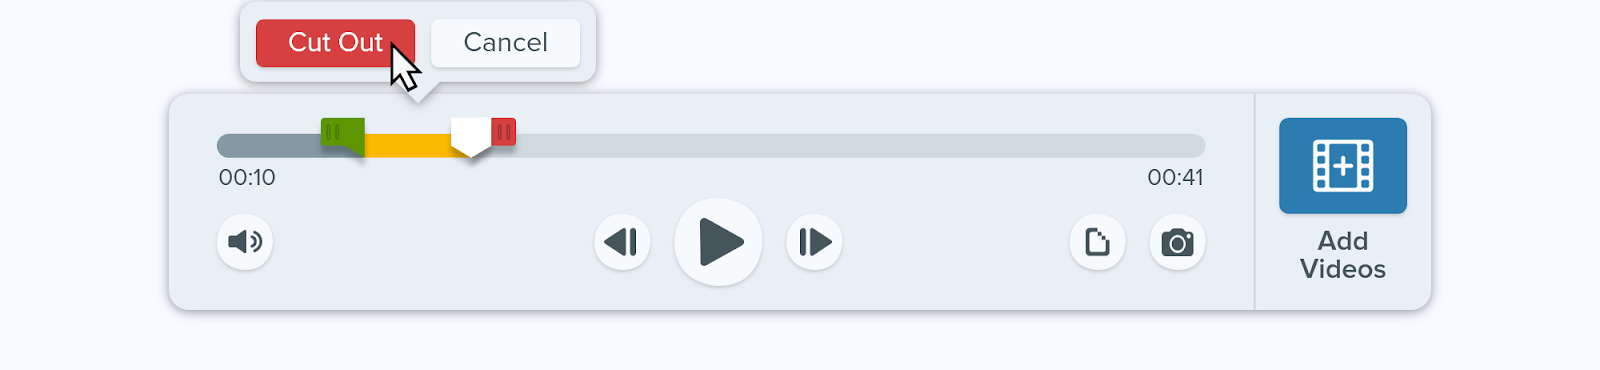
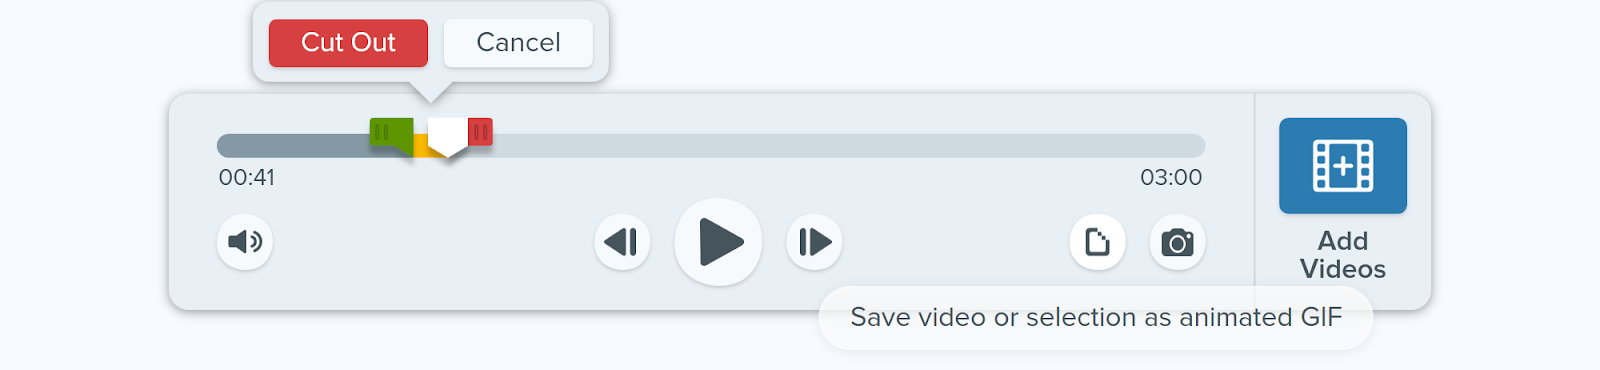
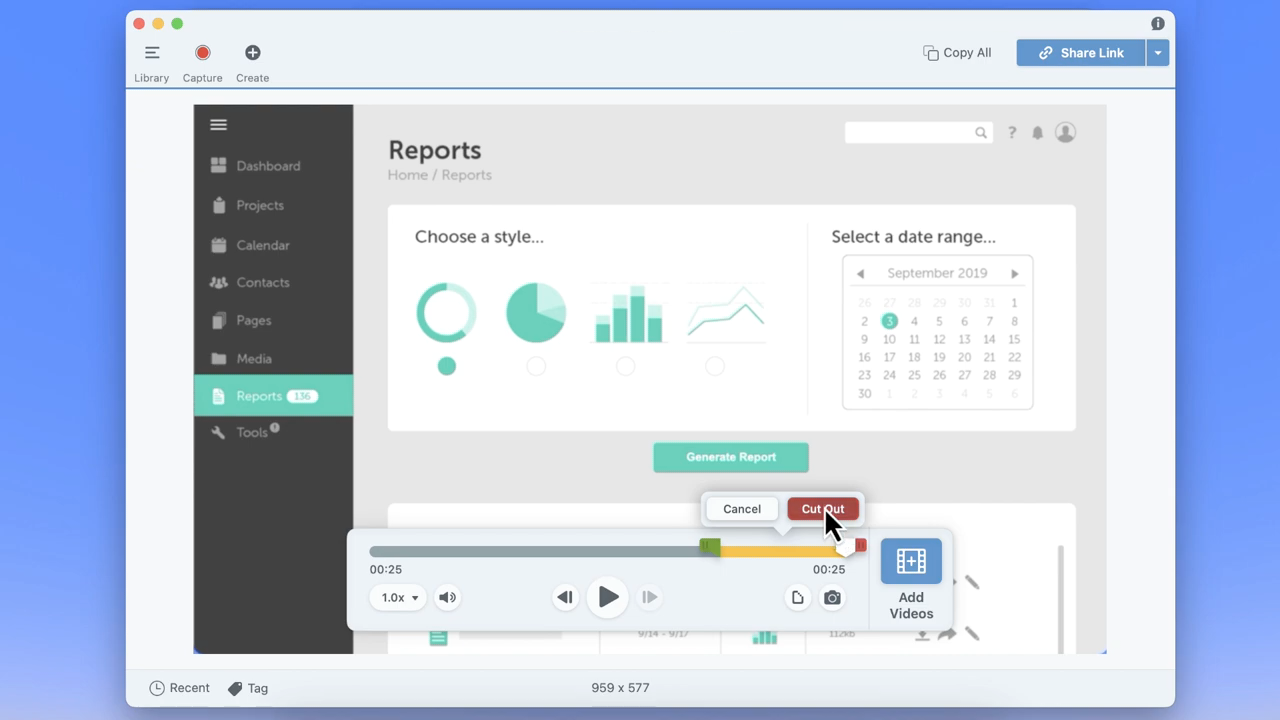
From Snagit Editor, you can preview your entire video recording, cut out unwanted sections, and pull screenshots from the recording.
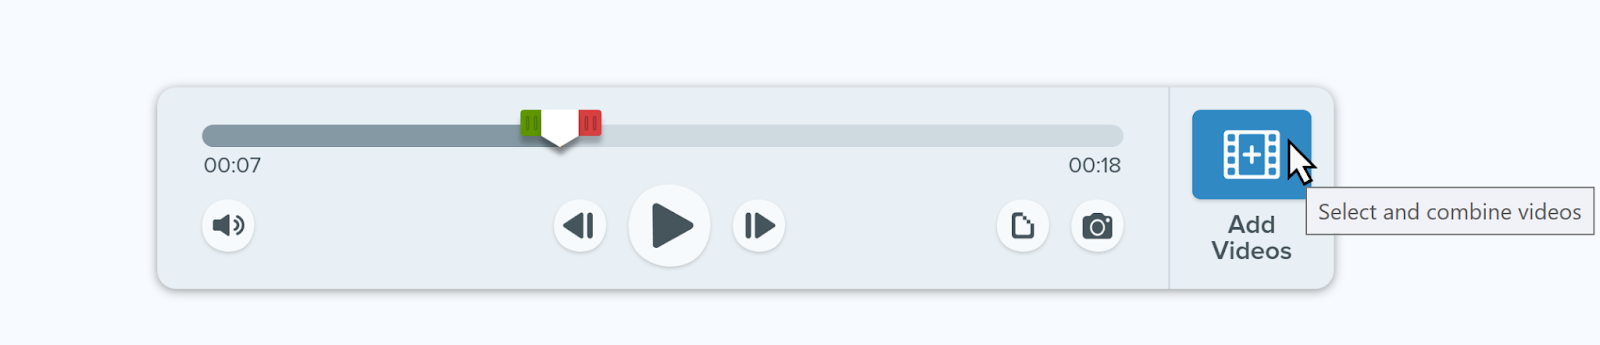
If you recorded your video in a few separate clips, you can stitch those together using the Combine Videos feature to make a full-length video of all the content.
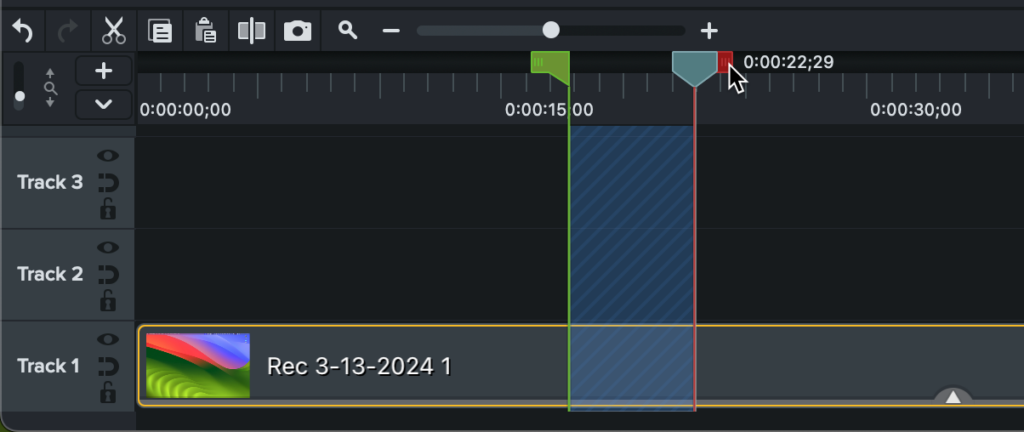
To cut out unwanted sections, move the playhead to the beginning of section you want to remove, then move the red handle to the end of the unwanted section and click Cut.
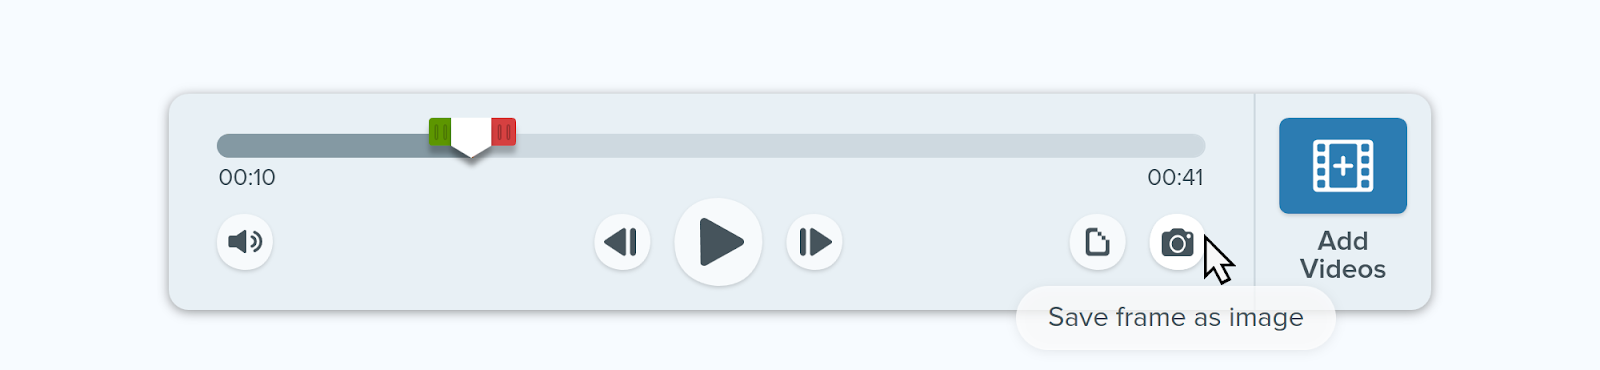
To save a frame from your video recording, move the playhead to the frame you want to capture, and then click the PNG button. The image will appear in your Recent Captures Tray.
With this feature, you can save interesting information or anecdotes to keep for later. Saving a frame is super convenient when you’re shown large amounts of data at once.
To combine multiple videos into one, click the Add Videos button and select your clips from your library. You can then reorder your clips to fit the narrative.
Then, edit your video like any other Snagit video. You can trim and edit until it’s perfect for you!
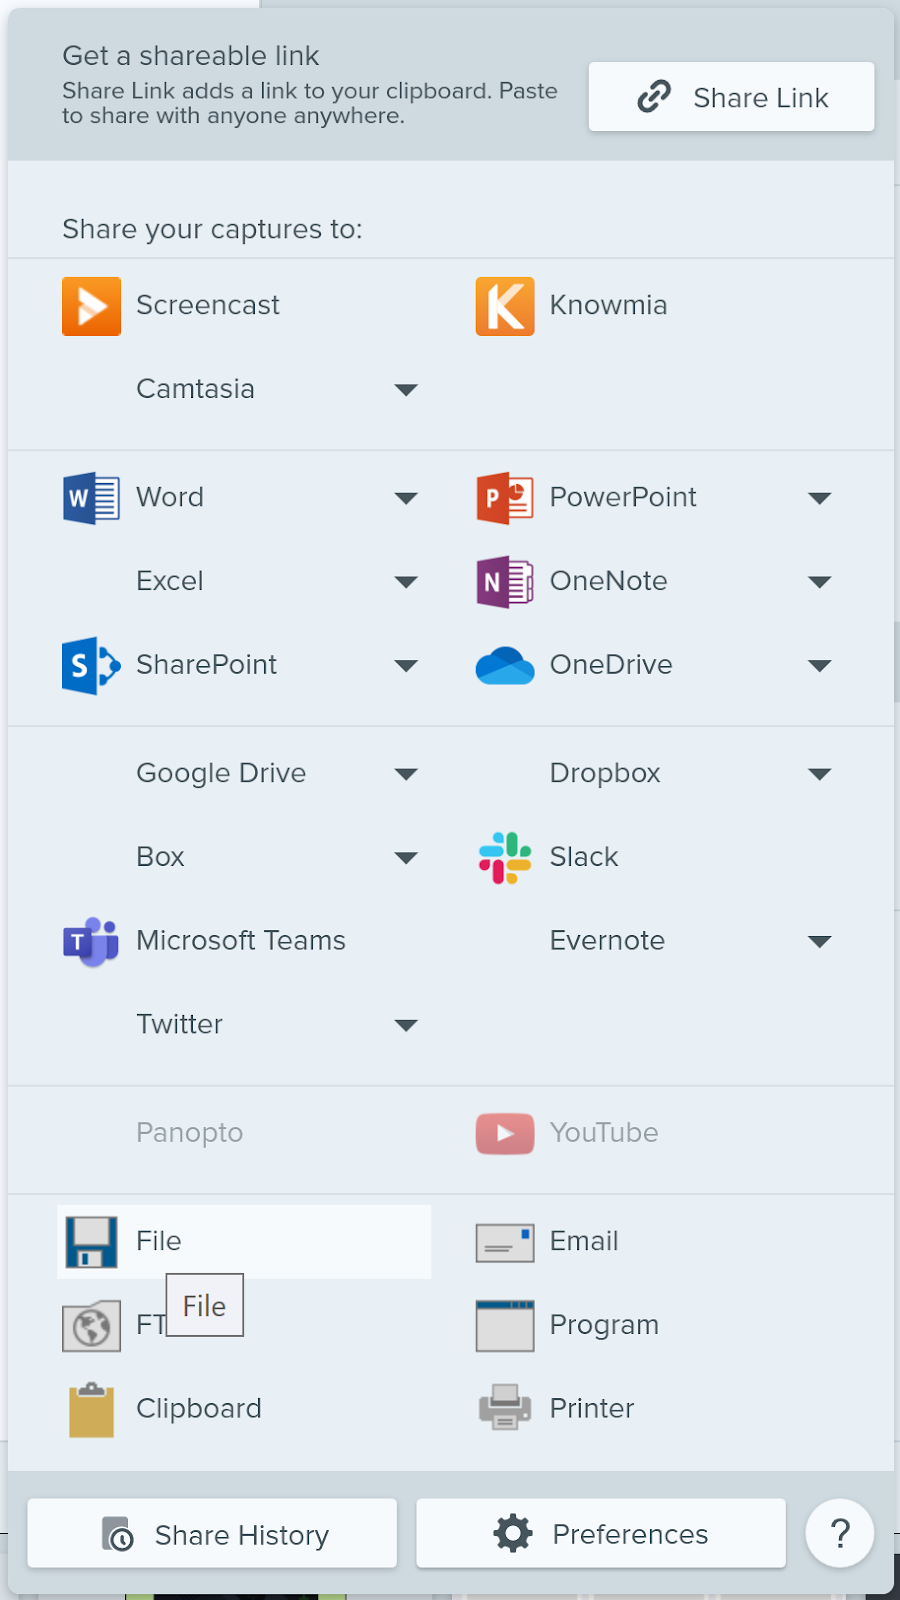
To save your webinar recording, click Share and then choose from popular social media and sharing destinations like YouTube, Dropbox, and Google Drive.
You can share your recording with anyone by using Screencast. Screencast makes it easy to share long-form videos without clogging up inboxes or taking up any space on your computer.
To save your video files as MP4s to your computer, choose the Share to File option. Then select where you’d like to save the video, and you’re done!
Of course, you can also use Snagit to record a high-quality pre-recorded webinar. Just follow the same steps above after you press play on your video.
Record a webinar with Camtasia
For more substantial webinar recordings, Camtasia is a great tool. Although similar to Snagit, Camtasia has more features and boasts more video-editing capabilities.
This makes it a perfect tool to record a webinar you’re putting on. You can easily source clips for websites and social media, make edits, and repurpose the content for other use.
Plus, Audiate is Camtasia’s perfect partner for text-based editing, which is 40% faster than regular video editing, and for adding captions to social media clips.
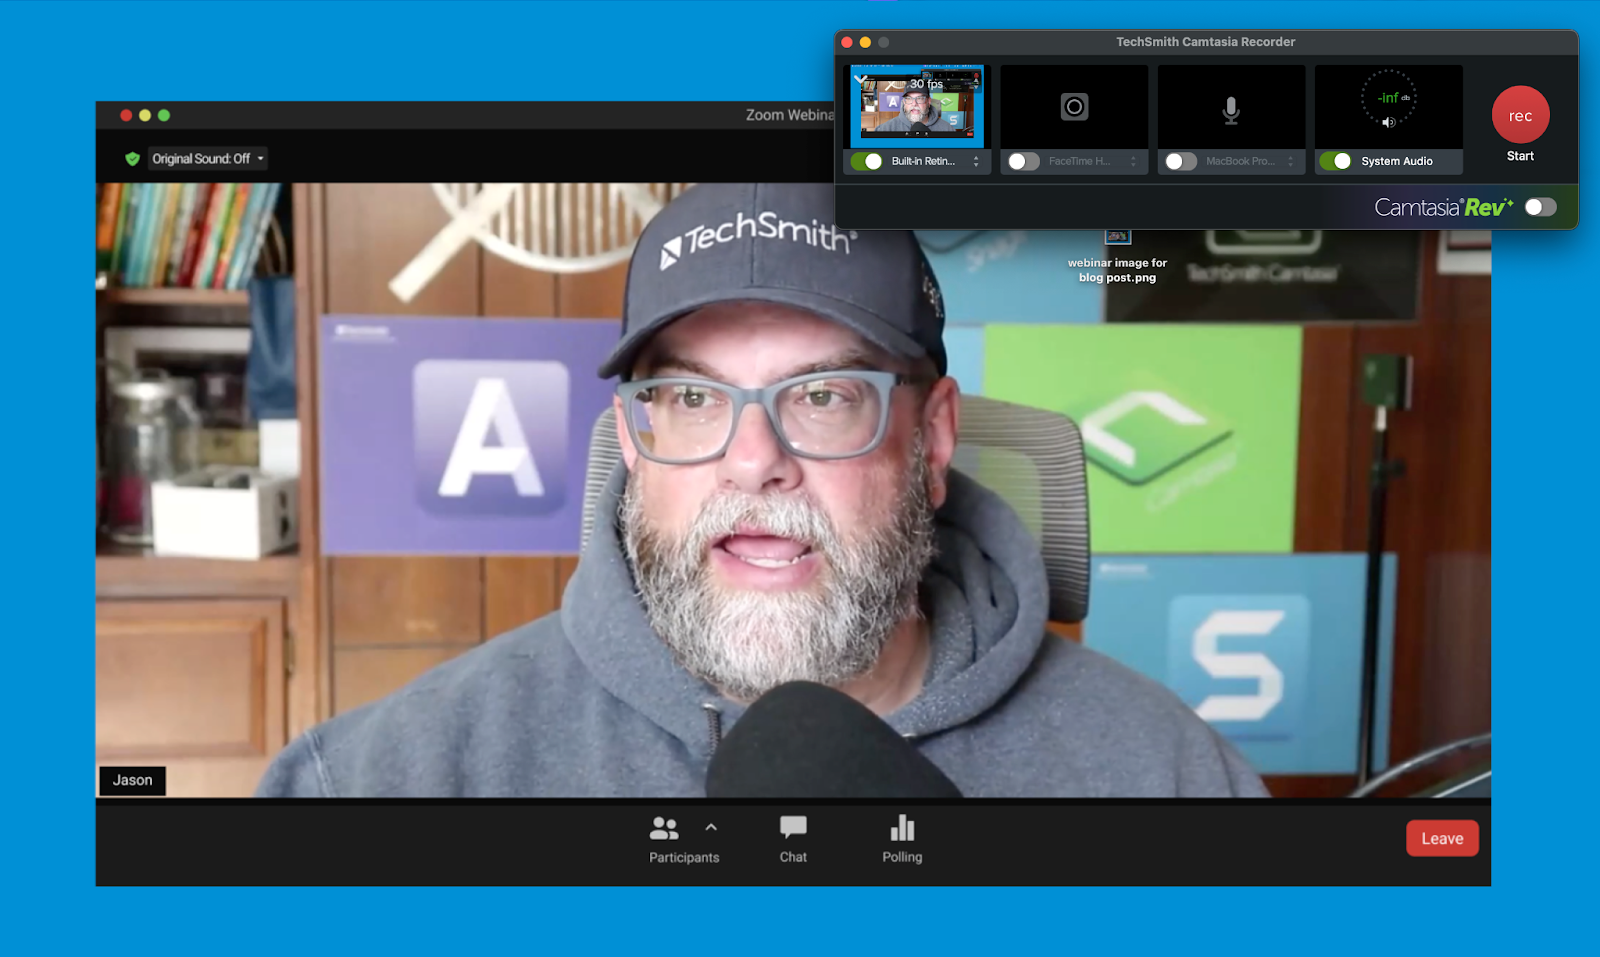
We’ll also cover how to set up your zoom to record your webinar so you can import the file directly into Camtasia for quick edits.
Let’s see how you can use Camtasia and Audiate to record and edit your webinar so your audience gets the most out of your hard work!
Step 1: Download Camtasia
Just like Snagit, Camtasia offers a free trial for users who’d like to try it out first.
Record your webinar with Camtasia
Record a great webinar with Camtasia’s easy-to-use screen recording features!
Once you’ve downloaded Camtasia, you’re ready to start recording.
Step 2: Set up your recording
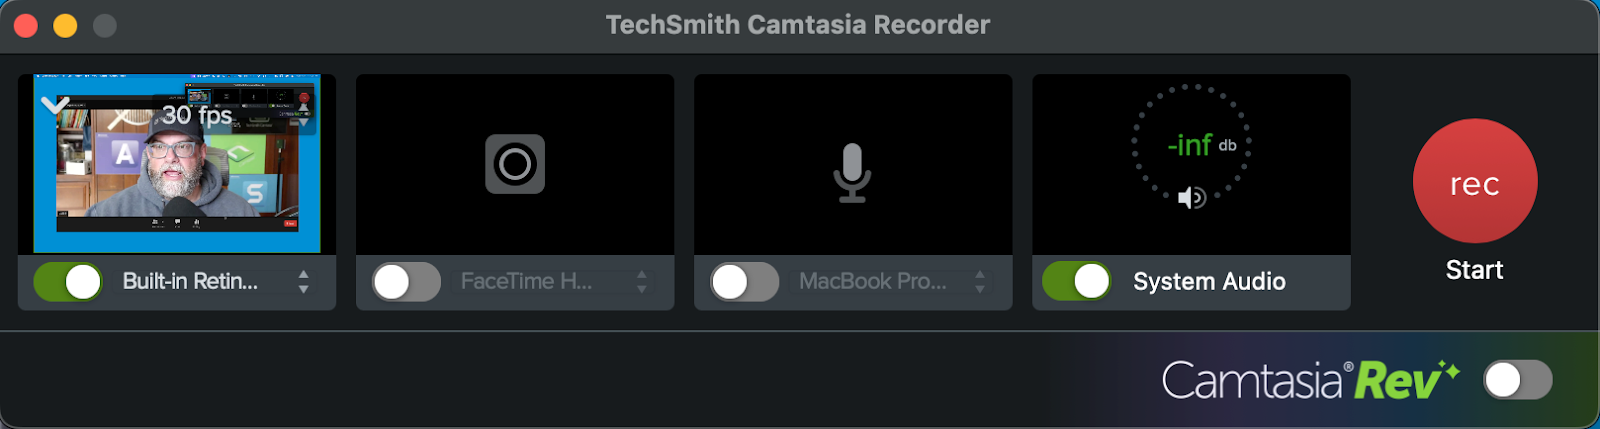
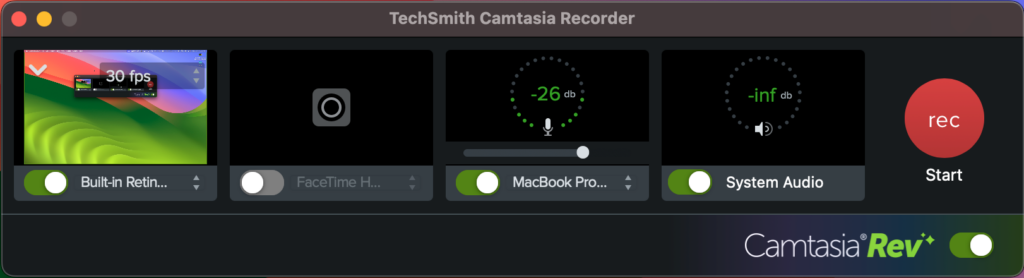
Open Camtasia and enable the Screen Record option. To present your webinar, enable the Microphone and System Audio options. This way, your viewers can hear you talk and hear any sounds from your computer.
Then, decide whether or not you’d like to record your camera. This is optional and depends on whether or not you want your face to be recorded.
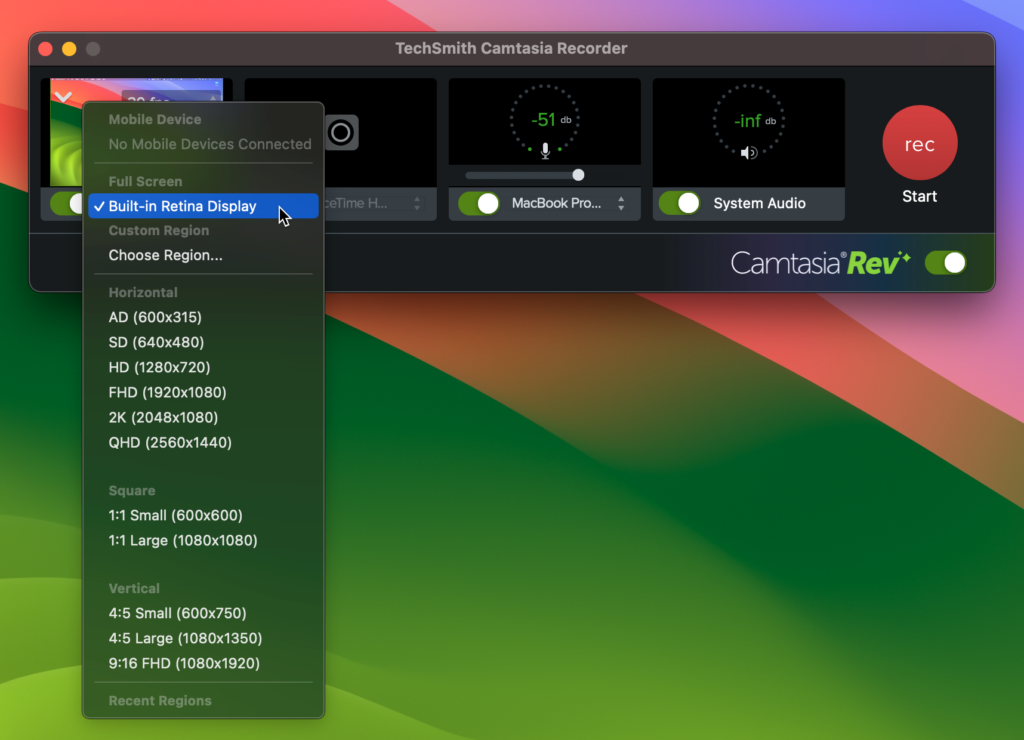
Keep in mind that Camtasia records your entire screen, so it is worthwhile to adjust your display to only show what you want your audience to see. However, it’s also super easy to edit and crop out any unwanted portions of your recording, so don’t sweat it too much.
Step 3: Record your webinar
Press the red rec button to start your recording. A pop-up bar will show up allowing you to pause, restart, and end your recording at any time. This gives you the flexibility to pause your webinar for a second and readjust so you get the perfect recording every time.
When you’re done recording, your webinar will open in Camtasia Rev. From there choose your favorite layout, background, and effects. The possibilities are truly endless.
Bonus: Uploading your Zoom recording to Camtasia
Now, you’re ready for any additional edits. This is especially important if you upload a pre-recorded zoom webinar into Camtasia. Let’s go over that process.
First, make sure you turn on the zoom recording option while you go through your webinar. To do that, press the record button on the toolbar
Press the buttons to pause or stop the recording once you’re done.
From there, just save your recording to your preferred location and import to Camtasia to start your editing process.
Step 4: Edit and save
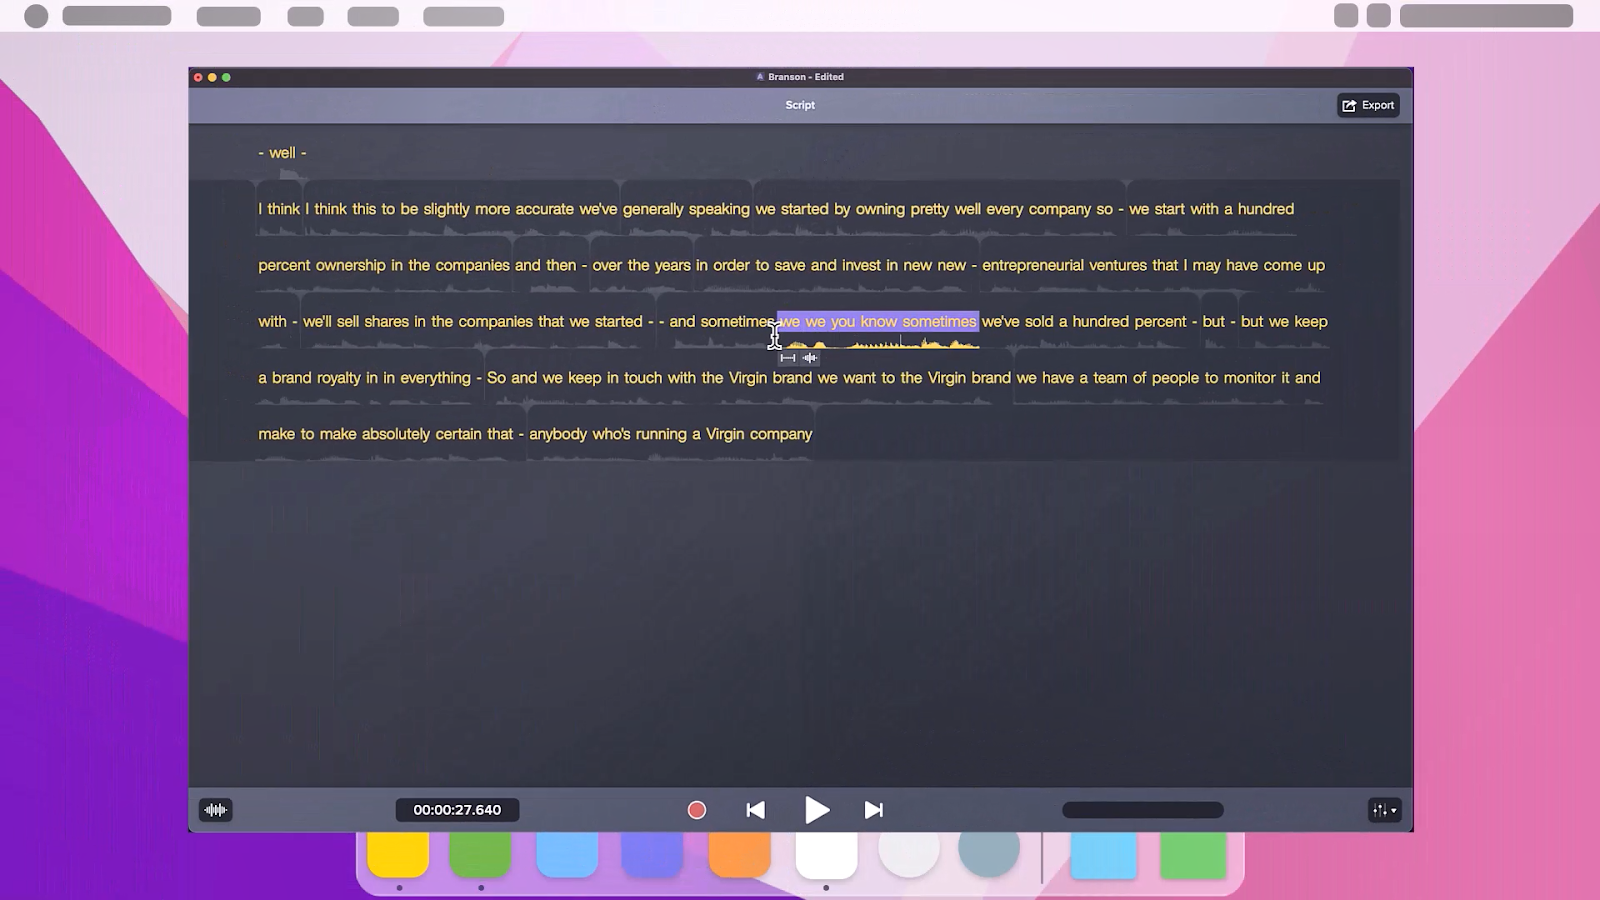
Editing a video with Camtasia will enhance your video however you need it to. Especially when you use Audiate with it. Audiate offers text-based editing functionalities that let you edit out any unwanted parts of your video simply by deleting words!
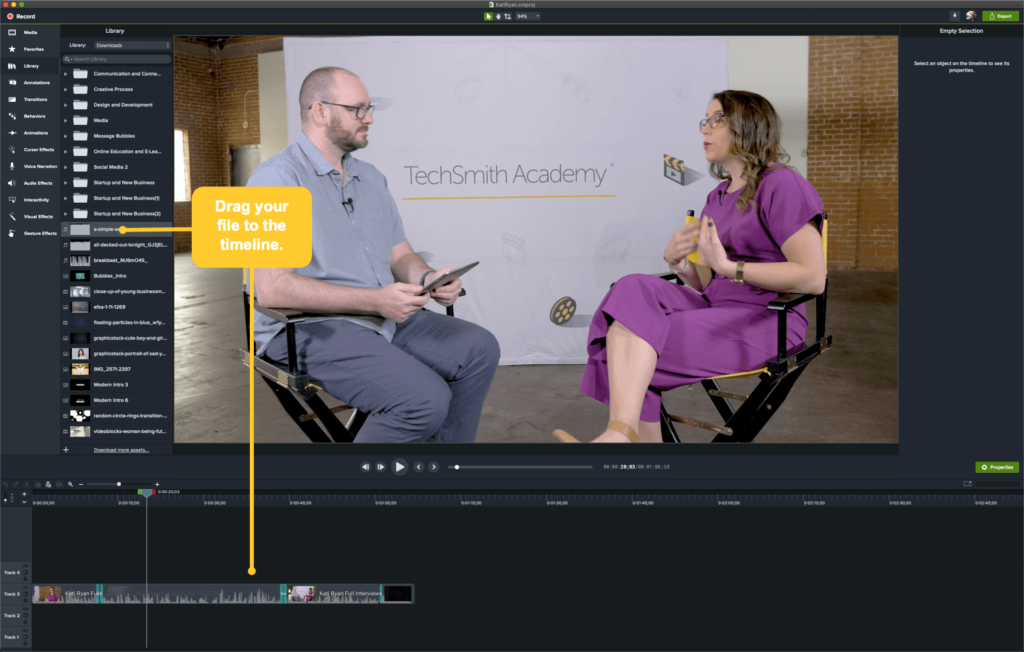
GRAPHIC
This will ensure that your video only includes the exact information that you need and minimizes the amount of cutting and trimming of actual video footage. Plus, you can edit out any hesitations and awkward “ums and ahs” that you don’t want your audience to hear with a simple press of your backspace key.
Once your recording is completely edited to your liking, sync the text-based edits with Camtasia and watch as any unwanted video clips disappear! It’s a convenient way to edit videos without wasting time on small details.
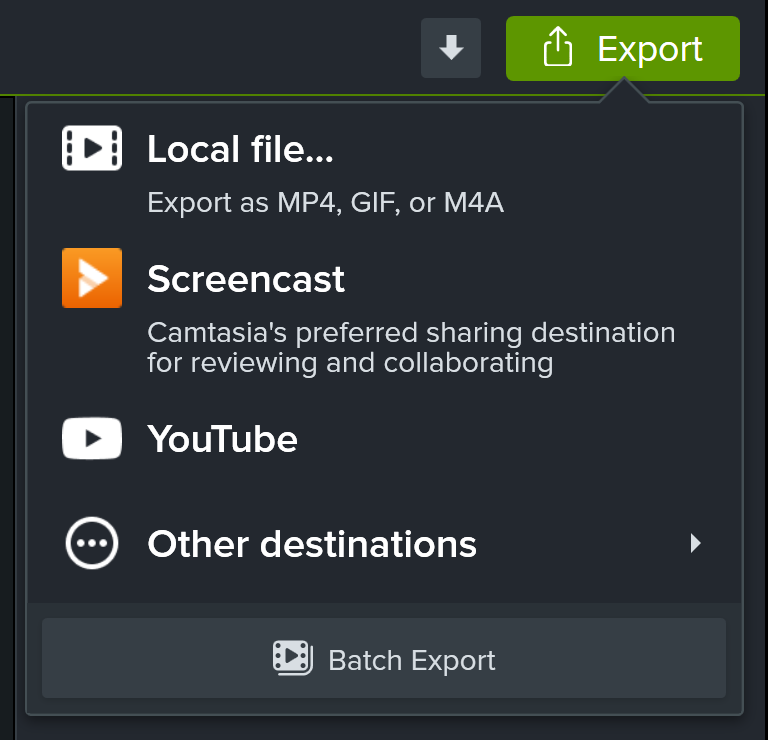
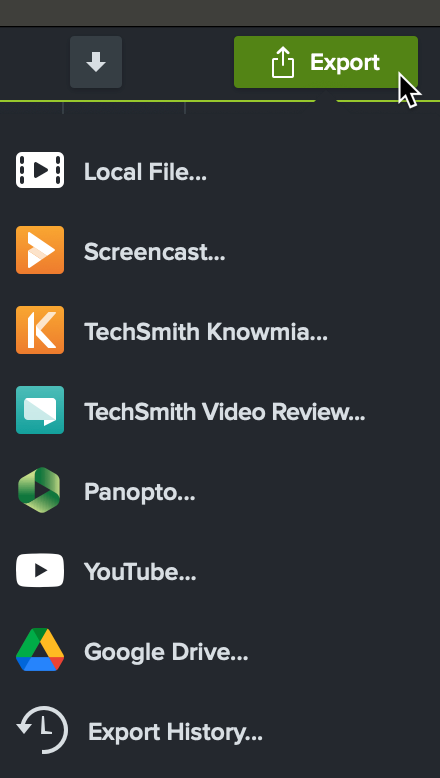
To save your webinar recording, click the Export button and choose to download as an MP4 file or to share via Screencast.
Screencast allows your viewers to not only watch your video whenever, but also comment and react to it with others. Your viewers can exchange their ideas and collaborate on the information from your webinar!
Screencast is an easy sharing option for a collaborative audience. Plus, anyone can watch your video even if they do not have a Screencast account themselves.
And you’re done! Using Camtasia and Audiate, you can record, edit, and share your webinar with anyone you need.
Final Tips
Recording your screen can reduce the performance of your computer. To reduce the possibility of screen lag or jumpy video, close applications you’re not using and consider lowering the resolution of your computer screen temporarily.
Double-check your audio and camera settings before you record! It’s easy to miss and can make a huge difference. You don’t want to present a webinar and afterward realize you weren’t capturing your audio the whole time!
Are you looking for the best tool to capture your screen, but aren’t sure which one to choose? TechSmith makes two software products that are perfect for capturing what you see on your computer. Which one is right for you – Snagit vs Camtasia – depends a lot on if you want to create images or videos.
In this post, learn the difference between Snagit and Camtasia, what they can do, and how to decide which one is best for your project.
Images and screenshots: Do you want to capture, create, or edit images?
If you want to work with images, go with Snagit. Camtasia really only does video.
What can Snagit do with images?
Not only can you grab pretty much any type of screenshot – a region, window, and full-screen (and easily adjust margins as you go), Snagit also lets you capture what extends beyond your screen.
Capture content that scrolls up and down, including scrolling webpages, and panoramic content that extends beyond your screen—up, down, and side-to-side. This is priceless when you’re trying to capture online maps, interestingly shaped images, and nested tables commonly seen in programs like Excel or Sheets.
If you want to create and work with images, Snagit is a clear choice.
Most importantly, Snagit makes it easy to edit screenshots the way you want.
Add notes and comments with callouts, or add text directly on the capture. Point important details out with arrows and fun stamps. Blur your screenshot or simplify complicated UI. Then, resize and crop your image to the right size. That being said, Snagit has a lot of lesser-known features that can make huge changes to your images too.
You can even move elements around in your capture and edit or replace text for easy modifications.
Snagit makes it easy to create simple videos
Screenshots and screen recordings are easy with Snagit
With so many image editing features, some people just get Snagit for that. But since it has both image capture and editing, it’s easy to capture and create great-looking, consistently-themed images, and share to popular destinations. When deciding between Snagit vs. Camtasia, people tend to choose Snagit for making images for documentation, elearning materials, written tutorials, and similar tasks.
Videos and screen recordings: Do you need a basic or fancy video?
For simple videos, Snagit’s your best bet.
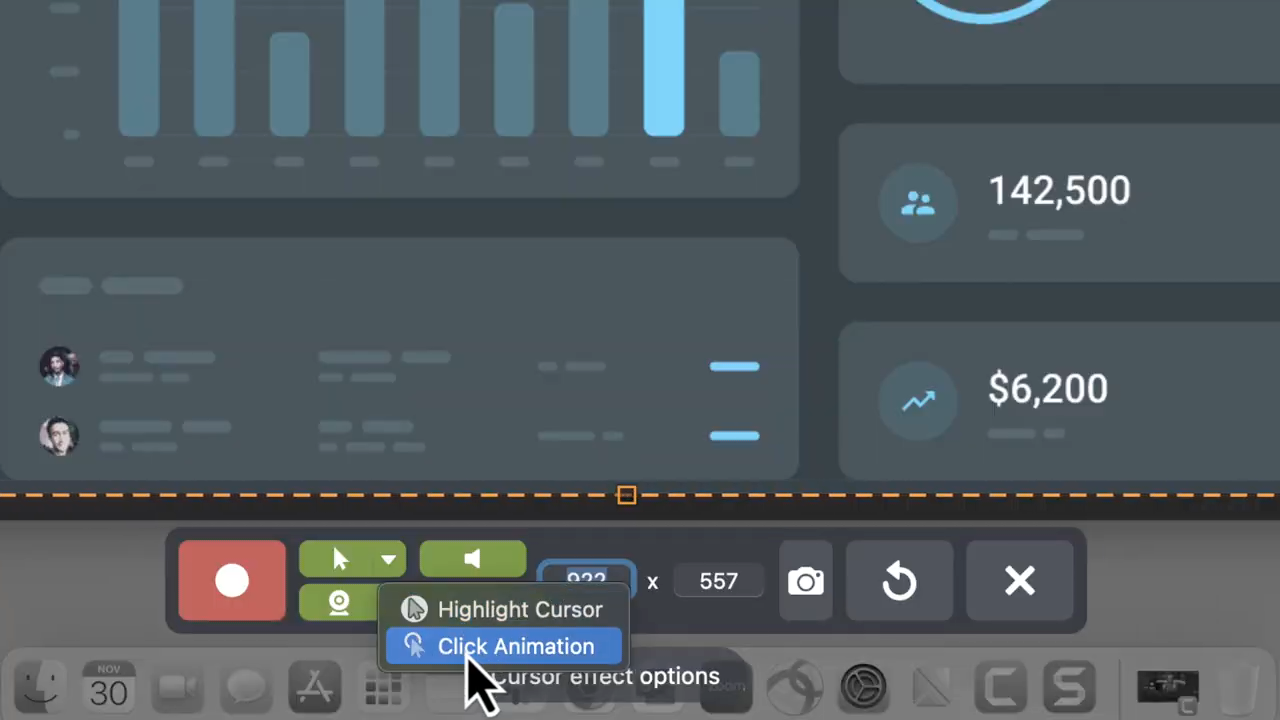
With Snagit, you can record your screen, camera, and audio simultaneously, which is perfect for tutorials! While you record, Snagit offers a Screen Draw option which means you can point out important details and highlight information in real-time.
Plus, Snagit has a click animation and a cursor highlight feature for your mouse. This way your viewers will always follow what you want them to see.
With simple video recording and basic video editing options, Snagit has a low learning curve, so it’s easy to make a complete video from start to finish in just a few clicks.
For more polished video, choose Camtasia.
Camtasia can also record your screen and camera but offers higher-resolution recording, as well as more advanced video editing features. And it goes beyond cutting and splicing content. But advanced doesn’t necessarily mean complicated. For easy editing, Camtasia has drag-and-drop animations, transitions, effects, backgrounds, and more. If you can think of it, Camtasia probably has it!
Camtasia Rev’s workflow lets you edit your videos quicker than ever before. The workflow enables you to resize and format videos with different optimal layouts for any screen size. You can also quickly add intuitive backgrounds, effects, and intuitive templates.
For accessibility, Camtasia offers closed captioning, not only great for ADA compliance but also handy when you want to give people the option of viewing your content with the sound turned ‘off’ on social media.
In contrast, you can make and share your own videos for a fraction of the price, on a much faster timeline.
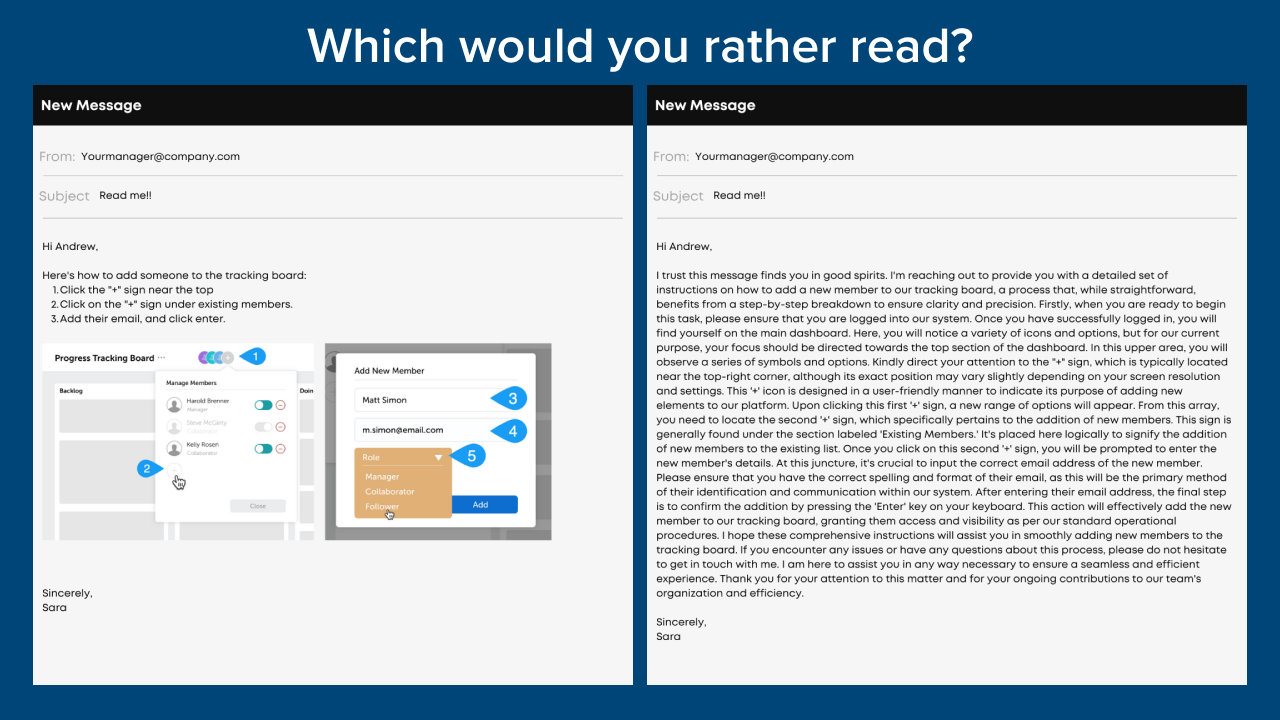
Lindy Belley, Marketing Coordinator at Integrity Data, explains how her department is able to save resources by making videos in-house:
“I know if I have to turn something out quickly, I can pull it into Camtasia and make all of my changes within minutes,” said Lindy. “I don’t know that I could have done that with any other video production tool.”
What do you want to do?
Another way to decide between Snagit and Camtasia is by what you want to accomplish, and how quickly.
Again, if you want to capture images and edit them, Snagit is the clear choice. But since both Snagit and Camtasia do video capturing, here are some differences in how people use each product, to help you choose.
People typically say they love Snagit for quick, spontaneous, videos with a relatively short shelf life. Use cases include:
Quick videos to show a colleague something
One-take videos that walk through a process
Record your screen to share information
Capturing screen footage of IT-related issues
Send personalized feedback to someone
Import video for basic editing
Or any other video that needs minimal editing and features.
On the other hand, people choose Camtasia for videos that are planned, scripted, and have a longer shelf-life for a larger audience. Popular types of videos include:
Tutorials, demos, and how-to videos for training
YouTube videos, marketing content, including social media
Engaging video lessons for online and blended learning
Accessible videos with captions for silent viewing
Rich videos with music, system sounds, and backgrounds
Interactive videos with clickable links
Or any other video that needs substantial editing and professional features.
While either tool can help you create and edit useful videos, the purpose of your project will help you decide which solution is right for you.
Create the perfect videos with Camtasia
Camtasia makes it easy to create professional videos with easy-to-use features.
Ultimately you want the best tool for the job. Choose a screen capture tool based on your project goals, not based on price.
Both tools offer non-profit and education discounts, along with volume discounts and enterprise pricing, that can help you get these tools for your team or company.
When choosing between Snagit vs Camtasia, if you can only provide one screen capture tool for everyone (regardless of project goals), Snagit is a good way to go. It will give your organization image capture and editing plus basic video creation and trimming, with a low learning curve to start seeing increased productivity right away.
You can always get Camtasia for a subset of employees who need to create training videos, demos, and other more complex recordings.
Both Snagit and Camtasia are valuable tools
Since they do different things,Snagit and Camtasia are both valuable tools to have at your fingertips. Both work on Windows and Mac and have a host of sharing options like Screencast, Google Drive, Microsoft Word, YouTube, and more.
When you want to share an effective screenshot, Snagit is a quick and easy way to communicate information. When you want to create an effective tutorial video, Camtasia is a great choice. Even people who have never made a video before can learn to use Camtasia, so having it for everyone lets them use their new skill set on an as-needed basis.
When you want to share information, it’s important to have the right tools in your toolbox when you need them. Whether you choose Snagit, Camtasia, or both, having quality screen capture solutions will help you share knowledge and save time.
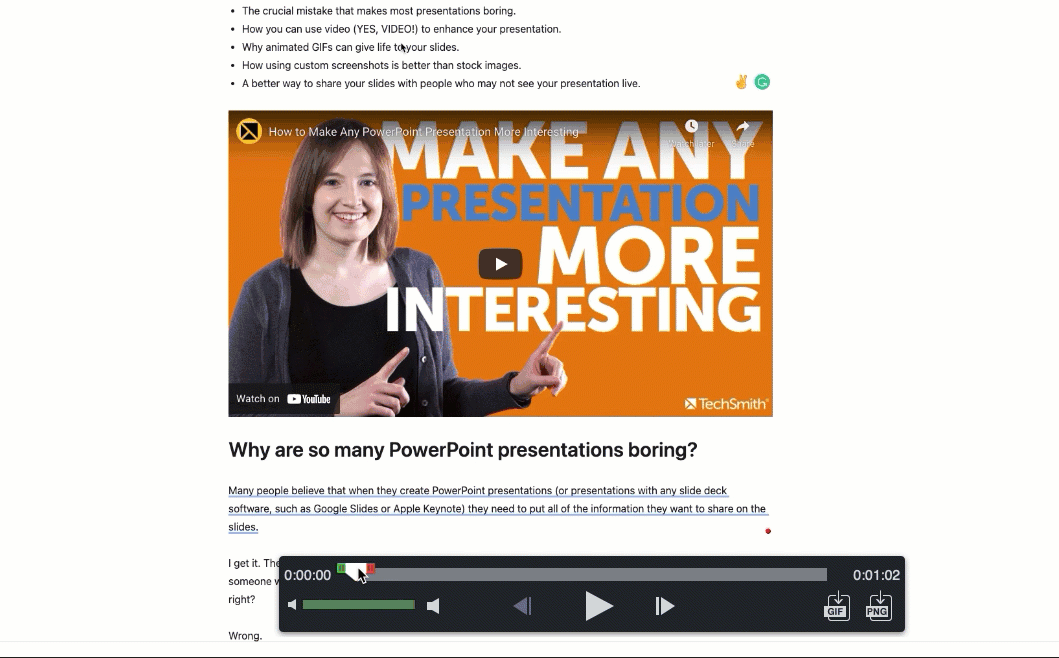
Microsoft PowerPoint, Google Slides, and other slide presentations have become an absolutely essential part of any presentation.
They’re easy to use, offer a great way to combine images, video, and text, and require almost no training.
So, why are so many presentations so boring?
All the elements are there for creating effective, eye-catching, and engaging presentations, but so often we’re forced to sit through slide after slide of overcrowded, hard-to-read text and fuzzy (or non-existent) images.
In this guide, we’ll show you how to make your presentations dazzle with just a few easy tips.
How to create a PowerPoint presentation
Your slide deck has the power to add to or take away from the overall effectiveness of your presentation. Learning how to make a presentation more interesting requires skillful collaboration between the strength of your content and knowing how to make your slides look good.
So, before you open PowerPoint, let’s go through some basics.
Less is more
Less is more with slide content.
Your slides should not be stuffed with content, especially text-heavy content. Incorporating bullet points helps your audience follow your message without getting distracted by trying to read the slide.
Using presentation templates can help you make PowerPoint slides, Google slides, or slides for other platforms as well without spending too much time trying to create a professional look.
You can easily find templates online through Slidesgo and Slidescarnival for Google Slides and for PowerPoint. Each of these platforms offers themes within their software as well.
All you’ll need to do is make minor adjustements to the design!
Be on-brand
Using consistent branding is an easy way to build familiarity and trust with your audience. If you have an established brand in place be sure to use it when building your slides.
The colors and fonts used in your design should always adhere to your brand standards without deviation.
If you don’t have a brand guide to work from, select a specific color palette, using color theory to ensure the message of your presentation is not counteracted by your color choices.
Stick with just a few colors, and go the same route with fonts. Only choose a few to use, and avoid overly scripted options as they are difficult to read on screen.
Use visual aids
Visuals make a huge difference in your presentations. But there are a few rules to follow.
For a more fun visual, use GIFs to highlight some key points.
GIFs are a great middle-ground option between static images and videos. They can be used effectively to drive home a specific point or to highlight a specific piece of data.
Visuals always help with memorability and GIFs usually include a touch of humor and personality – both qualities that help information stick.
We live in a video world. Embedding videos directly into your slides can play a role in creating an interesting presentation.
Videos can be an easy way to show a tutorial or demonstrate a process. Whatever your presentation is about, there are videos you can make or outsource that will support your point.
However, using too many videos can take away the impact your own content has. Try to stick to three or fewer videos in one presentation.
According to Forbes, thirty to sixty seconds is ideal for a presentation video.
You want your visual aids to support your presentation, not take over it. The focus of your presentation should still be you and the value you are bringing to your audience!
Presentation tips and tricks
For your presentation to shine, you need to combine storytelling, authenticity, and visual aids.
Basically, it’s all about what you say and how you say it.
Tell a story
Often times when we think about how to make an effective presentation, we focus on the visuals. We add animations and transitions, hoping that will keep our audience engaged.
If most of your attention and time is spent on design, you are missing out on a key element that is crucial for making presentations interesting – the story.
The best presentations draw in their viewers with a relatable narrative, but the narrative also helps the presentation to gain memorability as well.
You should be spending a large portion of your preparation time crafting your content – the actual information you will be sharing and how you will be sharing it. It doesn’t matter how good your slide designs are if they aren’t supporting compelling content.
You don’t have to weave an epic tale for your presentation, but if you are looking to make your presentation interesting you need to incorporate some storytelling aspects, like personal connection and impact.
To achieve your purpose, you’ll need an outline. That way, your purpose is kept at the center of your presentation and you follow a familiar structure. You need to make sure that you have a clear beginning, middle, and end. Just like a regular story!
Presentations that are interesting from beginning to end take the audience on a journey. Steer away from reciting facts and from long tangents. Find a middle ground that’s personable and informative!
To create an interesting presentation, be sure you structure your content in a way that makes it easy to tell the story and provide your audience with a journey that is relevant and memorable.
Be authentic and engaging
A key point that often gets forgotten when preparing presentations? YOU are the presentation.
“What it comes down to. Whenever you’re doing any kind of presentation, whether you’re doing it on a video, whether you’re doing it in front of folks in person, it comes down to your audience is building the relationship with you. Your slides, your images are not the presentation. You are the presentation. So as you go forward to present, be true to yourself, speak from your heart, and enjoy every minute of it.”
Lean into the parts of your personality that best serve the presentation’s purpose. Tell personal stories, speak in the same manner you normally do, and be open. Public speaking is always a little daunting, but with confidence, you can achieve anything!
Your body language should be easygoing, so try to use natural hand gestures and smile. Make sure to maintain eye contact with audience members. It will create a bond between you and them, which will increase their confidence in you.
Your energy is contagious. To make your presentation more interesting, you’ve got to bring the right energy.
High-energy presenters get more engagement from their audiences while coming in with low energy is a surefire way to destroy any hope of engagement, regardless of how good a story you have crafted with your presentation’s content.
Memorize your content rather than relying on reading your slides, and be sure to use different speeds and volumes throughout the presentation to make it more interesting, draw attention to specific points, and present authentically.
And don’t forget to use organic visuals in your presentation to support your purpose and drive home the information you’re sharing.
Create a Video to Share Your Slides After Your Presentation
To wrap it up, you can make a video of your presentation. That way, you’ll be able to use it again in the future without going through the hassle of presenting over and over.
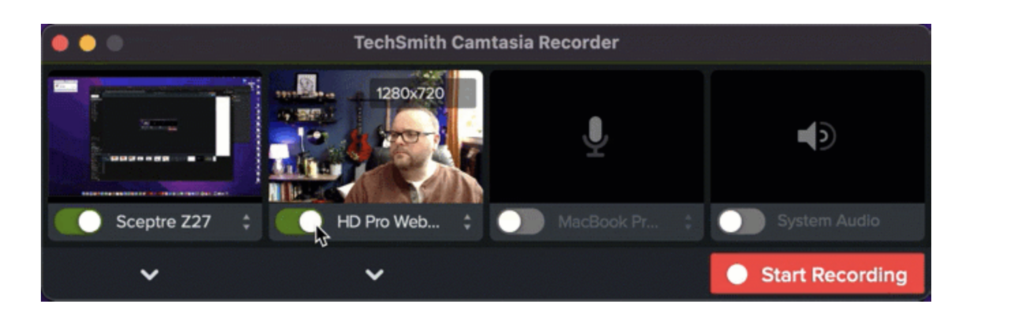
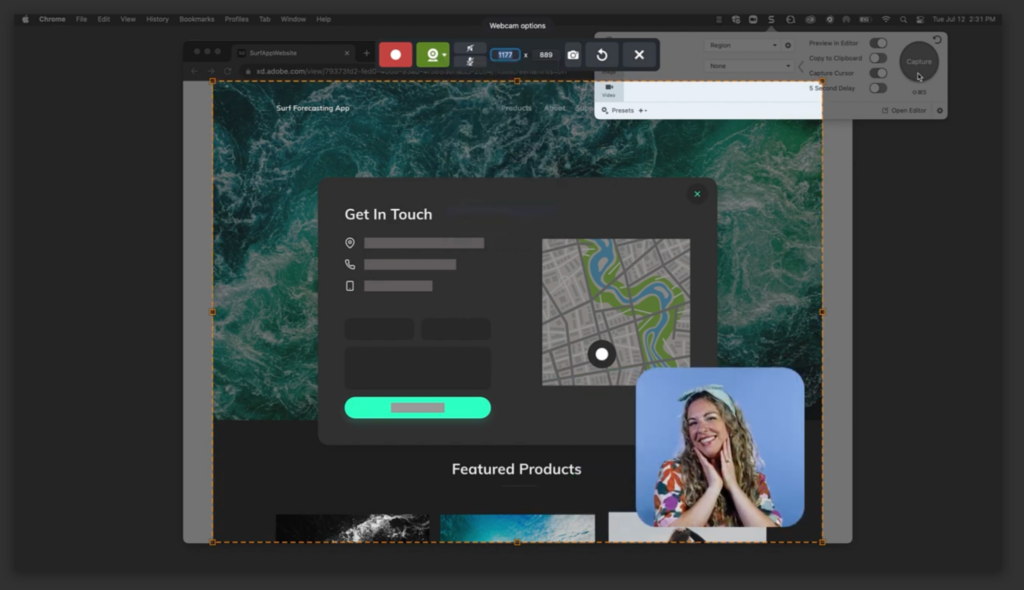
To do so, you can simply video record your screen and your camera. With Snagit, you can do so easily and use some fun tools like Screen Draw to direct attention to certain parts of your slides.
Record and share your presentation with Snagit
Snagit makes it easy to record your screen, camera, and audio for the perfect presentation setup!
Once you’re done recording and making simple edits, send the video as a link through Screencast. Hit the Share Link button to create a unique link to your video. Then, send it out to anyone who might’ve missed your presentation!
This is also a great way to get feedback on your presentation before it happens. Record a mock-up presentation using Snagit, and send it to your team for honest, constructive criticism. That way, your presentation will be so much better when the day comes!
Email etiquette isn’t something that we’re born knowing. Yet, it feels like everyone but us knows the unwritten rules of professional emails.
Luckily, these rules are not hard once you get the main picture. We’re here to give you tips that’ll make you stand out. In a good way, we promise!
So whether you’re new to professional email communication or just want a quick refresh, this guide is for you. After all, sending an email should never be overwhelming.
Let’s get into emailing best practices so you can elevate your professional communication in just a few steps.
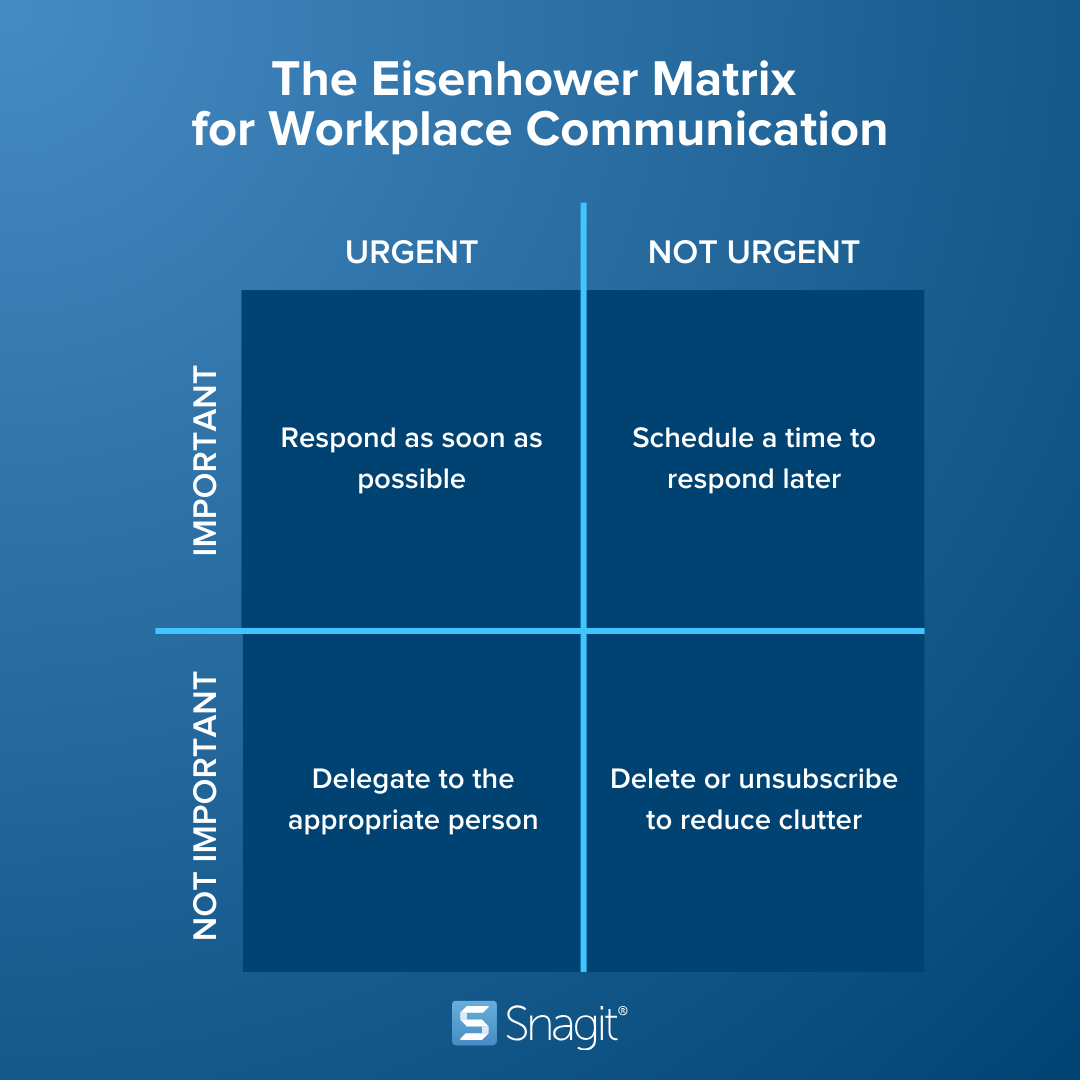
What is professional email etiquette, and why is it important?
Simply put, email etiquette is the way you write your emails for professional communication. Different aspects of emails have different purposes, which is what we’re covering in this guide.
Let’s go over the most important rules that you should follow for proper communication.
Professional email address
This one is easy. When you create your account, use an email address with your name. I know we all have an embarrassing address from our youth, we never want to resurface. If you’re still using it, let’s create a new one!
Appropriate and informative subject line
Your subject line is the introduction to your email. Or, what your recipient will read first. Keep this one short, concise, and informative.
For example, a good subject line for a job application email would be: “Sales Assistant Position Application.” Notice that the subject line includes the job title “Sales Assistant” and the purpose “Application.” The recipient will know exactly what you are reaching out for–that’s the goal!
Professional salutation & closing
Proper salutation is always a greeting like “Hello, Good morning, Dear, etc” followed by their name. Add the “Mrs, Ms, MR, Dr, etc” prefix whenever you can.
If you don’t know their name, no worries, just say hello. And don’t forget to add a comma after the salutation.
Your closing and signature are also going to be standard. End your emails with a closing remark such as “Best regards”, “Sincerely”, or “Thank you” depending on the context.
Then, sign off your email with your name or a personalized email signature block.
Proper grammar and spelling
This one is obvious, but it can be the hardest to follow. Our best advice is to double-check your words and follow standard grammar rules. Outlook and Gmail have spell checkers, but more advanced tools like Grammarly can really take your writing to the next level.
Maintain a professional tone and don’t overuse exclamation points. We know it can be hard to come across as friendly without them but use them sparingly. They quickly get overwhelming.
Keep it concise
No one wants to waste time wading through a clunky, long email. Your email recipient is likely only spending a small amount of time on your message. That makes it important to get to the point quickly.
In your opening line, state the purpose of your email. Follow it up with some additional information and close it out with a timeframe. This makes communication extremely easy and efficient for everyone.
Don’t let attachments clog inboxes
Large files are an email inbox’s worst nightmare. They can mess up the speed and efficiency of your recipient’s inbox.
Screencast is a third-party application that creates a unique link for all of your images and videos. You can then send that link instead of the large attachment itself.
Plus, you can start a conversation on the image or video you attached. Add comments, reactions, and continue to collaborate all in one space.
Trust us, your recipient will thank you for not slowing down their inbox.
Easily communicate with Snagit today
Snagit makes it easy for you to create and share engaging and easy-to-follow visuals for your emails!
Reply all is a great tool, but it can also be a scary tool. Our advice is to use it… sparingly. Remember that when you reply all, you reply ALL.
Everyone on the thread will get your email back, which is a great tool for mass communication of information. However, it becomes a not-so-great tool for specific, individualized questions.
Best practices you may not know about
Business email etiquette should seem a bit more doable at this point. Or so we hope. In this section, we’ll go over some email etiquette tips that will improve your communication beyond expectations.
Use a secure messaging platform or a face-to-face conversation for any confidential information. Although emails are usually private, they are not foolproof. As the saying goes: better to be safe than sorry.
Use visual communication to avoid long walls of text
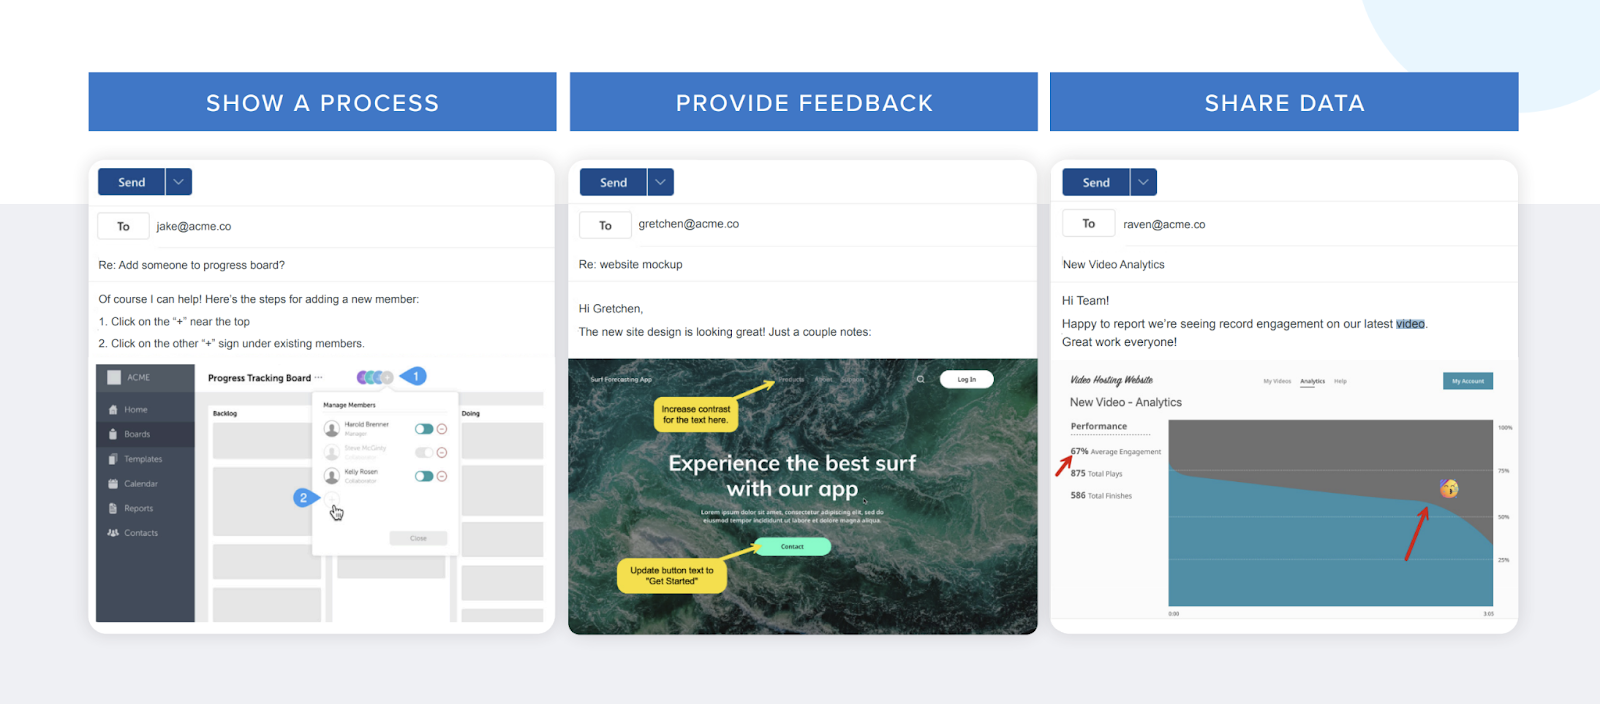
This one is a real game-changer. Instead of long, boring emails, try to share information through visuals. It’ll be more effective and less boring to your recipients.
In fact, a recent TechSmith study found that 98% of respondents who use video at work say it impacts the effectiveness of their message in various ways, among them by reducing misunderstandings, increasing engagement, and saving time.
Images
By sending images, you can easily show a process, provide feedback, and share data. Communication gets a whole lot easier when it’s clear and thrives with the aid of visuals.
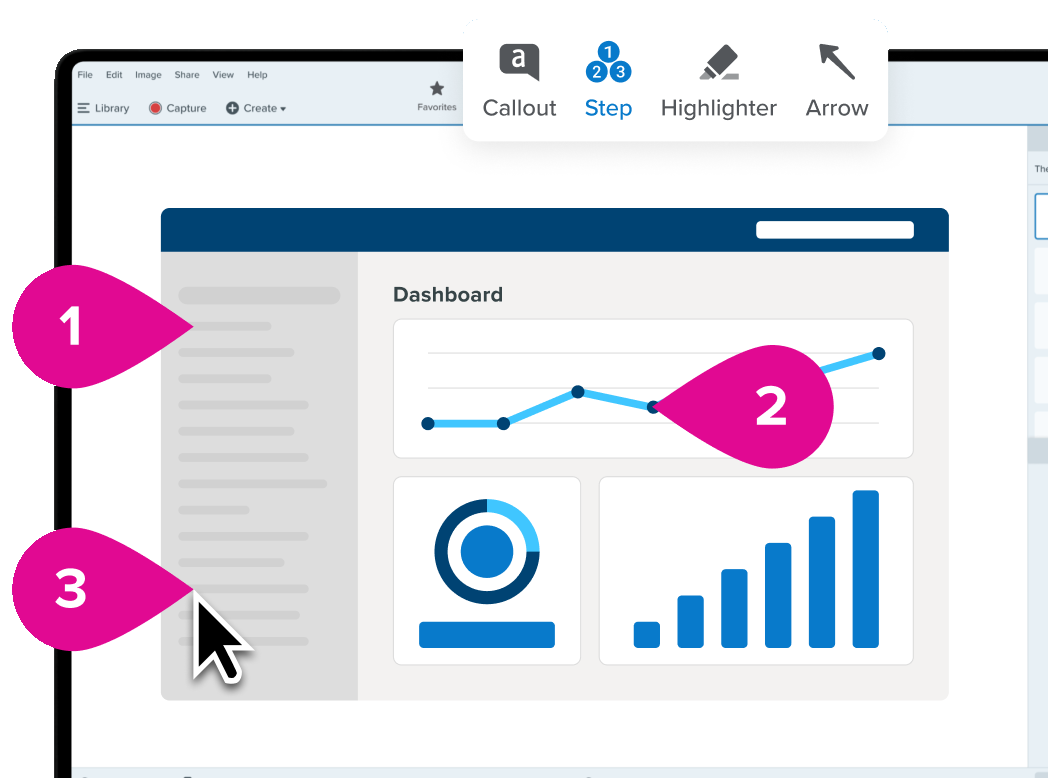
Plus, screenshots are super easy to take. With a screenshotting tool like Snagit, you can capture your screen, and add helpful annotations whenever you need. Whether you need to call out an important detail, use the Step Tool to highlight a process, or use more features, Snagit has you covered.
Once your capture is edited perfectly, share your screenshot with a unique link. Then, paste it into your favorite messaging platform. We’re guessing it’s over email!
Videos
Videos are fantastic tools when you need a quick demo or tutorial for yourself or your team. With Snagit’s picture-in-picture recording and Screen Draw abilities, you can elevate any email. Just press record and everything else is made easy for you.
Just like a screenshot, you can email your videos by sharing a unique link.
Share your screenshots and screen recordings with Snagit
Easily create, edit, and share information with anyone using Snagit!
Lastly, stay organized! Emails get lost in the sea of communication we receive every day. And you can’t mark all of them as flagged, that’ll get confusing too!
Instead, create folders to stay organized. Once you’re done reading an email, just file it away in the appropriate folder. That way you’ll never lose an email and you can refer back to it quickly whenever you need information from it.
It changes your communication and it changes the way you work. No more wasted time.
In conclusion…
So, sending a professional email isn’t all that hard. Some of the conventions can definitely be tricky to keep in mind, but that’s what this guide is all about. Feel free to refer back to it whenever you need, nobody will know!
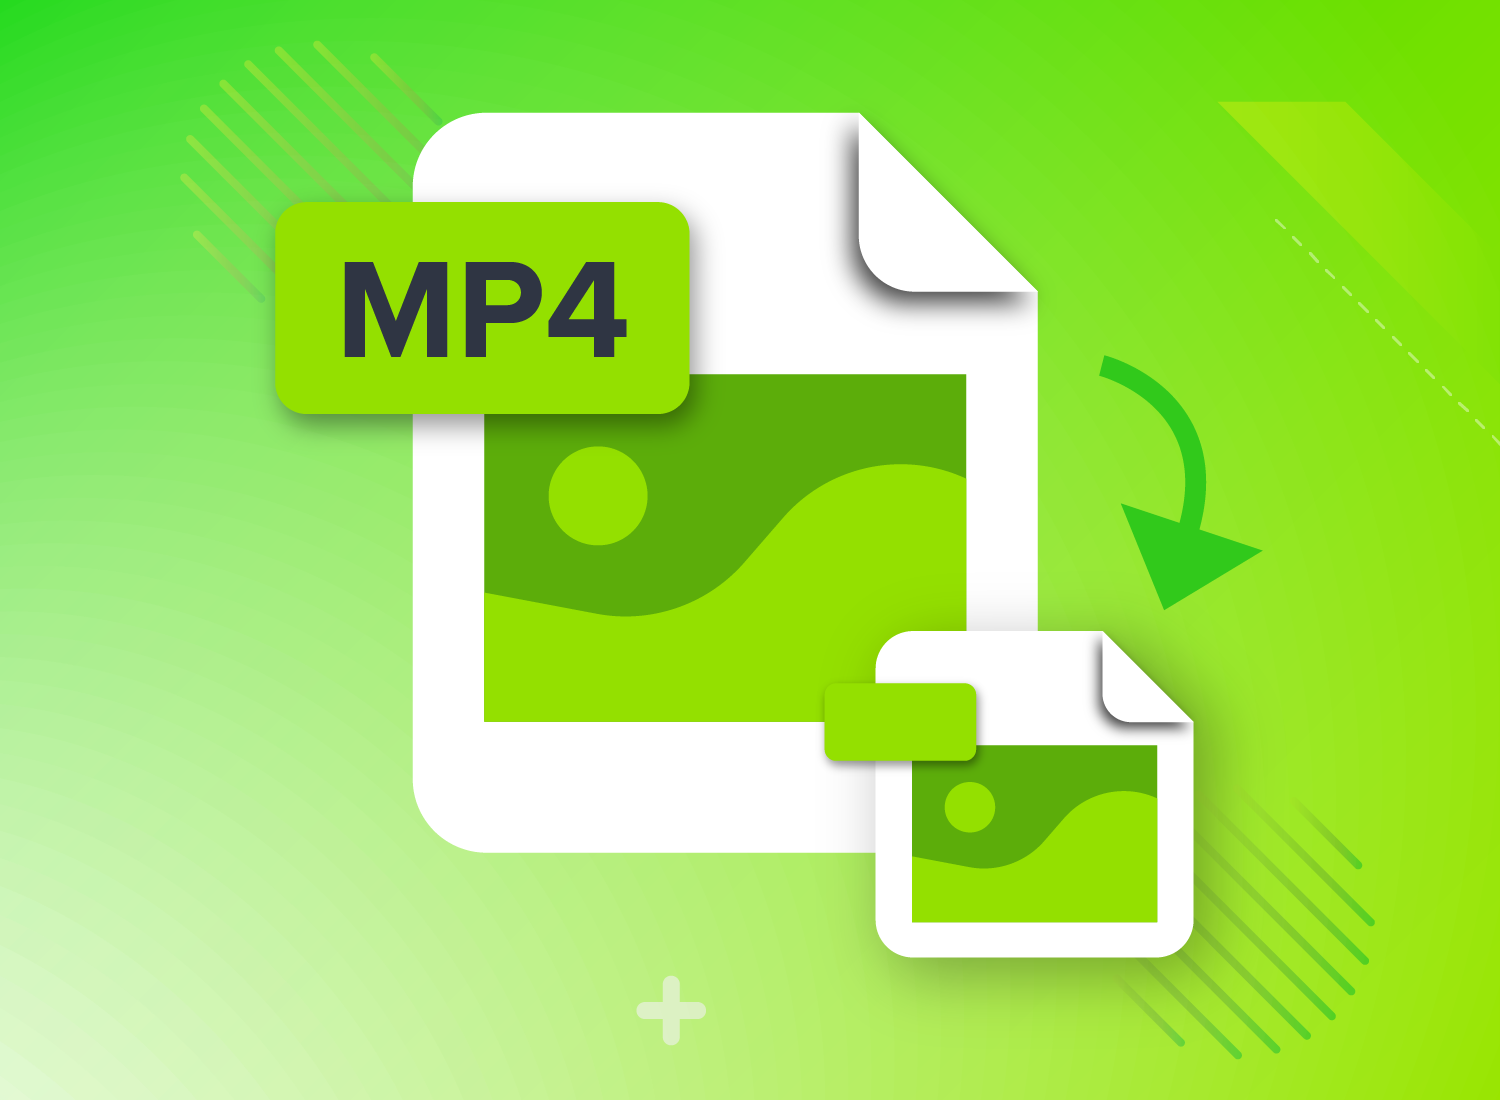
Let’s just say it: Large video files are a hassle. First, your computer struggles to get through editing because it can hardly support the file. Then, your video takes forever to render, leaving you twiddling your thumbs. And, just when you think you’re finally done, Google says ‘video file too large to email’ UGH!
There has to be an easy way to reduce video file size.
In this guide, we will explore the reasons why video files are so large in the first place. More importantly, we provide simple solutions to these common problems so that you never have to worry about large video files again!
The field of video compression uses a lot of technical jargon, which makes it hard to know where to start. Thankfully, using video editing software like Camtasia makes reducing video file size fast and easy! In fact, you might not even need to think about it with our automatic features!
These two terms are important to understand before we get started because compression always takes one of these two forms.
Lossy compression refers to any type of compression that reduces file size by removing data from your video. It’s called “lossy” because your video will lose data with this method. While lossy compression is super common and easy to achieve, it can seriously impact the quality of your video if you overdo it.
We have two tips when using lossy compression. First, since data lost with lossy compression is unrecoverable, save a backup of your video before applying any compression.
Our second tip is to only apply lossy compression after your video is completely finished – you should never edit a compressed video as doing so will destroy your video quality.
Lossless compression uses mathematics to reduce file size while keeping all of the original data in your video. Lossless videos can be decompressed to the original size at any time without data loss. The quality advantage of lossless compression is great, but it may not be able to compress your video as much as you desire.
When using lossless compression, we recommend that you consider your intent. If you’re posting the video to a platform like YouTube, your video will have lossy compression anyways!
Step 1: Consider making cuts to the video
If you have a long video that contains multiple sections, one of the easiest ways to reduce video file size is to cut it up! Simply cut the video by each section and export them individually. Each file should have a much lower size than before!
If length isn’t the problem, it could be the number of animations and effects you used! Color effects are known to have a significant effect on the overall file size. So, consider removing unnecessary effects to reduce the overall file size!
Takeaway: Adding lots of movement and transitions will cause your file to be larger.
MP4 is typically the best balance of quality and file size. Because of this, MP4 is most popular for web-based delivery including YouTube, Facebook, Twitter and Instagram. MP4 uses lossy compression.
MOV is Apple’s native video format, but it is compatible with Windows. It has very high quality options, which makes it a professional standard. Depending on the encoding process you select, MOV can be either lossy OR lossless, which makes it one of the most versatile options on this list.
AVI is Microsoft’s answer to MOV, but it is not compatible with Mac. Developed in 1995, it is one of the oldest formats in existence. Like MOV, AVI can be either lossy and lossless based on the encoding process you choose.
WMV is the only format that beats MP4 in terms of compressed file size. However, the video quality is poor, and this format is incompatible with Mac. You should only use WMV if file size takes priority over everything else.
Camtasia and Snagit video outputs default to the MP4 file format. We recommend using MP4 in the majority of cases for online sharing.
But if quality is your highest priority, we recommend working with either MOV or AVI during the editing process. You can decide which compression method suits you best later on with the comfort that no data is being lost while you edit.
Takeaway: Use the MP4 file type to keep quality and reduce file size.
Step 3: Use smaller dimensions and thoughtful captures
The resolution of a video determines the size in height and width that the video will be created in. In Camtasia, you can change the project settings to produce your video at any desired resolution. Just remember, larger resolution videos will dramatically increase file size.
A video that is 1920 x 1080 (1080p) will have a larger file size than a video that is 1280 x 720 (720p).
Some screen recordings taken on high density displays can even produce videos at or above 3840 pixels × 2160 (4k).
So, don’t record your entire screenunless it’s necessary. Better yet, consider using zoom-and-pan actions while editing your video. This way you can scale the video down, which helps focus the viewer’s attention on a specific portion of the screen.
Takeaway: Export at a suitable resolution for your project. If you try 1080p and the file is too large, try 720p instead!
Step 4: Lower the frame rate
What is frame rate? The short answer is that frame rate describes how many frames (still images) are shown per second. For an in-depth discussion, take a look at our beginners guide to frame rate!
Most films are shot at 24 fps. Home videos and camcorders typically default to 30 fps. Some mobile phones even default to 60 fps! Which is best? That’s a subjective question and depends on your intended audience.
The custom production settings in Camtasia allow for between 1 and 30 frames per second (fps). While the default, 30 fps, is standard for video, if you’re looking to get more cinematic you can lower it to 24 fps. And if you recorded on your phone, definitely change it from 60 fps to 30! This should considerably reduce your file size.
Takeaway: Use the frame rate that is right for your project, either 24 or 30. Remember that higher frame rates will cause larger videos!
Step 5: Compress your audio
Sometimes audio can create larger file sizes, though most of the time recording devices and software will compress your audio so as not to create large file sizes. In addition, it is very rare that uncompressed audio is going to make an audible difference to your viewers.
After you’re done editing your video, make sure to export with compressed audio. Default outputs for Camtasia and Snagit MP4 format uses AAC audio compression which has a good combination of sound quality and file size.
When you’ve finished editing your video with all these optimized settings, the only thing left to do is create a zipped folder for the video file!
On both Mac and Windows, zipped folders use lossless compression. So, you don’t need to worry about losing any quality on your final take. You can upload zipped files to Google Drive, send them via email, and easily share them across operating systems.
Creating a zipped folder on Windows
To create a zipped folder on Windows, simply right-click your video file, then select New > “create zipped folder.”
Creating a zipped folder on Mac
Simply select your file, right-click to bring up the context menu. Then, click “Compress”
Conclusion
Hopefully these tips will help you reduce the file size of your video. If you’re ready to try it yourself, download Camtasia! Let us know how it goes on Facebook or Twitter!
I'm a content marketing specialist contractor for Techsmith. In plain language, I write blogs, social posts, video scripts and more to help support the marketing team's efforts. Organic growth gets me excited, both in the tech space and in my in garden.
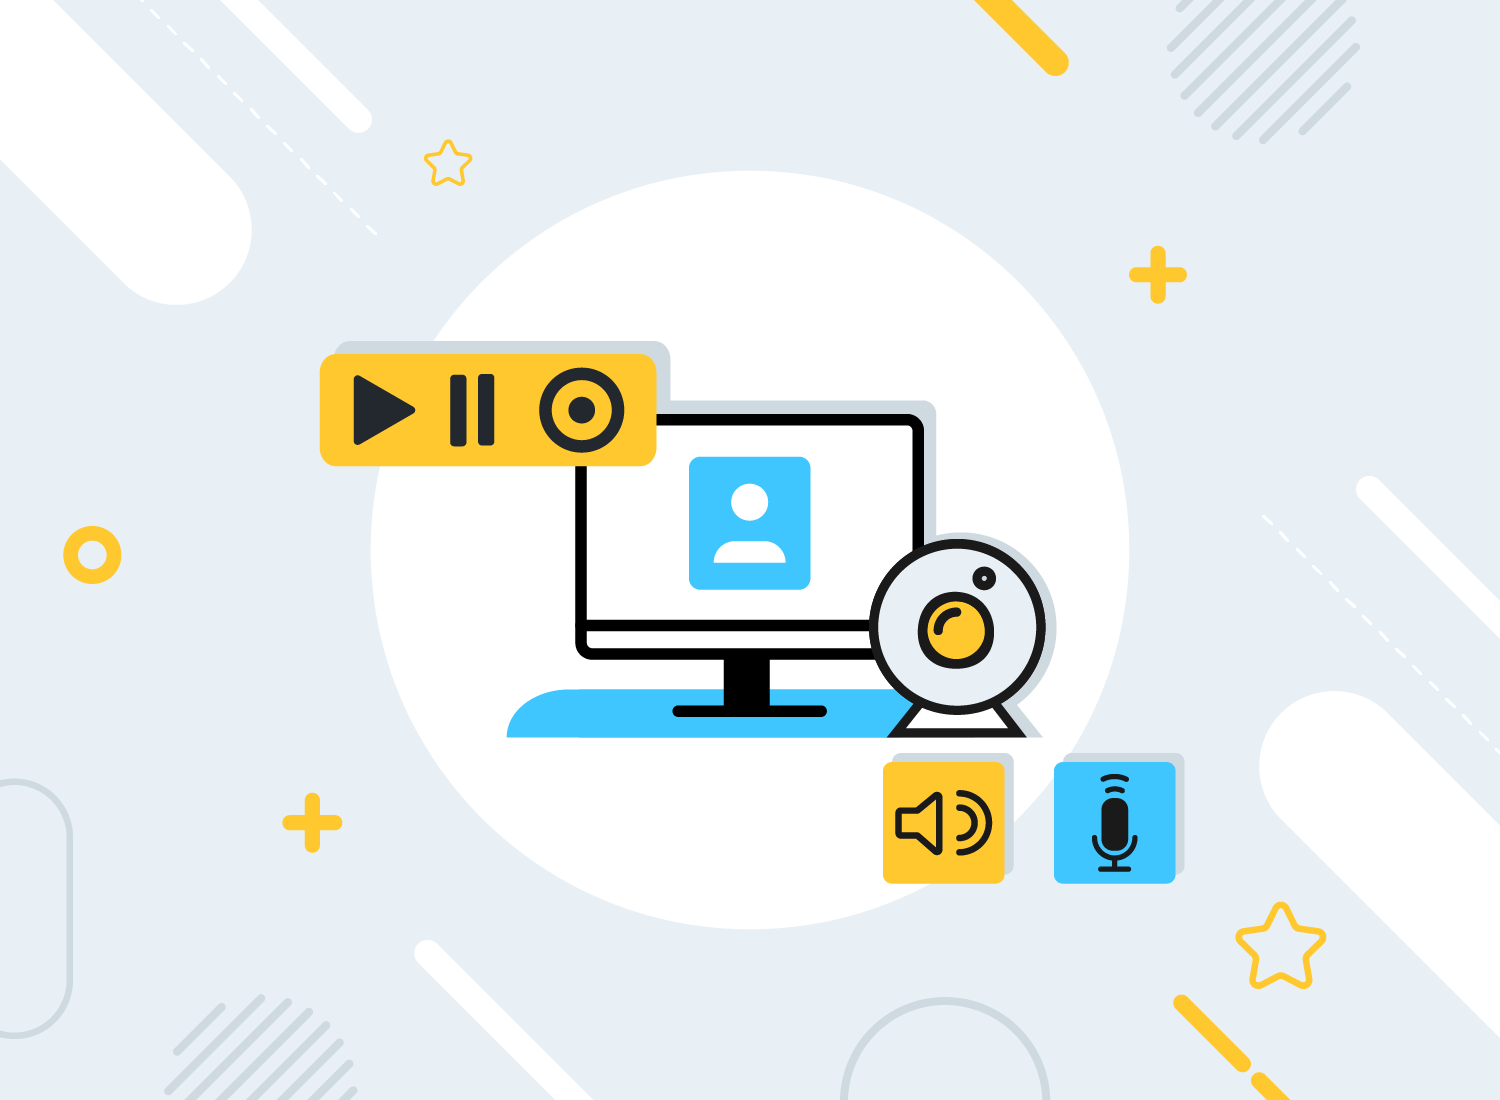
For anyone that’s never made a screencast before, it’s easy to assume that it’s a long and complicated process that only the most tech-savvy people with expensive software and equipment can manage.
Fortunately, that’s not the case, and creating a professional-looking screencast is actually much easier than you might think. In fact, we believe anyone can create a screencast – including you!
Making a screencast isn’t rocket science, but it is a bit like riding a bike – because once you’ve learned how to do it, you’ll never forget. That’s why in this guide, we’ll teach you how to record a screencast in five simple steps. All you need is a computer, a microphone, and screen recording software.
We’ll provide you with some tips to create an immersive viewing and listening experience for your audience. Whether you want to create a tutorial, a demo, or a presentation, this guide will help you create a professional-looking screencast that impresses your viewers. Let’s get started!
Make a screencast easily!
Snagit is probably the most user-friendly and reliable screen-capture and screencasting software on the market.
First off: What is a screencast and what is screencasting? Put simply, screencasts are screen recordings of your computer desktop and often feature audio narration to provide context and instructions to the viewer.
Screencasts are great — and we mean really great — for creating tutorials, demos, and presentations that show how to use software, navigate a website, or perform a specific task. They can be saved as video files and shared online or offline, making them an excellent tool for remote learning, training, and communication.
If you’ve ever watched a video on YouTube of someone explaining how to do something on your computer, such as how to take a screenshot, then you’ve watched a screencast – and there’s a good chance you learned something from it too!
Educators, trainers, and businesses often use screencasts to create instructional content, as they allow learners to see and hear what’s happening on a computer screen. They’re also helpful for troubleshooting and providing support, as users can record and share their screens to show technical issues or receive assistance from remote tech support teams.
Screencasting software has come a long way over the years, and these days there is a lot of different software available for recording and editing screencasts. Some software — including Snagit and Camtasia — come with their own tools, some of which allow you to to add annotations, effects, and transitions to your screencasts, giving them a more polished and professional look.
With the popularity of online video, screencasts have become an essential tool for creating engaging content and communicating effectively.
What are the benefits of using screencasts at work?
Screencasts can be (and are being) used in a number of ways within the workplace. Why? Because when it comes to communicating between teams, onboarding new staff, and creating visual how-to guides, there simply isn’t another way of conveying complex concepts and instructions so easily and effectively – at least we don’t think so!
Effective communication is key to the smooth running of a business. Being able to optimize communication between teams is an essential part of improving knowledge sharing, productivity, and the quality of output. With that in mind, let’s take a closer look at some of the ways in which businesses are using screencasts:
1. They are great for teaching and learning
Screencasts are great for teaching someone how to do something, especially when so many people are working remotely.
As the person doing the teaching, screencasts make it easy to share detailed instructions with colleagues and employees. The visual context that comes with a screen recording does a lot to improve comprehension. So you can rest assured that the information you want to convey will be easily understood and received in the way it’s intended.
You also don’t have to repeat yourself if you’re asked how to do the same thing by multiple people, as you can share your screencast with any number of people.
On the other hand, as a learner, you’ll probably find it easy to follow along with a screencast, as opposed to information conveyed solely through text or audio.
Make a screencast easily!
Snagit is probably the most user-friendly and reliable screen-capture and screencasting software on the market.
2. They provide a full visual and audio experience
People learn in different ways, some prefer to learn by listening to audio, while others prefer to see visuals or read text. That’s why screencasts are an all-in-one teaching tool that can cater to everyone’s unique learning style.
With a screencast, you can create multimedia files that combine visual, audio, and annotation tools to create an immersive learning experience. You can use on-screen notes and drawings to highlight important points, add audio recordings to provide additional context, and even include closed captions for people who prefer to read along.
For businesses creating training materials for their employees, screencasting is a versatile and effective way to deliver information. By using a combination of different media, you can create a more engaging and memorable learning experience that’s tailored to each individual.
3. Watchers can pause, rewind, and watch multiple times
Perhaps one of the greatest advantages of screencasts is that they allow viewers to learn at their own pace. With a screencast, you can pause when you get interrupted, rewind if you need something repeated, and easily refer back to it if you need a refresher.
This functionality can give people the flexibility they need to take notes and fully absorb information without having to worry about missing anything.
4. They don’t require fancy equipment
One of the best things about screencasting is how it’s accessible to practically anyone. There was a time when creating professional-looking videos required expensive software and equipment, but with screencasting, all you really need is a computer and screen recording software.
Most computers come with built-in tools that make it easy to record your screen and create professional-looking videos without spending lots of money. You can also use a microphone to record audio narration, but even that isn’t strictly necessary as some screencasts can be made without audio, and instead, rely on screen annotations to convey information.
While there is free software that lets you record your screen (including that which is built-in on your computer) none offer the same level of advanced tools and functionality that come with Camtasia and Snagit.
For example, with Snagit, you can turn images into videos and record your screen, webcam microphone, and system audio exclusively or all at the same time! Meanwhile, Camtasia lets you edit videos with ease using templates, which is useful for creating professional screencasts quickly and easily.
Another great thing about screencasts is that they’re easy to share online. Once you’ve created your screencast, you can upload it to a variety of video-sharing platforms, such as YouTube or Vimeo to share it with your audience.
However, with Snagit sharing your screen recordings has never been easier. All you have to do is click on the Share Link button and you’ll have a link that’s ready to be pasted anywhere you want – such as in an email, a Slack message, or on a training document. Your audience doesn’t even need a TechSmith account to view your content – they just need the link!
This is all made possible by TechSmith Screencast®, the easiest place to organize your content and collaborate with your contacts.
At TechSmith, we believe that everyone should have access to the tools they need to create high-quality videos. That’s why we’ve developed software like Camtasia and Snagit, which are both affordable and easy to use – even for beginners!
Make a screencast easily!
Snagit is probably the most user-friendly and reliable screen-capture and screencasting software on the market.
If you’re wondering how to use a screencast, you’ll be glad to hear that they can be used in many different ways, from education and training to marketing and entertainment. Such versatility means there’s no limit to the number of industries they can be used in, from healthcare to finance to gaming.
They are particularly useful for creating instructional or informative videos that require visual demonstrations or walkthroughs. For example, a teacher might use a screencast to explain a difficult concept to their students, while a business might use a screencast to create a product demonstration video.
Screencasts can also be used for software and website testing, allowing developers to record and analyze user interactions with their products. Alternatively, they can also be used for creating video tutorials or how-to guides, helping users learn how to use that new software or website.
Now, let’s take a closer look at the most popular ways people use screencasts:
1. Record calls and meetings
Screencasting is a great way to record online calls and meetings. By recording these events, you can easily review the content later and share it with anyone who wasn’t able to attend. This can be particularly useful for remote teams stretched across different time zones.
To record a call or meeting, you can use screen recording software like Camtasia or Snagit. These tools allow you to capture everything that’s happening on your screen, including audio and video. You can then save the recording as a video file, which can be easily shared with people directly via Slack, or archived on cloud storage.
There are many benefits to recording calls and meetings with screencasting software. It allows you to review the content later and catch any details you may have missed during the call. It also makes it easy to share the information with others who weren’t able to attend. Plus, it can be a great way to archive important information and keep a record of your team’s discussions and decisions.
2. Replacing unnecessary meetings
On the other hand, you might consider skipping the meeting altogether. That might sound like sacrilege to some, but we’d argue it’s better to focus on the quality, rather than the number of meetings a business conducts.
In fact, learning how to run effective meetings — and when they’re needed — is the key to optimizing internal communications and efficiency. With tools like Snagit, you can irradicate the need for unnecessary meetings. This can help businesses save time and money, while also boosting productivity and morale among employees.
For example, rather than setting up a meeting to walk a person through a simple process, it’s much easier for you to record a quick video that provides step-by-step guidance on how to complete the task in question.
Not only does this allow the person learning to revisit the video if they ever forget a step, but it means that you (the teacher) can send out the same video should you ever be asked how to do the same thing by someone else.
Make a screencast easily!
Snagit is probably the most user-friendly and reliable screen-capture and screencasting software on the market.
Screencasts are the ideal tool for creating quick and effective how-to training videos as they allow you to quickly capture your computer screen, microphone & system audio, and even webcam footage to create a step-by-step tutorial for your audience.
Whether you’re creating training materials for employees, clients, or customers, screencasting makes it easy to explain complex concepts in a clear and concise manner. You can use a variety of tools, like callouts, annotations, and on-screen highlights, to draw attention to important points and ensure that viewers understand the material.
Improving Your Internal Communications
A guide to how visual content can help create a more collaborative and productive work environment.
In addition to being a highly effective training tool, screencasting is also extremely cost-effective. Instead of spending time and money creating a physical training program, you can create and distribute screencast training videos quickly and easily. This makes it an ideal solution for businesses and organizations of all sizes.
But screencasts don’t have to just be used for official company training, as they can also be used informally to explain tasks and processes between colleagues.
For example, if you’re considered to be the office pro at completing a specific task, you’ll no doubt be familiar with being asked how to do the same thing, multiple times by different people. Rather than getting stuck in a loop of answering the same question or explaining the same process, a screencast can be made once and sent out an infinite number of times.
4. Product demos for sales and customer experience
Screencasting is a powerful tool for creating product demos that can help boost sales and enhance the customer experience. With screen recording software like Camtasia, you can create compelling demos that showcase your product’s features, benefits, and value proposition – without needing to schedule in-person or virtual meetings.
By creating product demonstrations with screencasts, you can give potential customers an inside look at your product’s functionality and capabilities. You can show them how your product works, what problems it solves, and how it can benefit their business or personal life. This can help build trust with prospects and increase their confidence in your product.
5. Customer and product research
Screencasting is a powerful tool for conducting customer and product research. By using screen recording software like Camtasia or Snagit, you can record (with their permission, of course!) user interactions with your website, software, or product, and analyze the data to gain insights into customer behavior and preferences.
For example, you might use screencasting to record how customers navigate through your website, or how they use your software to complete a specific task. This can help you identify any pain points or areas where your users are experiencing difficulties. You can also use screencasting to record user feedback or comments, which can provide valuable insights into how customers feel about your product or service.
Screencasting can also be used to conduct product research. For example, you might use screencasting to record how your team uses new software or demonstrate new features to potential customers. This can help you gather feedback on the usability and effectiveness of your product, and make improvements based on that feedback.
Make a screencast easily!
Snagit is probably the most user-friendly and reliable screen-capture and screencasting software on the market.
Screencasting is a powerful tool for onboarding new employees. By using screencasts to create onboarding materials, you can provide new employees with a clear and comprehensive understanding of their job duties and responsibilities.
You can also show them how to use important software and tools, as well as any specific processes or workflows they need to be aware of. Screencasts can act as training materials that walk new employees through the various systems, processes, and tools they’ll use in their new role. This can help new team members feel more confident and prepared as they settle into their new job.
Also, if you’re already creating screencasts to convey information, a lot of that pre-recorded footage could probably be used to make more official training materials. This is essentially the same as gathering years’ worth of content and knowledge and making it easily accessible to new staff.
How to make a screencast
If you’re wondering how to make a video and share your screen — or to put it more eloquently, “how to screencast” — you’ll be glad to know that with the right tools and a little know-how, you can create a screencast that looks and sounds great.
We’ve developed a simple, five-step process that teaches you how to make a screencast on a Windows PC (or on an Apple Mac) using Snagit – regardless of your level of technical expertise. Whether you’re creating a training video, product demo, or anything in between, our process ensures that your screencast will be engaging, informative, and professional.
So, if you’re ready to take your screencasting skills to the next level, all you need to do is follow these five simple steps:
1. Choose your screen recording software
When it comes to choosing screen recording software, there are a lot of options out there. While many devices come with built-in screen recording software, these programs are often limited in their features and functionality. The built-in tools are usually fine for creating basic screencasts, but if you’re looking for a more powerful, versatile solution, you may want to consider dedicated screen recording software such as Snagit or Camtasia.
Snagit is great for those who need quick and easy screencasting capabilities packaged in a simple, user-friendly interface. With Snagit, you can quickly and easily capture screenshots and video recordings of your screen, annotate your images and videos, and share your screencasts with others.
If you’re looking for more advanced functionality, Camtasia offers a full suite of video editing tools, making it the perfect choice for those needing to create professional-quality screencasts. With Camtasia, you can capture high-quality video and audio from your screen, edit your footage, and add effects and animations to make your videos more engaging.
In summary, if you just need basic screen recording capabilities, Snagit may be the best choice for you. However, if you need advanced video editing tools and want to create professional-quality screencasts, Camtasia may be the better option. Ultimately, the choice comes down to your individual needs and preferences.
For the following steps, we’ll be using Snagit as our software of choice for talking you through the steps of how to make a screencast.
Make a screencast easily!
Snagit is probably the most user-friendly and reliable screen-capture and screencasting software on the market.
Snagit offers users the ability to record their entire screen or just a portion of it. If you plan on recording your entire screen, it’s worth tidying up your desktop by changing any distracting wallpapers, hiding your desktop files, and disabling notifications.
To ensure your screencast is as smooth as it can be, we recommend you write a script to help you stay on topic and ensure you cover all the important points you need to make. If writing a full script seems daunting, creating a bulleted list of key points can be just as effective.
Before you start recording your screencast, it’s a good idea to have a couple of rehearsal runs. This can help you identify potential stumbling blocks and ensure that your recording goes smoothly. Taking the time to prepare and practice will ensure your screencast is polished and professional.
3. Record your screen
Now it’s time to start recording! First, you need to decide whether you want to record your entire screen or just a part of it.
Even if you decide not to do an entire rehearsal, it’s worth running a quick sample recording to test your audio settings to ensure that your voice and any other audio elements are clear and easy to hear.
Remember, if you do make a mistake, there’s no need to stop and restart the whole process. Instead, you can just carry on recording and cut your mistakes later – trust us, with Snagit, it’s easier than you think!
4. Make adjustments to your recording
Now if you do manage to record the perfect screencast in one take, we salute you! However, the chances are you’ll make a small mistake at some point, if not on your first screencast, then maybe on your 100th!
It’s fine to make mistakes. We all make them, but with Snagit, it’s super easy to edit out parts of the footage – here’s how:
Make a screencast easily!
Snagit is probably the most user-friendly and reliable screen-capture and screencasting software on the market.
Now that you’ve recorded your screencast, the fifth and final step is to share it with your audience. Snagit provides numerous options to easily share your screencast with others.
It offers a wide range of popular sharing destinations, such as Google Drive, Dropbox, Slack, Outlook, and TechSmith Screencast®. You can also save your screencast as an MP4 or GIF file directly to your computer for further editing.
Tips to make amazing screencasts
Screencasts are an incredibly powerful tool for teaching, training, and presenting information in a way that’s clear, concise, and engaging. But even if you’ve mastered the basics of screencasting, there’s always room for improvement. In this section, we’ll explore some tips and tricks that can help you take your screencasts to the next level.
By honing your technique, you can create incredible screencasts that are guaranteed to engage your audience and help them learn more effectively.
Let’s take a closer look at some of the top tips for creating incredible screencasts:
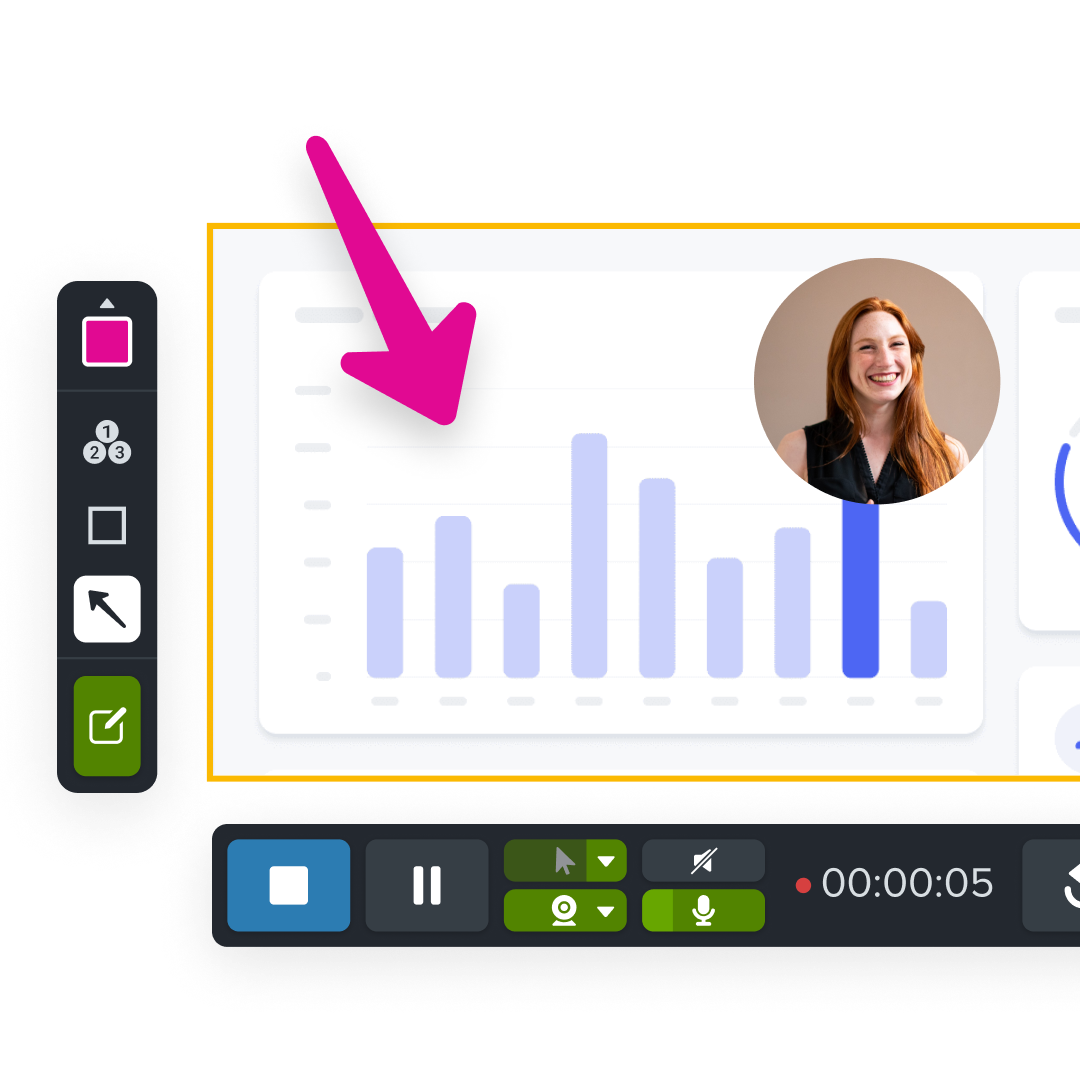
1. Record your webcam
With Snagit’s picture-in-picture video tool, you can record your webcam while simultaneously recording your screen – this is a great way to add a layer of personality to your screencast. This personal touch can make your video feel more human and will keep your viewer engaged.
This is especially useful for anything you might send to a customer as it helps them put a face to your voice and is a great way to increase engagement. To take this one step further, you could even create a split-screen video with Camtasia, which could be used to create a more polished-looking screencast.
2. Create an outline before recording
We really can’t stress enough just how much of a difference it will make to prepare before recording your screencast. While not every screencast requires a fully-written script, writing a rough outline of what you want to cover will keep your video focused.
Two of the fastest ways to lose your audience are to ramble on about a specific point, or lose your train of thought while recording, which often leads to a lot of “ums” and “ahs”. To avoid this, create a list of points you want to cover (at the very least), have them by your side while your recording, and stick to them.
Make a screencast easily!
Snagit is probably the most user-friendly and reliable screen-capture and screencasting software on the market.
Lots of background noise in your screencast will only work to distract your audience, so it’s important to ensure you’re recording your video in the quietest environment that you have access to.
While you don’t need a sound-proof recording studio, it’s best to plan ahead and think of the best time and place to record quietly. If you’re making a screencast in the office, it might be with booking a meeting room. Alternatively, if you’re working from home and you know your neighbor likes to mow the lawn on Thursday afternoons, try to avoid recording at that time.
4. Practice before recording
There’s a reason everyone says “practice makes perfect” – because it does! If you’re new to making your own screencasts, a little practice before creating the videos you plan to send out will do a lot to help you hone your skills and boost your confidence.
Even if you’re the world’s most experienced screencast creator, you may still benefit from doing a dry run, especially if you’re covering something you’re only partly familiar with.
5. Test your recording software
Whether you’re using Snagit, Camtasia, or some other screen recording software, it’s really important you take the time to familiarize yourself with the tool before getting stuck into the recording.
It can be incredibly frustrating (take it from us!) when you’ve spent time preparing and then recording a screencast, only to realize that your microphone wasn’t picking up any audio. So even if you’re a Snagit pro, it’s still worth doing a quick software check just to make sure everything is working as you want it to.
6. Cut out dead moments
Snagit’s trimming tool makes it easy to cut out the mistakes and “dead moments”. What is a dead moment, we hear you ask… well, it’s any time that’s captured in the screen recording that isn’t going to benefit the audience.
For example, footage of screens loading or of you filling out a form won’t teach your audience anything, but it will quickly make your viewers feel bored. The tip here is to cut out parts of the recording that don’t offer anything to the audience, which will help keep your video concise and to the point.
Make a screencast easily!
Snagit is probably the most user-friendly and reliable screen-capture and screencasting software on the market.
In some cases, yes! A screencast is a specific type of video. Screencasts are a type of instructional video that usually include screen recording and audio narration.
How can I share my screencasts?
With Snagit, sharing screencasts is super easy. Just go to the Share Link button in the top right corner of the application and select one of the many sharing destinations, or save it as a local file.
How do I edit my screencast?
Snagit can help you make simple edits to video clips, like cutting out unwanted footage. However, if you need to add more in-depth effects to a video, we suggest checking out Camtasia.
Danielle Ezell is a Marketing Content Strategist at TechSmith, where she writes about effective workplace communication, offering tips and strategies for using images and videos to collaborate more effectively in hybrid and remote environments.
Everybody is making videos these days. Good ones, bad ones, funny ones, serious ones. Videos for training. Videos for marketing. Videos for social media. Videos for quick updates. Videos to share ideas.
If you’re making videos, or interested in them, you’ve probably noticed that many of the best ones include a short intro section. It’s an ideal technique for giving videos a professional and polished look.
What makes a good video intro?
A good video intro animation is quick and concise. A short opening to your video lets the audience know what it’s about, who you are, and, if applicable, the brand or organization you represent.
It’s for this reason that video intros are often templatized. One of the most convenient things about a good video intro is they can be reused throughout a video series or in all the videos on a channel.
A bit of catchy music along with a few animations or transitions becomes a visual signature for you or your brand.
Do I need an intro for my videos?
It’s not absolutely necessary to add an intro to every video.
Consider the purpose. If your video is a quick one-off that you’re sending to one or a couple of people, it might not be necessary.
On the other hand, if your video will be hosted and shared publicly or is part of a series, then an intro can be a really nice touch. It’s almost always a good idea to add an intro to YouTube videos.
How long should a video intro be?
YouTube video intros should be quick and snappy. Viewers want information as fast as possible, and your videos should reflect this desire.
The best video intros quickly greet viewers, introduce the presenter, and say what the video is about. This can all be communicated through text displayed in the intro sequence.
The intro is not the place to ask for likes, subscribes, shares, and comments. This adds unnecessary length to the intro and delays viewers getting to the content they want. Save the housekeeping for the end.
As far as raw length, 3-7 seconds is a solid rule of thumb.
How to Make a YouTube Intro (Step-by-step)
Making a video intro is actually a very easy process. All you need is some easy-to-use video editing software and, to make things really easy, a selection of video intro templates.
Camtasia comes with a number of video intros that you can use in any project. And TechSmith Assets for Camtasia has more YouTube video intro templates that you can download straight to Camtasia and then customize.
Step 1: Choose a video intro template
This step can be done from within Camtasia by choosing one from the library. Alternatively, you can download one from TechSmith Assets for Camtasia, which has more free video intros plus other resources like video templates, sound effects, music, and more.
Step 2: Add the intro template to the timeline
Camtasia is a great video intro maker because it makes video editing so easy. Drag your video intro template from the Library to the timeline.
Step 3: Customize the intro with Quick Properties
Camtasia’s Quick Properties gives you customization options that make it easy to change text, colors, and logos in your intro template.
Step 4: Add the customized intro to your Camtasia library
Right click the intro media group on the Camtasia timeline and choose Add to Library.
Name the intro and choose a folder to save it to.
Now, you can use the customized intro as a template in any new video you create!
Create your own YouTube video intros!
Ready to start creating cool intros for your videos? Download Camtasia and get YouTube intro templates to use in any project!
Now that you know how to create an intro for your videos, you might want to learn to create an outro. YouTube outros have some special features you can use, so learning the ins and outs can be really helpful.
Ryan Knott is a Marketing Content Strategist at TechSmith, where he creates content about easy, effective, and efficient video creation, editing, and tips and tricks, as well as audio editing for creators of all kinds. He/him.
Writing a professional email is critical in today’s fast-paced business world, but crafting engaging messages can be challenging.
Whether you need to know how to write a formal email for a job application or a networking connection, we’ve got you.
This guide will walk you through the art of writing compelling emails!
Why is it important to write a professional email?
Professional, effective emails are the backbone of business communication, reflecting your credibility and professionalism. They leave a great impression on recipients and play an important role in achieving various goals.
In fact, a recent TechSmith study found that most of our workplace communication happens over email. While it sometimes might seem old-fashioned, it’s clear that email has staying power, so being able to write effect emails will help you excel in any career.
Components of a professional email
Let’s go over how to compose an email. A professional email includes the following:
subject line that captures the attention of the recipient
salutation that addresses the recipients with professionalism and warmth
body that structures your message effectively to maximize impact and readability
appropriate sign-off that leaves a positive final impression
The following graphic highlights, in bold text, the important parts of a professional email for a business partnership opportunity.
Best practices for writing a professional email
Write an engaging subject line
Email subject lines are key and the first impression you make on your recipient. Create an attention-grabbing subject line. Consider using action verbs, asking questions, or including a sneak peek of the content.
Keep it concise, relevant, and intriguing to entice your recipient to open the email.
Address the recipients
Start your email by addressing your recipients. Do this by striking a balance between professionalism and warmth. Use their name, preceded by an appropriate title (e.g., Ms., Dr.) if applicable. If you’re unsure, opt for a neutral greeting like “Hello” or “Hi.”
Edit your salutation to match the tone and context of your email. Make sure it aligns with your relationship with the recipient.
Aim to establish a connection that goes beyond the surface. No matter who you are reaching out to.
Follow proper email formatting
Proper email formatting is essential for readability and professionalism. Begin by choosing a clear and readable font style and size.
Organize your content logically, using paragraphs, bullet points, and headings to break up text and improve comprehension.
Be mindful of the recipient’s time and attention span by keeping your email concise and focused. Use formatting features like bold text sparingly to draw attention to key points without overwhelming the reader.
Keep messages concise and to the point
Nobody has time to wade through lengthy, rambling emails. Start by clearly stating the purpose of your email in the opening sentence.
Whether you’re sharing information, or requesting assistance, get straight to the point. Keep your message concise and focused, avoiding unnecessary details or tangents. Short paragraphs make your emails easy to read.
The more efficiently you can convey your message, the more likely they will reach your email.
Maintain a professional tone
Maintaining a professional tone in your email is crucial to establish credibility and foster positive relationships. Choose your words carefully, opting for formal language and courteous phrasing in the body of your email.
Avoid slang or jargon that may be misunderstood or come across as not professional.
Treat every email as an opportunity to showcase your professionalism and attention to detail.
Follow email etiquette guidelines
Adhere to email etiquette guidelines to ensure smooth and respectful communication. Respond to emails quickly. Even if it’s just to say “Hey, thanks for sending that over!”
Be courteous and respectful in your interactions, using please and thank you when appropriate. Avoid using all caps or excessive punctuation. Recipients might think you’re yelling at them!
By practicing email etiquette, you’ll ensure that your messages are received positively and professionally.
Close the email
Your closing should leave a positive final impression on your recipient. Consider using courteous and professional sign-offs such as “Sincerely,” “Best Regards,” or “Thank you.”
Avoid overly formal or informal language, and always sign off with your name or professional email signature block.
After that, you can send an email with no worries.
Professional email examples
When writing professional emails, having concrete examples to draw inspiration from can be incredibly helpful. Below are three common types of professional emails along with tips on how to craft them effectively.
Job application email
Subject: Marketing Professional Applying for [Job Title] at [Company Name]
Dear [Hiring Manager’s Name],
I hope this email finds you well. I am writing to express my interest in the [Job Title] position advertised on [Job Board/Company Website]. With [X years] of experience in marketing strategy development and campaign management, I am confident in my ability to contribute to [Company Name]’s success.
In my previous role at [Previous Company], I spearheaded several successful marketing campaigns that resulted in [specific achievements or metrics]. I am particularly drawn to [Company Name]’s innovative approach to [mention something specific about the company or its values].
I have attached my resume and cover letter for your review and would welcome the opportunity to discuss how my skills and experience align with the needs of your team further. Please don’t hesitate to reach out.
Thank you for considering my application.
Best regards, [Your Name]
Networking Email
Subject: Connecting and Exploring Potential Collaboration Opportunities
Hi [Contact’s Name],
I hope this email finds you well. I recently came across your profile on [LinkedIn/Networking Event] and was impressed with your expertise in [mention specific area or industry].
I am reaching out to introduce myself and explore potential opportunities for collaboration or mutual support. In my current role at [Your Company/Position], I specialize in [briefly mention your expertise or area of focus]. I am particularly interested in [mention specific interests or goals related to the recipient’s work].
I would love the opportunity to connect and learn more about your work and how we can support each other. Would you be available for a brief coffee or virtual meeting in the coming weeks?
Looking forward to the possibility of connecting further.
Warm regards, [Your Name]
Business email
Subject: Proposal for [Project/Initiative]
Dear [Recipient’s Name],
I hope this email finds you well. I am writing to propose [brief description of the project or initiative] and explore potential collaboration opportunities between our organizations.
At [Your Company/Position], we have developed a comprehensive plan to [outline the key objectives of the project]. We believe that partnering with [Recipient’s Company] could significantly enhance the impact and reach of this initiative.
I would welcome the opportunity to discuss this proposal further and explore how we can work together to achieve our shared goals. Please let me know if you would be interested in scheduling a meeting to discuss this further.
Thank you for considering this proposal. I look forward to the possibility of working together.
Best regards, [Your Name]
The power of visuals in emails
In addition to crafting compelling written content, adding visuals into your emails can significantly enhance their effectiveness.
Benefits of adding visuals
Visuals can add clarity by providing additional context and reinforcing key points. People process visual information faster and retain it better than text alone, making visuals an invaluable tool for communication.
How visuals can add clarity
Visuals can help clarify complex concepts, illustrate processes or workflows, and convey information more effectively than text alone.
For example, an annotated screenshot can provide step-by-step instructions. A chart or infographic can summarize data or highlight key trends at a glance.
Types of visuals
Various types of visuals can be incorporated into your emails, depending on the content and purpose:
Annotated screenshots: Use screenshots with annotations to provide visual instructions or demonstrate how to use a product or software.
Charts: Visualize data or statistics using charts, graphs, or tables to make information easier to understand and digest.
Infographics: Create visually appealing infographics to summarize key points or convey complex information in a more engaging format.
Tools and resources
Fortunately, there are many tools and resources available to help you create professional-looking visuals for your emails.
Make your emails standout with visuals!
Snagit makes it easy to capture your screen, add context, and communicate your message clearly.
Grammar and style checkers help to maintain correct grammar, punctuation, and style in your emails. This helps you craft clear and error-free messages.
Email templates can save you time and effort in crafting emails for different purposes.
When you need to capture an entire webpage, a specific window, or a selected region, Snagit can help.
Once captured, you can edit your screenshots directly within Snagit’s user-friendly editor.
Writing professional emails
Creating professional emails is essential for effective communication in the business world. By following best practices, adding visuals, and leveraging the right tools, you can enhance the clarity, impact, and professionalism of your emails.
Implement these tips in your email communication to achieve better results and foster positive relationships with your recipients.
By definition, team norms are simply the way a team works together. That is through team collaboration on a project, brainstorming meetings, or lunch banter. Norms are a set of spoken and unspoken rules everyone follows. Knowing this, you might be wondering how to set team norms!
How a team interacts is super important for its success and can have a negative impact if done wrong.
That’s why laying down clear and healthy norms can make a huge difference in workplaces.
Let’s get into the nitty-gritty of team norms and how they can help you positively change the way you interact with others. Remember, each team is unique, so keep an open mind!
Team norms look different in the modern workplace!
Find out more in the 2024 Workplace Flexibility Trends Report.
These norms can pop up naturally through regular interaction, through company changes, and even come about unexpectedly.
It can be difficult to envision what team norms look like in broad terms. So, let’s dive into some team norms examples!
Organic interactions
Imagine you’re standing next to the coffee machine with your two favorite coworkers. You begin to chat about the weekend, and then switch to a chat about upcoming work.
Then, over time, it becomes routine. Every morning you share your upcoming work, maybe explain how you can help them, and there you have it. A new norm is created.
And this is just one of countless ways that team members interact at work. Maybe you set up a brainstorming session one Wednesday and it sticks around. Now it’s a habit that increases productivity.
Policy change
Aside from organic interaction, company policies affect how teams interact.
For example, a company may encourage team members to chat for a few minutes before meetings and expect everyone to be there within 2 minutes of starting. Or, you have to share a meeting agenda at least a day before every meeting.
Even the policy to work from 8 a.m. to 5 p.m. is a company norm. These hours are expected and (usually) followed.
Unexpected
Now, although some norms are day-to-day habits, some surprise us and start from new circumstances. Like, a pandemic for example.
Workplaces around the world had to readjust the bases of communication because everything changed so quickly. Team communication had to shift from in-person to remote, and team norms became a whole lot different.
However, you don’t need an event as jarring as a pandemic to change work norms.
How do you know when it’s time to change your company norms?
Change looks different for every company and every employee, but it’s important to keep everyone on the same page. After all, communication is key.
Most importantly, team leaders need to know they are good at listening and problem-solving at the same time. That way, the team can move forward with healthy changes.
Unfortunately, that’s not always the case.
A recent TechSmith study found that 74% of teams have not established norms to provide clarity on how they will work as a team. Additionally, 76% have not established norms to ensure that meetings are effective and inclusive.
And that’s a huge issue.
Without clear expectations on how a team communicates, how can they be expected to thrive?
They can’t, which means it’s time for a change. When there is miscommunication, unaligned collaboration, and tense conversation, team norms will need to be adjusted.
Another tell-tale sign that a team needs new norms is frequent complaints. It doesn’t matter if they are about missed deadlines, confusing projects, or ineffective teamwork, complaints need to be taken seriously.
So, you know it’s time for a change. Let’s establish some healthy norms!
Establishing team norms for everyone
To create team norms, group members need to be listened to and heard. You are creating a work environment where everyone can speak freely without fear of criticism by others.
Once you’ve established a safe space, try to find common themes in issues.
For example, a team member complains about ineffective meetings, another about long, confusing emails, and another about constant work interruptions. What do these have in common?
Communication isn’t clear and organized.
An easy solution for these complaints would be to implement visual communication. Instead of overbearing emails and meetings, use screenshots or quick videos to explain what’s needed.
In fact, a recent TechSmith study found that while some respondents are hesitant to make video messages, when asked what type of email they would prefer to receive, respondents chose ones with video or images 75% more than those with just text.
Additionally, 42% of respondents believed video messaging could replace over a quarter of their meetings!
Even though these complaints seem unrelated, you can see that there is actually a common solution. Those broad solutions are your friend.
Norms are not difficult, they just need to be implemented clearly. Vague norms are difficult to understand, so it’s important to be clear when you establish them.
Now, let’s check in
Applying team norms is more easily said and done. The hard part is keeping up with those changes and tracking their success. As we mentioned, if your new norms are not easily understood, they will be difficult for your team to see through.
Create an accountability schedule to document, like a team charter. Every two weeks, or whenever works best for your team, gather feedback from everyone.
Again, acknowledge the situation and create a safe space for honest, open feedback. Most importantly, team members feel comfortable to speak up.
Feedback is important to create a clear picture of what worked and what didn’t. By making tweaks you’ll be able to change your work norms to best reflect your team’s needs.
The Workplace Flexibility Trends Report
Get more insights on when, where, and how people work, and how you can make a difference.
According to monday.com, team norms help give your employees a sense of accountability, so they feel like their hard work is being recognized by their boss and other co-workers.
And that’s all! Team norms may seem daunting at first, but creating them is super easy. We’ve even added a few examples so you can start thinking about what your team may need.
If you’re here, it probably means you’ve had enough of disappearing screenshots. There are only so many times we can ask ourselves: “Where do screenshots go?”
Plus. if you’re working with a new machine it can be even harder to get used to all of the quirks.
Trust us, we’ve all been there.
In this guide, we’ll go over where your screenshots go on different types of machines.
Where do screenshots go on Windows 10?
First, take a screenshot on your Windows machine. The quickest way to do so is to press the Print Screen Key, which is usually located by your space bar.
Once you take your screenshot with Snipping Tool, it’ll be automatically saved to your clipboard. You will be able to copy and paste it anywhere you need.
However, this also means that you usually can’t save your screenshot in a specific location right away. You’ll need to open the screenshot in the Snipping Tool, then right-click and select “Save As” to assign it a location.
To find your screenshots in your files, you’ll need to open your File Explorer and click on This PC. Then follow this file path:
Local Disk → Users → “your username” → OneDrive → Pictures → Screenshots
That’s a lot of work to find the screenshots saved on Windows machines!
It may be a good idea to consider saving your screenshots somewhere else. You can customize the location by pasting your screenshot into Paint. Then, click option Save As to customize the location.
We recommend creating your own folder so you can easily retrieve your screenshots later on.
However, it is quicker to use a third-party application like Snagit to follow an organized filing system. It makes a huge, time-saving difference and helps you organize your files more efficiently than Snipping Tool. More on that later.
Easily find and organize your screenshots!
Snagit’s library makes finding and filing screenshots super convenient
First, you’ll need to capture your screen using your Mac. The quickest way to do this is by using keyboard shortcuts like Cmd + Shift + 3, which captures your entire screen.
The saving location of screenshots on Mac is much simpler than Windows. Once you take a screenshot with the built-in Screenshot app, it will automatically save to your desktop.
This makes it convenient for people with clutter-free desktops, but we all know that is rare! Although straightforward, this method invites a lot of chaos to your screenshots. Sometimes it can be hard to find desktop documents in the first place!
You can customize your screenshot saving location by clicking on the screenshot from your desktop. This will open Preview.
From there you can click on File, Move To, and select a new location. It’s a good idea to make a specialized folder for your screenshots so you can store them somewhere with easy access.
However, it is still a too-long process to capture, save, and find your screenshots that way!
Using a third-party screenshot and organization software like Snagit can really make a difference when capturing, filing, and sending screen captures. Snagit has so many filing options, that you’ll be able to save and find your screenshots in just a few seconds.
Find, organize, and send your screenshots like a pro
Now you know how to find your lost screenshots. But do you really want to deal with that hassle at all times?
Odds are, you don’t. It’s time you file screenshots somewhere else.
Luckily, Snagit is a great resource for people just like you. It’s super easy to use and makes organization almost too easy.
First, you’ll need to take a screenshot using Snagit. Snagit has a lot of different options like Region or Scrolling so you can capture everything you need and more.
After you take a screenshot with Snagit, it’ll automatically open in the Snagit Editor. From there, you’ll be able to make quick image edits if needed.
Use Callouts to add important information, the Step Tool to make an easy-to-follow tutorial, and more!
Most importantly, you’ll be able to file your screenshots however you want!
Snagit’s library has multiple filing options that fit your needs best. For example, you can look for your captures based on date and time, website, and application.
For more specialized organization, you can tag every image with customizable tags. Think of it as a highly customizable Pinterest board just for you. You can tag your images, and it’s almost certain you’ll never lose a screenshot again.
We love to use Snagit’s library to keep track of every document. You can upload preexisting documents to your library and tag them too so nothing gets lost again!
Easily find and organize your screenshots!
Snagit’s library makes finding and filing screenshots super convenient
Top YouTube content creators can make hundreds — if not thousands — of dollars a day. But ironically, being successful and making money on YouTube has little to do with making videos.
So how DO you become successful on YouTube?
Today I’m going to share with you techniques from some of the top YouTubers that show exactly what you should (and shouldn’t) do for YouTube content creation.
Let’s go!
Start Creating YouTube Videos Today!
Download Camtasia to make your own YouTube videos quickly and easily.
Here’s everything, step-by-step, that you need to make a successful YouTube video:
Step 1. Create a YouTube Video Strategy
Choose the right topic (for the right audience)
Want to know the best-kept secret about being successful on YouTube (or any other content platform)?
It has very little with you as the creator.
You can be charismatic, funny, and intelligent, but your videos are useless if you don’t provide value. It’s not about you or what you can gain. You probably won’t be very successful if you show up on YouTube looking to get something out of it. You need to focus on your audience — not yourself.
Find your perfect audience for YouTube
Before working on your first script or storyboard, you must answer this question: “Who is your audience?”
Knowing your target audience will guide nearly every decision about your video. Knowing general information is helpful, but think about your specific audience.
What are their problems or interests?
What do they need to know?
What will they learn from your video?
How does your video benefit them?
You need to dig deeper if you can’t answer these fundamental questions. The answers to these questions will guide you as you plan and create your video.
Experts’ Take
As you start looking at what your audience wants and needs, there are some things you can do to help you narrow your focus.
Here’s advice from YouTube experts who have learned (from a lot of practice and work) what you need to define your audience.
YouTube Marketing Consultant Owen Video says, “The very first thing we do is run our clients through a questionnaire that helps them to get the biggest topics that the audience would be interested in.”
Jeremy Vest, Director of Marketing for vidIQ, suggests that listening is critical because “if you don’t listen to your audience then…you’re not going to serve them very well.” However, it’s not all about just seeking what the viewer wants.
Once you have a sense of your audience, you need to create content that matches your persona. It doesn’t matter if your video doesn’t work for other groups or other personas.
When you’re just starting out you want your audience to be as specific as possible.
Niche is good. Broad is bad.
Focus your content on helping the viewer achieve their goals. If you’re selling software, you need to make sure your video helps the viewer learn exactly what they need to be successful.
Fernando Silva, Account Executive for Wistia, emphasizes this need and suggests that we must “[get] a sense to what your audience is actually interested in and what they want to keep watching or maybe what doesn’t interest them. It … helps you make better content in the future.”
If you work hard to understand your audience but aren’t sure of what you should create for them, Tyler Lessard, Vice President of Marketing at Vidyard, stresses that you should, “focus more on the quality of the content and how you deliver it. Making sure it’s relevant to your audience, and I think that’s a simple way to start.”
Throw perfection out the window
Just start.
It’s really that simple.
I know it can be tempting to watch the big-name YouTubers and think you have to create videos just like that and engage a massive audience all at once, but all of those thoughts can be paralyzing.
“I personally believe that we’re all on the same plane, whether you’re a business or whether you’re an individual creator. Because we all start somewhere…”
Amy Landino, Co-founder of Aftermarq, and Best-Selling author of Vlog Like a Boss.
What should you do if you find yourself stuck on making it perfect?
Start by asking yourself a few questions:
Will my audience not clearly understand the purpose of the video if these changes aren’t made?
Will the video, as is, achieve your goal?
Does the video contain something incorrect that would seriously impact the viewer?
What is the worst that will happen if the current version is released as is?
Can the time that could be spent continuing to edit be put to better use on another project?
Once you answer these questions, give yourself permission to move on. If you focus too much on creating the perfect video you will limit yourself in the long run.
Step 2. Make sure your video is found on YouTube
A video can’t be successful if no one sees it! You must consider Search Engine Optimization (SEO) when you start creating your video.
There is a lot to learn and figure out, but mainly you want to get your content found by the people who are searching.
Two key ways to rank your YouTube videos:
Make content that is good for the users
Make content that is good for search engines
You want people to find your content. SEO can be complicated, but you don’t have to do everything simultaneously. YouTube Analytics is your best friend! It can help you uncover what’s working and what’s not, current trends, and how your audience responds to your content. The creators we talked with made a few easy suggestions.
Andrew Kan of TubeBuddy recommends you make content focused on a specific topic and niches, which will help your content be more searchable. It also helps ensure that the right audience is finding your content.
“Many people spend time on broad terms that have so much competition they’re never going to show up for [in search],” he said. “If you show up on the race day, and you’re [not] a runner, and you’ve practiced once, you can’t expect to win. So by practicing, by understanding that being more specific helps you be more discoverable, it helps you win.”
In addition to focusing your content on specific topics, Jeremy Vest recommends that you ensure your content is helpful and answers questions your potential audience is asking.
“Match that search intent with ‘how do I fix this blank,’ and you sell that blank,” he said. “Instead of just talking about how good your widget is, be the answer to questions being asked…and being the answer to those is…one of the easiest ways for brands to start doing well in this environment and then from there beat that expectation. Provide things they’re not expecting. Have guests they wouldn’t expect to be on your program. And, give more value than they can even believe.”
To make your content helpful and findable, consider your viewers’ questions and where they’re asking them. Then, you can create the right content and post it where they will find it.
Start Creating YouTube Videos Today!
Download Camtasia to make your own YouTube videos quickly and easily.
Now that you know your audience, you may wonder, “What should I make a YouTube video about?” The good news is that there are many ways to find YouTube video ideas your audience is searching for.
Let’s say you run a home contracting business. You decide to target your channel toward current homeowners looking to spruce up their houses. Your initial video topics might include “How to Remove Popcorn Ceilings” or “How to Refinish Your Kitchen Cabinets.”
That’s a great start, but for even more ideas than your initial list, here are some tips from Gord Isman on the best places to get inspired and find highly relevant topics for your specific audience.
1. YouTube search
YouTube search is one of the best ways to find what people seek. When you develop a content idea, do a quick YouTube search and see what comes back. Then, look at the search results and decide if it’s a saturated area or if there’s room to create a unique, valuable version.
You want to choose topics you’re passionate about and relevant to your audience. When you have a primary topic idea, YouTube can help you narrow it down. Search YouTube by typing some keywords into the search bar. The auto-suggest/autocomplete feature will give you additional keywords that YouTube suggests.
Here’s an example where I typed “tutorial video” into the search bar, and a list of suggested topics appeared below.
You want to take those terms and write them down. After all your research, one video can cover many of the same topics, or you can create a series of videos. For a topic focusing on “video tutorials,” I would want to concentrate on editing, video ideas, and background music as a good starting point.
2. Comments section
The comments section of videos and articles can be an excellent resource for YouTube video topics. Viewers often suggest additional topics or ask questions about areas of interest for creating additional content. So start by examining a competitor’s YouTube channel and mining the comments.
3. Communities and groups
Whether it’s X (formerly Twitter), a Facebook group, or a membership group, find like-minded people who will inspire you and help you out along the way. Don’t discourage yourself by assuming you must go at it alone. Find a group that you can bounce ideas off of and ask questions. You might even come away with some different (and better) video topics.
4. Ask your audience
If you already have an audience (even a small one), it’s worth asking them what content they want to see. This is a surefire way to determine what your audience wants to know, learn, and watch.
Step 4. Understand YouTube equipment for beginners
It can be easy to get overwhelmed and feel like you don’t have the right tools to create your video. It’s fun to have high-end equipment and tech, and there is no question that better equipment can produce a better-quality video. Remember, too, that highly specialized equipment can be complex and requires considerable time and training. Especially as you’re starting, try not to worry too much about equipment.
First, learn to get good at creating the content and worry about leveling up your gear later.
>> Tip: Check out TechSmith Academy shooting, lighting, and audio courses for more information.
If you’re still worried about what gear you should use, Brian Fanzo of iSocialFanz has some advice. He suggests baby steps, “Start with your phone, and then move to a good web camera, then move to professional gear.”
You can do so much with screen recording software, a simple video editor, a smartphone, and creativity. These tools can help you learn the basics of video creation and help you practice good techniques that will be beneficial no matter what gear you use.
People create all kinds of videos on YouTube. The best video you can start with is aninstructional video. According to a recent TechSmith study, 53% of people reported watching two or more instructional videos per week (up 152% compared to 2013).
A simple tutorial or how-to video is a great way to get your feet wet. A tutorial video simply answers a question someone asked. It could be “How to Freeze Panes in Excel” or “How to Change Your Oil.” Either way, you’re simply sharing your expert knowledge with others. These types of videos are all over YouTube, and with good reason.
According to a Pew research study that surveyed more than 4,500 Americans in 2018, 87% of users said that YouTube is essential for helping them figure out how to do things they haven’t done before. That means you have an excellent opportunity to create helpful and valuable instructional videos for your audience.
Do you have dog training tips to share? Gather a list of all the questions a dog owner might have and create a series of how-to videos to give them answers.
If you are an expert in Photoshop and want to help others get better, a tutorial video or training video would be a great place to start.
And if you’re a business or entrepreneur, there’s no better place to start than a product demo video, podcast episode, or explainer video.
Social media content creator? Creating YouTube Shorts — short video snippets similar to a TikTok video or Instagram Reel — might be up your alley.
These videos will help potential customers see what your product or service does without reading much material. People look for video help every day. Learning and educational content alone driveover a billion views daily on YouTube.By the end of this guide, you’ll be able to make a high-quality YouTube video using screen-recorded content, just like this one from TubeBuddy.
Step 5. Learn the first YouTube video you should make.
People create all kinds of videos on YouTube. The best video you can start with is aninstructional video. According to a recent TechSmith study, 53% of people reported watching two or more instructional videos per week (up 152% compared to 2013).
A simple tutorial or how-to video is a great way to get your feet wet. A tutorial video simply answers a question someone asked. It could be “How to Freeze Panes in Excel” or “How to Change Your Oil.” Either way, you’re simply sharing your expert knowledge with others. These types of videos are all over YouTube, and with good reason.
According to a Pew research study that surveyed more than 4,500 Americans in 2018, 87% of users said that YouTube is essential for helping them figure out how to do things they haven’t done before. That means you have an excellent opportunity to create helpful and valuable instructional videos for your audience.
Do you have dog training tips to share? Gather a list of all the questions a dog owner might have and create a series of how-to videos to give them answers.
If you are an expert in Photoshop and want to help others get better, a tutorial video or training video would be a great place to start.
And if you’re a business or entrepreneur, there’s no better place to start than a product demo video, podcast episode, or explainer video.
Social media content creator? Creating YouTube Shorts — short video snippets similar to a TikTok video or Instagram Reel — might be up your alley.
These videos will help potential customers see what your product or service does without reading much material. People look for video help every day. Learning and educational content alone driveover a billion views daily on YouTube.
By the end of this guide, you’ll be able to make a high-quality YouTube video using screen-recorded content, just like this one from TubeBuddy.
Step 6. Set up your video recording
Now that you know your audience, plan your topics, and understand what video to make, it’s time to start creating your video.
Write a script or outline.
A script may seem pretty formal, but it’s a great tool to help you stay focused. Plan out the visuals (shots, angles, graphics, etc.) that accompany each line of dialogue. If you already have a blog post for a topic, I’d suggest you write a script based on the original post. It doesn’t have to be elaborate.
If a script seems like overkill, a simple outline will help you talk through your points, and it is better than hitting the record without a plan.
Clean up your desk (and desktop).
One of the top mistakes to avoid when you recordyourself is too much clutter, both on and off the screen. If you’re shooting a video at your desk, business, or home, you want your environment to be clean and presentable.
Next, you’ll need to adjust your camera and video lighting (if you have them).
Clean up your mess.
If you’re getting shots of yourself, make sure anything that can be seen on screen is clean and free from clutter. A blank, single-color wall is a great background, but if you don’t have access to that, just ensure your setting is as free from distractions as possible. You want your viewers focused on you, not the artwork on your wall.
If your video includes a screen capture or screen recording, clutter on your computer screen is just as distracting. And there’s nothing worse than fumbling through unnecessary apps and programs to get what you want to show in your video. Make sure to close any unneeded programs and windows before you record.
Avoid recording in front of windows.
If you record near a window, avoid recording in front of it. Position yourself next to the window or facing the window. This way, you won’t be washed out or become a silhouette. Pro tip: this is also a great way to enhance your lighting, though be careful, as it can be hard to control the amount of light.
Position your camera correctly.
Tilt your webcam or camera so that it’s at eye level and your viewers don’t have to look up at you. Stick to the Rule of Thirds or position yourself in the center of the frame.
Step 7. Record your desktop
Pick your favorite screen recorder and walk through your script as you record your desktop. Here at TechSmith, we use Camtasiafor our YouTube videos. It’s perfect for anyone who needs to make instructional videos on YouTube, and we have many tutorial videos to get you started.
To start a recording, click the Record button at the top of the tools panel. This opens the Camtasia recorder, which captures everything that happens on your screen by default.
2. Customize your settings.
First, you’ll want to record the entire screen or select a custom recording region.
Next, choose other inputs to record along with the screen. Options include webcam, microphone audio, and system audio. Select the down arrow or double arrows next to each to choose a specific microphone or webcam.
Finally, click “Start Recording” to begin.
3. Finish recording.
Windows:
When finished recording, click the Camtasia recorder icon in the taskbar, then the stop button. If you need to re-record, choose ‘delete’ to start over.
Quick Tip: Press “F10” to stop a recording or “F9” to pause/resume a recording.
Mac:
To finish the recording, click the Camtasia icon in the Apple menu bar, then click “Stop Recording.” Or, if you need to re-record, choose “Start Over.”
Quick Tip: Press “CMD+OPTION+2” to stop a recording, or “CMD+SHIFT+2” to pause/resume a recording.
Step 8. Edit your video
Editing your video can be the most fun and time-consuming process. And for a beginner, it can be the most overwhelming. Here are a few simple edits you can use to get started.
1. Trim mistakes.
Often, we record a little extra at the beginning and end of a recording. To remove the extra content, drag the end of the clip “in.” This is called trimming. If you trim too much, drag the video clip back to restore your video.
It’s good to note that any edits you make on the timeline, won’t affect your original recording in the media bin.
2. Use cuts
Drag the red or green handle on the playhead to select the area to remove, then click the cut button to remove the section. A stitched line appears, showing you where the cut was made.
If you make a selection and want to bring the playhead back together, double click the playhead.
3. Add titles, transitions, annotations, and more
Add a level of polish and professionalism to your videos with eye-catching titles, annotations, effects and more. Click and drag them from the tools panel to the timeline or canvas.
Video editing tips
Endless resources across the web can show you the intricate details of video editing. But you’ll need a few video editing tips to make a high-quality video without overcomplicating it. Let’s review other standard enhancements to make your video stand out.
Add a simple video intro.
A video intro leads your viewers into your content. Keep your intro simple and to the point. Viewers want to get to the meat of your content. They don’t care about anything besides what you promised to teach them. You can use an intro throughout all the videos on your YouTube channel, a playlist, or just a single video.
Create lower-thirds.
A lower third (also called a chyron) is placed on the screen’s lower third portion (usually to the right or left) and is a simple way to provide your audience with information. Usually, they display a name, place, or other helpful information. Learn more about lower thirds in our video, “What are Lower Thirds? (And How to Make Your Own).”
Click for sound.
These shouldn’t cover up your visual and are meant to complement your primary subject.
Add music.
Finally, you’ll want to add music to your new video. Choosing the music you like will probably take longer than adding it to your video. For most purposes, your best bet is to use music from a premium royalty-free music website. While the music won’t be free, it’s typically inexpensive, and you’ll have a broader range of high-quality music.
>> Where can you find music for videos? You can access a massive library of free and premium music tracks from TechSmith Assets.
Focus on good audio and voice overs.
Poor audio can sink your video. For recording voice overs, you can use Camtasia. However, for the most straightforward voiceover experience, I highly recommend TechSmith Audiate. Audiate transcribes your voiceover as you speak. You can then edit your audio just like editing text. No more searching through the waveform to find your mistakes. And, Audiate even lets you quickly find and delete your “ums,” “uhs,” and other mumbles and hesitations.
If you have music in your video, ensure it doesn’t overpower you with your voice over. Don’t be afraid to add those phat beats, but remember that your audience is here to learn from what you’re saying. Pay special attention to your final edit by focusing on the sound. Close your eyes and just listen to your video. If it sounds off, you should adjust it, regardless of how unique your footage or screen content is.
“My editing style has always been to keep our content as concise as possible. I want people to get what they need from my videos as fast as possible. And to keep our videos on brand, we always use the same font, brand colors, and tone of music — which creates consistency and familiarity.”
A YouTube outro is where you can add specific calls to action to your video. This is also called the end screen, a.k.a. the last part of your video.
Four different content types are available for use on your end screens on YouTube called elements. These four elements are:
Video or Playlist: This allows you to link to a different individual video or a YouTube playlist of multiple videos.
Subscribe: This allows you to link to your YouTube channel, where a viewer can click to subscribe.
Channel: This allows you to link to a different YouTube channel.
Link to Approved Website: This allows you to link to a website outside of YouTube.
Step 9. Upload your video to YouTube
Uploading to YouTube is simple. If you use Camtasia to create your YouTube video, you can share it directly to YouTube from within the product. You’ll simply have to log into YouTube and connect your YouTube account to Camtasia. Or you can save your video to your hard drive and upload videos with the YouTube platform.
How to optimize your video for YouTube
As you start making your own video, you’ll want to focus on specific areas to ensure your video performs well on YouTube. By being strategic while you make your video, you’ll give yourself a better shot at ranking on YouTube.
Video Production Optimization
Target relevant keywords that list videos on Google.
Have you noticed more videos popping up in your search results? Google processes 3.5 billion searches per day, and many how-to-based searches now include YouTube videos directly in the Google search engine results.
These online videos show up for all sorts of searches. Simply type in “how to fix my fridge” or “how to change spark plugs,” and Google will give you the top YouTube videos based on your search.
Make longer videos.
Longer videos generally rank higher than shorter ones. Backlinko analyzed 1.3 Million YouTube Videos and found that the average length of a video on the first page of YouTube is 14 minutes and 50 seconds. YouTube will push longer videos higher in search results. This is because of two key ranking factors: Total Watch Time and Total Session Time.
YouTube will push videos higher in the ranking if they provide value and keep people on the site as long as possible. So, as you brainstorm and plan your videos, think about how you can expand them. Rather than just adding filler content, think about how to dive deeper into your topic to create an even more helpful video.
Make sure you speak your keyword in your video.
YouTube transcribes your content, so say your main keyword 1-2 times in the script.
Make a unique introduction.
Retention is everything on YouTube. Incentivize users to watch as long as possible in your first 10 seconds. Teach them what you will discuss and give them a reason to stay and watch your video.
Tell users to comment, like, and subscribe.
If you don’t tell your viewers to engage with your YouTube channel, they probably never will. And if you create supportive, helpful content, they will be more likely to interact with your YouTube channel.
YouTube Ranking Optimization
Now that you’ve created an optimized video, it’s time to optimize within the YouTube platform. You don’t want to overcomplicate this. It isn’t about stuffing keywords into places and trying to trick YouTube into ranking your video. You want to be strategic in what you do and, above all else, provide value to your audience.
Update your title, video description, and thumbnail.
Get your SEO keyword in the title and YouTube description, preferably at the front, but don’t forget to make it compelling and click-worthy. It’s less about trying to stuff keywords in and more about letting viewers know that your video will help solve what they are looking for.
Pro tip: Be honest in your title and description. People stop watching videos that don’t deliver on their promises.
According to YouTube, 90% of the best-performing videos on YouTube use a custom thumbnail. Try to make your YouTube thumbnail exciting and different than everything else in the search results. Make your video worthy of a click.
Leverage your current audience to build video velocity.
The first 48 hours your video goes live are critical. This is where leveraging your current audience plays a big part. You can create a more substantial buzz, and your views will begin to climb through your existing base.
Owen Video likes to create video velocity by acquiring views before a video is public and rewarding his followers with exclusive content. As a result, YouTube sees the video as more valuable and is more likely to appear high in search results. Here is one of Owen Video’s most successful strategies for YouTube video promotion. Mirroring his strategy with your videos will help you improve their performance early on:
Owen Video’s video promotion strategy example:
The first day he publishes a video, he leaves it unlisted (the video can’t be searched or found by the public without a link).
The link to the unlisted video is distributed on social media platforms.
The link to the unlisted video is emailed to applicable mailing lists.
The audience gets early access to new content and feels rewarded for maintaining a relationship with Owen Video.
Then, he makes the video public. When the video goes live, there are already views, which helps build traction for the video.
This is video velocity; essentially, you’re getting a head start on YouTube.
“So what happens is, you create velocity with your video…people are watching it before it’s even public yet. Having that distribution or pre-promotion plan is going to set [you] apart from your competitors who are just figuring this stuff out.”
Owen Video
What’s next?
We’ve covered a lot in this step-by-step guide. Whether you’re just getting started or a video veteran, you’ve learned some critical tools and strategies to create successful YouTube videos.
We built Camtasia for anyone who needs to make any kind of video. We offer a ton of helpful tutorials to get you started. And, for the record, we produce 100% of our tutorials and other screencasts using Camtasia.
The Best Video Editor for Creators!
Download Camtasia to make your own YouTube videos quickly and easily.
To make your first YouTube video, start by getting a simple video editor like Camtasia and just try making a few videos on topics you’re an expert on. If you know much about a particular product or service, try putting together a quick tutorial. Many people are searching for help across YouTube, and you could be their answer.
What should I make a YouTube video about?
There are many ways to find YouTube video ideas your audience is searching for. Three of my favorites are YouTube searches, comment sections, and communities.
YouTubers use different programs to edit their videos, but at TechSmith, Camtasia is the perfect video editing software for beginners. To learn more about Camtasia and its simple video editing functionality, check out this quick video from Tim Schmoyer of Video Creators.
How to make a YouTube video without a camera?
Recording your screen is a great way to make a YouTube video without a camera. When you choose screen recording software, pick a tool with built-in recording, editing, and sharing features. It will save you time and let you do all your work in one tool.
What equipment do you need for YouTube?
It can be easy to get overwhelmed and feel like you don’t have the right tools to create your video. Start with your phone or screen recorder and a simple video editor. Then, move to professional gear.
Editor’s Note: This post was originally published in May 2019 and has been updated for accuracy and comprehensiveness.
Ryan Knott is a Marketing Content Strategist at TechSmith, where he creates content about easy, effective, and efficient video creation, editing, and tips and tricks, as well as audio editing for creators of all kinds. He/him.
A screenshot, sometimes referred to as a screencap or screengrab, is an image that shows the contents of a computer screen. These captures let you capture exactly what you see on your screen and are often shared with others or used as a reference point later on. But what is a screenshot, and how do you take one?
Taking, saving, and sharing screenshots can be extremely helpful. Some insist that it is one of their most powerful tools. But how can a simple picture of your screen be so vital? Well, they often act as an artifact. They serve as a way to prove to others that you are seeing the crazy stuff you’re seeing.
Not only do they help you share visuals, but they also help you archive the past. For example, they can help you capture what a website looked like before the latest brand refresh, that weird error message you got a couple of months ago, or even a juicy gossip article you don’t want to forget.
Capture your screen today!
Download a free trial of Snagit to quickly and easily take screenshots of your computer screen, mark them up, and share them.
If we were to list every way you can use these captures in your day-to-day, this article would be much, much longer. No matter how long a web page is, with the advanced screenshotting tools of TechSmith’s Snagit, you can capture a page as long as your arm with just one scrolling screenshot.
However, they are more than just handy tools. They provide a revolutionary way to get more work done faster. A picture is worth a thousand words, after all!
3 ways screenshots can help you get more work done faster
1. Collaborate with others
Does your coworker want your thoughts on a new webpage they’ve created? Or do they need you to look over a brochure they’re having printed? Instead of writing a lengthy email detailing your edits, you can take a screenshot to provide efficient feedback.
With Snagit’s easy-to-use features, you can leave feedback on virtually anything. Use Callouts, Stamps, and other features to share your thoughts! This makes it easy for anyone to illustrate their ideas.
Editing a screenshot to mark up design concepts onscreen is faster and more effective than writing a wordy email
2. Demonstrate how to perform a function
Why tell someone how to do something when you can show them?
You can easily demonstrate a process with screenshots. Since they are a more accurate way to show exactly what you mean, there’s less chance you’ll be misunderstood. Less confusion means less time wasted explaining, and more time for you to focus on what’s important.
Let’s say you want to show a new employee how to log into a platform. You could schedule a Zoom call to walk them through the process, but a quick screengrab will save everyone some time.
Once you’ve taken your capture, use annotations and other editing techniques to help the other person understand what they’re looking at. Snagit’s Step Tool makes it super simple to indicate the steps of a process.
A screenshot with numbered steps is quick to make and easy to understand
Using screenshots or recordings to demonstrate a process is incredibly efficient. Do you get the same question a lot or are the go-to for a specific function? You can send the same screen capture multiple times instead of repeating it yourself.
Plus, people can refer back to the content if they forget something instead of asking you again.
3. Show exactly what’s happening
If you’ve ever contacted your IT or Web Support Team to report a bug, you’ve likely been asked to provide a screenshot. That’s because not everyone’s computer is the same.
Depending on your machine, the operating system, and the browser you use, the way something looks for you could be completely different for someone else.
Providing a visual example of what you’re looking at helps others see exactly what’s going on and, in this case, identify what could be going wrong.
A screenshot of an error message helps avoid confusion by showing someone exactly what you’re seeing
You should say: “A screenshot.” The use of “a” or “an” before a noun (at least in English) depends on the sound that follows. The fact that the word “Screenshot” starts with a consonant means that “a” is the right article to use.
What is the definition of a screenshot?
The definition of a screenshot — also known as a screen grab or screen capture — is an image that captures the current display on a computer, phone, or any other digital device. Despite the different terminology, they all refer to a snapshot of the exact visual information shown on the screen at a specific time.
Screengrab vs screenshot, what’s the difference?
There isn’t one! Despite what they’re called, screengrabs and screenshots are essentially the same thing: an image that captures the screen of your computer, phone, or digital device at any given moment.
What are screenshots used for?
Screenshots have lots of different uses. They can be used to capture and share error messages for troubleshooting, save memorable moments from a video or game, provide step-by-step guides or tutorials, or document important information that can’t be easily saved in other ways. Essentially, what screenshots are used for is to capture a visual record of the contents on a screen at a specific moment.
What happens when you take a screenshot?
When you take a screenshot on a phone, tablet, or computer, your device captures a static image of whatever is currently showing on your screen. This image is then saved to your device, usually in a folder dedicated to screenshots. Once it’s saved, it can be viewed, shared, or edited — just like any other photo or image. This is what happens when you take a screenshot on most computers, phones, or other digital devices.
Is a screenshot the same as a photo?
Not exactly. While a screenshot can function similarly to a photo (in that it captures an image), it’s not the same thing. A photo is an image taken with a camera, capturing things in the real world. A screenshot, on the other hand, is an image of the content displayed on a screen.
Learning how to edit a video used to require a ton of skills. In fact, it wasn’t that long ago that you really needed professional equipment and training to create great videos.
Luckily, that’s no longer the case!
Today it’s possible to create professional-quality videos with no video experience at all.
I’ll show you how!
Whether you’re looking to make videos for education, for platforms like YouTube, or your business, learning how to edit videos helps you connect with your audience better than ever.
Ready to elevate your video projects?
Edit Your Own Videos like a Pro
Camtasia is the best screen recorder and video editor on the market. Create content your viewers actually watch.
There’s more to editing video content than meets the eye! As with many creative projects, success comes from effective planning and preparation. Let’s take a look at some of the early steps you need to take before jumping into the editing suite.
Import or record your footage
If you have footage shot on your phone, the first thing you’ll need to do is import it to your computer. For Mac users, we highly recommend airdropping to your device. If you’re on Windows, OneDrive is a great option.
Once your footage is on your computer, it’s best to back up your media in two or three places, including cloud storage and physical hard drives. This might sound over-the-top, but should anything happen to your computer, hard drive, or internet connection, you’ll be glad you were extra careful.
Next, create a new project and save it as a standalone project file. This makes it super-easy to keep your footage and media assets organized because they’re being saved to the same project file.
Then, import your files to your editing software. In Camtasia, adding footage is as easy as dragging and dropping it into the media bin. You can also open the media bin and choose Import to select your files.
Even at this early stage, you should see the benefit of taking the time to organize your footage before editing, with each shot clearly labeled.
But if you need to record footage, look no further than Camtasia Rev. Rev makes it easy to record your webcam, screen, and voice. Plus, it makes editing your video faster with a variety of automatic features like size, layout, background, effects, and filters. Check out our Rev editing workflow video to see it in action!
Pro tip: As you populate your Media Bin, save the file frequently by going to ‘File’ and clicking ‘Save’. Alternatively in Camtasia, you can use the keyboard shortcut by pushing Control (Ctrl) + S on Windows or Command (Cmd) + S on Mac. Learn about shortcuts in Camtasia.
How to edit a video in Camtasia
Most video editors offer a number of the same tools and similar workflows, but not all video editors are created equal. Here’s a quick walkthrough aimed at equipping you with everything you need to know about video editing tools.
Before we get into the walkthrough, let’s discover the key features of video editing software!
Key features of video editors
They might be named differently in your editor, but most video editing software has many of the following features:
Media bin: We think of this as the kitchen, which contains all the ingredients (video clips, music, narration) for the video you’re making right now.
Media library: If the media bin is your kitchen, the media library is your pantry, which contains many basic assets like intros and outros, video clips, and music that you can use in any video.
Assets: Building on our food analogy ー assets are like your personal supermarket. Thousands of B-roll videos, motion backgrounds, soundbytes, music scores, and more are available whenever you need them with Camtasia assets.
Edit video with popular tools
Annotations: Whether it’s adding readable text on screen to underline your message, or using arrow pointers to highlight elements, the annotation tool ensures your viewers never miss the important parts of your video. Annotations are an important part of accessibility! Here’s how to add them in Camtasia.
Visual effects: Visual effects can make your background disappear or apply a cinematic blur to focus on the main subject. How about enhancing colors to make your footage pop? Good news! Professional-grade effects are just a few clicks away, enabling you to craft stunning videos that stand out.
Filters: Enhancing the look of your video is fast and easy with filters. Filters adjust the mood and tone of your footage using color enhancement, sometimes called look up tables (LUTs). Select one of many presets or create a custom one that contributes to your video’s overall impact.
Transitions: Easily transition between scenes with fades and transitions. Smooth fades gently guide your audience from one scene to the next, while dynamic wipes add energy and movement to your transition. The transition tool helps you maintain flow and keep your viewers engaged.
Animations: Animations add motion to your static images, creating an immersive experience that captivates your audience. They can be used to achieve effects like:
Webcam recordings transitioning or trading places with a screen recording.
Images that enter the video from the left and pause before moving off the canvas.
Callouts that animate in various ways on the canvas to draw attention to an area in the video.
Behaviors: With behaviors, you can automate animation sequences on image or text, making them grow, shrink, slide, or pop without needing keyframe adjustments. These tools are designed to add polish to your projects, making your video not just seen, but remembered.
Edit video with useful effects
Cursor effects: With cursor effects, you can highlight or magnify your mouse pointer, making it easy for viewers to follow along with your tutorials or presentations. Edit the cursor.
Audio effects: Audio effects ensure your sound is as clear and impactful as your visuals. From removing background noise to enhancing voice clarity, our audio tools are here to make sure your message is heard loud and clear. Add audio effects.
Regardless of the tools and effects you decide to use, be sure to use them somewhat sparingly. Too many transitions or effects might make your video feel chaotic and look amateurish. When using transitions, it’s best to only use them at the beginning and end of a video, or when there’s a significant change in the video’s content.
Edit Your Own Videos like a Pro
Camtasia is the best screen recorder and video editor on the market. Create content your viewers actually watch.
Once you’ve explored the key features of your video editor, it’s time to strap in and start editing your clips. But what should you do to effectively edit your video? Let’s explore some ideas..
Techniques for cutting and stitching video sections
When you add your footage to the timeline, a good practice is to make any large cuts to the footage. If you know that the first two minutes of a clip needs to be cut, do it now!
Effective editing often involves removing parts of your video to keep the content concise and engaging. If you’d like to experiment with more advanced editing techniques, you could even try adding some L-cuts and J-cuts to your video. Stepping outside of your comfort zone and playing around with different creative processes can be a great way to hone your skills.
If you simply delete a video section and move the clips together, you might find gaps in your timeline. The cutting tool seamlessly joins clips together, reminding you where the cut was made and smoothly joining the clips. Camtasia’s cutting tools allow you to easily remove unwanted sections. Simply hit CTRL+X on Windows or Command+X on Mac.
Expert tip: Boost your editing efficiency in Camtasia by using Shift + Click to precisely drag sections from the playhead. Then, hit the spacebar for quick playback of selected sections
Using Zoom-n-Pan and custom animations for dynamic content.
Master the timeline
Mastering the timeline is crucial for efficient video editing. A handy feature in Camtasia is the use of red and green tabs on the media playhead. These allow you to effortlessly adjust the start and end points of your clips.
This means you can quickly move elements back and forth on the timeline, ensuring precise timing and seamless transitions between segments. Check out this step in action:
No matter what software you’re using, play around with the timeline until you feel comfortable. You’ll be using the timeline a lot, so it’s a good idea to familiarize yourself with it!
Shrink and grow footage
Animation can dramatically increase the engagement and understanding of your content. With Camtasia, adding animations like ‘Grow’ and ‘Shrink’ is straightforward, enabling you to highlight specific parts of your video or make transitions more dynamic.
This technique is perfect for creating Picture-in-Picture (PiP) effects, enhancing tutorials, or presentations with a more interactive feel.
How to apply transitions
Drag and drop transitions are a great way to give your video a polished look, and they’re easy to use in Camtasia! You may want to apply a simple fade to your scenes or use a more complex transition like ripple or dissolve, if that’s fitting for your video.
But did you know that transitions aren’t only useful between scenes? You can also use transitions with annotations or other images shown on-screen to provide a more focused and polished look. Here’s how easy it is to add transitions with Camtasia!
Drag-and-drop transitions in Camtasia
How to add animations
Animating your videos is a powerful way to captivate your audience, and Camtasia makes it intuitive, whether you’re on Windows or Mac. Like transitions, it’s important to use animations intentionally. You don’t want to distract your viewers!
Windows users have a fantastic tool at their disposal—the ‘Scale to Fit’ feature, which works hand-in-hand with Zoom and Pan. This feature allows you to focus on specific content or create a dynamic flow throughout your video. To use it, simply select the clip you want to animate, navigate to the ‘Animations’ tab, and choose ‘Zoom-n-Pan.’ From there, you can adjust the scale of your clip to fit the screen as needed, providing a smooth, animated transition that keeps your viewers engaged.
Mac users aren’t left behind when it comes to animation. The ‘Restore’ feature in Camtasia for Mac leverages custom animation, allowing for a high degree of personalization and creativity. To animate a clip, head to the ‘Animations’ tab and select ‘Custom Animation.’ Drag the animation to your timeline, and then tweak the scale, position, and rotation as desired. This method gives you the flexibility to create unique animations that can emphasize points, guide your audience’s attention, or simply add a touch of flair to your videos.
Enhance the cursor in your video
Camtasia’s suite of tools makes it easy to manage cursor movements, ensuring your viewers can follow along without missing a beat. Plus, adding cursor effects can help emphasize key points or give your audience a moment to absorb the information. Whether it’s highlighting clicks or smoothing cursor paths, these tips will polish your screen recordings to perfection.
Brand your video with custom assets
Your brand tells your story, and consistency is key to making that story resonate. With Camtasia, incorporating branded elements into your videos is a breeze. Use customizable animated titles to introduce your content with flair and align with your brand’s colors and fonts. This cohesive approach not only strengthens your brand identity but also elevates the professionalism of your videos.
Add music to your video
According to our research on Video Viewer Habits, Trends, And Statistics you Need to Know, nearly half of the videos we identified as “great” featured background music. This underscores the importance of adding music to your videos, as it can truly elevate the viewing experience.
Whether you’re aiming to set the tone, build excitement, or underscore key moments, the right soundtrack can transform your content. Here’s how to seamlessly integrate music into your video projects with Camtasia:
Audio effects and balancing
The right balance between music and narration is essential for engaging videos. Whether you’re looking to emphasize your narration or create the perfect ambient mood, effects like emphasize or fade-in and fade-out allow you to fine-tune your audio for an immersive listening experience.
Camtasia’s audio effects offer you the control to ensure your background music complements, rather than competes with, your voice.
Get started creating videos!
This may seem like a lot, but remember you can always start small and add more techniques and skills as you go. In fact, one of the greatest things about Camtasia is that it’s easy enough for beginners, but powerful enough to be your video editor for life.
It features multiple video experts, including Owen Video (Thevideospot.net), Buddy Scalera (Content Strategist), Jason Valade, Master Trainer (TechSmith), and Amanda Robinson (Social Savvy Society).
Embark on your video editing journey, and discover the endless possibilities that await. With Camtasia, every video project is an opportunity to captivate, educate, and inspire. Ready to elevate your video projects to unprecedented heights?
Download Camtasia today and unlock your creative potential. Let’s make something amazing together.
Edit Your Own Videos like a Pro
Camtasia is the best screen recorder and video editor on the market. Create content your viewers actually watch.
To edit videos on iPhone, you can use the built-in iMovie app. Simply import your footage, select the clips you want to use, and then use the editing tools to trim, adjust, and add effects to your video. Once you’re happy with your video, you can export it in a variety of formats and share it with others.
How to edit TikTok videos?
To edit TikTok videos, you can use the built-in editing tools in the TikTok app or Camtasia video editing software. Simply select the clip you want to edit, and then use the editing tools to trim, adjust, and add effects, text, music, or filters. Once you’re happy with your video, you can post it to your TikTok account for others to see.
How to edit Youtube videos?
To edit YouTube videos, you can use the Camtasia video editing software. All you need to do is import your footage, select the clips you want to use, and then use the editing tools to trim, adjust, and add effects, transitions, text, or music to your video. Once you’re happy with your edits, you can export your video directly to YouTube, or export it locally before manually uploading it.
How to edit videos on Windows?
On Windows, you can use video editing software such as Camtasia, which offers a simple interface with powerful editing tools. First, import your footage, select the clips you want to use, and then use the editing tools to trim, adjust, and add effects, transitions, text, or music to your video. Once you’re happy with your edits, export your video in a variety of formats and share it with your colleagues, friends, and family.
How to edit video on mac?
The Camtasia editing suite offers a range of powerful and intuitive features to help you create professional-quality videos on Mac and Windows. To start editing, simply import your footage and use the editing tools to trim, adjust, and add effects, transitions, text, or music to your video. Once you’re satisfied with your edits, you can export your video in a range of formats and quickly share it with your audience.
I'm a content marketing specialist contractor for Techsmith. In plain language, I write blogs, social posts, video scripts and more to help support the marketing team's efforts. Organic growth gets me excited, both in the tech space and in my in garden.
You could be wondering how you add music to a video for a variety of reasons. Maybe it’s to add some spark to your narration, to create an emotionally engaging sequence, or simply because you want to add music to your video!
But did you know that audio is actually more important than great visuals when it comes to viewer engagement? More on that soon.
Background music can add more interest to your videos, making them even more engaging and entertaining. Also, good news! Adding music to videos is simple. Ready to get started? Open your video editor of choice and let’s go!
Let’s jump in!
Camtasia makes it easy to add music to a video!
Not only is it easy to add music to videos in Camtasia, finding the right track is simple with our huge.
First, let’s address a fact: not all videos need music. Quick videos that demonstrate how to log into your new HR software or how to access archived emails probably don’t need a soundtrack.
But if you plan to publish on a platform like YouTube, a little music can help make the video a whole lot more engaging. Even if you just add music to your intro and outro, it helps make your video more exciting for your viewers.
Nearly 50% of the videos identified in our Video Viewer research study as being “great” had background music. And that was before the rise of TikTok and “Trending Sounds.”
It’s a pretty strong indicator that music adds something special to your video!
Five steps to add music to a video
For now, we’ll assume you already have the music file you want to use, but later in this article we’ll share tips on where to find music for your videos. Adding music to your video is as easy as:
1: Open your video 2: Import your soundtrack 3: Add audio to the timeline 4: Adjust to fit 5: Add descriptive captions
Step 1: Open your video
In your preferred video editor, open the video project to which you want to add music.
Step 2: Import your soundtrack
In most video editors including Camtasia, there are several ways to import video and audio files into your Media Bin.
To import your media, select Media from the menu, right-click in the bin, and select Import Media from the menu.
Or, you can choose File > Import > Media from the menu.
Pro tip: If you’re into shortcuts and hotkeys, you can choose CMD+I on Mac or CTRL+I on Windows to quickly import footage.
You can also click the plus button in the bottom left to import footage from Google Drive!
No matter which method you choose, navigate to the file you want to import, select it, and choose Import.
Note: You can also find music from TechSmith Assets for Camtasia in the Libraries folder. More about that later!
Step 3: Add your audio to the timeline
Next, find your audio file in the media bin, and drag and drop it to the timeline. You can either add it to a new track or an existing track depending on your needs.
Pro tip: If no empty track is available, Camtasia automatically creates a new track when you drag your file to the open area above the timeline.
Step 4: Adjust the audio to fit your needs
For this example, let’s assume that we want to have the audio run throughout the entire video. Since this video has narration, we want to make sure the music isn’t so loud that the narration becomes difficult to hear.
When you select the audio track in the timeline, a horizontal line with shading will appear. To adjust the volume, you can click on the line and drag it up or down to the desired level. The waveform in the track grows and shrinks as you adjust the volume up and down. This lets you know that the volume is being adjusted.
In the Audio Effects menu, there are additional options for adjusting audio. For example, adding a Fade Out at the end of your video clip can help avoid an abrupt ending.
Step 5: Add descriptive captions
Remember that not all your viewers will hear your audio the same. People who have trouble hearing — or who may choose to watch your video with low or no sound — also need a way to understand your message.
Beyond standard closed captions for dialogue, include descriptions of the music (e.g., [uplifting music] or [tense music fades in]) to convey the mood or tone it adds to the scene. This helps those who are deaf or hard of hearing experience the emotional impact of your video.
Now that you know how to add music to a video, try playing around with it the next time you create a video. These steps were designed to get you started, but there are many other ways to edit audio that fits your needs.
How to choose the right music for a video?
There’s a noticeable difference between adding a random track and finding the right music. Before you choose your audio track, think about what type of video you’re creating. For a video showing software or product features, you’ll probably want something upbeat and positive. You want your viewers to feel good when they’re seeing your product!
For videos with informative intent, like tutorial videos or instructional content, you don’t want to distract your viewers. In this case, subtle atmospheric music would better fit the tone of your video.
Imagine if the Super Bowl theme song was replaced with ragtime piano. Something might feel a bit off, right?
Finding the right music enhances the experience for your viewers, while the wrong music can send the wrong message entirely.
Where to find music for a video?
Finding music for a video can be challenging. You might be thinking, I have 70 GB of music on my iPhone right now. I’ll just use some of that music.
Wouldn’t it be nice if it were that easy?
Unfortunately, most of the music on your phone, even music you “own”, is effectively off-limits for your video.
That music is under copyright and, if you use it, you owe the owner money (called “royalties”) every time someone views your video.
Key points to understand fair use
Fair use is a legal doctrine that allows the use of copyrighted material without permission under certain conditions, such as for commentary, news reporting, education, and parody.
Purpose and character: Your use must be for purposes such as criticism, comment, news reporting, teaching, scholarship, or research. Transformative use (changing the material to create new meaning) is more likely considered fair use.
Nature of the copyrighted work: Using copyrighted works that are factual or educational leans more towards fair use than using purely creative works like music and art.
Amount and substance: The less you use, the more likely it could be considered fair use. However, even a small portion can be too much if it’s considered the ‘heart’ of the work.
Effect on the market: If your use of the music could replace the original work or harm its market value, it’s less likely to be considered fair use.
While fair use can provide a legal avenue for using music in videos, it’s a complex approach that requires careful consideration. For most video creators, using royalty-free music or obtaining licenses is a more straightforward and safer way to enhance your videos with music.
So where do you find the music you can use? Well, unless you want to compose your own music, the easiest answer lies in royalty-free music.
TechSmith Assets for Camtasia
There are a number of places to find royalty-free music, but your best bet could be to start right in your video editor with TechSmith Assets for Camtasia.
If you use Camtasia as your video editor, using Assets to find music is a no-brainer. You can get a few options for free, or pay a yearly subscription to get full access to the library.
Camtasia makes it easy to add music to a video!
Not only is it easy to add music to videos in Camtasia, finding the right track is simple with our huge.
Once you head over to the music section, you’ll see a wide variety of tracks to choose from. You can sort by mood and by genre.
Best of all, it lets you directly open your song in Camtasia or download it to your machine.
Free music options
Some royalty-free music is truly free. There are a number of sites that offer music you can simply download and use as you wish (though often for non-commercial purposes, so be sure to read the user agreement).
Free music sites are a good place to start if you have trouble finding exactly what you’re looking for, but the music may not be the quality you prefer.
That said, I use free music on when there is no other option, and am happy with the results.
Is adding music to a video easy?
Yes! With Camtasia adding music to a video can be as easy as a few steps. Just drag and drop and you’re ready to go!
Where can I find music to add to my video?
There are a number of good options for finding royalty-free music to add to your videos. TechSmith Assets for Camtasia has a number of options that are totally free to use for Camtasia users. Additionally, the free music library on YouTube, or paid services such as Premium Beats are best bets.
Why should I add music to my video?
Music, even if only used at the beginning and end of your videos, can add another degree of interest and provide a more engaging experience for your viewers.
How do I choose music for my video?
Know your audience and their expectations, as well as the type of video you’re producing. An instructional video intended for senior citizens will likely have different music than a rad skateboard video.
Want to add music to a video?
Download a free trial of Camtasia to add any music track into your video.
I'm a content marketing specialist contractor for Techsmith. In plain language, I write blogs, social posts, video scripts and more to help support the marketing team's efforts. Organic growth gets me excited, both in the tech space and in my in garden.
Trying to figure out how to screen record on Mac? Look no further!
In this guide, we’ll dive into how to create basic screen recordings using built-in tools like the QuickTime player. But, we’ll also show you how to record a video on Mac using third-party options.
When screen recording on your Mac, Apple’s built-in tools offer straightforward solutions that are good enough for basic recording needs.
In this section, we’ll show you how to record your Mac screen with Apple’s built-in tools and discuss some of the pros and cons of each.
With the Screenshot toolbar
If your Apple computer is running the macOS Mojave (or later) then you can use the Screenshot Toolbar for screen recording on a Mac.
First off, push the following buttons on your keyboard, at the same time: Shift + Command + 5. This will open the Screenshot Toolbar.
With the Screenshot Toolbar open, you’ll see several icons, which you can hover over for information about each one.
For now, just focus on the icons that are on the left of the toolbar. One will let you record your entire screen while the other will let you record a specific part of it.
For a partial screen recording, just drag and choose your area, and hit Record.
Click the Stop icon in your menu bar when finished.
This tool has editing features, like cutting and trimming the screen recording, but they are limited compared to third-party options like Snagit.
The built-in QuickTime Player
For computers running an OS earlier than Mojave, you can create a screen recording on a Mac with QuickTime player.
Start by opening QuickTime Player. Navigate to File in the Menu Bar and click New Screen Recording.
Next to the Record button, there’s an arrow. Click it to select your audio input source. Hit the Record button to start recording.
To record your entire screen, just click anywhere. If you only want to capture a part of it, drag your cursor to define the area and click Start Recording.
To stop, you can click the Stop button in the Menu Bar, or press the Command + Control + Escape keys simultaneously.
The only real difference between QuickTime Player and the Screenshot Toolbar is that QuickTime is compatible with older macOS versions.
Recording on Mac with Dedicated Software
With Snagit – For easy screen recording
If you’re looking for a dedicated screen recorder, Snagit stands out as a user-friendly option. It creates clear, informative, and informal screen recordings that still have a polished look.
Snagit combines the ease of screen capturing with the most essential editing tools, including basic trimming and cutting. This is ideal for quick tutorials or walk-throughs where speed and clarity are key, but excessive editing isn’t required.
Step 1: Choose what you want to record
First, open Snagit, and select the video tab from the Capture Window. Make sure that Region is selected from the Selection drop-down menu.
Next, hit the Capture icon. This will make Snagit’s crosshairs appear on your screen, which you can use to select the part of your screen that you want to record.
The selection will automatically snap to the windows you have open. To manually select a region, just click anywhere on the screen and drag the crosshairs.
Step 2: Choose audio to record
Additionally, let’s cover how to screen record on Mac with audio. Snagit will let you further enhance your videos by letting you record a microphone, as well as your screen.
If you’re looking to add a personal touch by recording a voiceover, simply select the Record Microphone option.
To record the sounds that come from your computer, like notifications, make sure to select Record System Audio as well.
Step 3: Annotate and animate while recording
To add even more detail to your screen recordings, you can use Snagit’s Screen Draw feature, which allows you to annotate and animate directly on your screen while recording. This tool is perfect for highlighting areas or demonstrating steps in real-time, making your content more engaging and easier to understand.
To use the Screen Draw feature, first ensure the Screen Draw option is enabled. Then, when you start recording, select your desired tool from the Draw Toolbar and draw arrows or shapes by clicking and dragging your mouse.
You can also highlight your cursor and add click animations to your videos to draw attention clearly.
Step 4: Start your screen recording
When you’re ready, click the Record button and Snagit will give you a three-second countdown before filming. After that, anything that shows in the chosen recording area will be captured.
For your viewers to see your face while you’re recording, click the webcam icon on the Recording toolbar to turn webcam recording on or off.
To stop recording, click the Stop button and Snagit will open the recording in the Snagit Editor, where you can edit and share your video.
Step 5: Trim your video
Once you’ve completed your recording, your video will open in the Snagit Editor, ready for reviewing, editing, and sharing. You don’t have to wait for your footage to render either, as your video will be ready immediately.
If you find mistakes or parts you want to remove, make a selection with the playhead, and click cut.
Snagit’s simplicity and efficiency make it perfect for Mac users wanting to record their screen, especially when you need a quick, polished result without a steep learning curve.
Step 6: Save or share
When you’re finished with your video, click Share, and choose the destination that’s best for you. If you’re not sure what to choose, we recommend Screencast.
Screencast gives you an easily shareable link that you can paste into an email, Slack channel, or any other communication platform. Plus, it’s free — and the person you’re sending it to doesn’t need to have Snagit to watch your video!
Easily record your screen with Snagit!
Snagit is the ultimate tool for recording presentations, creating video tutorials, or sharing quick updates.
When your project calls for high-quality, professionally edited screen recordings on Mac, Camtasia should be one of your top choices.
Whether you’re recording a live stream, or creating a video presentation, Camtasia has hundreds of editing features to give your videos a more polished look and feel. But don’t worry, despite being full of advanced editing tools, Camtasia’s intuitive interface has been designed with beginners in mind.
That means the more complex features are there when you need them, without making the interface more complicated than it needs to be. In fact, most actions are a simple drag-and-drop away, making it accessible to everyone!
Now let’s look at how to record your screen on a Mac with Camtasia.
Step 1: Choose your recording options
To start, open Camtasia and click the Record button in the Tools Panel. This will open the Camtasia Recorder. This is essentially the control center for your screen and audio recordings and will be automatically set to capture everything that happens on your screen.
Step 2: Select what you want to record
Start by selecting the part of your screen that you want to record.
In some cases, it might make sense to record your entire desktop, in others you might want to capture a specific window, or even a small portion of it.
Remember, if you’re doing a full-screen recording you might want to clean up your desktop and turn off your notifications to make sure nothing is distracting or unwanted in your video.
Step 3: Record your audio
Camtasia is the perfect choice when you need to know how to record screen and audio on Mac at the same time.
If you plan to narrate your recording, writing a script (or at least some talking points) is a good way to make sure you stay on track and cover all the essential information.
When you’re ready to record, select which microphone you want to record from and decide whether you to record your Mac’s system audio at the same time
Step 4: Edit your video
Camtasia comes with a built-in video editor, and it only takes a few short steps and little editing know-how to get a professional and polished look for your video.
To start, cut out mistakes by selecting them with the Playhead, and clicking Cut. To trim extra footage from the ends of your recording, simply drag the end of the clip in.
Once you’ve got your footage all sorted, you can work on adding additional effects.
Your all-in-one screen recorder and video editor
Camtasia’s intuitive interface and drag-and-drop features help anyone create professional-quality video.
The final step is to export and share your video to the hosting platform of your choice. With Camtasia, you can easily share your video to a platform like YouTube, Vimeo, or Screencast, or save the video file locally on your Mac.
Learning how to screen record on Mac is easy, and now you have comprehensive options to choose from!